When I first heard that Adobe was bringing Photoshop to the iPad sometime last year, I was sceptical. I presumed it would be a very limited app compared to the powerful desktop app, or maybe just a slightly improved version of Photoshop Express. At best I thought it might give you some good editing tools to fix and correct photographs, perhaps with some layer support and effects. I didn’t think Adobe could pull off creating a great tablet version of Photoshop, and I wasn’t sure the iPad would be a good fit for the tasks in Photoshop.
So when I finally got to try out Adobe Photoshop Touch, I was intrigued to see what Adobe had accomplished. After a couple of hours playing around in the app (it accidentally went live yesterday, then Adobe pulled it) I’ve come away very impressed with what Adobe has accomplished. Photoshop Touch is a powerful and capable version of Photoshop for the iPad, without a doubt. To me, it is the latest iPad app that has demonstrated that the iPad is for more than “content consumption” — that’s just an old myth now.
It’s the apps that make the iPad great and Photoshop Touch is perhaps the prime example of the potential of the device and how flexible it is at becoming a great machine for a whole slew of different tasks, from reading, to writing, to viewing to editing and now, to using Photoshop for more than just basic photo edits. Sure, Photoshop Touch is still not as powerful as the desktop version, in fact it’s quite a distance away from reaching such parity — but it all comes down to the car Vs. truck analogy that Steve Jobs rather famously explained. Photoshop on your Mac or PC is still available for when you need to do complicated and advanced tasks, but for a lot of other tasks, you could probably migrate to the iPad and Photoshop Touch.
Enough with the introduction, let’s dive into our review of Photoshop Touch.
The Tutorials
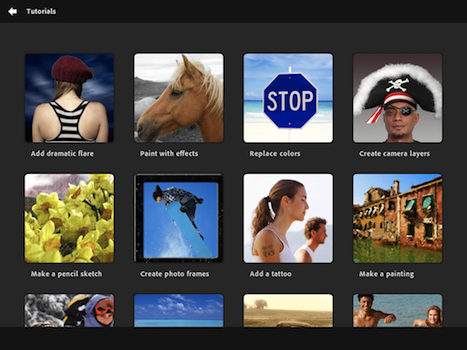
When you first launch Adobe Photoshop Touch, you’ll be greeted with an introduction screen that asks whether you want to begin a tutorial or begin a project. The inclusion of tutorials is a good idea because if you are accustomed to Photoshop on the desktop (as I am), the new UI will be a little disorientating at first because tools are in different places to where you would expect them to be and grouped with other tools that aren’t grouped together on the desktop. Similarly, if you have never used Photoshop before, I suspect the UI may feel a little overwhelming initially. These tutorials provide a great introduction to Photoshop Touch for virtually any user.
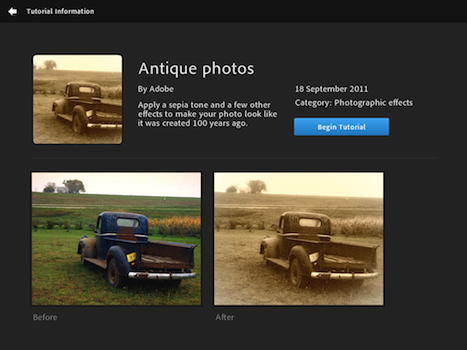
There are 13 tutorials that cover everything from cropping people out of a photo and replacing the background, using artistic effects (sketch, paint, etc), replacing colours, adding drop shadows and smooth image blending, amongst others. The tutorials work by displaying a small banner at the bottom of the screen: this gives you short instructions on what to do, occasionally displaying a pop-up that directs you to the tool you need to use. You simply follow the instructions and then tap for the next step. It works well in not only helping familiarise you with the UI, but also how to accomplish various Photoshop effects. I can imagine this will be very popular within schools in teaching students the basics of Photoshop, and I hope that Adobe adds more tutorials in future updates, as it’s a great feature.
The User Interface
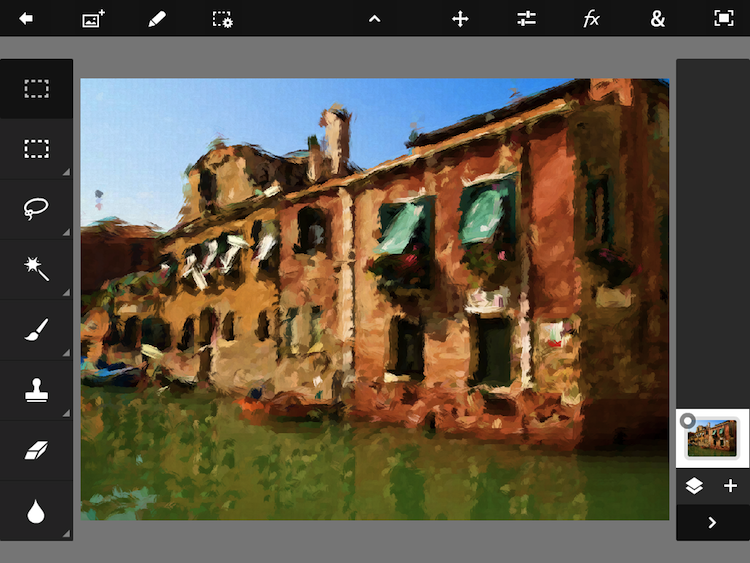
Photoshop Touch uses a very simplified user interface compared to the desktop app. To the left of the screen you have what you might call the “tools palette”. There you will find your familiar selection tools, everything from the traditional Marquee Selection tool to the helpful Magic Wand and a Scribble Selection Tool. Below those are the Paint and Spray tools, followed by the Healing Brush and Clone Stamp and, finally, the Eraser, Smudge and Blur tools. The very top tool is a quick action button that jumps you to the last tool you used.
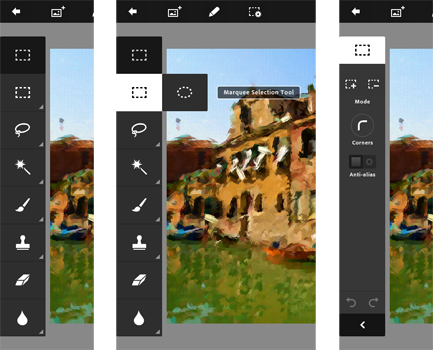
Some of these tools are stacked on top of each other, so to get to them simply tap and hold over one of the tools, and the hidden ones will pop out and you can simply swipe over to them to enable them (see second image above). Hidden tools are indicated by a small arrow in the bottom corner of the tools palette boxes. When you select a tool, the tools palette will be replaced with the relevant options for that tool (see third screen above) – for example when the Marquee Selection tool is selected, you see the option to add to selections, remove from selections, add corners to the selection and whether Anti-aliasing is on or not. To go back to the Tools Palette, simply tap at the top of the palette (where the tool currently selected is being displayed).
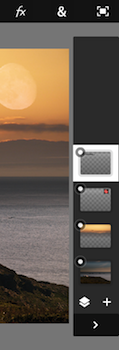
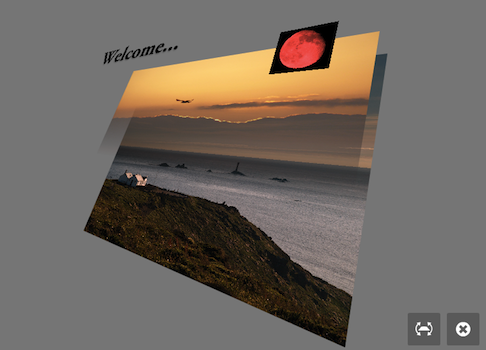
To the right of the screen is the layers palette. Each layer is displayed as a thumbnail, and like on the desktop, the layer that is highest in the stack is what is visible. If transparency is used in layers, you will be able to see through to what is underneath that top layer. To hide a layer, simply tap the little circle in the top left corner of the thumbnail, and it will turn into an exclamation point (!) indicating the layer is not visible. Tapping the plus (+) button lets you add a new layer, either as an empty layer, a duplicate layer (of the layer currently selected) a photo layer (importing an image) or a layer from the current selection. Tapping the button next to it opens up some layer settings - giving you the option to change the opacity and blend mode of the layer, as well as the ability to merge layers and delete the layer. A nice little semi-secret feature here is if you double-tap any layer, you’ll get a 3D view of your layers stacked on top of each other – I can’t think of how this might be useful, but it’s really neat (it’s also rotatable).
Finally, up on the top of the screen are some final tools and effects. I’ll just quickly list these, as there are quite a few.
- Back button: Exits you out of the document to the main screen.
- Add image: Add an image as a layer to the document.
- Pencil: Cut, Copy, Paste, Delete, etc.
- Selection options: Select All, Deselect, Inverse, Feather, Resize, Refine Edge, etc.
- Four-way arrow: Goes into transform mode where you can resize, rotate, skew, move, etc.
- Levels: Opens the Adjustments menu, allows you to edit saturation, contrast, levels, curves, etc.
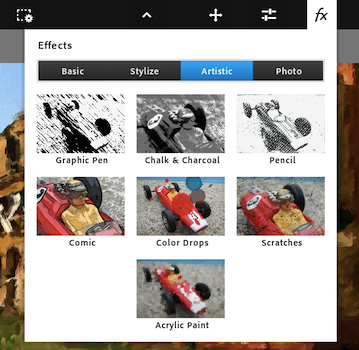
- fx: All the standard Photoshop effects from drop shadow to Guassian blur to Halftone patterns to Pencil and Old Sepia.
- &: Crop, Image Size, Fill & Stroke, Text, Gradient, Fade, Warp, Camera Fill.
- Last icon: Hide all palettes, just view image.
As you can tell, Adobe has fit in a lot of Photoshop’s tools, options and effects inside Photoshop Touch, and yet they’ve done it in a clever way. Not only does everything fit fine inside the 9.7” screen of the iPad, but there’s still plenty of room for the actual image itself. Furthermore, the design works well, and I have quickly adjusted to the different layout and location of tools from the desktop version without much pain. It is intuitive and makes sense.
Using the app: the feel, ease of use and performance
One of the biggest benefits of stripping out unnecessarily complex tools and features for Photoshop Touch, is that it really does feel streamlined, with all the (mostly) unnecessary bloat cut out. It feels fast and snappy for most of the time (a rare exception to this is when applying a heavy artistic effect to your image), and this makes using the app a much more satisfying experience. Additionally, whilst I thought using a finger would make things more difficult in Photoshop, that isn’t really the case. Using things such as the Lasso Selection tool really isn’t that much worse than using something like a trackpad - it may not be as precise as a very good mouse or Wacom Tablet, but it should be fine for most tasks in Photoshop Touch. But I surprised myself with how much I enjoyed using such tools with just my finger on the iPad – I thought it would be frustrating, but it really wasn’t.
The simplified, tablet-ised UI of Photoshop Touch also means it is a great entry point for those who want to learn about Photoshop, as I touched on in the tutorial section. When I first started learning how to use Photoshop, I was overwhelmed with not only the wealth of tools, options and effects but also all the new terms I had never heard of. With Photoshop Touch, a beginner will be eased into learning the important tools and effects because not only are there less, but things are much more visual. Take a look at the Adjustments menu in Photshop Touch and compare it to Photoshop on the desktop. But I don’t want to send the impression that Photoshop Touch is only for beginners — it isn’t. More advanced users will be able to take most of their knowledge of Photoshop and use it in Photoshop Touch, because most of it is still there.
Getting images into Photoshop Touch
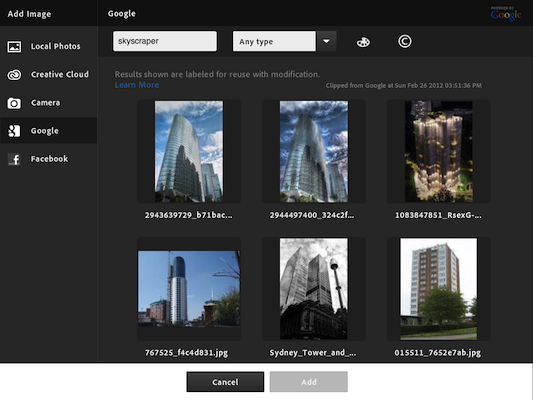
One of the failings of other iPad productivity apps such as Pages is that it is difficult to get my existing documents into the app. I thought it would be particularly frustrating getting my images into Photoshop Touch, but Adobe has been clever with this. There is a dedicated image import screen, giving you a number of options. You can get images from your device (saved to the Photos app), take a picture with the Camera, import from Facebook, import from Adobe Creative Cloud and last but not least, from Google. Most of those are self-explanatory, but I want to quickly explain how the Google option works. This doesn’t refer to Picasa: instead, it is literally a Google image search. Better yet, it is directly integrated into the app, and it doesn’t open any mobile web view. Also neat is the fact you can (just like on Google.com) sort by face, photo, clip art and line drawing, search by a colour and even adjust by usage rights (by default, only those marked for reuse with modification are displayed — appropriately).
It’s great to see Adobe noted the problem of getting images into the app, and implemented a few different ways of doing so. Hopefully future updates might add support for other services such as Dropbox or SugarSync.
Some other cool tidbits
- Finding it hard using your finger? Go to the Pencil icon up the top, select “Show Pointer”. You will literally be able to control a cursor like on the desktop – your iPad screen becomes a trackpad. It’s really cool and well done. Particularly helpful for curved selections that need to be precise (see image below).
- You can use AirPlay Mirroring with the app just fine and PS also has an options in the Settings (on the main screen) to enable presentation mode: this puts a visual marker on where you tap, so people watching via an external screen can see what you are tapping easily.
- You can put your projects into folders and duplicate projects from the main screen.
- You can save projects to the Camera Roll, upload directly to Facebook, share via email or use AirPrint to print your project.
- You can hide any of the three palettes individually — just tap on the arrow that is pointing to the edge of the screen. Swipe the little tag to bring them back.
I look forward to Illustrator Touch…
One big aspect missing from Photoshop Touch are the illustration tools – think of paths, the pen tool and shape tools. They just don’t exist, and whilst you can sort of emulate them with the selection tools, they aren’t as flexible or powerful. I don’t know why Adobe skipped out on including these – maybe they think that is firmly a desktop Photoshop task, maybe they wanted to release Photoshop Touch before adding everything, or maybe they want to release an Illustrator Touch app and include all the drawing tools in that app? Regardless, it is an important note to remember. Photoshop Touch is definitely aimed at image manipulation, rather than complete image creation, which I think is understandable.
Some other noteworthy restrictions, negatives
I’ve been pretty positive about Photoshop Touch, partly because of my moderate expectations with what Adobe could achieve, but it isn’t completely perfect, as there are some restrictions and points of failure that are disappointing.
- This is an iPad 2-only affair. This is probably due to the fact that the iPad 2 is a far more capable device, but it is still disappointing for those on the iPad 1.
- There is a maximum resolution size of 1600 x 1600 for any files you are working on. A little small in my opinion – maybe when the iPad 3 is released, Adobe will increase the limit for those on the new device (particularly if it has a Retina Display)?
- Whilst you are be able to open Photoshop Touch files on your desktop version of Photoshop via Adobe Creative Cloud, you cannot open your existing PSD files on Photoshop Touch: they simply import from Adobe Creative Cloud as a single layer.
- Your files aren’t automatically uploaded to Adobe Creative Cloud – you have to manually tell Photoshop Touch to upload the file. This should happen automatically once you link it to your Adobe Creative Cloud service – which you can sign up for in the Settings.
- Doesn’t use iCloud. I understand Adobe is pushing their own Creative Cloud service, but iCloud would be a nice alternative.
- Scrolling in the app is a little laggy and jarring, it’s a minor point but for an app that is so powerful with graphical manipulation, it is a little odd that scrolling through just the list of tutorials isn’t as smooth as it is in other native iOS apps. This could be related to the AIR nature of the app (Photoshop Touch is also available for Android tablets).
- You can’t edit text after you have saved it to the layer. It does not stay as a text layer, it becomes rasterized instantly.
- As a big fan of Layer Styles in Photoshop on the desktop, I’m a little disappointed that they don’t exist in Photoshop Touch. In particular, it’s annoying that if you want to add a drop shadow, you can’t later edit it, because the drop shadow is permanently painted onto the layer you chose. If you later choose to remove the drop shadow, tough luck, you’ll have to delete the layer and re-add the text or image you applied the drop shadow to.
- Was it necessary to hide the iOS status bar? I guess Adobe wanted to squeeze every pixel of the display, but I think there should at least be an option to restore it.
Wrap-up
Adobe has done a great job with Photoshop Touch: it’s one of the very best iPad apps to date. As far as I am concerned, Adobe has matched the quality of Apple’s iPad apps like Pages and iMovie in creating Photoshop Touch. Adobe has made appropriate compromises in bringing Photoshop to the iPad, making considered design choices that fit in with the iPad and exploiting the philosophies the iPad embodies: simplicity and an enjoyable experience. One final note: Photoshop Touch is available for $9.99. This is a great price that almost warrants an instant-buy – even if you have never used Photoshop before.
Adobe Photoshop Touch is available on the iPad App Store for $9.99.


