I’ve been intrigued by Keyboard Maestro since I first heard about it on Daring Fireball years ago, but never installed and tried the app because of a somewhat widely shared notion that it’s “too difficult to use”. Recent Keyboard Maestro coverage on Brooks Review, ShawnBlanc.net and MacDrifter took my curiosity to a whole new level, so thanks to the Productive Macs bundle, I pulled the trigger and got a copy of Keyboard Maestro, which was later upgraded to version 5.0 for free with the same license.
There’s no easy way to describe Keyboard Maestro, but I’ll try: Keyboard Maestro is a trusted and powerful assistant for your Mac. When you don’t know how to do something, or how to make an existing menu or functionality faster and easier to use, you can turn to Keyboard Maestro and start building your own way out of options third-party developers or Apple didn’t think about.
Keyboard Maestro empowers you to take existing apps, menus, keyboard shortcuts – anything your Mac can perform – and mix them together to achieve something that fits better your workflow.
Keyboard Maestro isn’t strictly about tweaking. The app’s real power lies in how it puts the focus on discovering and building what’s better for you, and sticking with it. It’s no toy, but it’s fun to use once you get the (easy) hang of it.
Writing a review of Keyboard Maestro it’s like asking someone to “write a review of Apple”. The subject is so broad, the offer so variegate and ever-changing, it makes almost no sense to go into every single feature and over-analyze it with no context. Rather, I’d prefer to provide a more empirical look at this app in that I’ll share some of the tricks and functionalities I’ve come to learn and use in the past weeks.
A simple way to understand Keyboard Maestro is this: you tell the app to do something for you automatically, in the background, whenever you want, and all you have to do to start such sequence is a trigger. The trigger can be a keyboard shortcut, something you typed, a system event – you choose the trigger and there’s plenty of options to look at when deciding which action should initiate a process.
Keyboard Maestro works with macros. Macros are a set of pre-determined “workflows” that you can assign to a specific Mac app, multiple ones, or the system itself. For instance, “Bring Twitter in the background, refresh, and open a new compose window” and “paste as plain text using CMD+V” can both be Keyboard Maestro macros you can configure and use. But, and here’s what I didn’t understand at first, it’s not that Keyboard Maestro finds the app on your Mac, and gives you a set of actions like the ones I wrote above. You have to build your own macros from scratch, using a series of simple tools to interact with what’s already installed on your machine.
Once you have an idea, building it in Keyboard Maestro is like completing a puzzle. Take the example above: Keyboard Maestro doesn’t come with pre-installed Twitter actions, but you can build them by understanding how the Twitter app works. And by “understanding” in these early stages of Keyboard Maestro learning, I mean taking a look at an app’s menubar menu, and see what options it’s got. Thanks to that menu, in fact, Keyboard Maestro will be able to execute every app’s functionality, as long as it’s been given a name or a keyboard shortcut you can see from the menubar. For my Twitter example, you’d build a macro that sets Twitter as the frontmost app, executes the Refresh action in the File menu, then opens a New Tweet, from the same File menu. Last, you’d give Keyboard Maestro a shortcut, so you only have to think about that, and let the app do the rest while you sit and watch.
Is Keyboard Maestro for lazy people? Maybe. But as long as laziness leads to saved time, better use of available resources and an overall improved user experience with less clicks and taps, then excuse me while I welcome laziness in my workflow.
I haven’t “mastered” Keyboard Maestro yet, but not because the app is “difficult” or counter-effective in its intent to make users feel more productive. I have yet to unlock the full potential of KM because I still don’t completely understand my own use of a computer. And I don’t mean that in a psychologically awkward way. The hardest thing to do when configuring Keyboard Maestro is trying to take a look at yourself and how you work with a Mac from the outside, and ask your hypothetical external projection “how can this guy improve his workflow?”.
It’s hard to see this when you’re used to a certain set of actions and “habits”. So after a first week of KM testing, the second week I asked my girlfriend to sit next to me for a few minutes while I was working, and don’t hesitate to ask me why I was doing “stuff” in some way or another when she noticed something unusual. Disclaimer: she’s not an OS X nerd – she’s the typical “average Mac user” who is, however, curious to learn more when she sees someone else using a Mac, so there was no lack of questions. This method helped me put my workflow in perspective – self-criticism is always hard, but it gets really tricky when you think you’ve perfected the art of “using a computer” and yet there’s an app that claims it can make you a better, faster user.
I’ve set up a few Keyboard Maestro macros in these two weeks of “official” experimentation, but I know more will come as I analyze the way I work, and understand the weak points that can be improved to ultimately let me save time, write more, and automate my computer.
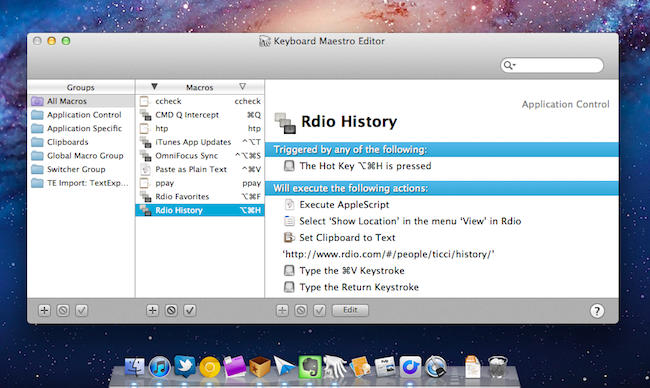
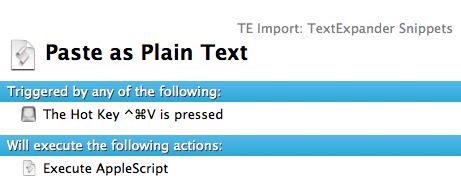
Here’s an initial look at my macros. First one is relatively simple: through Don Southard’s fantastic “paste as plain text” AppleScript (which I covered here), Keyboard Maestro allows me to paste without any style by pressing ^⌘V. When the hotkey is pressed, Keyboard Maestro runs an AppleScript - easy to setup and use.
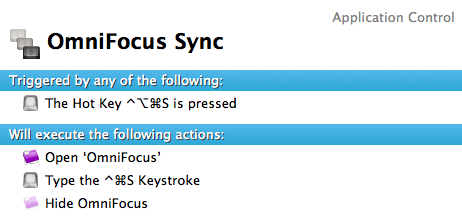
“OmniFocus Sync” tells Keyboard Maestro to open OmniFocus – doesn’t matter whether it’s already running or not – and type ^⌘S. That’s OmniFocus’ shortcut for sync, and Keyboard Maestro is simulating it for me. This way, I can make sure OmniFocus is up to date every few minutes or before quitting without having to manually head over the dock, click its icon, click again on the Sync button or use the shortcut, then minimize the app. With a single, slightly modified keystroke, Keyboard Maestro does all this automatically.
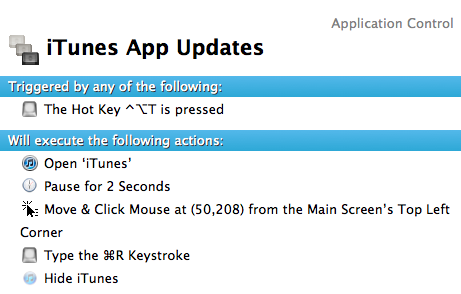
“iTunes App Updates” helps me overcome my tedious need of checking for App Store updates every few minutes by taking care of opening iTunes, switching to the Apps tab, and hitting CMD+R to check for app updates. As you can see below, the macro involves some trickery with iTunes’ window position – there’s no menu for switching to the Apps view in iTunes (at least I couldn’t find it), so I told KM to open iTunes, pause 2 seconds so the app can “load” (just in case), move & click the mouse where “Apps” is on my screen, the hit Refresh. If no updates are available, iTunes’ icon will bounce in the dock because KM minimizes it.
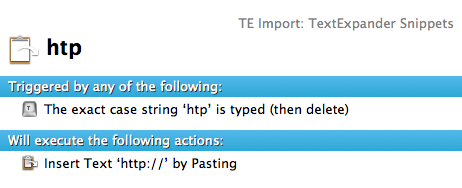
“htp” solves a simple and annoying problem: I hate that Twitter for Mac won’t let me copy full http:// links from tweets. So when I need to re-share a tweet from, say, @macstoriesnet, I copy the status update, and type “htp” to make Keyboard Maestro replace it with http:// – it’s an easy way to properly append http:// to links. I used TextExpander for this before (in fact, Keyboard Maestro can be used as a TextExpander replacement).
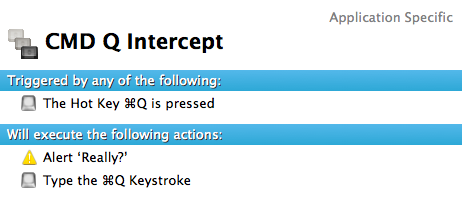
I borrowed “CMD Q Intercept” from MacDrifter, and I love it. I’m not accidentally quitting Movist and Safari anymore.
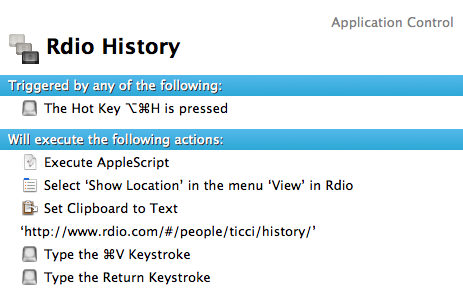
And then there’s my “favorite” Keyboard Maestro macro, one I set up to easily access Rdio’s History and Favorites playlists from the Mac app. I’m trying Rdio as a replacement for Spotify, and whilst I despise the fact that their Mac app comes with a Flash package and it’s nothing more than a site-specific browser, I actually quite like it overall. An update released today adds support for Lion full-screen mode and better integration with the “radio station” feature, but what I don’t really like is that Rdio for Mac hasn’t got the support for keyboard shortcuts I wish it had, so I set out to use Keyboard Maestro to fix this.
I find myself constantly opening Rdio’s History view and my own Favorites playlists, but there’s no keyboard shortcut for these. Luckily, because the app basically turns the Rdio website into a Mac app, the developers implemented a “Show Location” menu that lets you paste Rdio URLs, and navigate to them without leaving the app. Putting two and two together, the obvious result is a macro that takes History and Favorites URLs, and automatically pastes them into Rdio’s location menu with just a keystroke on my end.
There was an issue with the initial version of the macro though – if Rdio is closed and I hit the KM keystroke, it wouldn’t work because the “Show Location” menu needs to be activated after Rdio has completely loaded – that’s an advantage of having web apps wrapped inside Cocoa, I suppose. Anyway, I manually modified Shawn Blanc’s OopsieFocus AppleScript to do this:
- If Rdio is already open, go ahead and paste the History URL.
- If Rdio is closed, launch it, wait a few seconds, then continue with the macro execution.
On my network, Rdio takes around 3.5 seconds to load its “web” interface on the Mac, so I set a delay in the AppleScript that will slow down the macro until everything’s completely loaded, and Show Location can work.
This is what I’ve been able to do with Keyboard Maestro in two weeks, and I look forward to a better understanding of my workflow to further experiment with the app, and come up with new ways to refine my OS X habits around speed, efficiency, and automation.


