This Week's Sponsor:

Washing Machine X9

Spring Clean Your Mac Effortlessly


Posts in reviews

Accessing Shortcuts for Mac with Alfred Workflows and Universal Actions

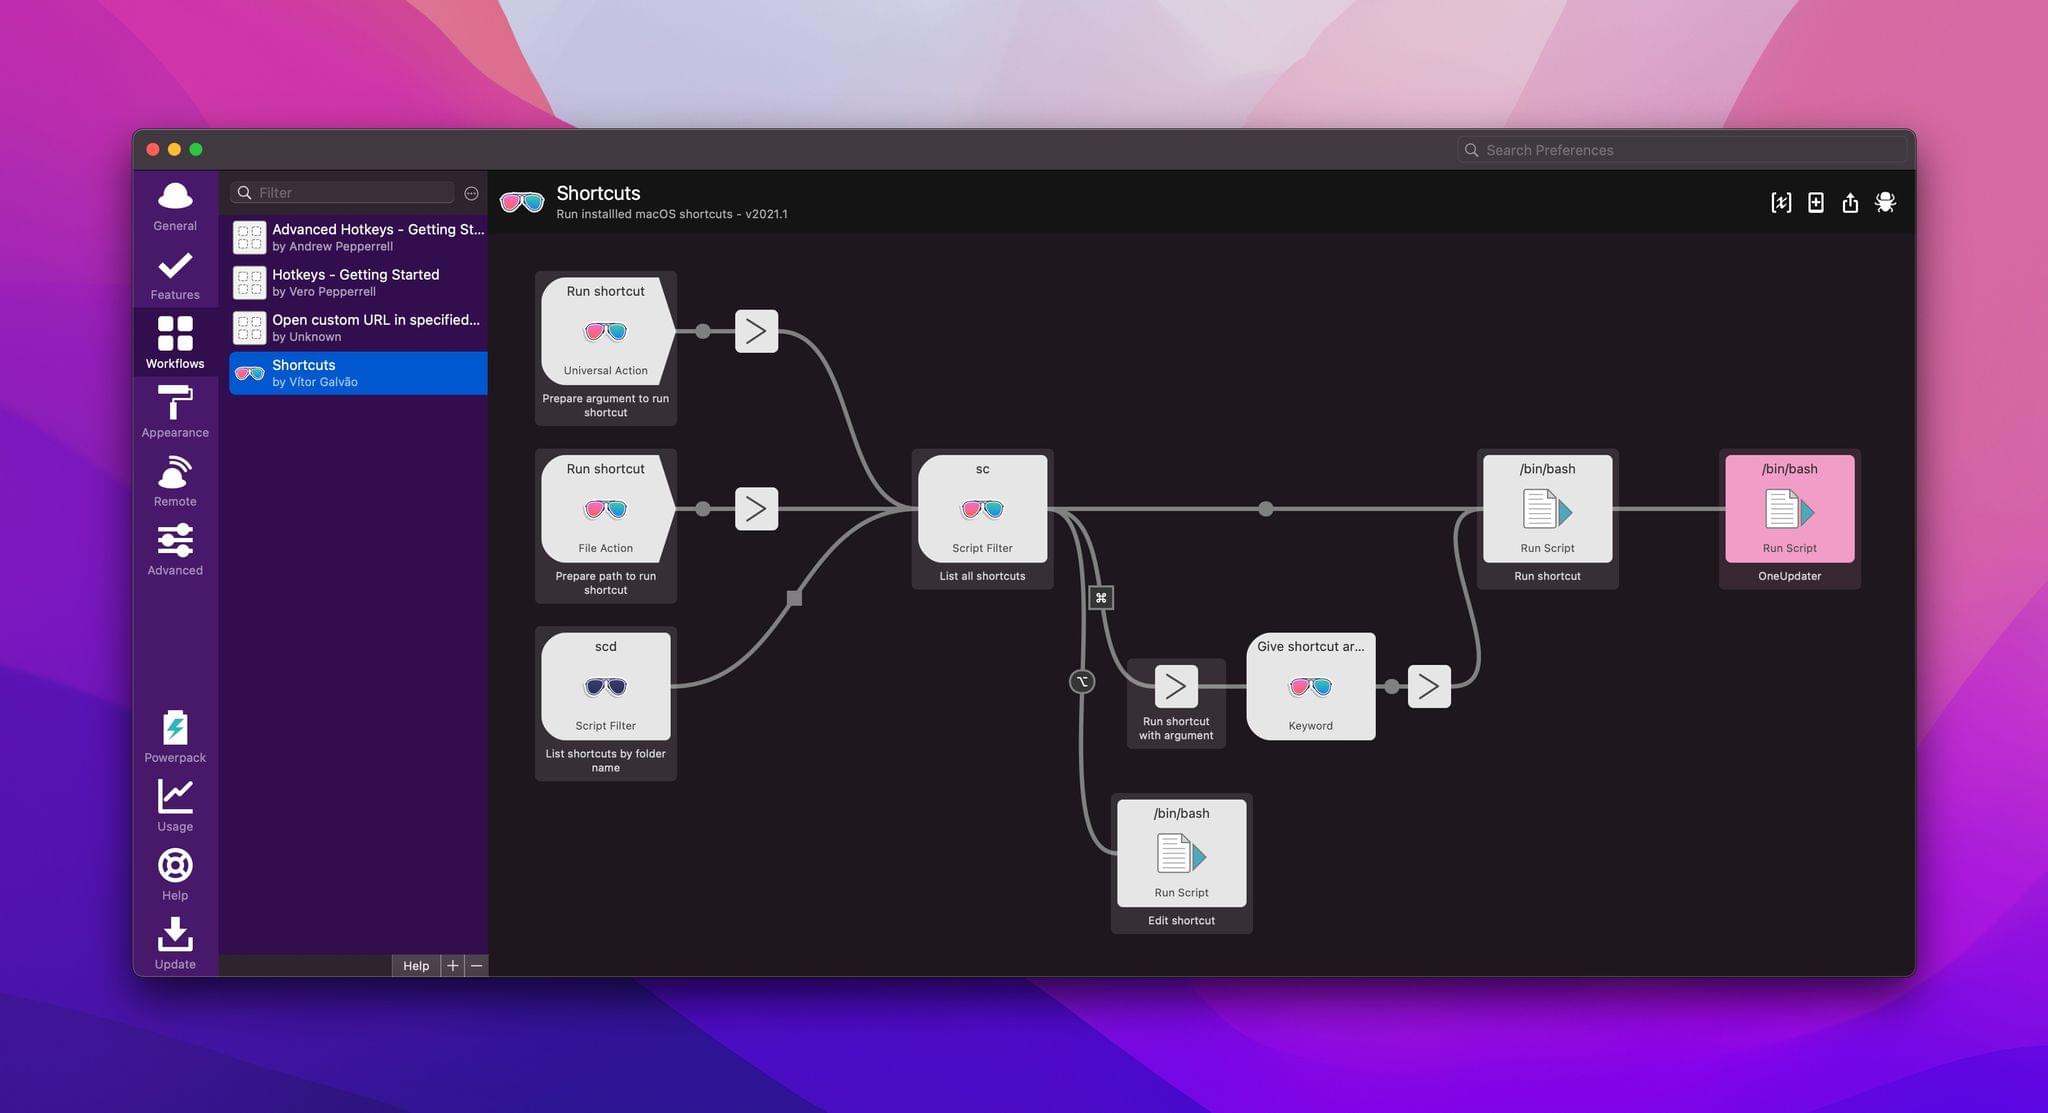
Alfred users can now access their library of shortcuts on the Mac, thanks to an official Alfred workflow by Vítor Galvão. The workflow allows users to access individual shortcuts and folders of shortcuts, as well as pass text and files to shortcuts for processing. It’s a nice approach that uses Alfred’s existing workflow system to invoke Ruby and Bash scripts under the hood.

Searching for individual shortcuts (left) and by folder (right).

Searching for individual shortcuts (left) and by folder (right).

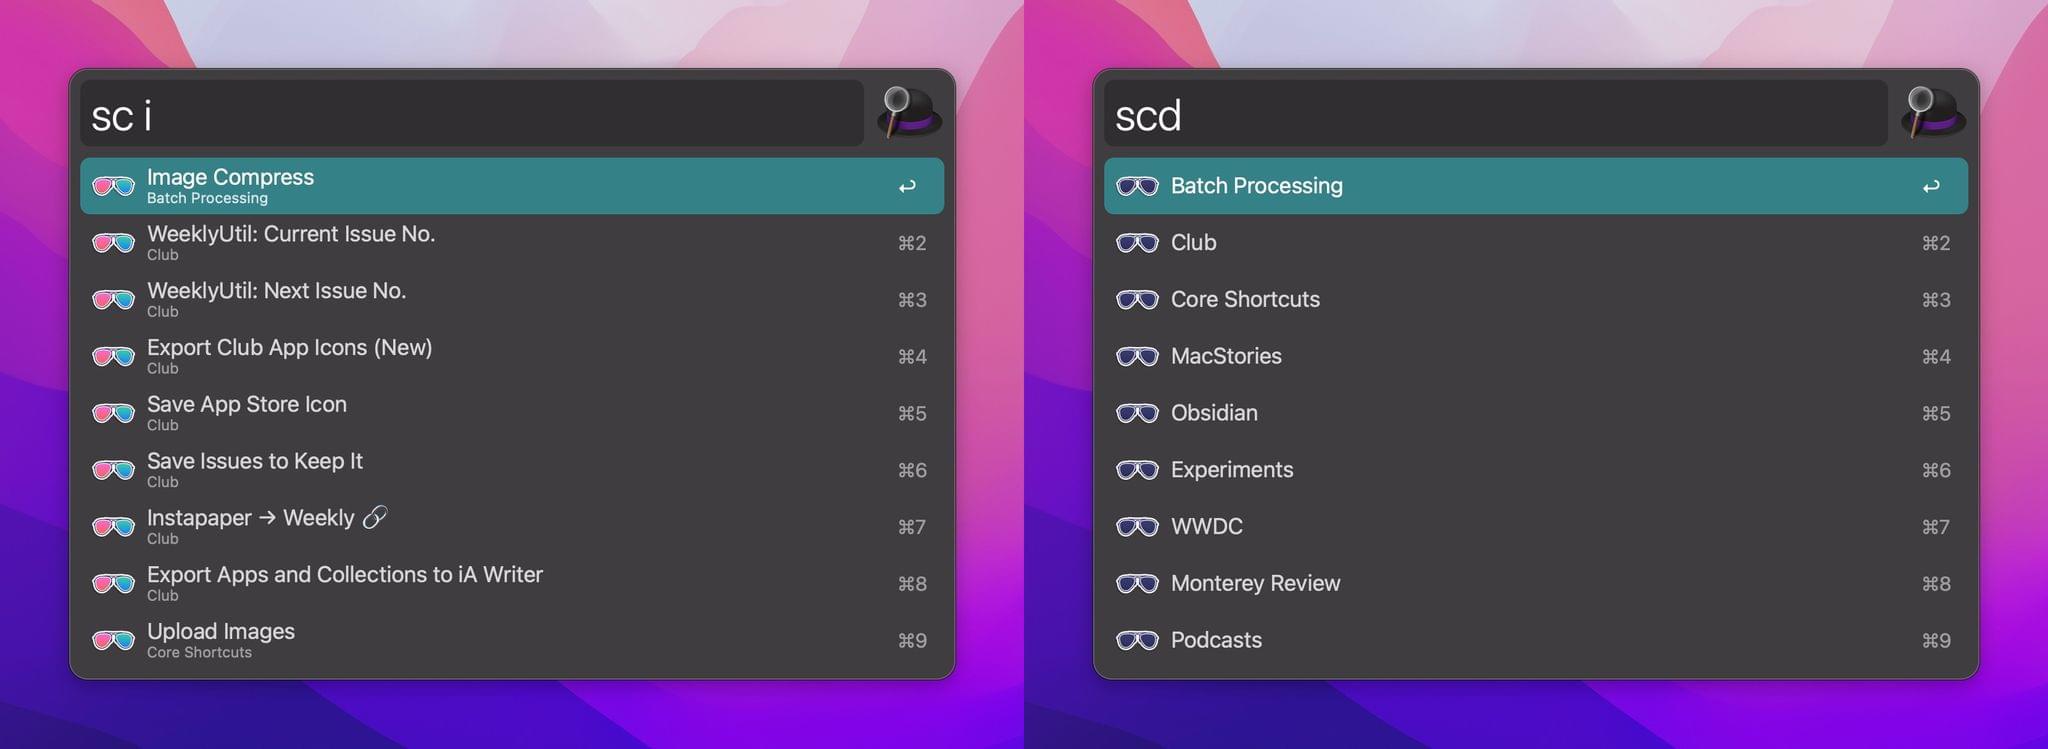
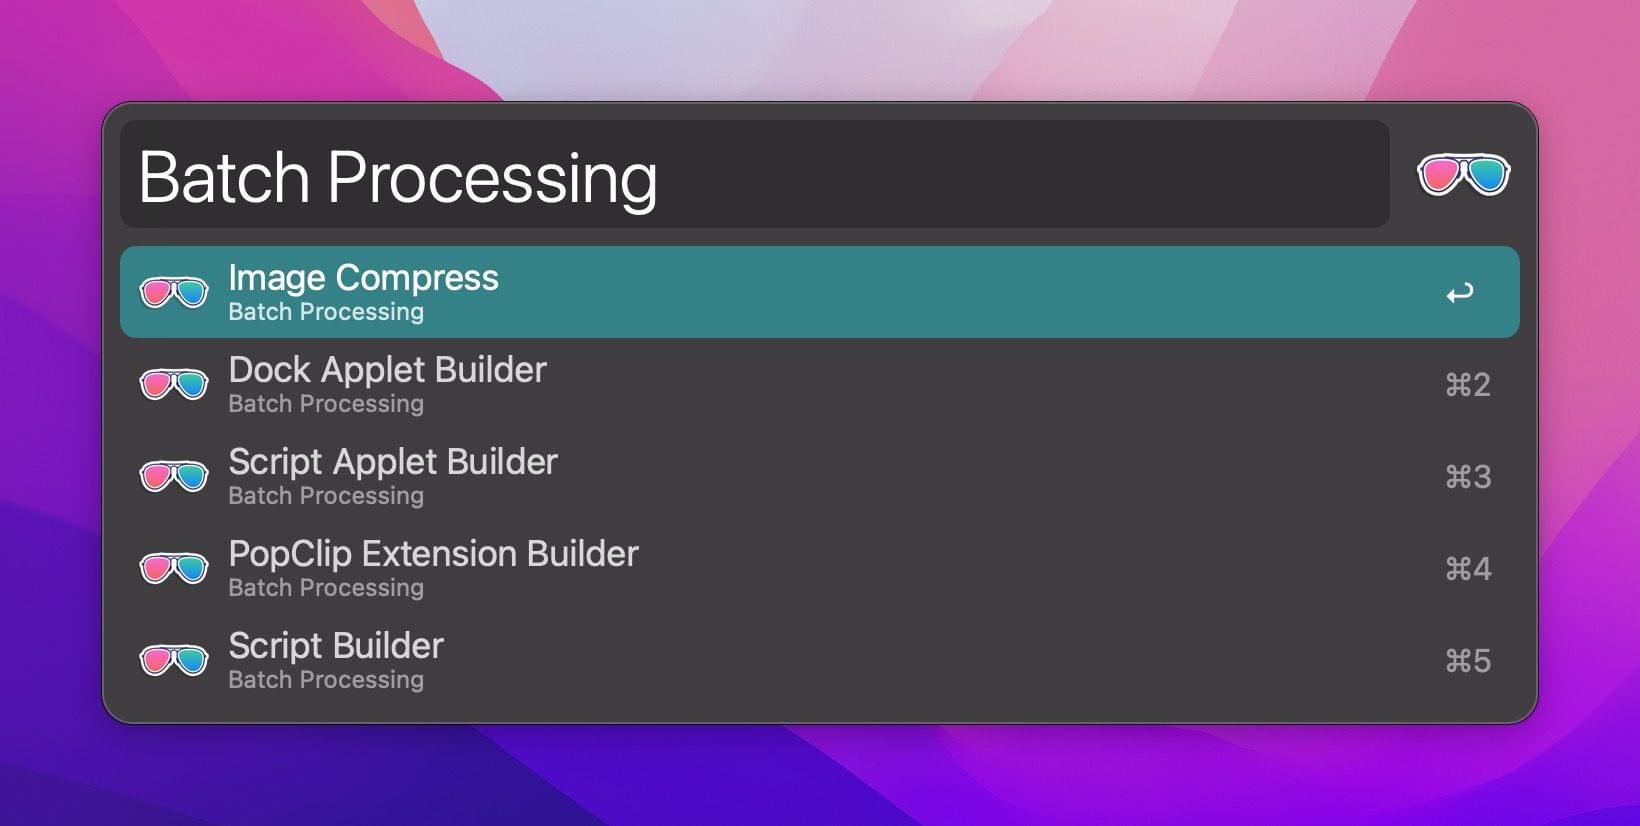
Let’s start with the easiest approach first. Invoke Alfred with the hotkey you’ve assigned to the app, then type ‘sc’ for Shortcuts. Any shortcuts you’ve recently accessed through Alfred will appear at the top of the list for quick access. If you need a different shortcut, though, start typing its name to filter the results until you see the one you want. Press Return and the shortcut will run.

Browsing shortcuts by folder.

Browsing shortcuts by folder.

If you don’t recall the name of the shortcut you want or want to browse a folder of shortcuts before running one, type ‘scd’ instead, which lists all of your shortcuts folders. Highlight one and hit Return to see all of the shortcuts in that folder.

Providing text to Alfred that displays an alert.

Providing text to Alfred that displays an alert.


Using Universal Actions to pass the text to the Alert shortcut.

Using Universal Actions to pass the text to the Alert shortcut.

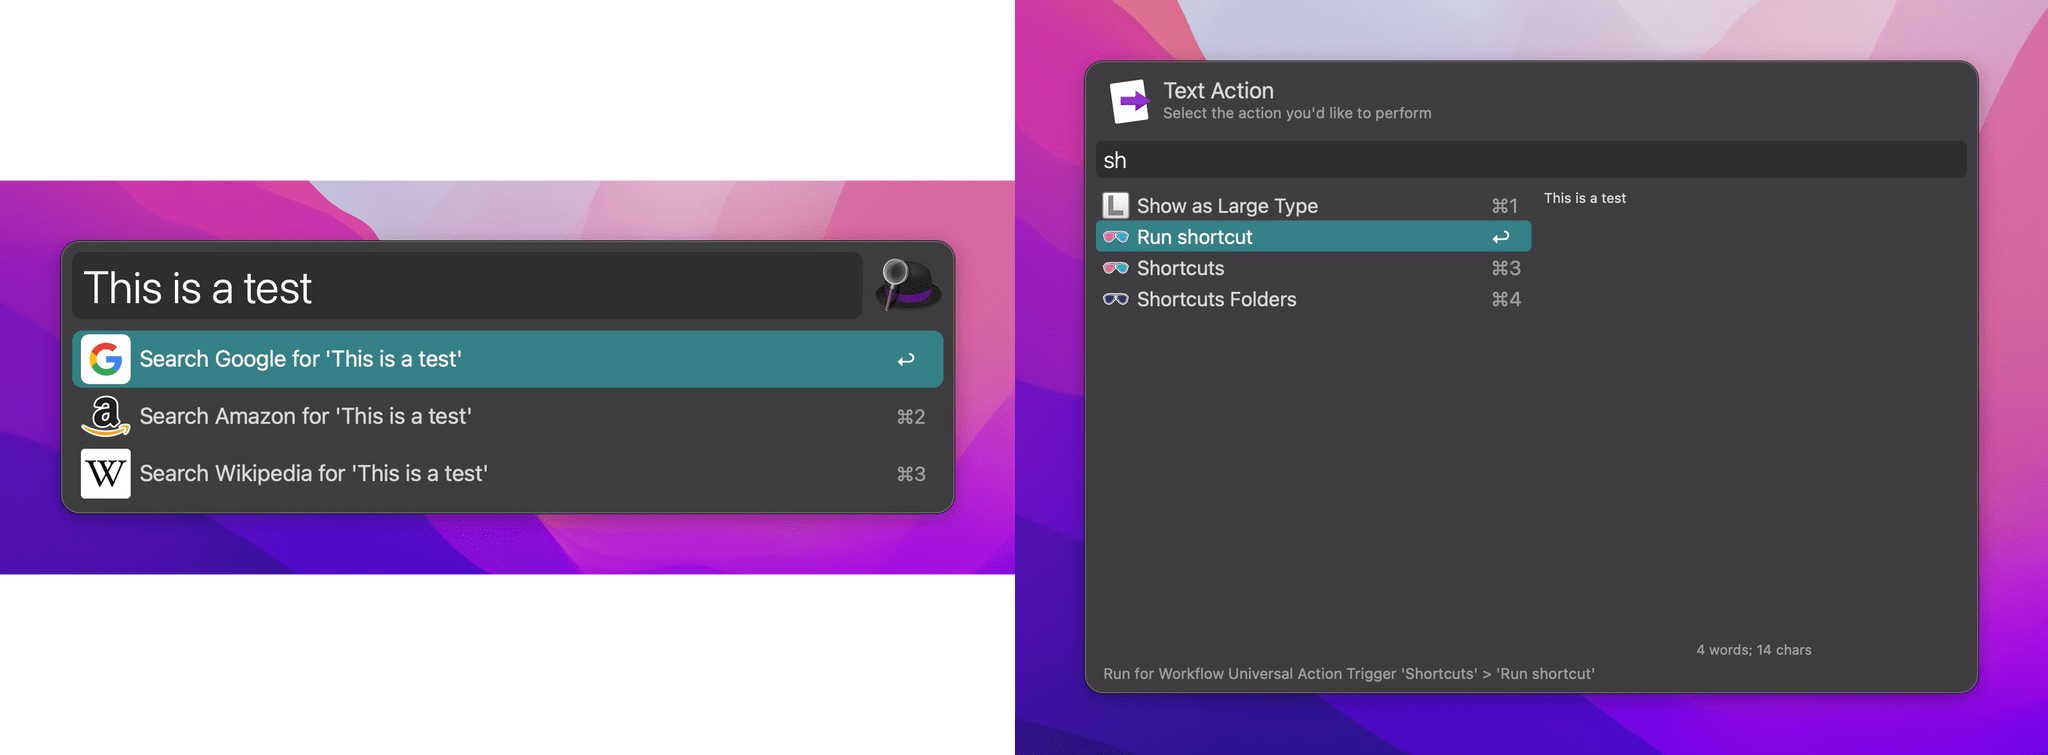
Alfred’s Shortcuts workflow also incorporates its Universal Actions feature, which was introduced last year. The simplest way to pass some text to a shortcut is to invoke Alfred, type, or paste some text into its UI. Then, invoke Alfred’s Universal Actions to display a list of commands that can be performed on the text you provided.

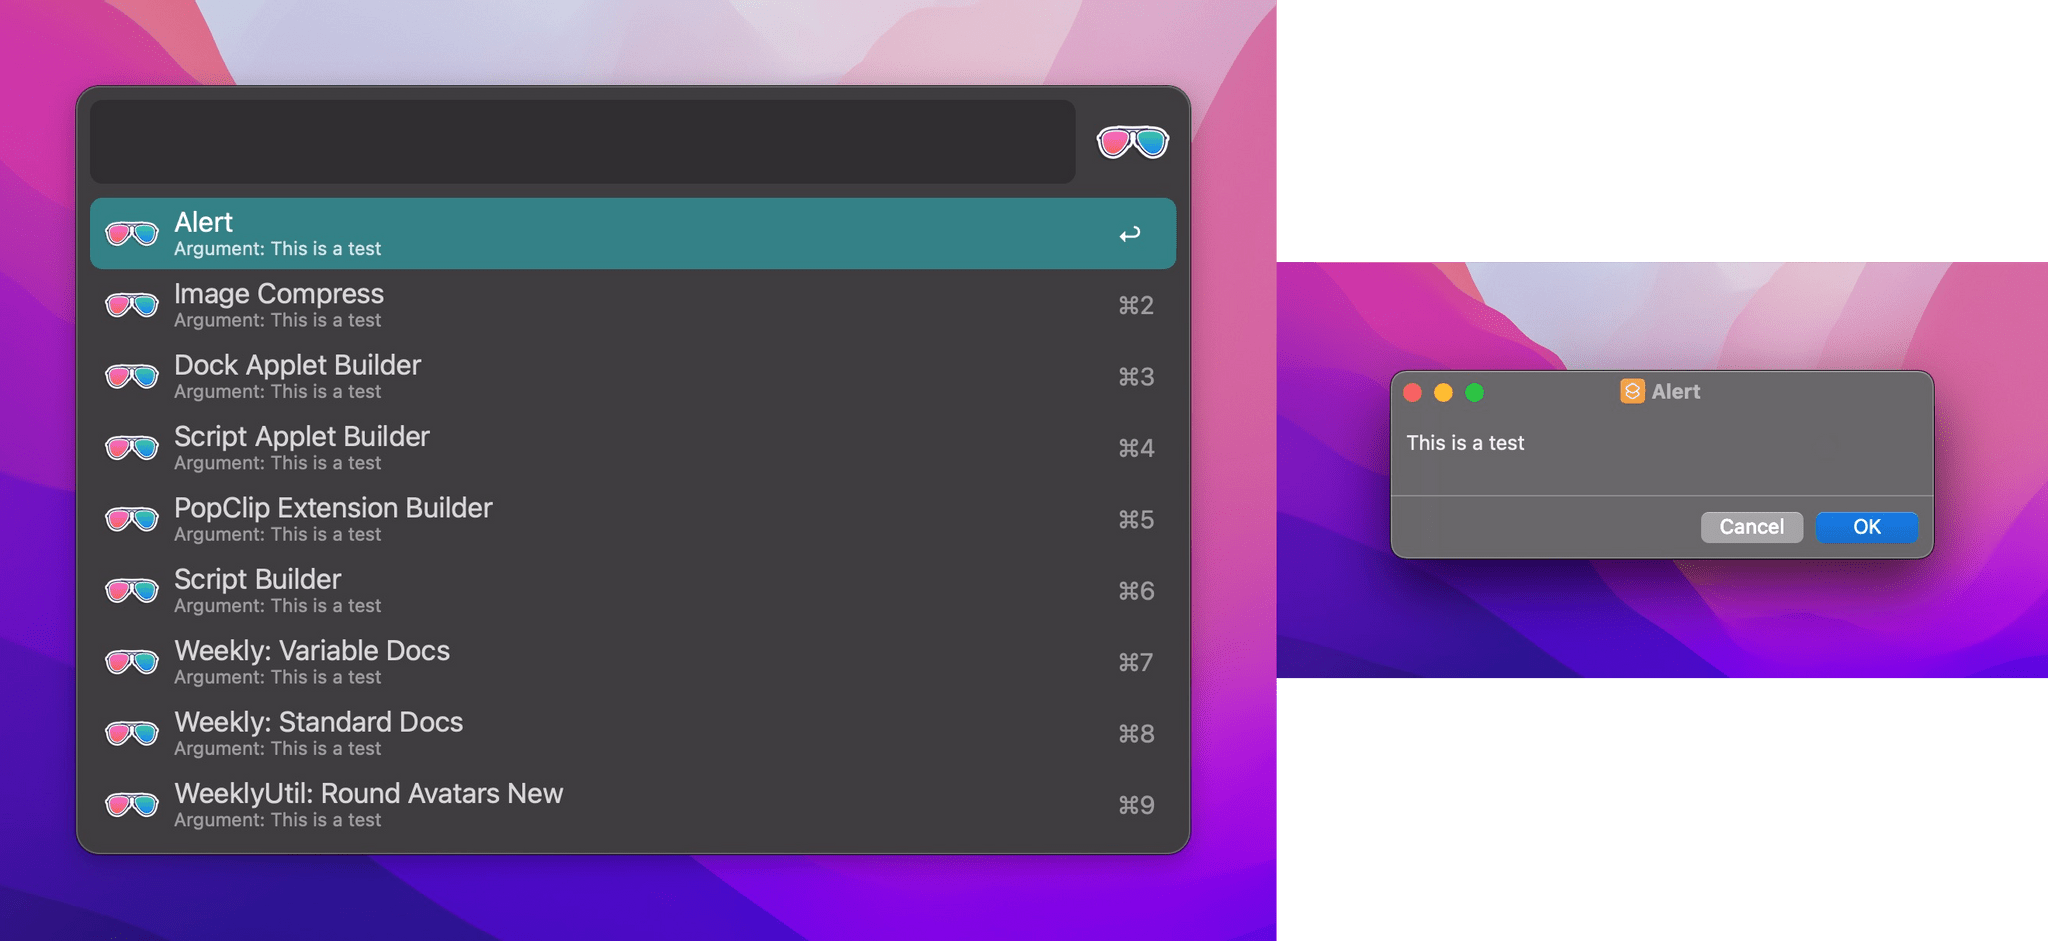
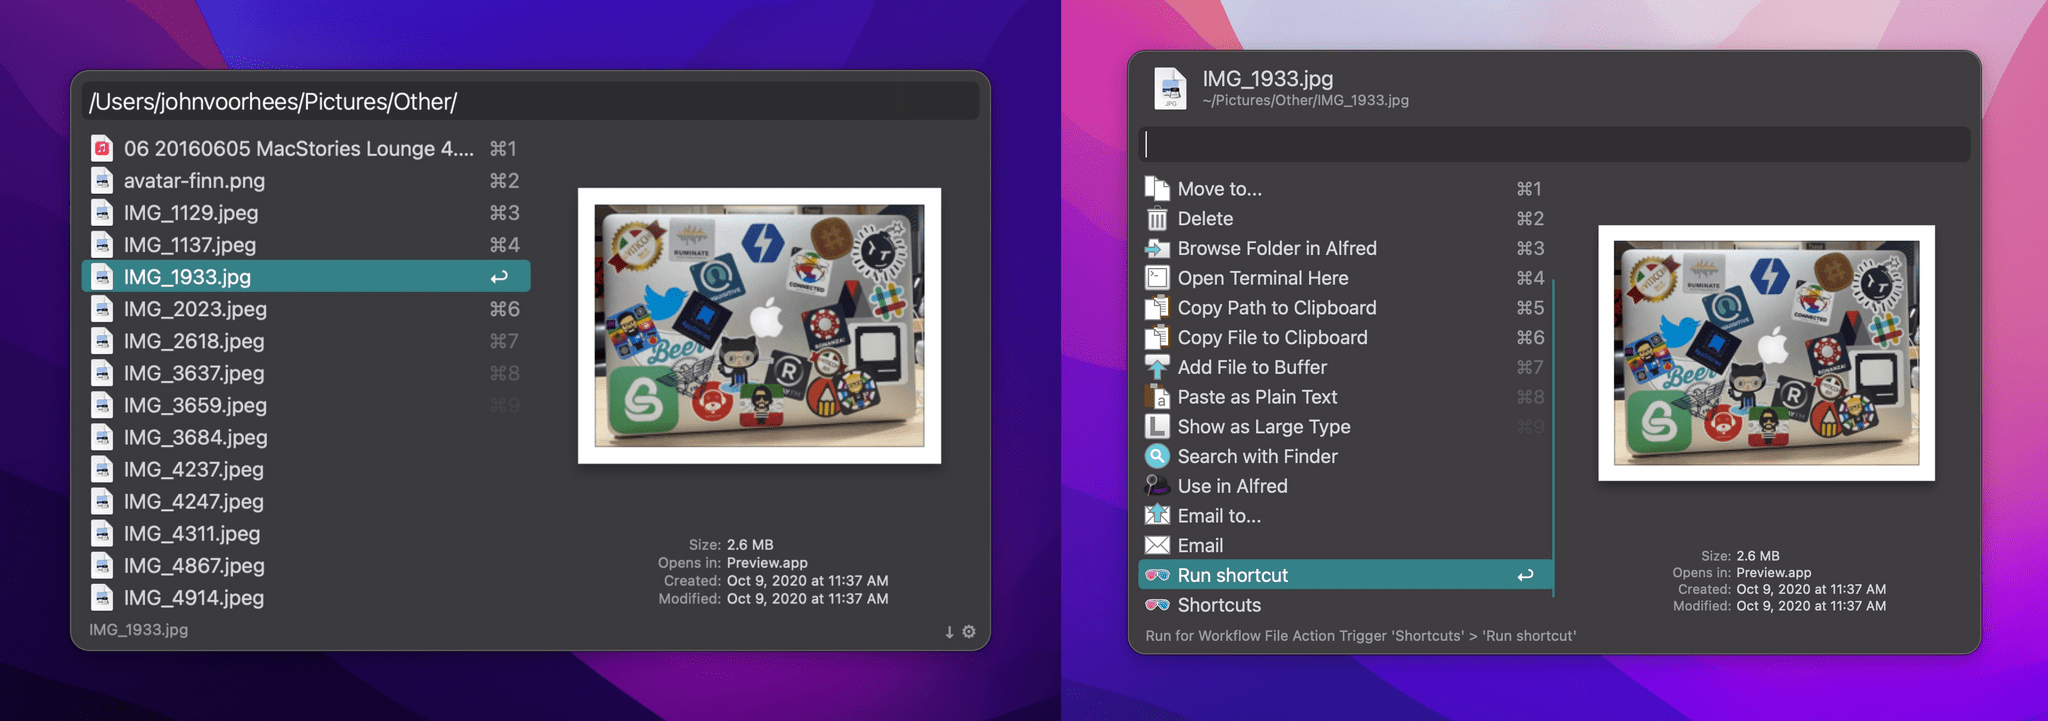
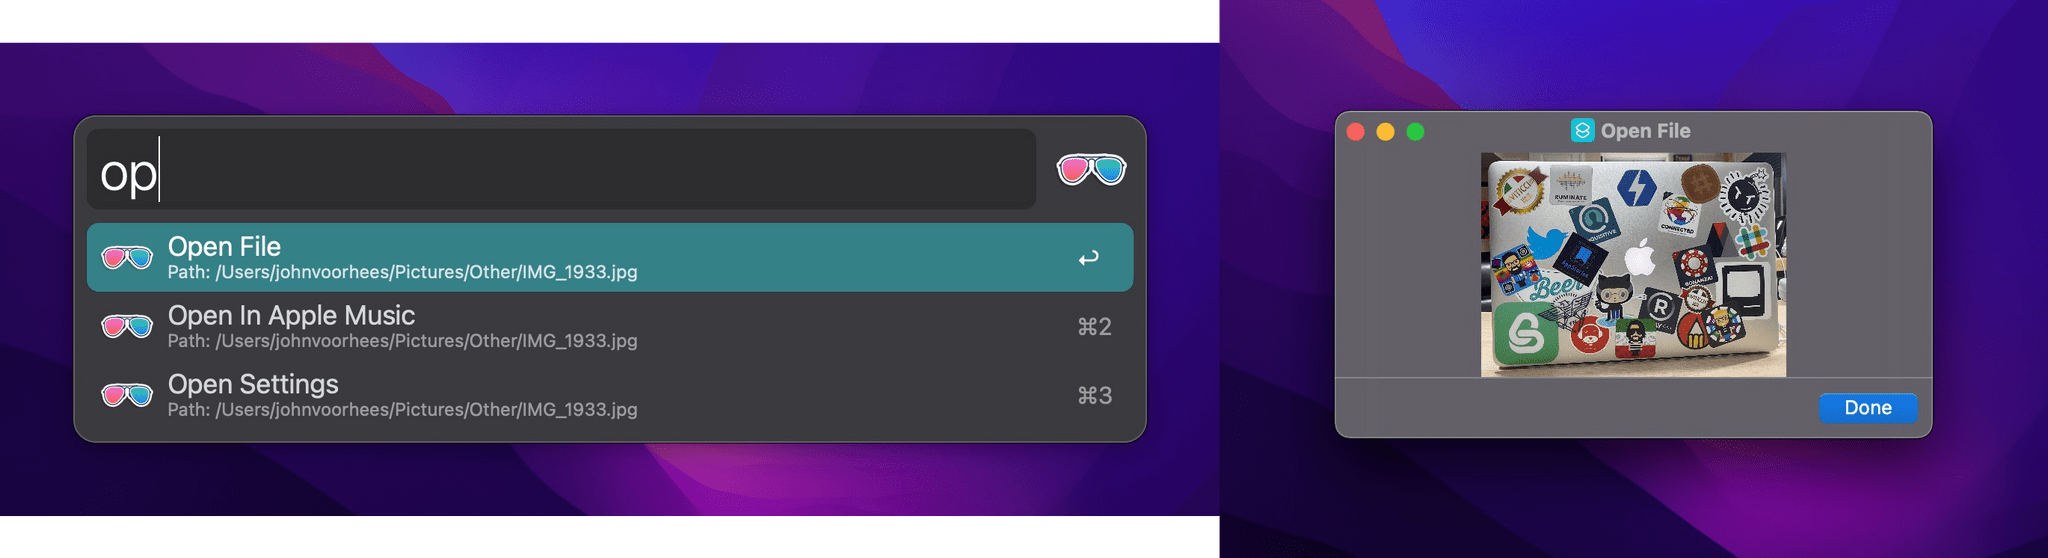
The list of Universal Actions includes ‘Run shortcut,’ ‘Shortcuts,’ and ‘Shortcuts Folders.’ ‘Run shortcut’ lets you pick from your list of shortcuts and then uses the text you provided to Alfred as its input. The ‘Shortcuts’ action locates any shortcuts that match the text you provided, and ‘Shortcuts Folders’ does the same searching instead for folder names that match your text. URLs and files work similarly when the ‘Run shortcut’ action is selected, passing the URL or file as input.

Picking an image to pass to a shortcut.

Picking an image to pass to a shortcut.


Displaying an image passed to a simple 'Open File' shortcut.

Displaying an image passed to a simple ‘Open File’ shortcut.

Vítor Galvão’s Alfred workflow for Shortcuts, which you can download from GitHub, is an excellent example of Alfred’s extensibility, which makes a series of Ruby and Bash scripts approachable for more users through Alfred’s simple UI. The workflow is also another of the many examples of just how well Shortcuts for Mac integrates with third-party utilities thanks to its scripting support and other integrations with macOS.


Shortcuts By SENTINELITE: A Fantastic New Stream Deck Plugin


If you own a Stream Deck and want a better way for adding your shortcuts to it, give Shortcuts by SENTINELITE a try. I’ve only been playing with the plugin for a short time, but this is hands down the best way I’ve found for adding push-button convenience to Shortcuts on the Mac.

I covered the Stream Deck and how I’ve been using it late last year. I’ve also built a variety of utility shortcuts for packaging shortcuts as scripts and applets that make it easier to add multiple shortcuts to your Stream Deck setup. Shortcuts by SENTINELITE significantly improves the process by making it as simple to add a shortcut to the device as it is to add an app.

One of the things that I appreciate about Shortcuts by SENTINELITE is that the plugin preserves the folder structure you use in Shortcuts and sorts shortcuts alphabetically. It’s a small thing, but one that makes the experience of wading through large collections of shortcuts much better, giving the plugin a leg up on many other Shortcuts utilities I’ve tried.

Here's a simple shortcut for grabbing the icons for the shortcuts you want to add to your Stream Deck.

Here’s a simple shortcut for grabbing the icons for the shortcuts you want to add to your Stream Deck.

Just like adding an app to a Stream Deck button, you can add a custom icon and title to the button you create. There’s also a toggle for turning on an Accessibility mode that adds audible cues to the plugin’s interactions for the visually impaired.

If you’ve put off adding shortcuts to your Stream Deck, your procrastination has paid off because Shortcuts by SENTINELITE is the easiest solution that I’ve found so far. That said, I have run into a known bug that occasionally requires the Stream Deck Mac app to be restarted, which is annoying, but on balance, it’s a small price to pay compared to the plugin’s utility.

You can download the Shortcuts for Stream Deck plugin, which also happens to be open-source and free from Stream Deck’s Mac app or on Elgato’s website.


Managing Music From Your Mac’s Menu Bar

As Club MacStories members know, I use my Mac’s menu bar sparingly. With Bartender, our MacStories Selects Mac app of the year, I limit my menu bar to a handful of frequently-used apps and system controls that take up as little space as possible. That cuts down on clutter and means everything will fit when I’m using my MacBook Air in laptop mode.

However, every rule is meant to be broken, and for me, I break my menu bar rule by tracking and controlling my music from the menu bar, which takes up a lot of space but is worth it. You see, I listen to a lot of playlists as a way to discover new music, but that also means I find myself flipping to the Music app frequently to see artist and album information and perform simple tasks like adding a song to my music library or liking it. The constant context switching was a distraction I didn’t need, which led me to look for a better way.

Apple's Control Center widget takes up limited space, but also doesn't do much.

Apple’s Control Center widget takes up limited space, but also doesn’t do much.

Fortunately, there are a lot of options depending on your needs. The simplest solution is to drag the Now Playing widget out of Control Center on your Mac and use it as a standalone menu bar item. That works well if you want simple playback controls and song information, but the functionality of Apple’s control is limited and requires a click to do anything.

The two third-party solutions I prefer are NepTunes and the recently-released Looking Glass music remote. Both apps live in your menu bar and offer different sets of features that will play a big part in which app will suit your needs best.

Read more


Pok Pok Playroom Releases Major Town Toy Expansion

Pok Pok Playroom, the delightful collection of digital toys that won an Apple Design Award earlier this year, got a big update today that expands the app’s town toy significantly. In the months since the app’s launch, the Pok Pok team has been hard at work adding to and refining the app’s digital toys, but today’s update is particularly noteworthy for its depth.

Source: Pok Pok.

Source: Pok Pok.

It’s not surprising that the town toy is among kids’ favorites. The town’s wide variety of buildings, people, animals, and other elements provided a rich environment for exploration and imagination. Today’s update grows the town into a thriving, diverse metropolis. The original parts are still there, but kids will also find more occupations, green spaces, new means of transportation, a farm, and even a movie set complete with a dinosaur.

Pok Pok's revamped town has a movie set.

Pok Pok’s revamped town has a movie set.

The all-new town was developed in collaboration with Sarah Kaufman, an urban planner from New York City, who helped the Pok Pok team incorporate the cultural, design, and community elements of modern cities. The results are fantastic. There’s a wealth of new areas available that I expect kids will find engaging and fun.

If you have kids and haven’t tried Pok Pok yet, now is a great time to do so. You can learn more on the Pok Pok website and donwload the app on the App Store. Also, if you want to hear from the Pok Pok team themselves, listen to the interview we did with them on AppStories when they won an Apple Design Award.


Pixelmator Pro Updated with Background Removal, Subject Selection, and Select and Mask Tools

Mac image editor Pixelmator Pro continues its streak of releasing machine learning-based tools that feel like magic, with a release that the Pixelmator team calls Abracadabra appropriately enough. The release of version 2.3 features tools to remove the background of an image, select just the subject of a photo, and a new Select and Mask feature for making fine-tuned selections.

I started with these images.

I started with these images.

When I first saw a demo of what Pixelmator 2.3 could do, I was a little skeptical that the features would work as well with my photos as the ones picked to show off the new tools. However, Pixelmator Pro’s new suite of related features is the real deal. With virtually no work on my part, I grabbed a photo of Federico and me from my trip to Rome, selected us, and after making a few refinements to the selection to pick up more of Federico’s hair (mine was perfect), I cut out the background, and replaced it with a photo I took in Dublin days before. After compositing the photos on separate layers, I color-matched the layers using ML Match Colors, so they’d fit together better.

The final composed image.

The final composed image.

The results aren’t perfect – the lighting and perspective are a little off – but those are issues with the photos I chose, not the tools I used. The photo of Federico and me was taken after the sun had set and was artificially lit, while the Dublin Canal was shot on a sunny morning, yet the composite image works incredibly well. What’s remarkable is what I was able to accomplish in just a few minutes. I also removed the background from one of the photos I took recently for my Stream Deck story, which worked perfectly with no additional work needed, which has interesting implications for product photography.

Remove Background takes advantage of Apple’s Core ML framework and works in just a few seconds. Select Subject works similarly but selects the subject of an image instead of erasing the background behind the subject. If you look closely at the masked selection below, you can see how well Pixelmator Pro did picking up the edges to get selection details like hair without any additional work by me. However, if an image needs a little selection touch-up, the Refine Edge Brush and Smart Refine feature make that sort of work easy too.

Pixelmator Pro’s new tools are available elsewhere in macOS, too, as Finder Quick Actions, Shortcuts actions, and AppleScript commands. I covered Pixelmator Pro’s Shortcuts actions earlier this fall, and they are some of the best available among Mac-only apps, so it’s fantastic to see those automation options continue to expand.

Pixelmator Pro has long been one of my must-have Mac apps. I don’t spend a lot of time editing images, but when I do, I appreciate that Pixelmator Pro makes the process easy and produces excellent results regardless of your experience with image editors.


ActiveTab Safari Extension Launched on iPad

Last week, I wrote about ActiveTab, a Safari extension that draws a colorful line beneath the active tab in Safari for Mac, which makes it far easier to identify the tab you’re viewing. However, the Mac isn’t the only platform where Safari’s tabs are problematic. As Federico explained in his iOS and iPadOS 15 review, it’s every bit as difficult to decypher which tab is active on the iPad.

Fortunately, ActiveTab is now available on the iPad too. The extension has the exact same features as the Mac version, making the active tab stand out by drawing a line across the top of the content view underneath the tab. If you haven’t installed a Safari extension on the iPhone or iPad yet, be sure to check out my story on iOS and iPadOS 15 Safari extensions for details on how to set them up.

ActiveTab has added new Blend Modes and custom colors to the app too.

ActiveTab has added new Blend Modes and custom colors to the app too.

Since I first wrote about ActiveTab, the app has been updated to allow you to add a custom color using RGBA values, in addition to the set of pre-defined options. The extension has added a Blend Mode option on both platforms too, which can help set the extension’s colored bar apart from its background in some circumstances.

If you haven’t checked out ActiveTab yet, it’s available on the App Store for $1.99.


Halide 2.5 Adds New Macro Mode

Halide 2.5 is out, and it includes a brand new Macro Mode. Macro photography is an exclusive feature of the iPhone 13 Pro and 13 Pro Max. Still, Halide has managed to make its Macro Mode available on the iPhone 8 and newer models thanks to some cool machine learning tricks.

Switching to Macro Mode and dialing in precise focus is simple with Halide 2.5.

Switching to Macro Mode and dialing in precise focus is simple with Halide 2.5.

Macro Mode is easy to use. When you open the app, auto-focus (AF) is selected by default. Tap it, and the focus controls slide into place with the auto-focus at one end of the app’s focus dial and Macro Mode (the button with the flower) at the other end. Select Macro Mode, and you’ll see a new focus dial with smaller increments appear. The Halide team says this enables sub-millimeter focusing for extra-precise close-up focusing.

Halide takes its close-ups by first switching to the camera on your iPhone that can take the closest shots. Focusing is handled by its precision focus dial, and the final step is to enhance the image’s details using an AI-based enhancement process. That last super-resolution step is what allows Halide’s Macro Mode to be used on cameras on older models of iPhones and to enhance Apple’s own macro system too.

In my testing over the past day, the results have been impressive. I’m especially fond of the precise focus dial that allows for minute adjustments that make a difference at such close range.

If you’re a Club MacStories+ and Club Premier member, head over to the new Photography channel in our Club Discord to see even more of my experiments with Halide’s Macro Mode and share your own macro shots.

Halide is available as on the App Store as a subscription for $2.99/month or $11.99/year or for a one-time payment of $49.99. The app also offers a 7-day free trial.


Hands On with AirPods’ New Find My Support

Yesterday, an AirPods firmware update was released, enabling new Find My features for Apple’s wireless headphones. Before the update, you could use Find My to see the last spot they were used, but that wasn’t always helpful if you carried them around for a while without opening the case before losing them.

With the firmware update, it’s easier to find misplaced AirPods Pro and AirPods Max. From Find My, choose your AirPods, and tap on the Find button. The app will begin searching for a signal and will suggest moving to a different location if it can’t find anything. In my tests, the time it took to locate the signal of my AirPods Pro varied from around 30-60 seconds when they were nearby.

Once Find My detects a signal, it will tell you whether your AirPods are nearby or far away, allowing you to move around to pinpoint the location. There’s also an option to play a sound through your AirPods to help locate them, which is handy once you’re close to them. However, with my AirPods Pro in their case, the sound playing from my AirPods Pro was understandably a little hard to hear. Also, you don’t have the benefit of the directional arrows you get when searching for an AirTag.

The feature worked well sitting at my desk with my iPhone and AirPods Pro sitting within sight of each other, but that’s not a realistic scenario. To get a better sense of the process, I put my AirPods under a pillow and blanket on our couch in another room on the same floor of our house. I went back to my office, opened Find My, and waited to see if it could pick up the signal roughly 10 meters away in a different room.

After about 30 seconds, Find My picked up a weak signal reporting that my AirPods Pro were far away. I began slowly walking through the house, watching Find My as it updated the distance to my AirPods from far to near and eventually ‘here.’ As I walked around and Find My updated, it provided haptic feedback with increasing frequency as I got closer to my AirPods Pro. I tried playing a sound on the AirPods Pro, but the pillow and blanket made the sound impossible to hear. However, the sound wasn’t really necessary because by the time Find My reported my AirPods as ‘here,’ I was right on top of them anyway, and they were easy to locate.

Found outside. Fortunately, my neighbors are used to my 5 AM experiments.

Found outside. Fortunately, my neighbors are used to my 5 AM experiments.

I also tried putting my AirPods Pro just outside my back door. Find My took a little longer to find a signal, and I had to be a little closer to the AirPods, but even though more walls, Find My picked up a signal.

I’ve only tested the new Find My feature in contrived scenarios so far, but I was impressed with the process. The feature isn’t going to pick up a signal if your AirPods are far away, but more often than not, I’ve simply misplaced my AirPods somewhere at home, and Find My should be perfect for that.


ActiveTab: A Simple Extension to Tell Which Safari 15 Tab is Active

Safari 15, which is already available for macOS Catalina and Big Sur, will be part of macOS Monterey too. One of the design changes to the updated browser is the separation of tab indicators from its web content. Apple has inexplicably interposed the Favorites bar in between the two, and even if you hide the bar, figuring out which tab is the active one can be difficult.

ActiveTab is a new Safari extension inspired by The Tragedy of Safari 15 for Mac’s ‘Tabs’ a story John Gruber wrote on Daring Fireball recently that you should read if you haven’t already. To make it easier to distinguish the active tab, ActiveTab draws a line underneath it along the top of the tab’s web content. There are eight colors to choose from, and the line can be anywhere from 1 to 7 pixels wide. Note that a page needs to be open for the line to appear because it’s being drawn on top of the content. As a result, you won’t see the line if a tab is empty.

I wish ActiveTab offered different colors for light and dark mode browsing.

I wish ActiveTab offered different colors for light and dark mode browsing.

The extension, which Stephen Hackett shared with me earlier today, undeniably makes it easier to spot the active tab in Safari. However, I found myself wishing almost immediately for light and dark mode versions of the color options that could switch between light and dark mode in sync with my system settings because the colors don’t all work equally well in both modes. The colors of the site you visit can affect the visibility of ActiveTab’s indicator too.

Of course, I’d prefer if Apple fixed the design of its tabs, but if you find yourself being tripped up by the new design, ActiveTab is worth considering.

ActiveTab is available on the Mac App Store for $1.99.