This Week's Sponsor:

PowerPhotos

The Ultimate Toolbox for Photos on the Mac


Posts in tutorials

Use Dribbble and Instagram as an Apple TV Screen Saver


Tired of stock images of plants and animals when your Apple TV screen saver comes on? Why not make it a little more personal with some ingredients from Dribbble and Instagram? With a little IFTTT magic you can have your Apple TV showing your Dribbble and Instagram feeds with just a little fun hacking.

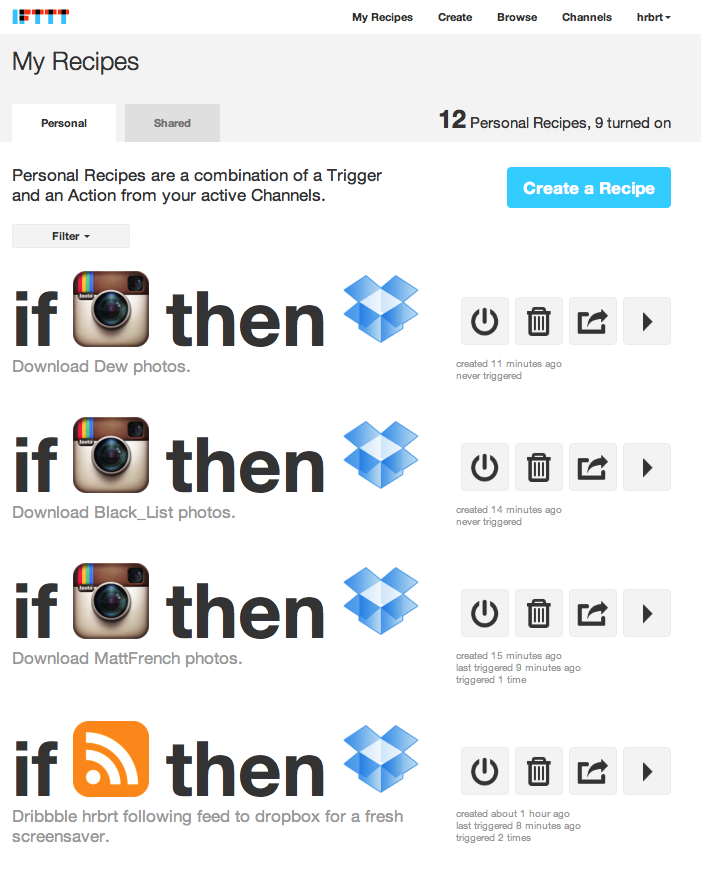
The interactive team over at BlingBlog.tv created a way to make this happen by using Dropbox and IFTTT then sprinkled some recipe magic to make this happen. I tried it last night and it worked perfectly; it only took me about 15 minutes to set up from start to finish. Here are the ingredients and the recipe:

Step 1: Dropbox
You’ll need a Dropbox account if you don’t already have one, but who doesn’t these days? If you don’t, you can sign up for free here.

Step 2: IFTTT
Okay, not everyone has an IFTTT account but you will need one to continue with this tutorial. IFTTT is a great service that lets you build recipes from many different web services. It’s free, so do yourself a favor and sign up if you already haven’t. When you do have an IFTTT account, you can continue.

Step 3: Get your ingredients together
To make the recipes that BlingBlog.tv created, some IFTTT channels will need to be activated. Go here to activate the RSS Feed Channel, the Dropbox Channel, and if you want Instagram, activate its channel as well.

Step 4: Recipes
Anytime a new item is added to Dribbble’s popular feed, or your own follow feed if you have an account, it is downloaded to Dropbox. If you have the Instagram channel activated, you can pick a few different users as well to really mix up your screen saver. IFTTT will save an Instagram picture every time that user account posts a new picture. Here are the links here and here that BlingBlog.tv posted if you want to modify or use their recipes. Note that you will need to make sure every recipe points to the same Dropbox folder. Every one of my recipes for this tutorial point to my Dropbox/IFTTT/Instagram folder, even my Dribbble feed.

Step 5: Screen Saver Info
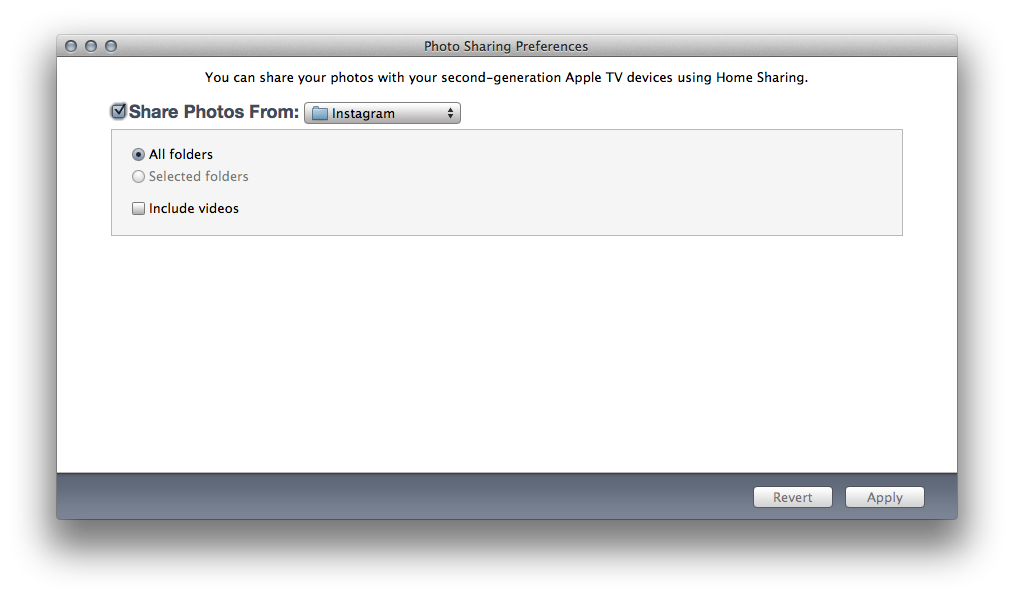
Did I mention this also works on your Mac? Just point to your Dropbox folder via the screen saver system prefs and you’re done with this tutorial. For your Apple TV, you will need to turn on iTunes’ Home Sharing on the Mac that has the Dropbox folder. After that is done, navigate to File > Home Sharing > ‘Choose Photos to Share with Apple TV…’ in iTunes and navigate to the same Dropbox folder (see image below).

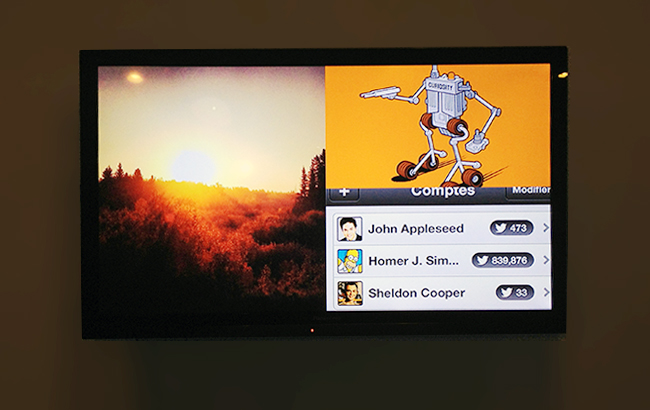
Then, go to your Apple TV > Computers menu and add your Apple ID to link to your Mac’s photo library if you haven’t already done so. Now, go to Screen saver and choose your user Photo library as the source. Here is a resulting picture from my own Apple TV using this recipe. As you can see, it’s showing images saved from the IFTTT recipe – I like the origami effect the best. So, if you get tired of looking at your photos or the boring stock ones that Apple ships, try this recipe for some inspiration!

Here are some FAQs that BlingBlog posted:

  • At the beginning of the week, delete all of the stuff from last week. Sometimes, it’s hard to let go, but this screensaver isn’t for nostalgia; it’s for inspiration. Bring on some new stuff!
  • IFTTT/Instagram recipes only let you choose one user per recipe. We have 3 or 4 different ones going.
  • You aren’t limited to just dribbble or Instagram, IFTTT can also hook up to Flickr or any other photo streaming service that has an rss feed.
  • Apple TV doesn’t automatically update as new images come in, so you have to stop the screensaver and repeat Step 5 from above. And make sure your iTunes is open when it is refreshing the feed.

Turn URLs and Webpages Into PDFs In Your Dropbox

I stumble across a lot of interesting webpages on a daily basis. Sometimes it’s a video I want to watch later; sometimes it’s an article I don’t have time to read right away. Other times, I find a webpage that I want to keep around for future reference. For me, there’s a difference between articles to read later and reference material: whereas a new item added to Instapaper has a short life span in terms of attention (read, share, archive), a webpage I want to keep around forever needs to be turned into a document I can read anywhere, highlight, annotate, and carry around between platforms and devices. For that, I like PDFs.

I keep a “PDFs” folder in my Dropbox that contains all the documents I check upon regularly for work and personal purposes. They can be eBooks, tutorials, or guidelines from Apple that are essential to my writing online. Thanks to the increasing support for cloud services in apps like PDF Expert, GoodReader, and iAnnotate, I can keep a single copy of a PDF in my Dropbox, use the app I want to annotate the document with, and forget about duplicates thanks to sync. Furthermore, I’m fairly sure that, due to their popularity, PDFs will still be readable and supported 20 years from now, so I don’t have to worry about data preservation and file formats.

Lately, I have become obsessed with turning longer articles I find on the Internet also into PDFs for long-term archival. For as much as I like Instapaper, I can’t be sure that the service will be around in the next decades, and I don’t want my archive of longform and quality content to be lost in the cloud. So I have come up with a way to combine Instapaper with the benefit of PDFs, Dropbox, and automation to generate documents off any link or webpage, from any device, within seconds.

(Disclaimer: what follows is an explanation of a hack I created for personal use. It uses publicly available tools and apps to fill a personal need. You shouldn’t create PDFs off websites and redistribute them – you should support the sites you read instead).

In short, I use the Instapaper Text bookmarklet to fetch a webpage’s text and images (while preserving hyperlinks and great typography) and I convert the resulting page to PDF using wkpdf. Created by Christian Plessl, wkpdf is a command line tool that uses WebKit and RubyCocoa for rendering HTML content to PDF. Since wkpdf uses WebKit’s HTML rendering, it can generate good-looking PDFs that maintain most CSS2 and CSS3 stylings and properties. I have tried another command line tool for file conversion, Pandoc, but I like wkpdf better for straight HTML to PDF conversion. Read more


Sprinkle a Dash of Cocoa in Your AppleScripts

The framework AppleScriptObjC allows users to write scripts with an interesting fusion of the AppleScript and Objective-C languages. Specifically, Apple describes the framework as:

AppleScriptObjC lets AppleScript objects serve as Objective-C objects in the Cocoa runtime

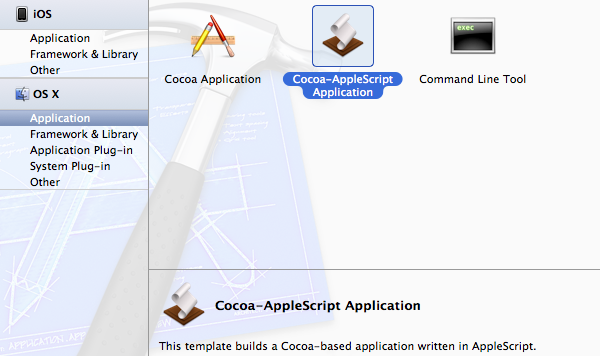
Basically this means that you can use simplistic Objective-C code in an AppleScript with the seemingly easier to grasp syntax of AppleScript. If none of this makes any sense yet then just hang in there and I will explain in a very visual tutorial in which I will build a sample Cocoa-AppleScript app that simply sends a notification to the Notification Center and quits.

Read more


Faster Searches With Bang On and Launch Center Pro

In our review of Bang On for iPhone and iPad, we noted how this nifty utility’s support for “hotkeys” centralized mobile search to avoid extra taps in Safari or switching between multiple apps. Our Lukas Hermann wrote:

To avoid a lot of typing, Bang On is designed around the ability of choosing “!”-hotkeys below the search panel and adding them to your search query. So, as an example: you heard something about that cool band called The Arcade Fire and you want to find out more about them. Fire up Bang On, tap the Wikipedia hotkey, then enter “Arcade Fire” afterwards into the search panel, and Bang On will immediately search Wikipedia and display the respective article using the in-app browser. What I personally found very useful is the ability to change the “!” parameter without changing the actual search query, so you just need to tap the “!youtube” hotkey and Bang On will replace the “!wikipedia” command (those commands are called “!bangs” within Bang On) with it and start searching for Arcade Fire videos instead of Wikipedia articles.

On my iOS devices, I typically run three kinds of searches on a daily basis: Google, Rdio, and email. Using a combination of Bang On and Launch Center Pro (my review here), I have managed to make my workflow faster, more enjoyable, and ultimately better than using dedicated apps.

For regular Google search, instead of using Safari I have created a custom action in Launch Center Pro that, with the input prompt, allows me to write first, then switch to Google with my query already filled in. Unfortunately, as far as Apple apps go, it’s not possible to create actions for Mail.app, which in Launch Center only supports message creation, but not search.

Last week, I found out a recent update to Bang On added some interesting new features including an option to open links in Google Chrome and support for Rdio search. Considering Rdio’s limited integration with their own url scheme and rdio.com URLs (it can auto-play single tracks, not albums or playlists, and it doesn’t always work), I was curious to try out whether Bang On could simplify and speed up the process of looking for music on Rdio – something I do every day.

As it turns out, Bang On’s take on Rdio search is very useful. The developer of Rdio created a custom web app off the Rdio API which, through the !rdio hotkey, displays artists, albums, and songs. Tapping on these items will take you directly to the Rdio app, and you can also tap & hold to see the URLs that Bang On is using for these searches (it’s a rdio://rdio.com scheme).

With Launch Center Pro, I have set up an action to search Rdio through Bang On with an input prompt, so I can type a song or album quickly in Launch Center Pro, like I do for Google. This is extremely simple to create – just make sure you include !rdio in the action composer, so the input prompt will redirect to Rdio search automatically.

Using BangOn and Launch Center Pro, you can speed up your searches using apps and services that only Bang On supports, and making them quicker to use thanks to App Cubby’s fantastic launcher. For instance, I use Launch Center Pro for almost all of my regular searches, but I rely on Bang On for unsupported apps like Articles, the aforementioned Rdio URLs, and many other websites.

You can download Bang On and Launch Center Pro from the App Store.


Give Safari 6 Its RSS Back

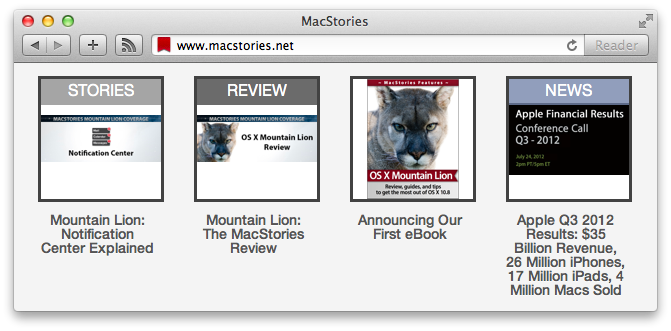
Apple made the decision to remove RSS support from Mountain Lion with Mail (it felt out of place there anyway) and Safari 6 - no more RSS detection and easy-to-click buttons. RSS isn’t dead, so what can you do to get feed detection working again? One option is to download an older version of Safari, use an excellent 3rd party Mac app such as Reeder, or a new Safari extension (yeah, remember those?) by Daniel Jalkut of Red Sweater Software. It’s called Subscribe To Feed and in a blog post yesterday, he expressed his opinion about Apple’s decision and offers a solution to add RSS detection back to Safari 6.

My beta-quality, more-or-less unsupported Subscribe to Feed extension adds a handy button to the toolbar that, when a page offers RSS or Atom feeds, can be clicked to easily open the feed:// link, which should automatically open your favorite news reader.

I hope this extension fills a void for those of you missing the beloved RSS button from Safari 5 and earlier.

The extension not only works like it’s supposed to (this is beta?) but also matches the look and feel of Safari’s UI. When activated, it simply finds the RSS url and adds it /opens it in your default RSS app. The functionality really needed is the ability to view an RSS feed inside the browser but it does bring back the button functionality, which is nice. You can download Jalkut’s RSS extension on Red Sweater.

[Hat Tip TUAW]


Mountain Lion: Getting The Most Out Of Messages

If, like me, you ever wished for an easy way to send messages from your computer to a phone that wasn’t AIM, a flaky SMS workaround, or email, the announcement of iMessage coming to the Mac was something of a Jobsend. When iMessage was introduced in late 2011 along iOS 5 and brought support for text messaging without the fees or character limits to iOS, many people (myself included) immediately found themselves wishing they could use it on their Macs as well. With Mountain Lion, that wish has come true.

So what can you do with iMessage on your Mac now that it’s here? Read more


OmniFocus and Calendar Notifications

I recently became tired with the fact that OmniFocus needs to be launched every once in a while in order to get the latest version of its synced database. For almost two years, I synced OmniFocus through The Omni Group’s excellent (and free) Omni Sync Server service, but I switched to a manual WebDAV location hosted on my Macminicolo machine because I like to be in control of the app’s sync sessions, and to fiddle around with ways to better automate the app’s syncing system.

Over the past few months, however, I have found myself increasingly missing notifications for due items because I am not always using the same device to manage OmniFocus, and I tend to forget to launch the app and hit the Sync button. I may go a full week without using OmniFocus for Mac, but I’d still like to be reminded of important items even if I don’t sync my iPhone and iPad all the time. Unfortunately, in the way OmniFocus is structured, the standard sync doesn’t allow items to be “pushed” in the background.

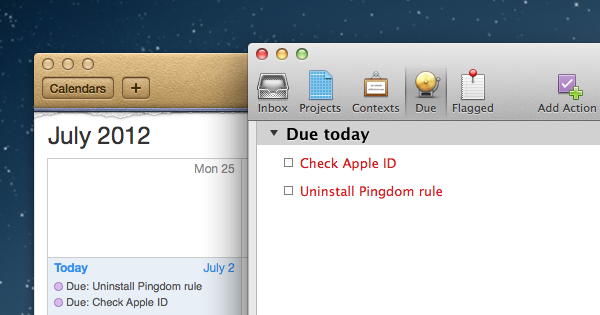
I came up with a way to have OmniFocus’ due reminders synced “in the cloud” and always up-to-date that enables me to keep using the app like I always have, yet staying assured I won’t miss items because I forgot to sync or open the app. It uses OmniFocus’ built-in calendar export functionality, and a mix of automation, Macminicolo hosting, and third-party apps to get the job done reliably and consistently. It’s not perfect (mainly due to Apple’s fault) and it’s likely doable in some other way with some other hosting solution, but I found this method to work perfectly for me in my workflow. Read more


Tip: Use Pocket’s Keyboard Shortcut In Google Chrome

Earlier this week, Pocket updated its ultra-handy bookmarklet and Chrome extension by adding tags after you’ve saved something. Along with this, the Chrome extension also received a useful shortcut (OS X: CMD+Shift+P, Windows: Ctrl+Shift+P) for even quicker saving.

This morning as I was drinking my coffee and reading my RSS/Twitter news I updated the Chrome extension, and then tried the new key combo… and tried… and tried. The only thing Chrome was doing was bringing up the Print Preview dialog box. Upon searching some Google Groups pages, I found an easy fix to disable the Print Preview box and let Pocket use its new shortcut as intended.

Directions: Type ‘about:flags’ in Chrome’s address bar and locate the ‘Disable Print Preview’ option. Click the underlined ‘Enable’ to disable Chrome’s print preview, then restart Chrome. Now CMD+Shift+P (OS X) or Ctrl+Shift+P (Windows) should activate the Pocket key command. Personally, I’d love for Pocket to add user-customizable shortcuts, so that users will have the option to use something else besides the default command to avoid this problem entirely.

By the way, if you haven’t checked out Pocket yet, read our review.


Tip: Handle iMessage Notification Overload with Contact Settings

Since Apple released a public beta of Messages for Mac, we’ve been having a bit of a notification overload here at MacStories HQ. See, ever since iMessage was released with iOS 5, we’ve had our own group message with everyone on the MacStories team – it was a portable water cooler, where we could chat about random things, share silly pictures and even co-ordinate things for the site, even when we were out and about. We used it quite frequently, but things turned for the worse last week when we all got that Messages for Mac beta. What might have been 10 messages in a given time period, suddenly morphed into 50 messages because of the convenience of having iMessage just a click way on our Macs. Things were becoming chaotic and quite distracting, Don had even turned off vibrations — meaning he got no notification for any message, from anyone.

We didn’t want to give up on using Messages for Mac, and it was probably going to be a hard task to change our messaging behaviours to limit the number of messages sent, but it was clear this week that we had to do something.

Fortunately, we think we have found a solution. In iOS, Apple includes the ability to change the text tone and ringtone on a per-contact basis. What we did for everyone in the MacStories team, was to change the text tone to “None”. You can do this by going into the Contacts app, selecting a contact and tapping the ‘Edit’ button and scrolling to “text tone”.

This now means regardless of whether your phone is on Silent or not, you will not get any noise or vibration to alert you to the new message. There are two downsides to this ‘workaround’: the first is that you will still get the notification bar flipping down from the top of your screen. The second problem, which could be a deal breaker for some, is that any messages from that person will not cause a vibration or text tone – important to remember if they are a participant in a few of your group message threads.

There should be another way…

Whilst the ability to change the text tone (and ringtone) on a per-contact basis is really cool (and can be used for a number of other purposes), perhaps there should be another way to control message notifications differently – especially now that iMessage is bundled in iChat, and may lead to an increased number of messages sent to iOS devices. Specifically I’m talking about muting specific message conversations. This would allow me to mute the message thread that has all of the MacStories members, but still receive notifications from Federico, in case he urgently wanted me to cover something.

Apple could easily implement the option inside the Messages app, simply displaying a mute icon next to each message thread when in the ‘Edit’ mode. Just like changing the text tone on a per-contact basis, this power-user option wouldn’t make the UI messy, because it would only appear in the ‘Edit’ screen. That way, users could choose between completely muting on a per-contact basis or on a per-message thread basis – all whilst still receiving notifications for your other messages.