In a recent episode of Connected, we rounded up some of our favorite “iOS little wonders” and Myke was surprised by one of my picks: the ability to launch individual notes on iOS through shared links. The ensuing discussion inspired me to assemble a list of tips and tricks to improve how you can work on an iPad with iOS 11.
Even though I covered or mentioned some of these suggestions in my iOS 11 review or podcast segments before, I realized that it would useful to explain them in detail again for those who missed them. From keyboard recommendations and shortcuts to gestures and Siri, I’ve tried to remember all the little tricks I use to get work done on my iPad Pro on a daily basis.
After several years of being iPad-only for the majority of my work, I often take some of these features for granted. And admittedly, Apple doesn’t always do a great job at teaching users about these lesser known details, which have become especially important after the productivity-focused iPad update in iOS 11. I hope this collection can be useful for those who haven’t yet explored the fascinating world of iPad productivity.
Let’s dig in.
#1: Create Launchers for Notes
As I mentioned above, you can take advantage of Notes’ built-in collaboration capabilities (introduced in iOS 10) to create custom launchers that open individual notes directly.
Apple’s Notes app doesn’t offer a way to copy local URLs that reference a specific note. Thanks to note sharing though, you can create your own “URL scheme launcher” for Notes simply by sharing a note with yourself and using its iCloud.com URL as a personal note launcher.
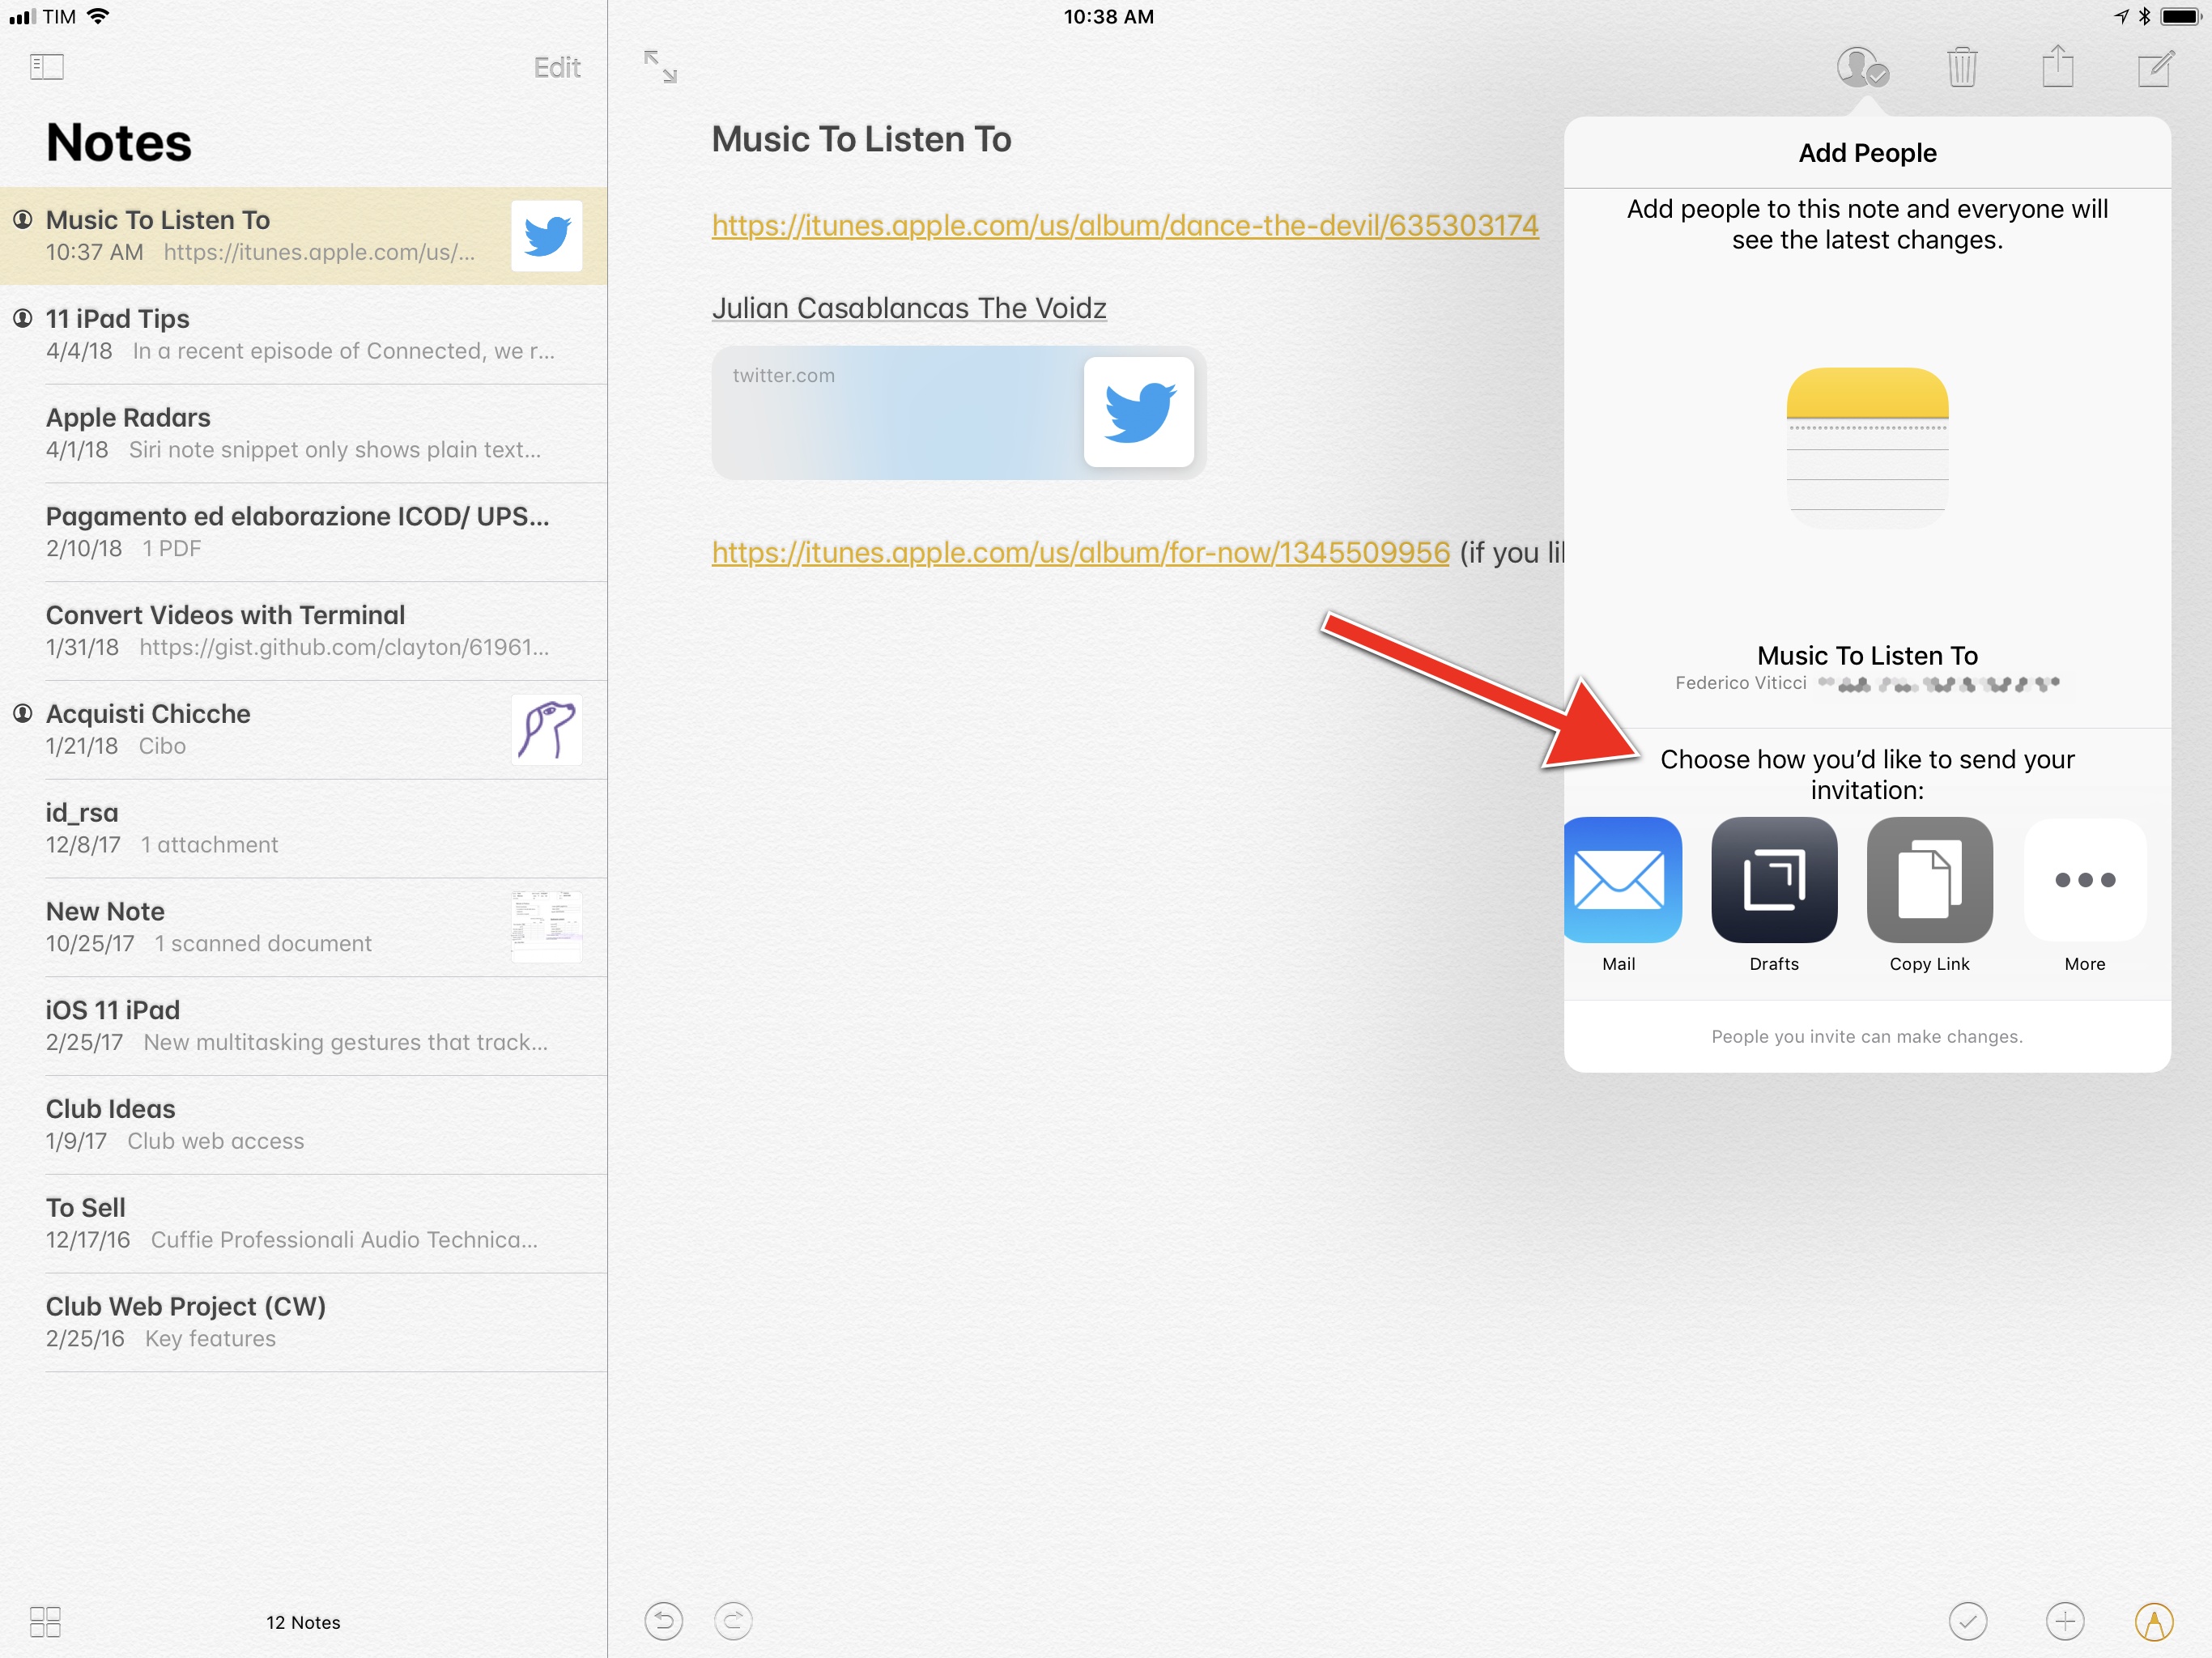
Let’s say you have a note that you open multiple times a day. You’d like an easier way to open this note, such as a widget built using Launcher or a workflow. Open the note, tap the Add People button, then scroll the extension list until you see Copy Link. Tap it, then in the contacts dialog that appears enter either your iCloud email address or phone number.
Tap Copy Link in the top right, and you’ll have a link that can reopen the note directly. The note has been uploaded to iCloud.com to generate this link, but it’s only shared with yourself, so only you can see it. At this point, you can paste the note’s link in Launcher, Launch Center Pro, Workflow, or any other iOS automation app to turn it into a shortcut to reopen the note.
I use this system for dozens of notes that I frequently open in the Notes app. The only downside is that every time you tap on a note launcher, you’ll see a message that says ‘Retrieving’ – that means your device is checking with iCloud’s servers to see if the note on your device can actually be opened because it’s a shared one. In my experience, this dialog disappears in less than a second, and self-shared note links always work reliably. If you’re a heavy user of the Notes app and find yourself constantly opening the same notes, I recommend setting up some of these launchers.
#2: Trim Spotlight App Results
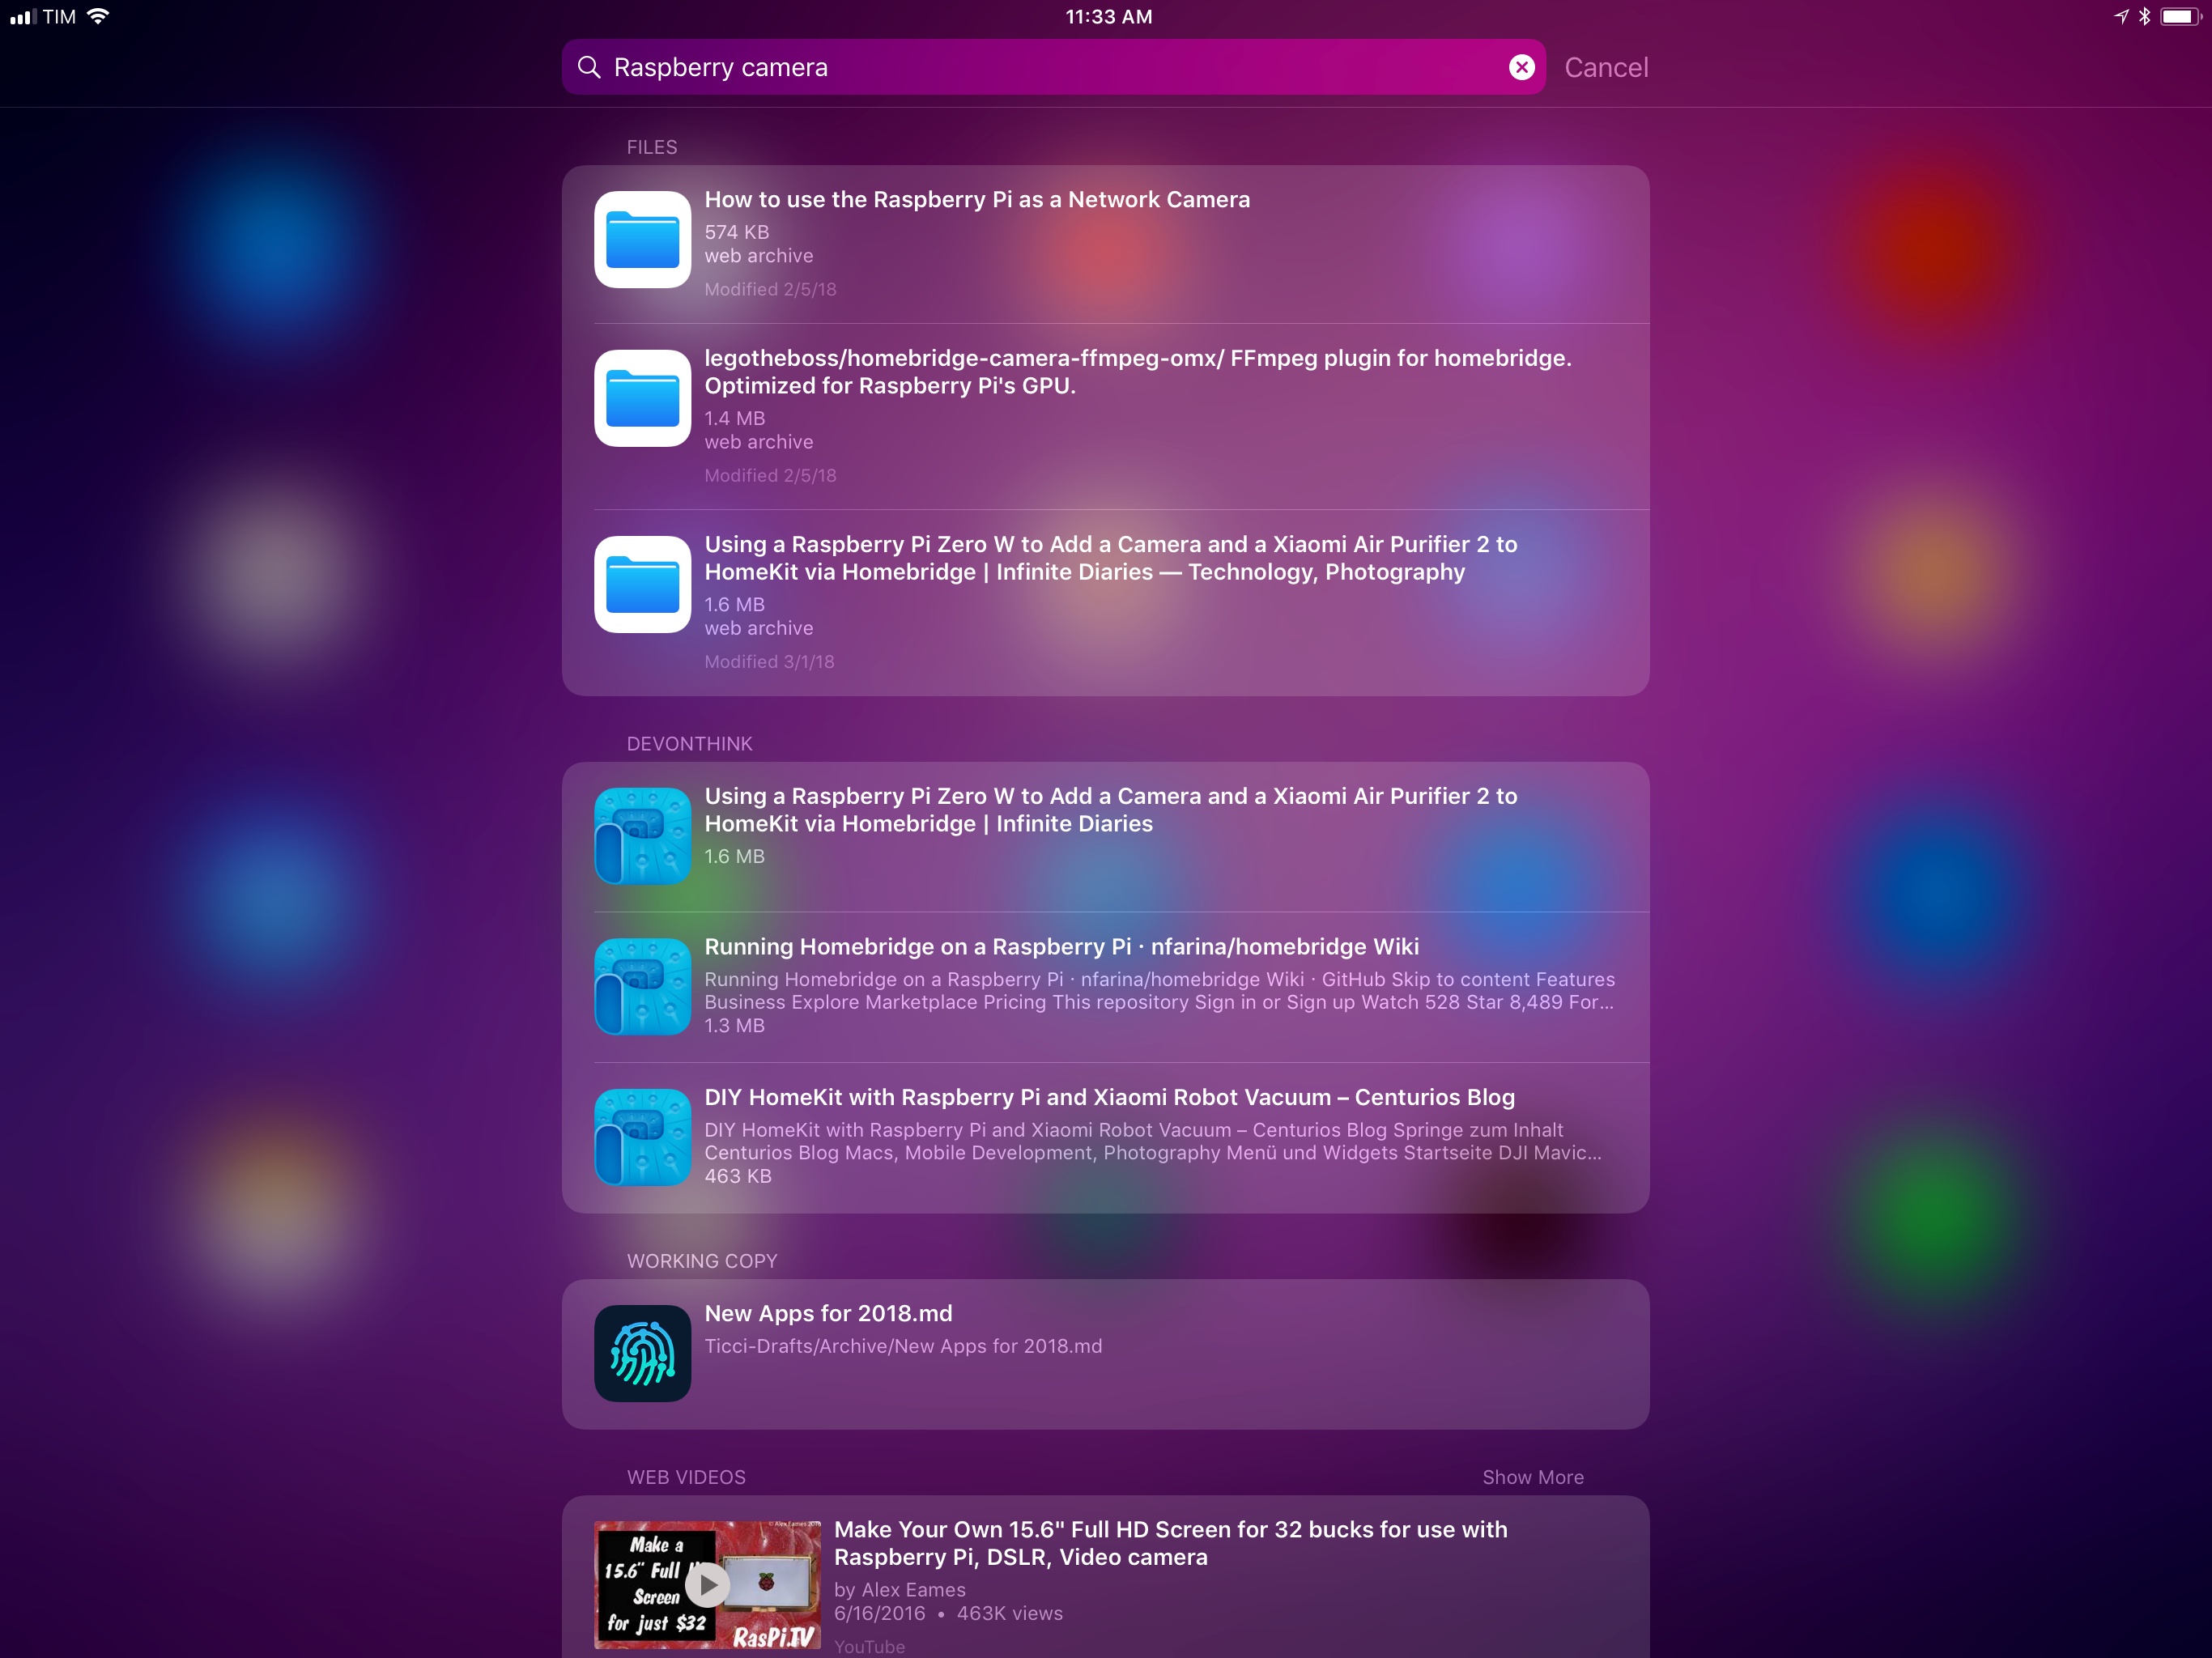
Whether you access it by hitting ⌘Space on a keyboard, swiping down on the Home screen, or via a dedicated physical key, iOS’ Spotlight search can be a powerful tool…once you’ve taken the time to trim down its list of included results.
I love Spotlight and use it a lot, but it requires time to be optimally configured to ensure its results are not polluted by unnecessary app data.
With iOS 9, Spotlight gained the ability to display results for documents and data contained in third-party apps. You can tap these results (or navigate them with the ↑/↓ arrow keys on a keyboard) to open them directly in the main app. The problem with Apple’s approach is that once an app is installed, its Spotlight integration is enabled by default.
If you find yourself searching for information with Spotlight and thinking that some of the results you see could be omitted, you can disable them and retain the ability to launch the app via Spotlight. To do this, go to Settings ⇾ Siri & Search, scroll to the app you want to disable for Spotlight results, and deactivate the ‘Siri & Search Suggestions’ toggle. Once turned off, a second toggle called ‘Show App’ will appear; leave this one enabled to keep the ability to launch the app by typing its name in Spotlight.
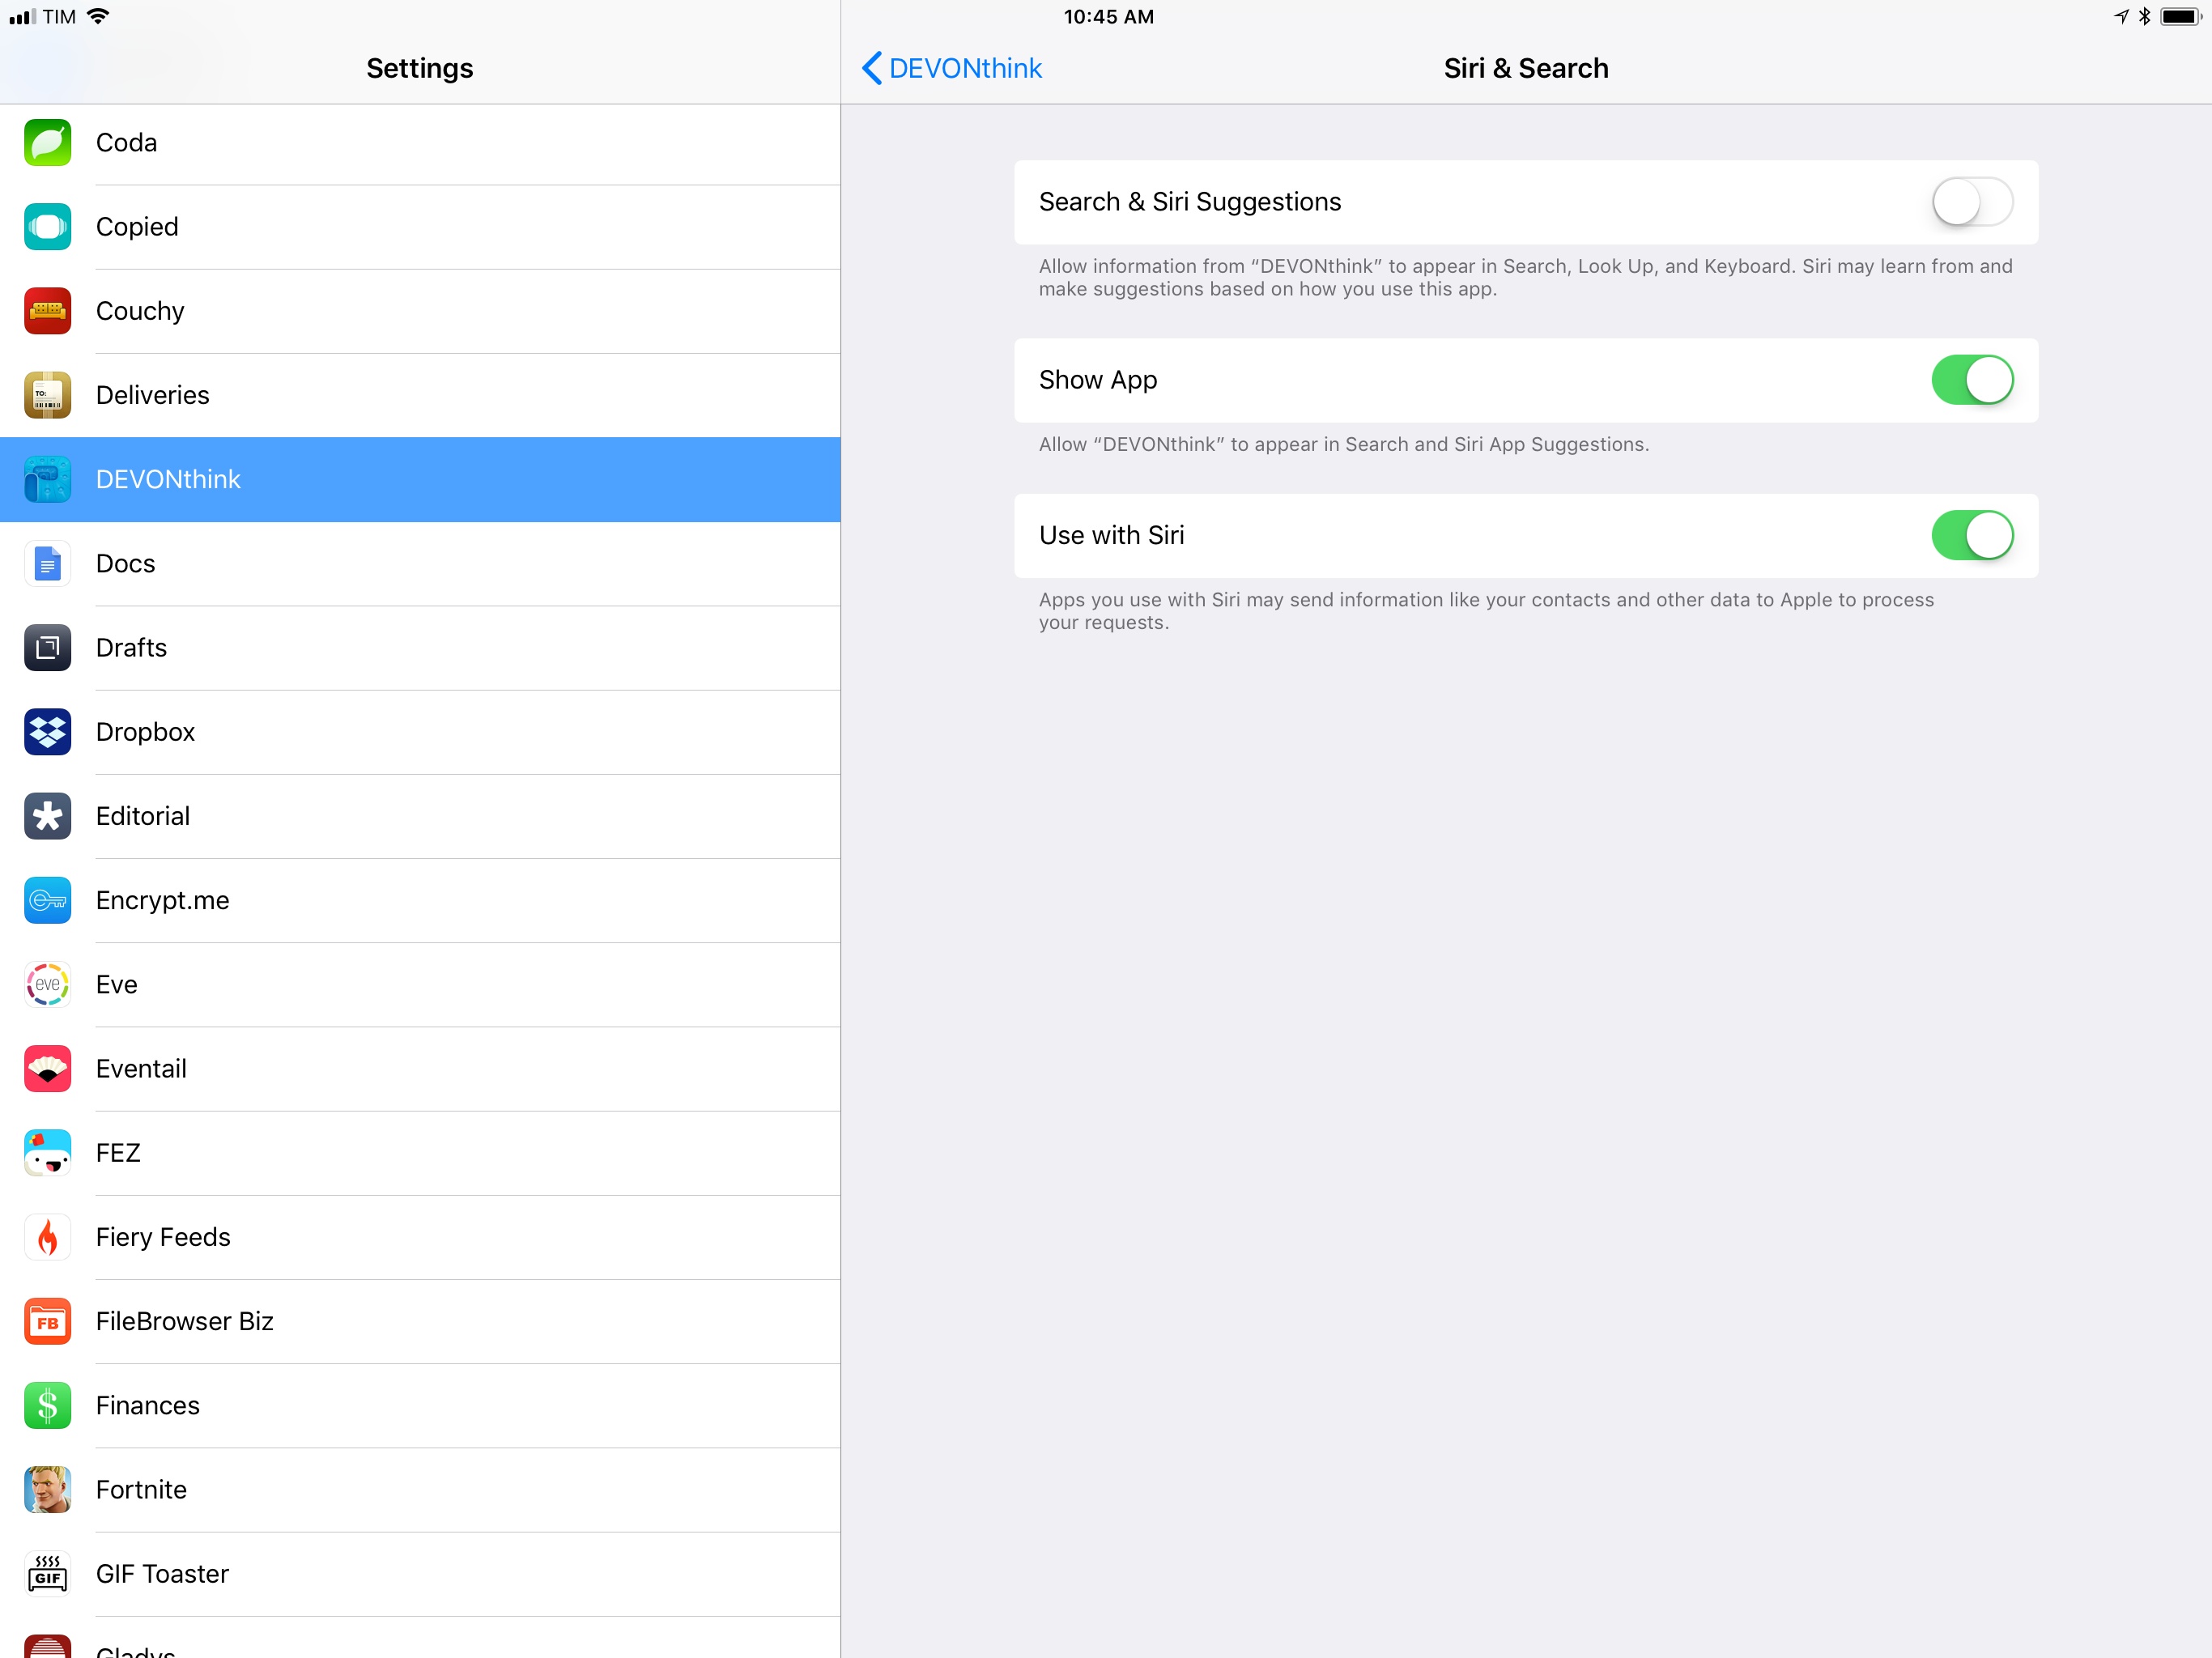
How to disable Spotlight results for an app while keeping the ability to launch the app via Spotlight.
I’ve repeated this process for all the apps I just want to launch via Spotlight and my experience has dramatically improved. Now when I type something in Spotlight because I’m looking for a document or message, only important apps I care about are allowed to display their contents in search results. It takes a while to disable search and Siri suggestions for every unimportant app, but it’s worth the time.
Lastly, here are some other useful Spotlight tips:
- If you’re using an external keyboard, you can press Return to immediately open the first (and most relevant) result brought up by Spotlight. This is perfect for turning Spotlight into a fast app launcher.
- You can use ↑-Return and ↓-Return to navigate between the first items of each Spotlight section (such as results from different apps).
- You can highlight different app icons on the same row by navigating them with the ← and → arrow keys.
- If the changes you make have no effect on the Spotlight results displayed by third-party apps, restart your iPad. Sometimes a hard reboot is necessary for Spotlight’s cache to clear.
#3: Take, Edit, and Share Screenshots Faster
Among various iPad-focused productivity enhancements, iOS 11 brought fantastic new screenshot features to quickly edit, share, and discard screenshots. What you may not know, however, is that you can make this workflow even faster on the iPad thanks to multitasking-aware cropping and keyboard shortcuts.
Unlike its iPhone counterpart, the iPad’s screenshot editing UI can recognize the edges of multiple app windows in a screenshot that was taken while in Split View or Slide Over mode. This means that if you take a screenshot while multitasking, then tap on the preview to edit it right away, the crop tool will automatically snap to the edges of a floating app in Slide Over or multiple apps in Split View, letting you easily crop just one app to share as a standalone image.
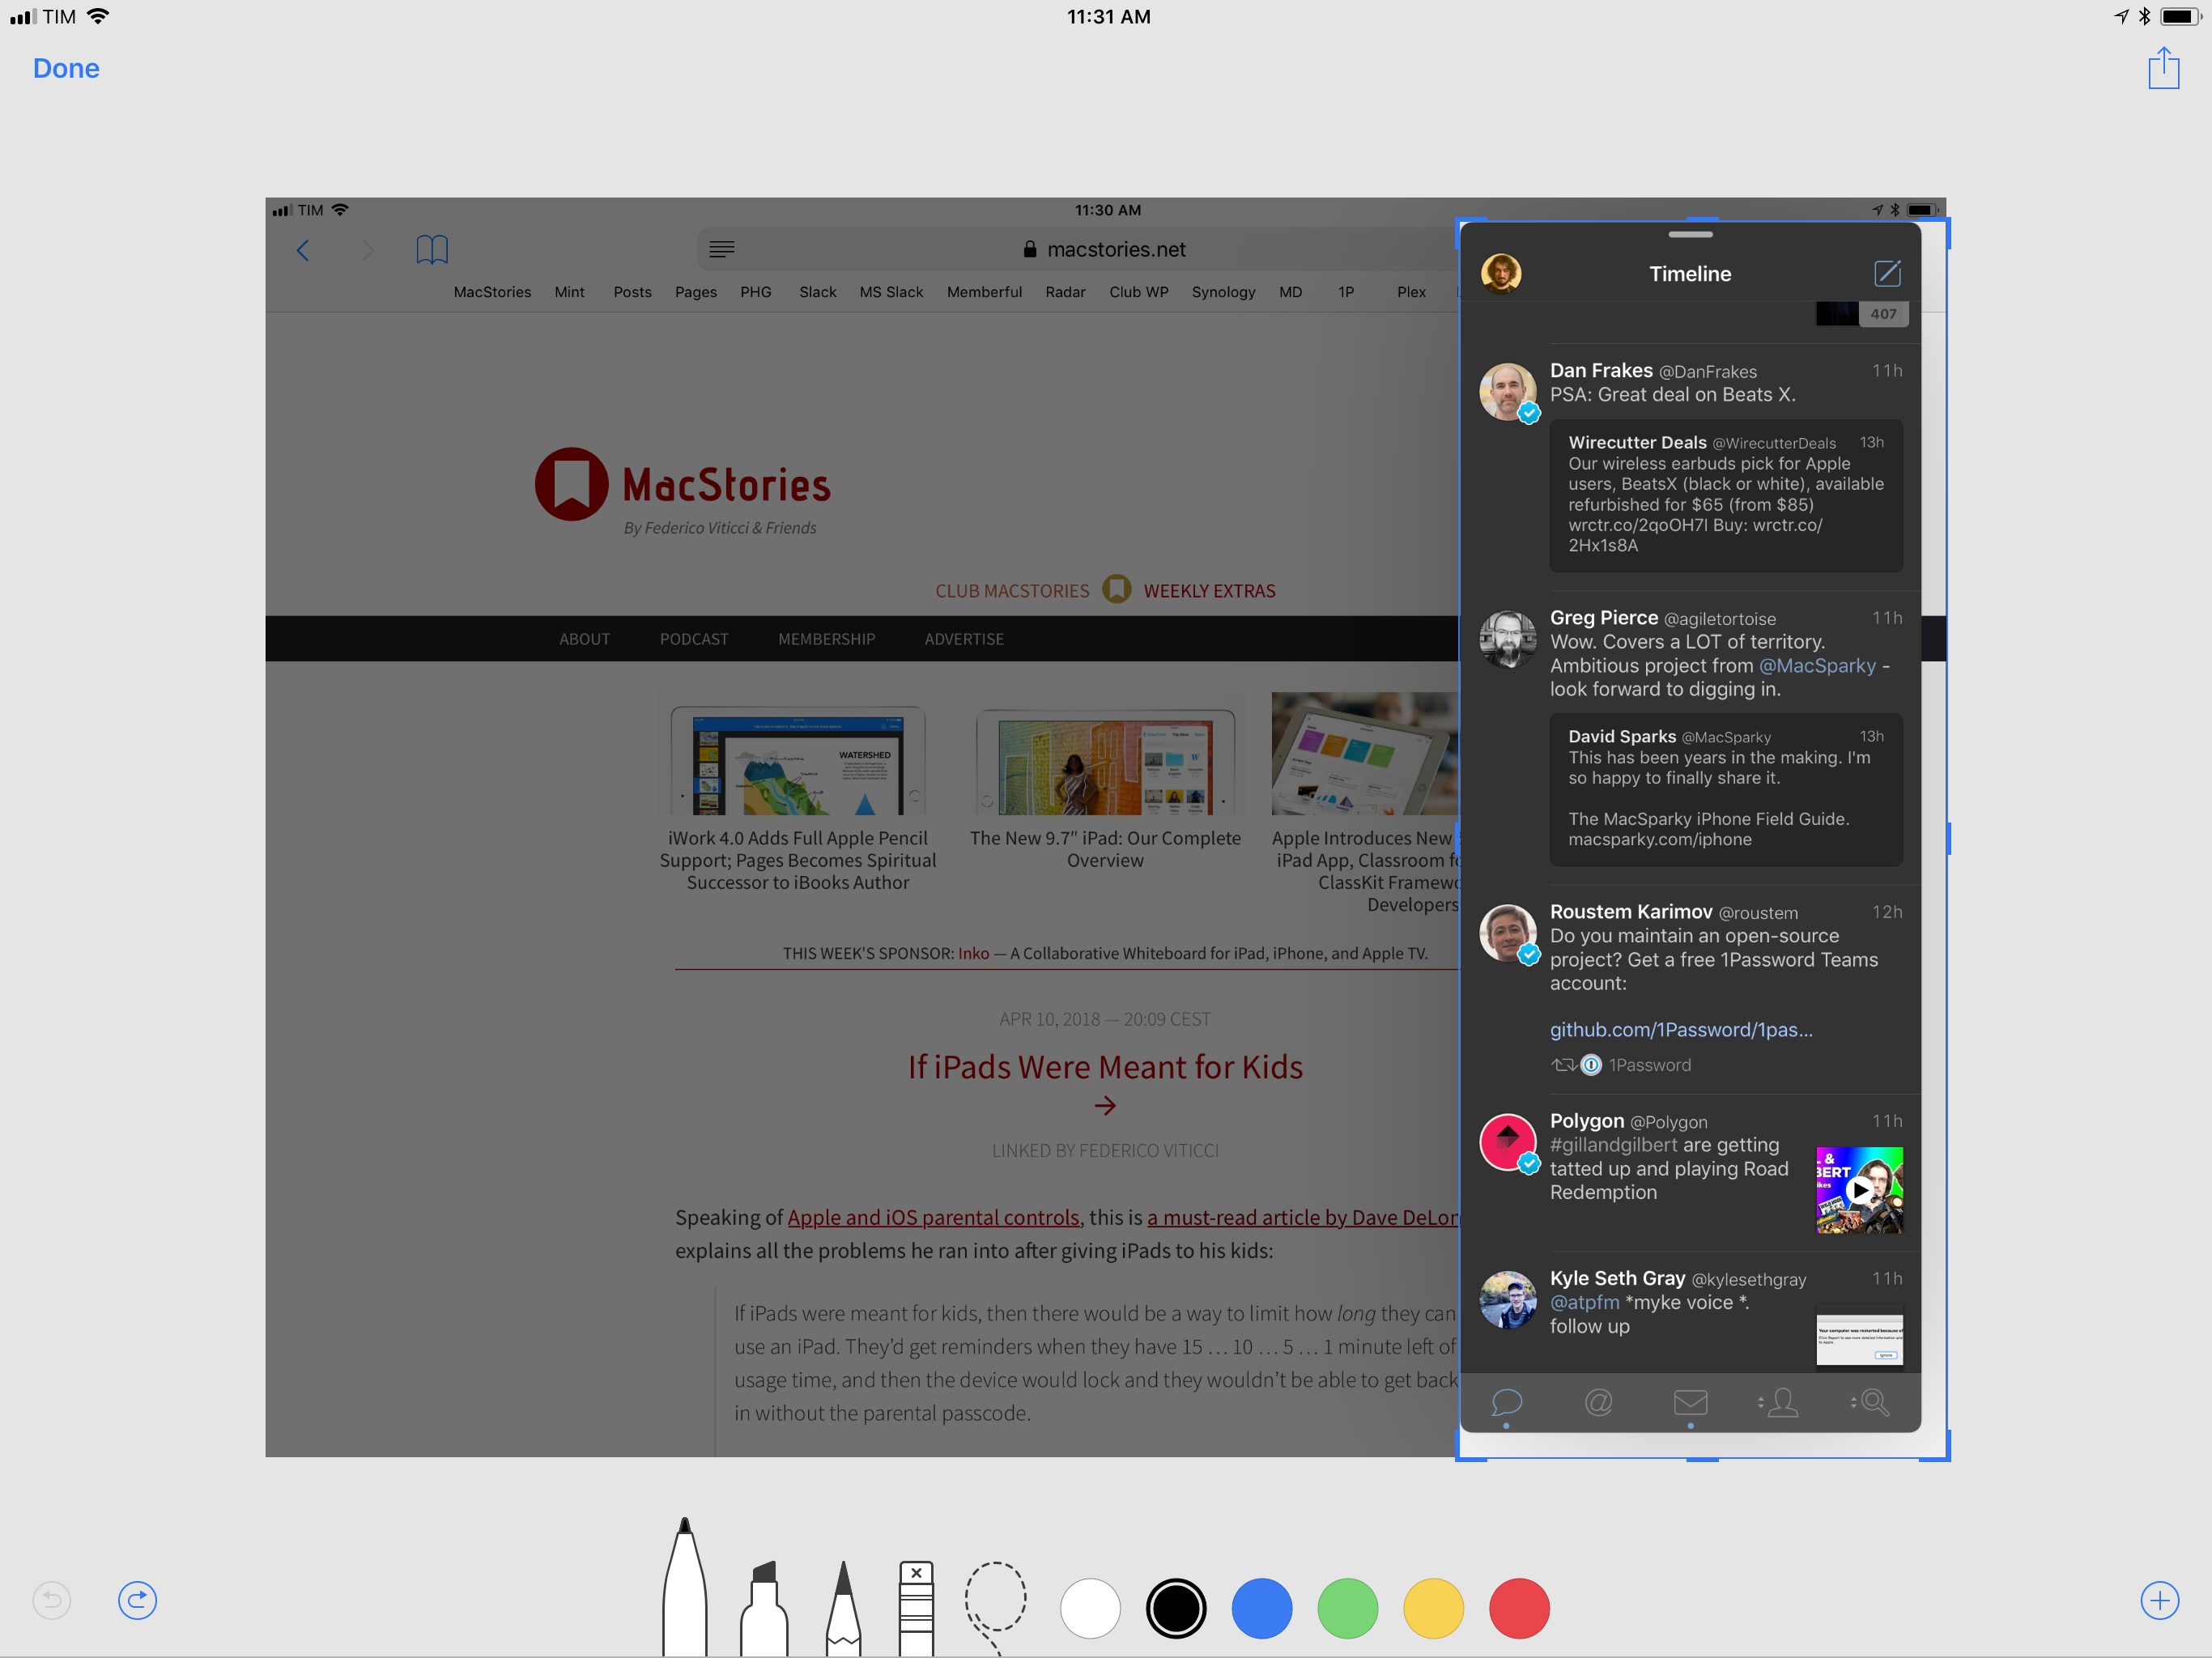
The crop tool automatically snaps to the edges of Tweetbot, which is running in Slide Over mode on top of Safari.
This special multitasking crop mode only works from the new screenshot editor of iOS 11; if you save a screenshot to the Photos app then edit it there, the crop tool will no longer recognize multiple apps captured on screen.
Furthermore, while iPad users have long been able to capture a screenshot by pressing the ⇧⌘3 hotkey, iOS 11 introduces ⇧⌘4. This new shortcut takes a screenshot and immediately jumps into the editing UI, removing the need to tap on the floating thumbnail preview to open a screenshot.
Finally, the screenshot’s thumbnail preview is fully compliant with drag and drop and app extensions. After taking a screenshot (or multiple ones in a row), you can tap & hold the screenshot preview and drag it around to drop it into other apps such as Mail or Gladys. If you don’t want to use drag and drop, you can long-press the screenshot preview until the system share sheet appears. I do this all the time to instantly process screenshots with the Workflow extension.
#4: Consider a Smart Keyboard Alternative
For most people, Apple’s Smart Keyboard is a good (albeit slightly expensive) option to complement typing on the iPad with a physical keyboard. Its big advantage, of course, is that it uses the Smart Connector in lieu of Bluetooth, so you never have to worry about pairing and battery life. It’s also thin and light, making it an ideal choice if you plan on typing on an iPad that you’re frequently carrying around.
For all its nice perks, however, the Smart Keyboard also has some serious drawbacks – particularly for users who need to type on a large iPad Pro that usually sits on a desk.
Most notably, the Smart Keyboard is not backlit: unless you’re an extremely proficient touch typist, typing in dark environments will be a challenge as you won’t see the keycaps’ labels. The Smart Keyboard’s other big problem is its lack of additional function keys to activate system features or simulate physical buttons. When you use a Smart Keyboard, you’re more likely to be forced to reach out to the screen with your hand because iOS’ native keyboard shortcuts only support a subset of system functionalities.
Which brings me to my keyboard recommendation: if you want to use an iPad as a laptop replacement with lots of typing involved, you should consider a Smart Keyboard alternative. Whether it’s a Smart Connector-enabled keyboard (such as Logitech’s Slim Combo line), a keyboard case setup, or an external Bluetooth keyboard paired with an iPad stand, my suggestion is to get your hands1 on a backlit keyboard that offers good battery life, multiple levels of backlight illumination, and an extra row of physical function keys mapped to iOS system features and media controls.
For the past few months, I’ve been using a Brydge keyboard with my 12.9” iPad Pro. This keyboard, besides being backlit and similar to a 2015 MacBook Pro keyboard in style and feel, comes with physical Siri and Home button keys that can be pressed to open the assistant and exit apps, respectively. The Siri key is effective when combined with Type to Siri (more on this below) and the Home key can even be double-tapped and long-pressed to enter the multitasking switcher or summon Siri.
Furthermore, the keyboard’s function row contains keys to control media playback and brightness (for both the system and the keyboard itself), show the software keyboard (useful to manually switch to the emoji picker), and lock the iPad. I’ve really enjoyed working on longform pieces with this keyboard – it’s the closest I’ve ever gotten to the dream of a real iPad laptop.
Brydge keyboards, unfortunately, are notoriously affected by quality problems that result in defective units that “drop” keystrokes. I know because I’ve been in that situation twice: I had to send my first two Brydge keyboards back to Amazon because it was impossible to type on them. I got lucky the third time. If you get a Brydge keyboard but it’s not working properly, and if you like the form factor, return it and repeat the cycle until you get a fully functioning one. Trust me – it’s worth it.
In addition to the Brydge keyboard, there are two other iPad keyboard setups I’ve tested over the years that I can safely recommend:
Logitech Slim Combo keyboard case. It’s bulky and made of plastic, but the case features an adjustable kickstand and has a Pencil holder at the top. The big advantage of the Slim Combo is that it uses the Smart Connector, just like Apple’s Smart Keyboard. The keyboard, which is backlit, replaces the Siri key with a dedicated Spotlight key. I used this keyboard for months before I moved to the Brydge.
Apple Magic Keyboard + Canopy + Smart Cover. Even though it’s not backlit, I like the feel and reliability of Apple’s Magic Keyboard. I also appreciate that I can charge it with a Lightning connector instead of micro-USB like other Bluetooth keyboards. Studio Neat’s Canopy is my favorite solution to carry the Magic Keyboard around and prop the iPad up at a good viewing angle. When you don’t need to use the Magic Keyboard anymore, you can close the Canopy and go back to using the iPad with a Smart Cover attached. This setup is how I wrote my iOS 11 review last year, and I recommend it if you already own a Magic Keyboard.
While Apple should do a better job at integrating external keyboard controls with iOS’ system navigation (for instance, you still can’t control Split View and Control Center with the keyboard), using a good keyboard with iOS 11 can considerably improve your iPad workflow. Whatever you end up choosing, I suggest getting a keyboard that features additional function keys and is backlit. And if you decide to try the Brydge lottery: good luck.
#5: Use Favorites in the Files App
As I argued in my review of iOS 11, the new Files app is the natural culmination of a new concept of file management that combines the traditional Finder model with an app-centric approach. While Files has a long way to go – in terms of stability, customization, and advanced integrations – I believe Apple has correctly identified the best path forward with this new app.
The ‘Favorites’ feature of Files’ sidebar is a great example of how it aims to combine classic folder-based navigation with apps. The Favorites section of the sidebar lets you pin frequently used folders for quick access. However, rather than being limited to iCloud Drive, you can mix and match favorite locations from iCloud and third-party file providers that show up under the ‘Locations’ area of the Files app.
I take advantage of Favorites in a couple of ways. In the Files app, I’ve enabled Dropbox, DEVONthink, iCab, and Working Copy as file providers. This allows me to browse the contents of the apps from Files and therefore manage their documents with the system’s drag and drop framework (which is available for every location in Files). More importantly, because third-party file providers are treated as native locations just like iCloud Drive, my Favorites section now contains folders from multiple sources. In addition to a handful of iCloud Drive folders, I have quick access to a shared folder in Dropbox, a repository in Working Copy, and a group from DEVONthink. This helps me use Files as a centralized location for all my documents, which I can retrieve with a couple of taps.
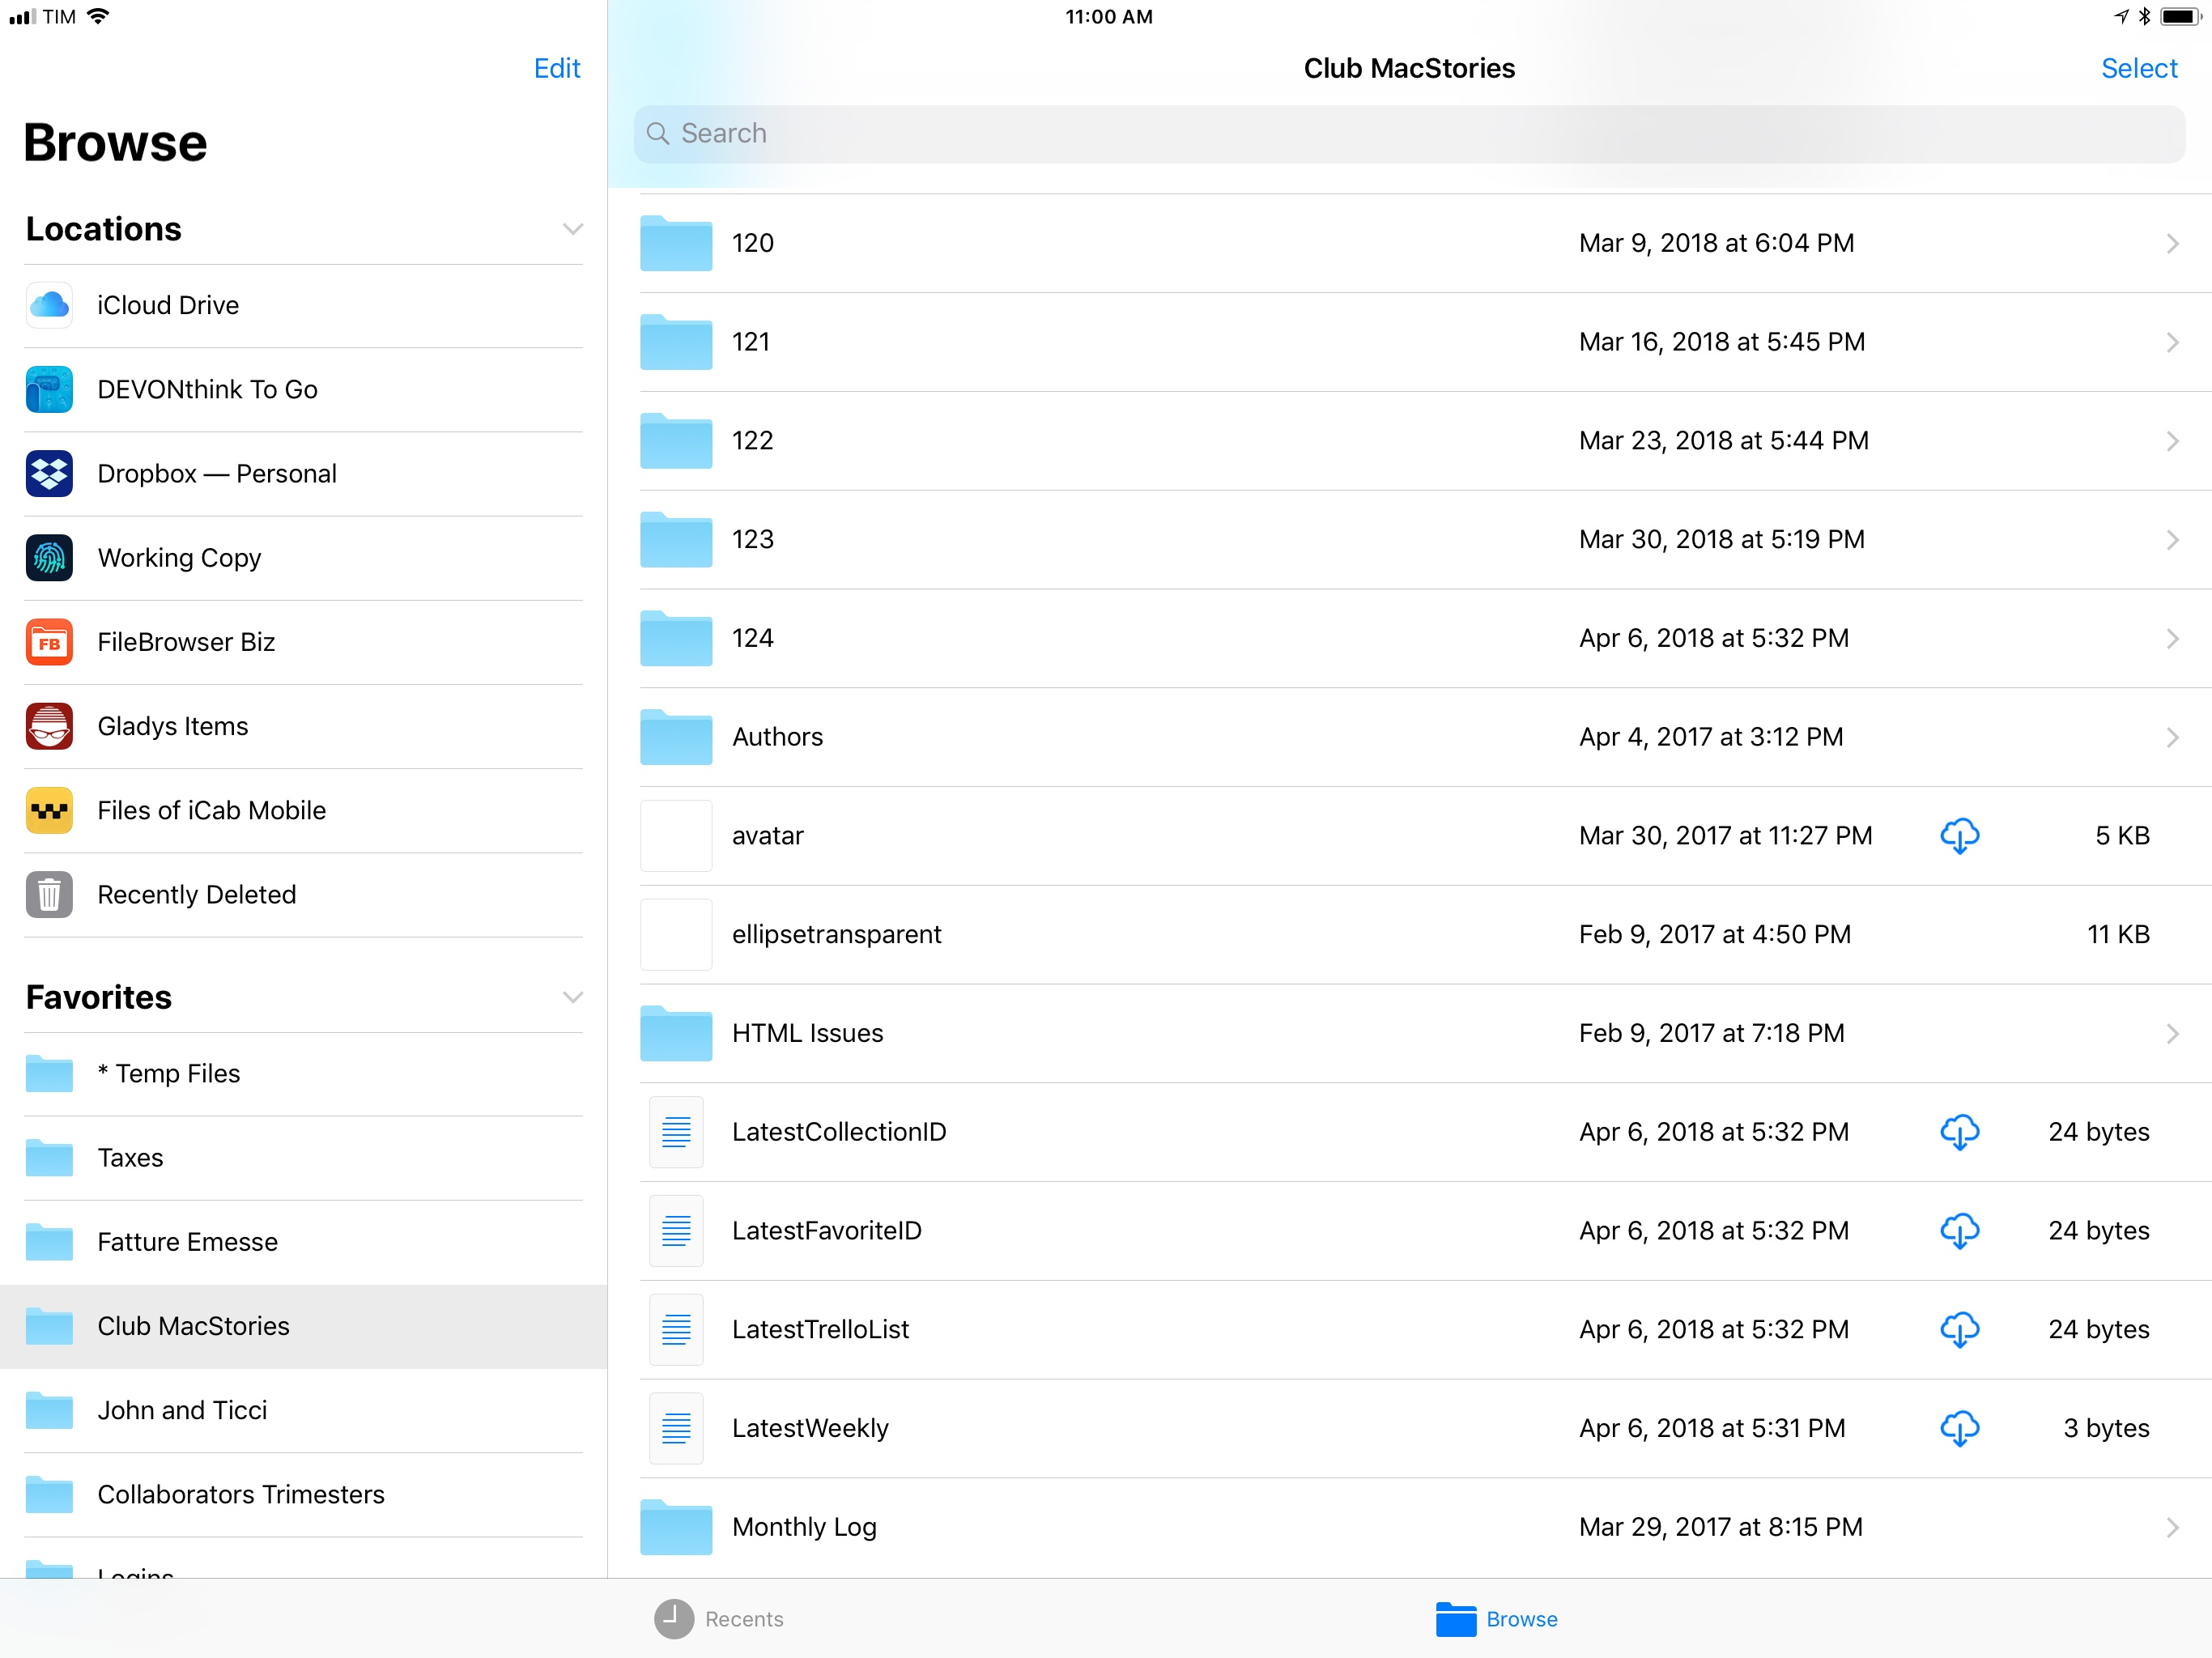
A Dropbox folder accessed as a favorite in Files. Notice how third-party favorites lose the ability to navigate back into previous folders.
For the past few weeks, I’ve also started saving documents that I need to act upon and then delete in a temporary “inbox” in Files that is pinned at the top of my Favorites. If there are any PDF receipts of screenshots I need to process and discard, I can open the first folder in my Favorites to get instant access to those items.
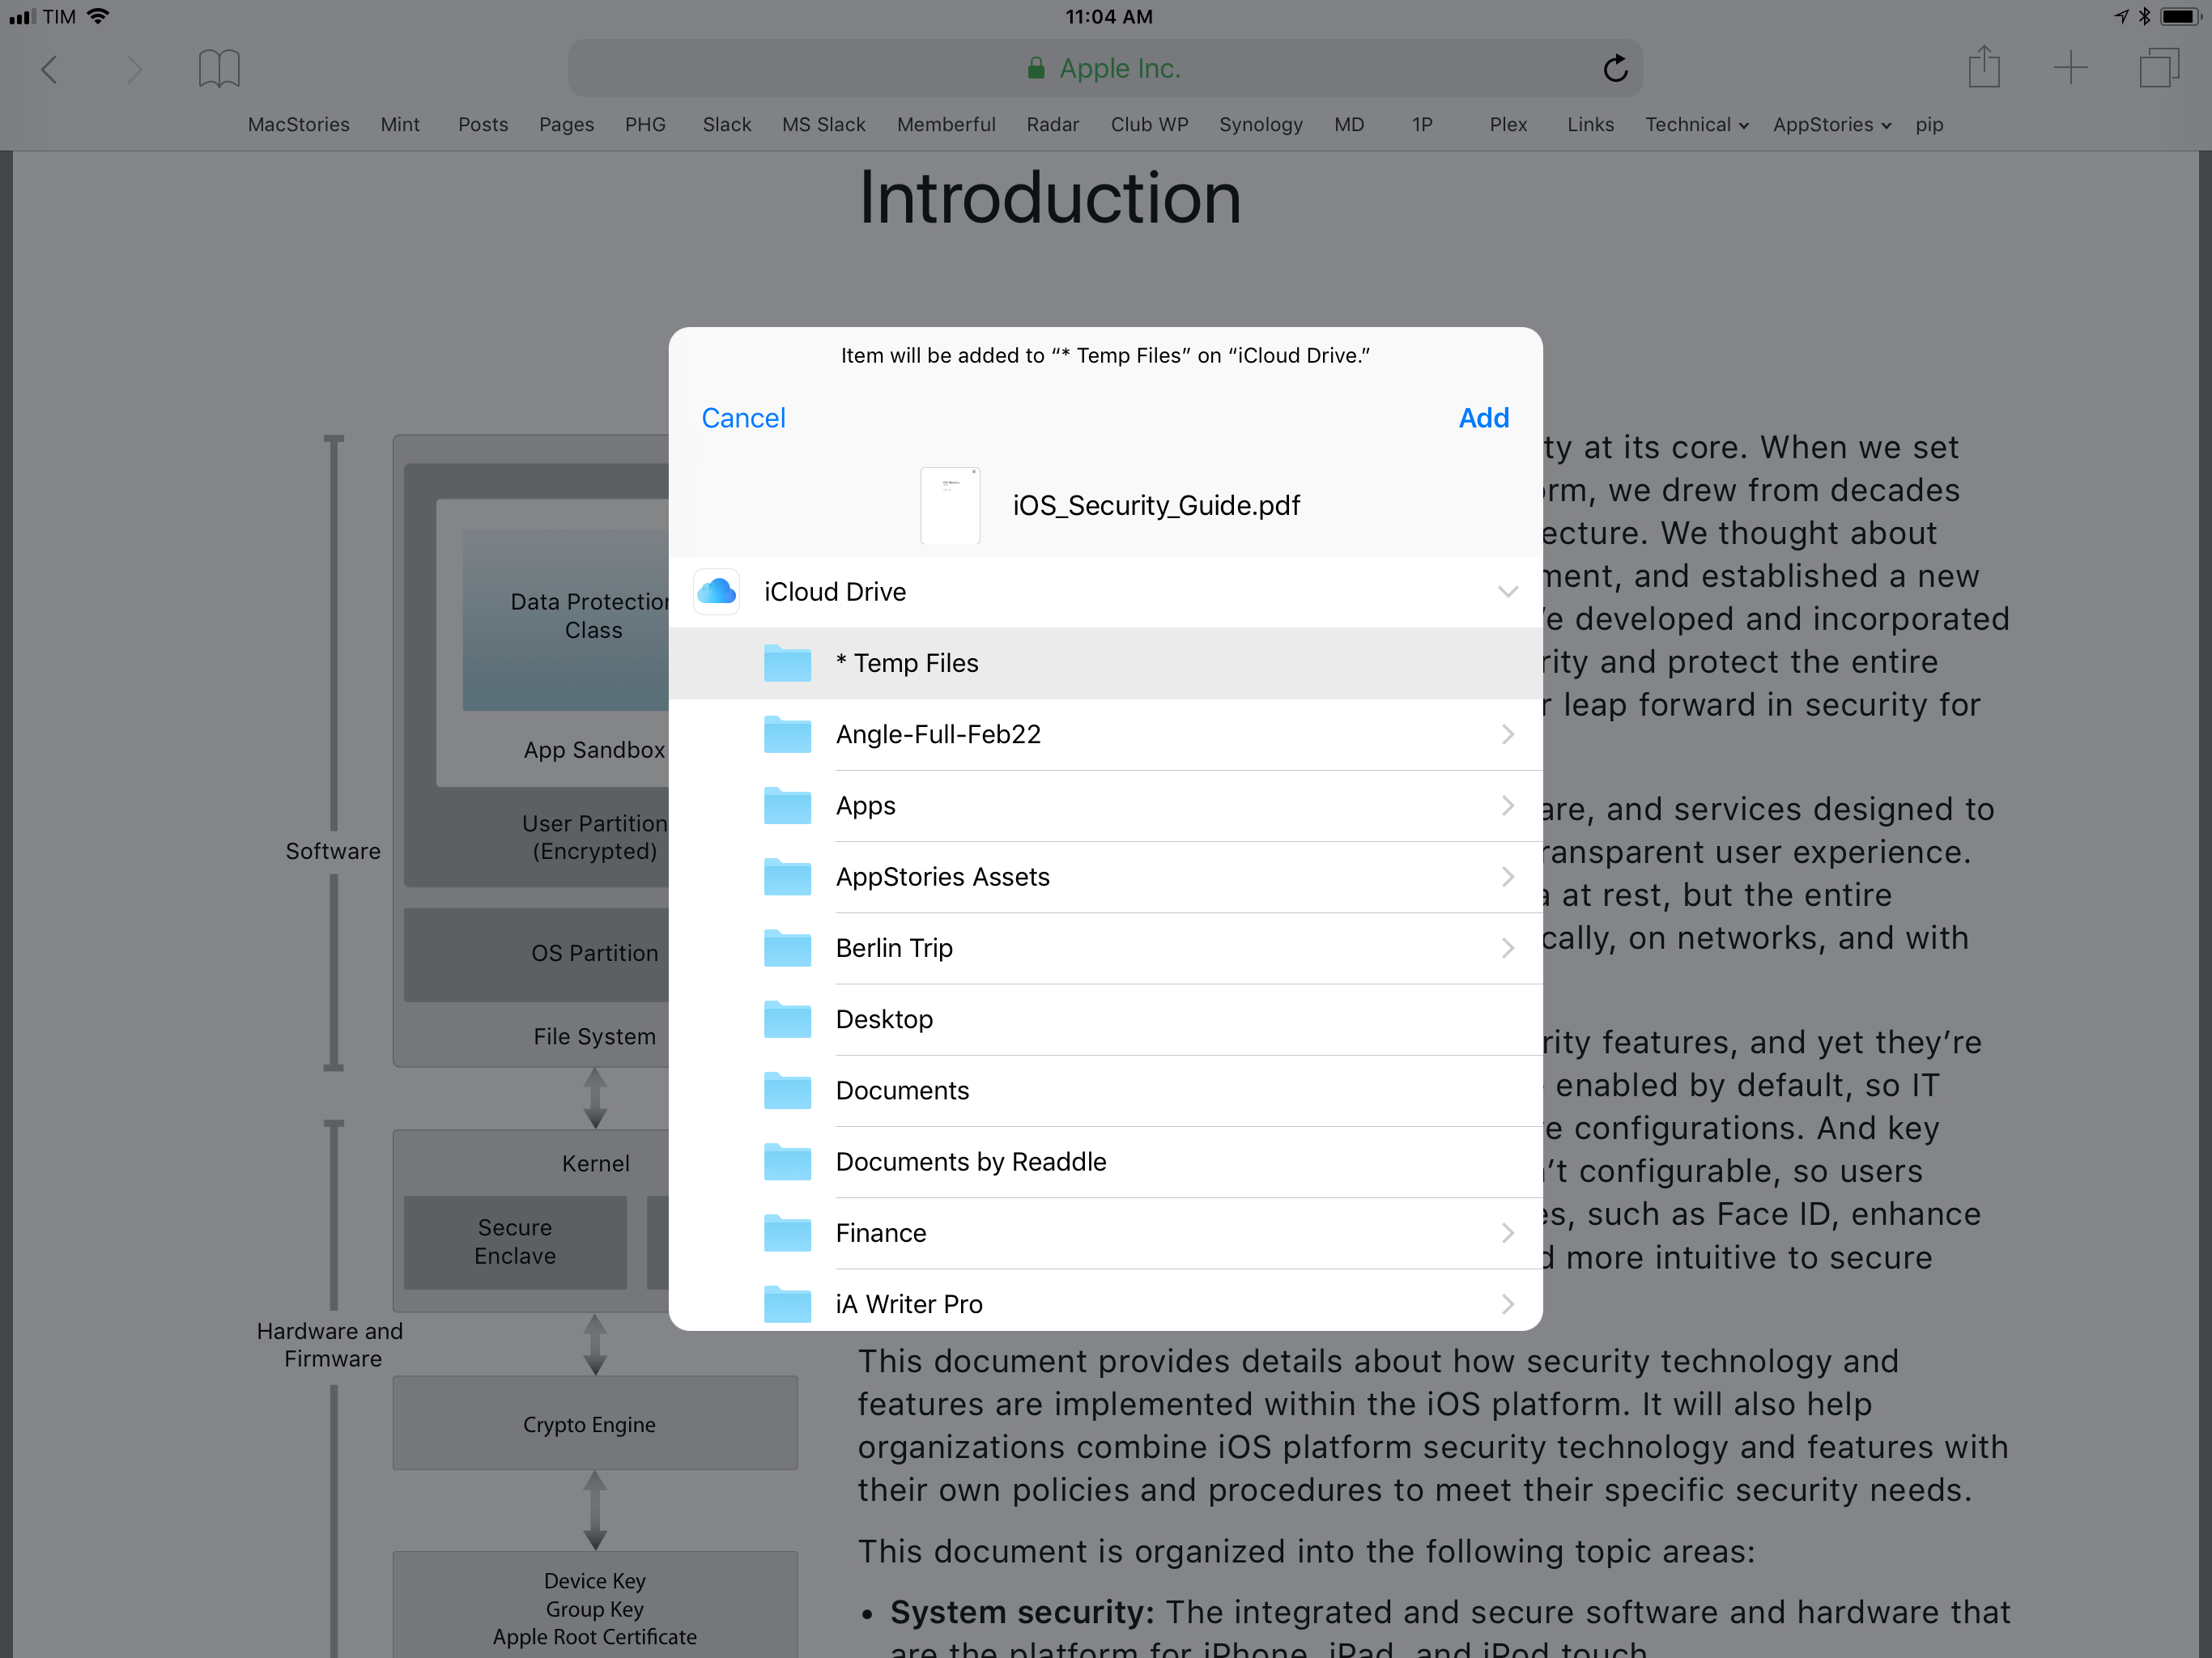
I named this folder ‘* Temp Files’ so that it’s automatically sorted at the top of my iCloud Drive’s main view. This way, the folder is also displayed at the very top of Files’ extension when saving documents from other apps. If I need to save a PDF displayed in Safari, I can invoke the ‘Save to Files’ extension, save the document in the ‘* Temp Files’ folder, and act on it later once I’m back in the Files app.
#6: Get URLs of Mail Messages
Did you know that iOS, just like macOS, supports referencing individual messages in Mail with a message:// protocol? And that this feature, which first appeared in Mac OS X Leopard’s Mail in 2007, can only be controlled by iPad users on iOS thanks to drag and drop and third-party apps?
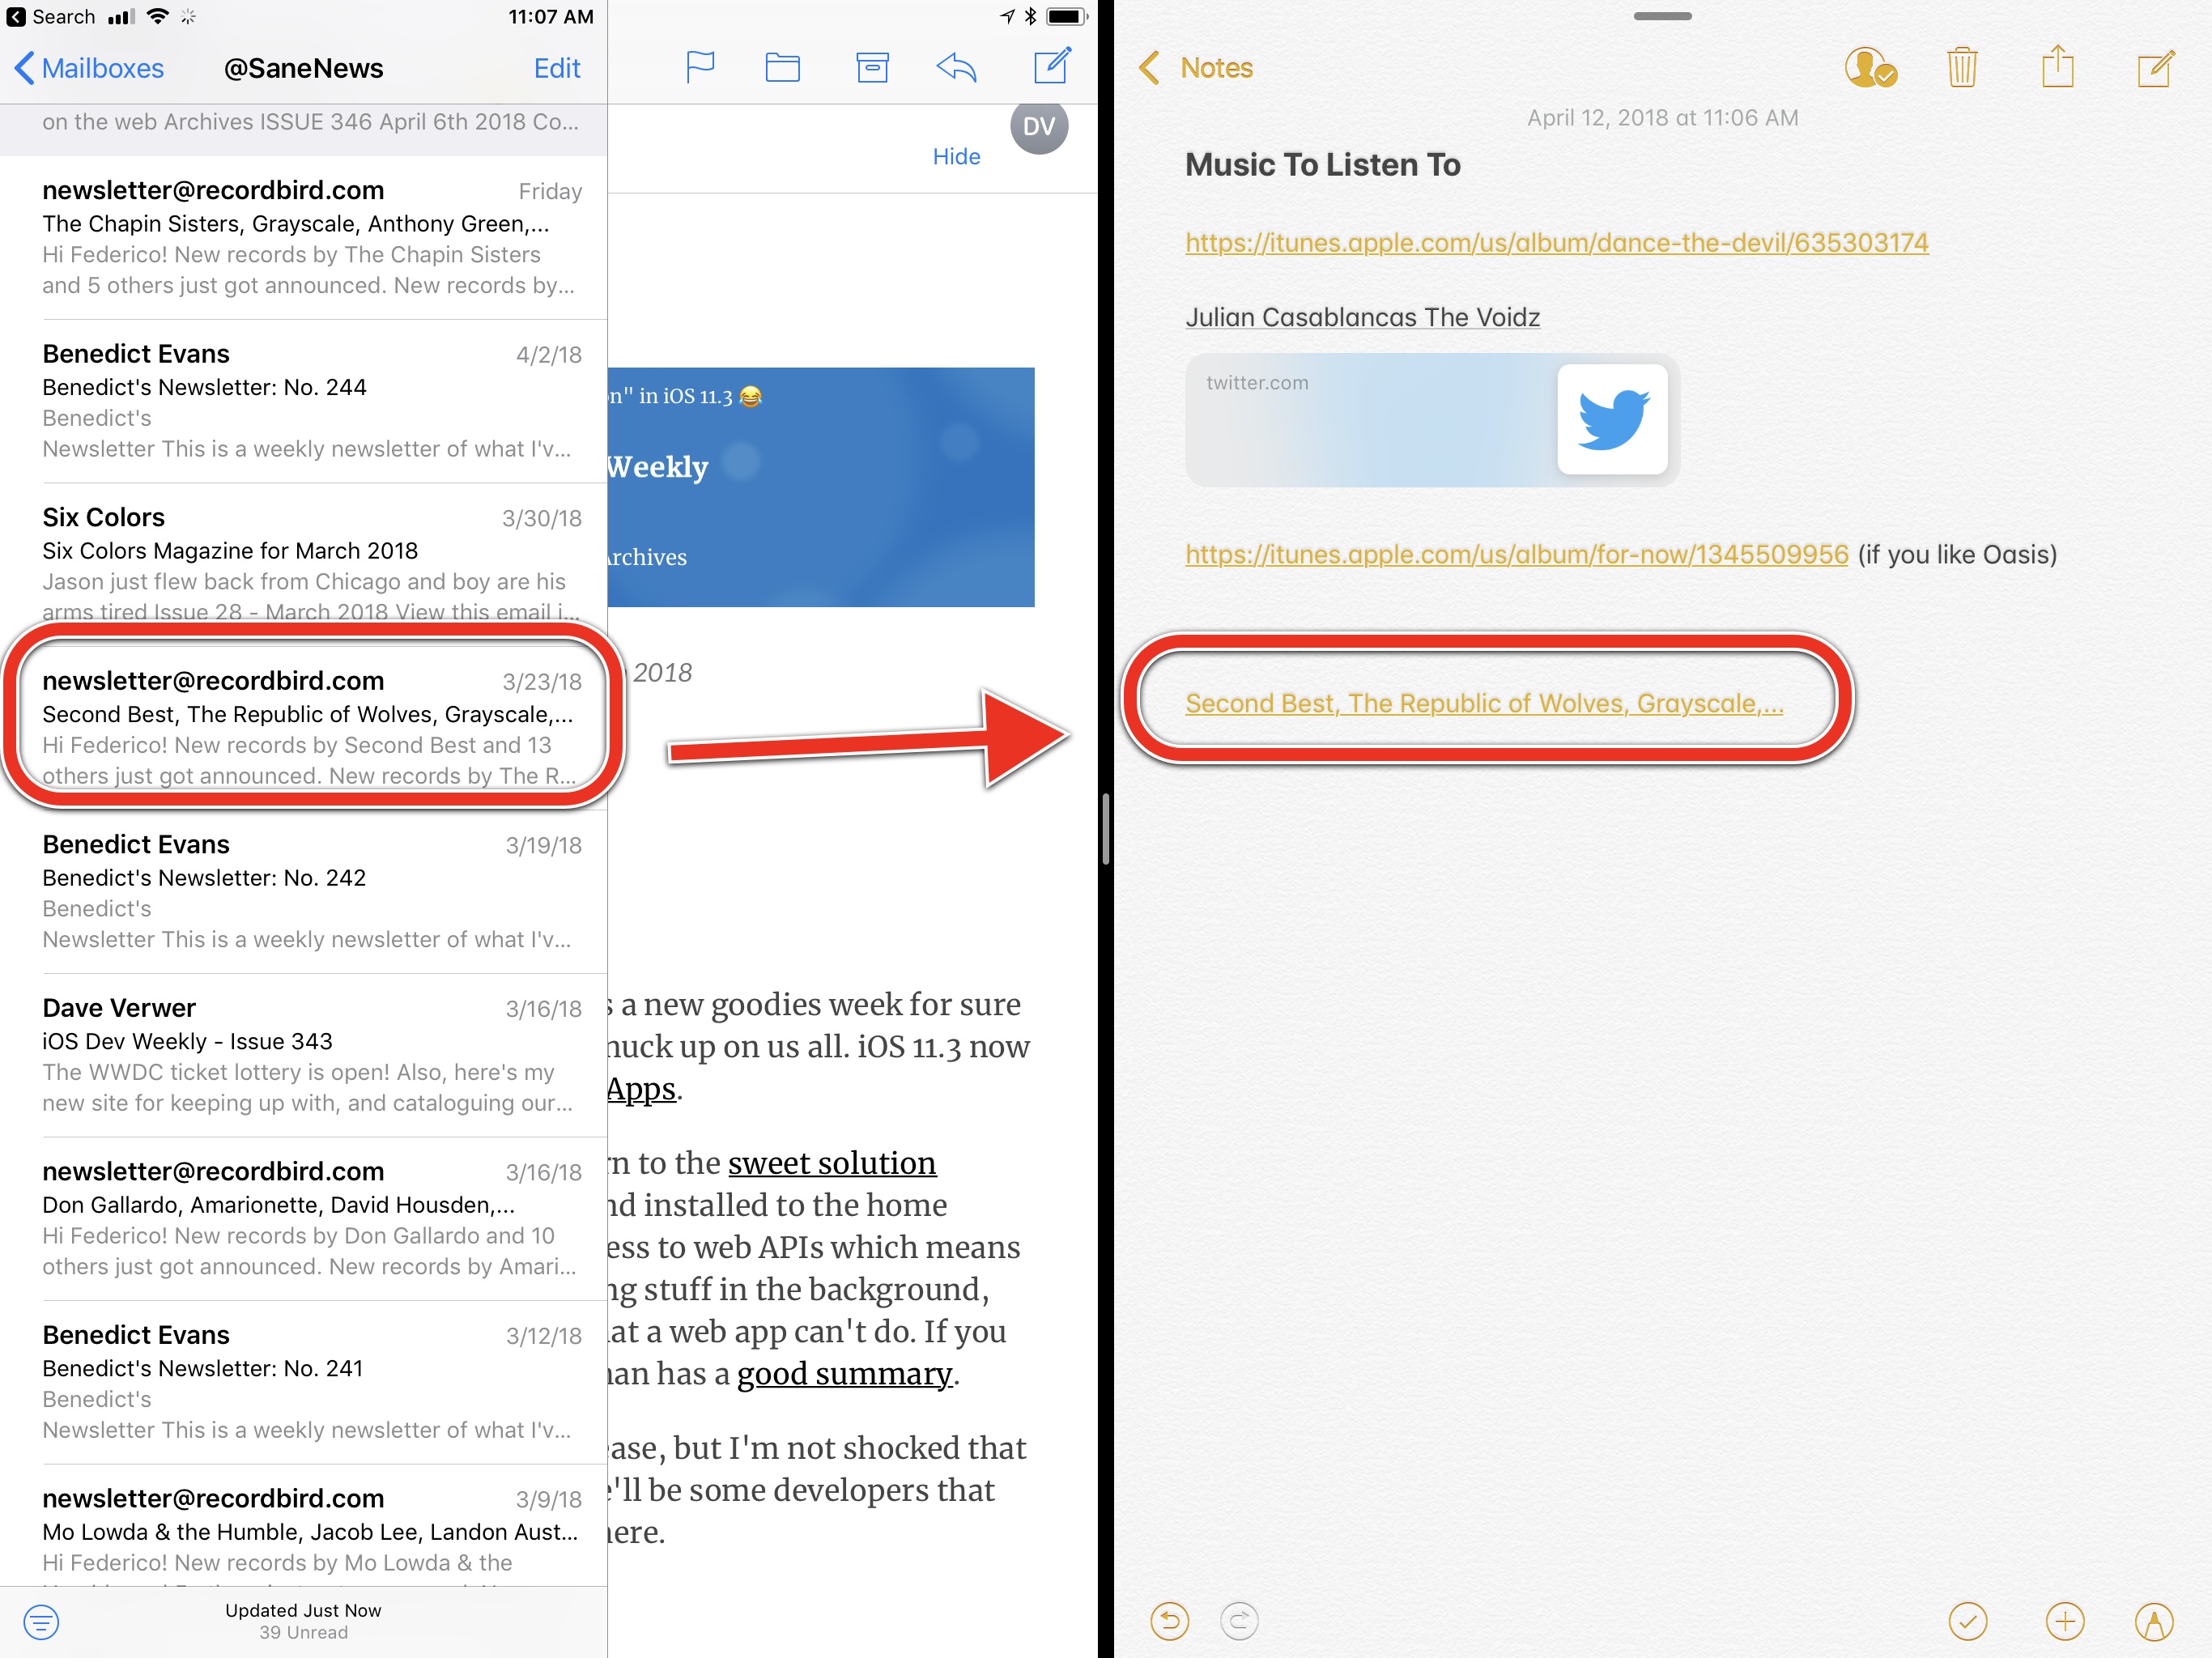
If you’re on an iPad and use Apple Mail, try this: pick up a message from Mail’s inbox and drop it into a note in Apple Notes. You’ll notice that the message gets saved as a link, which you can tap to instantly reopen the message in Mail.
The beautiful aspect of these Mail links is that they keep working even if the message they reference is archived or moved to another folder. Mail’s message links are ideal for task managers and note-taking apps where you may want to save email messages as todos for later.
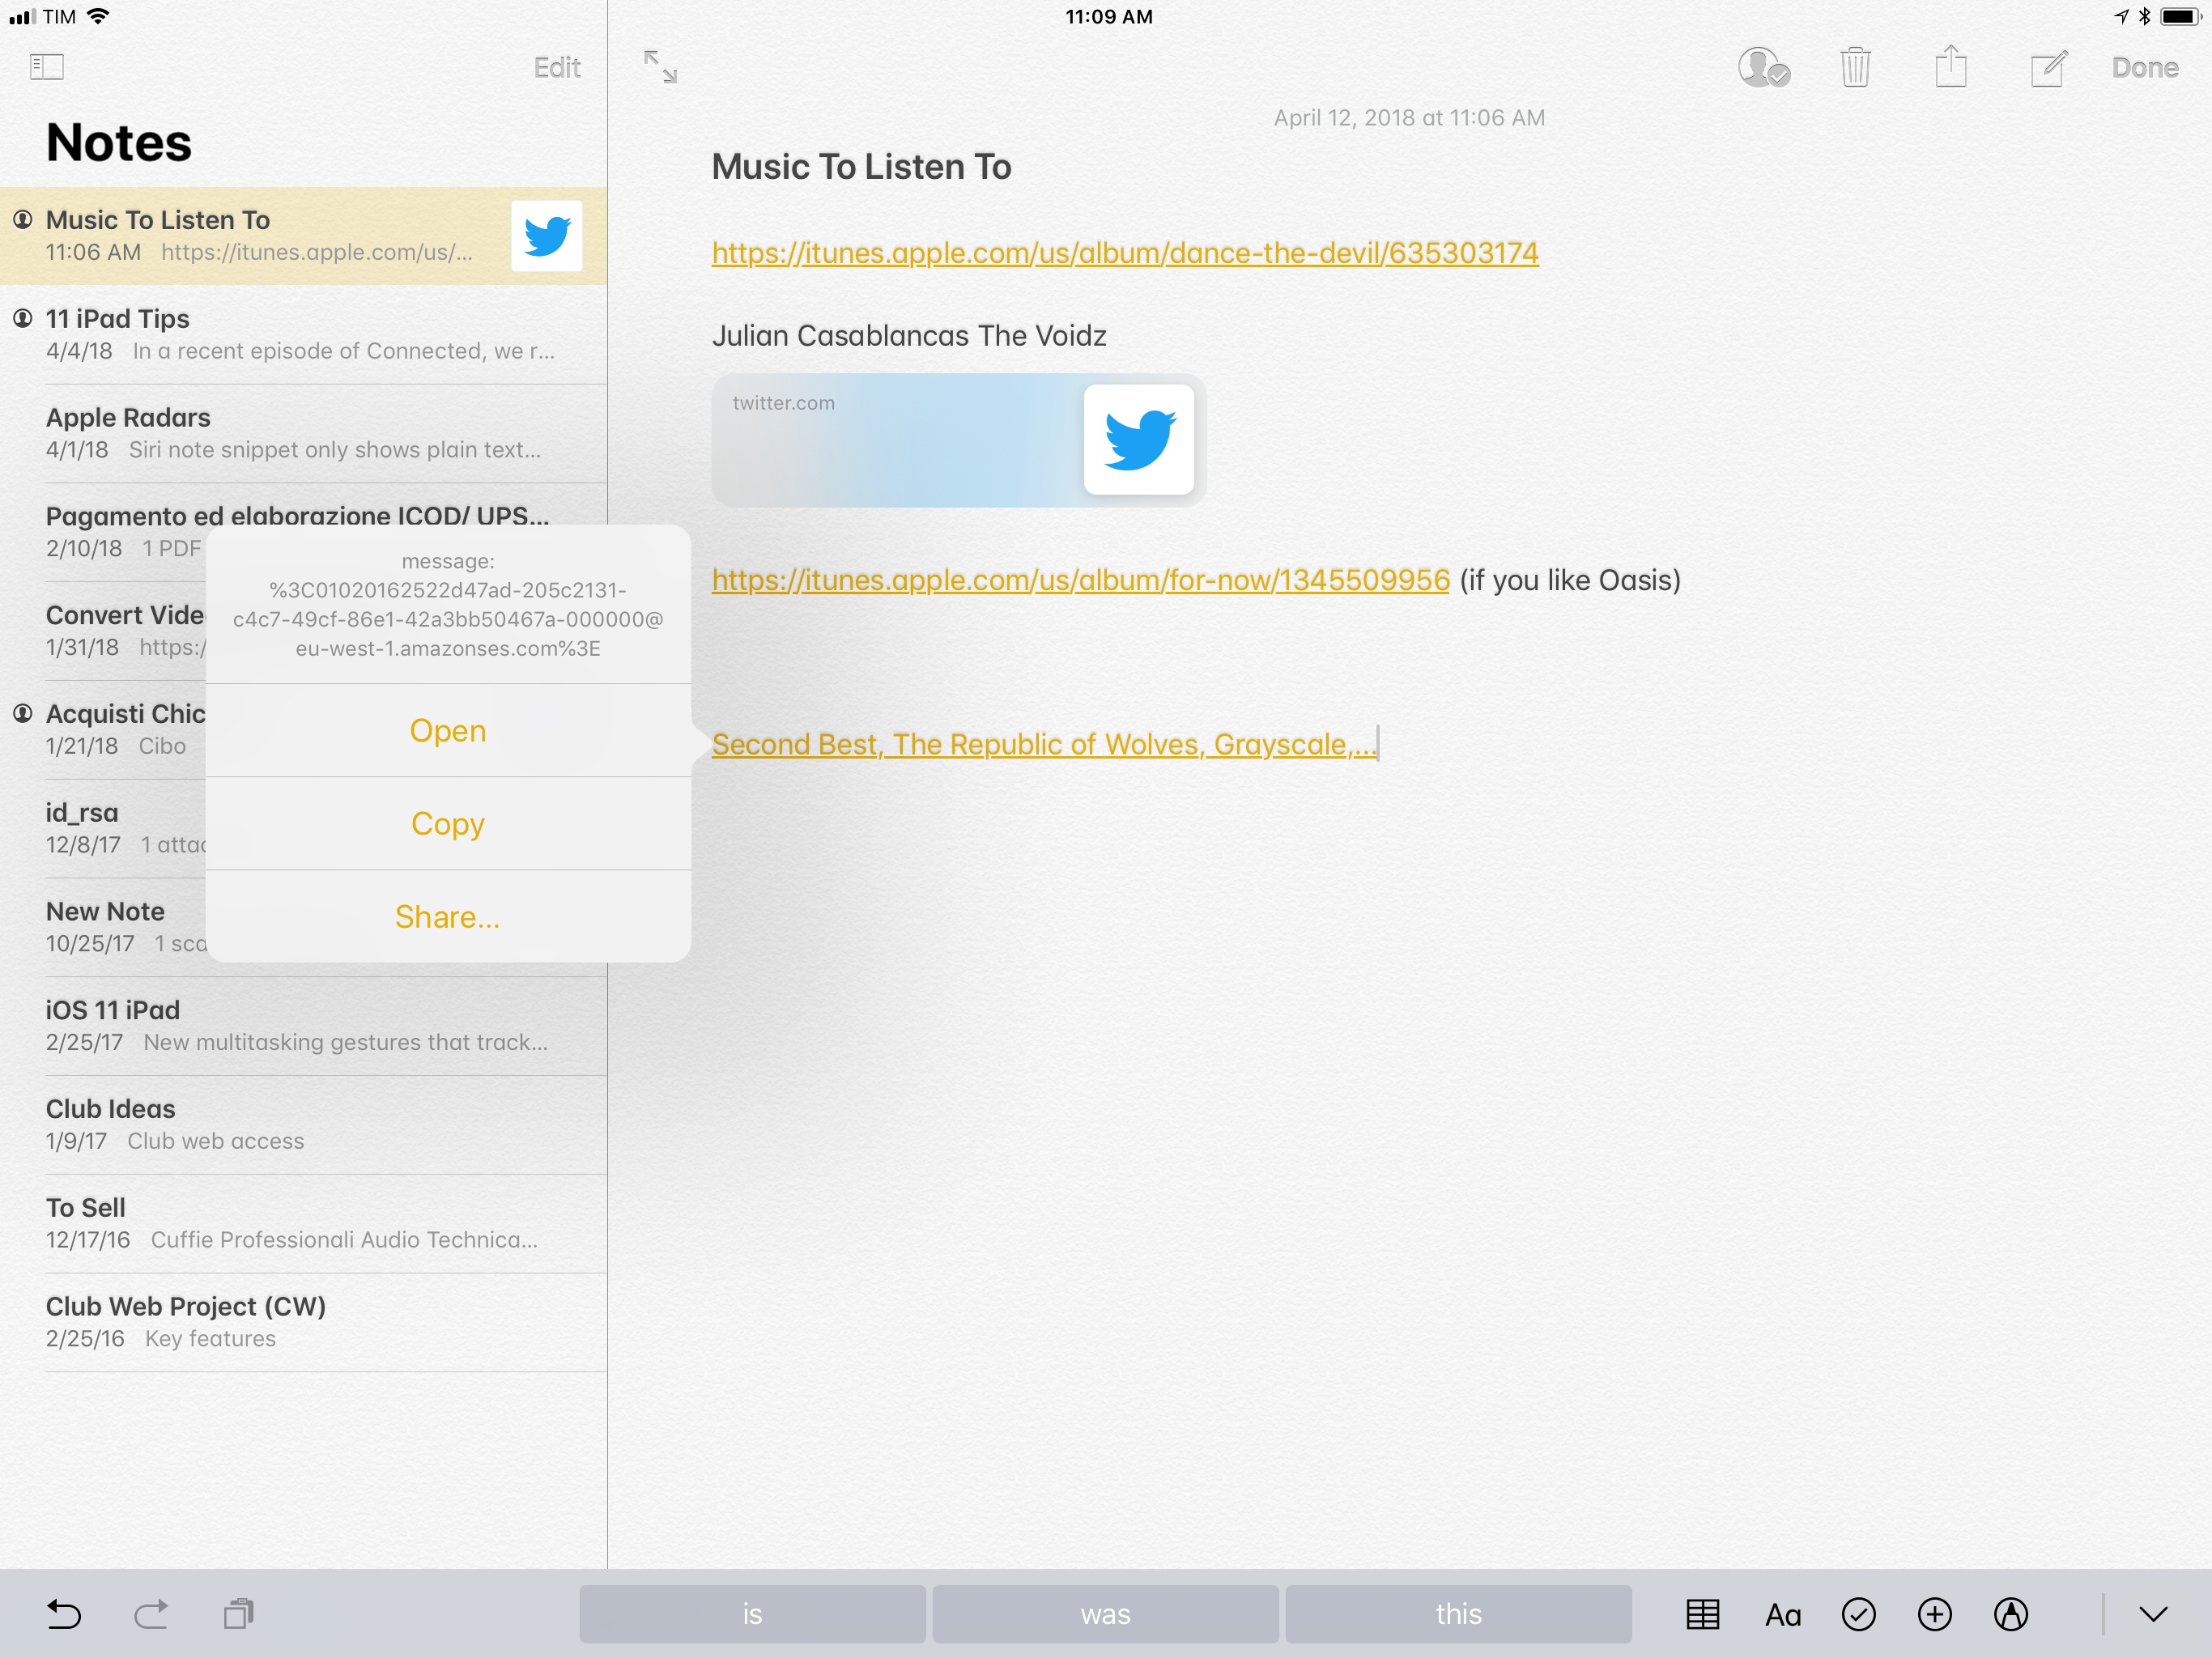
Unfortunately, unlike macOS and its AppleScript support in Mail, there’s no easy way to copy these Mail message links on the iPad. If you use drag and drop with Notes, you can long-press the link to open a menu that lets you copy the URL you can paste elsewhere.
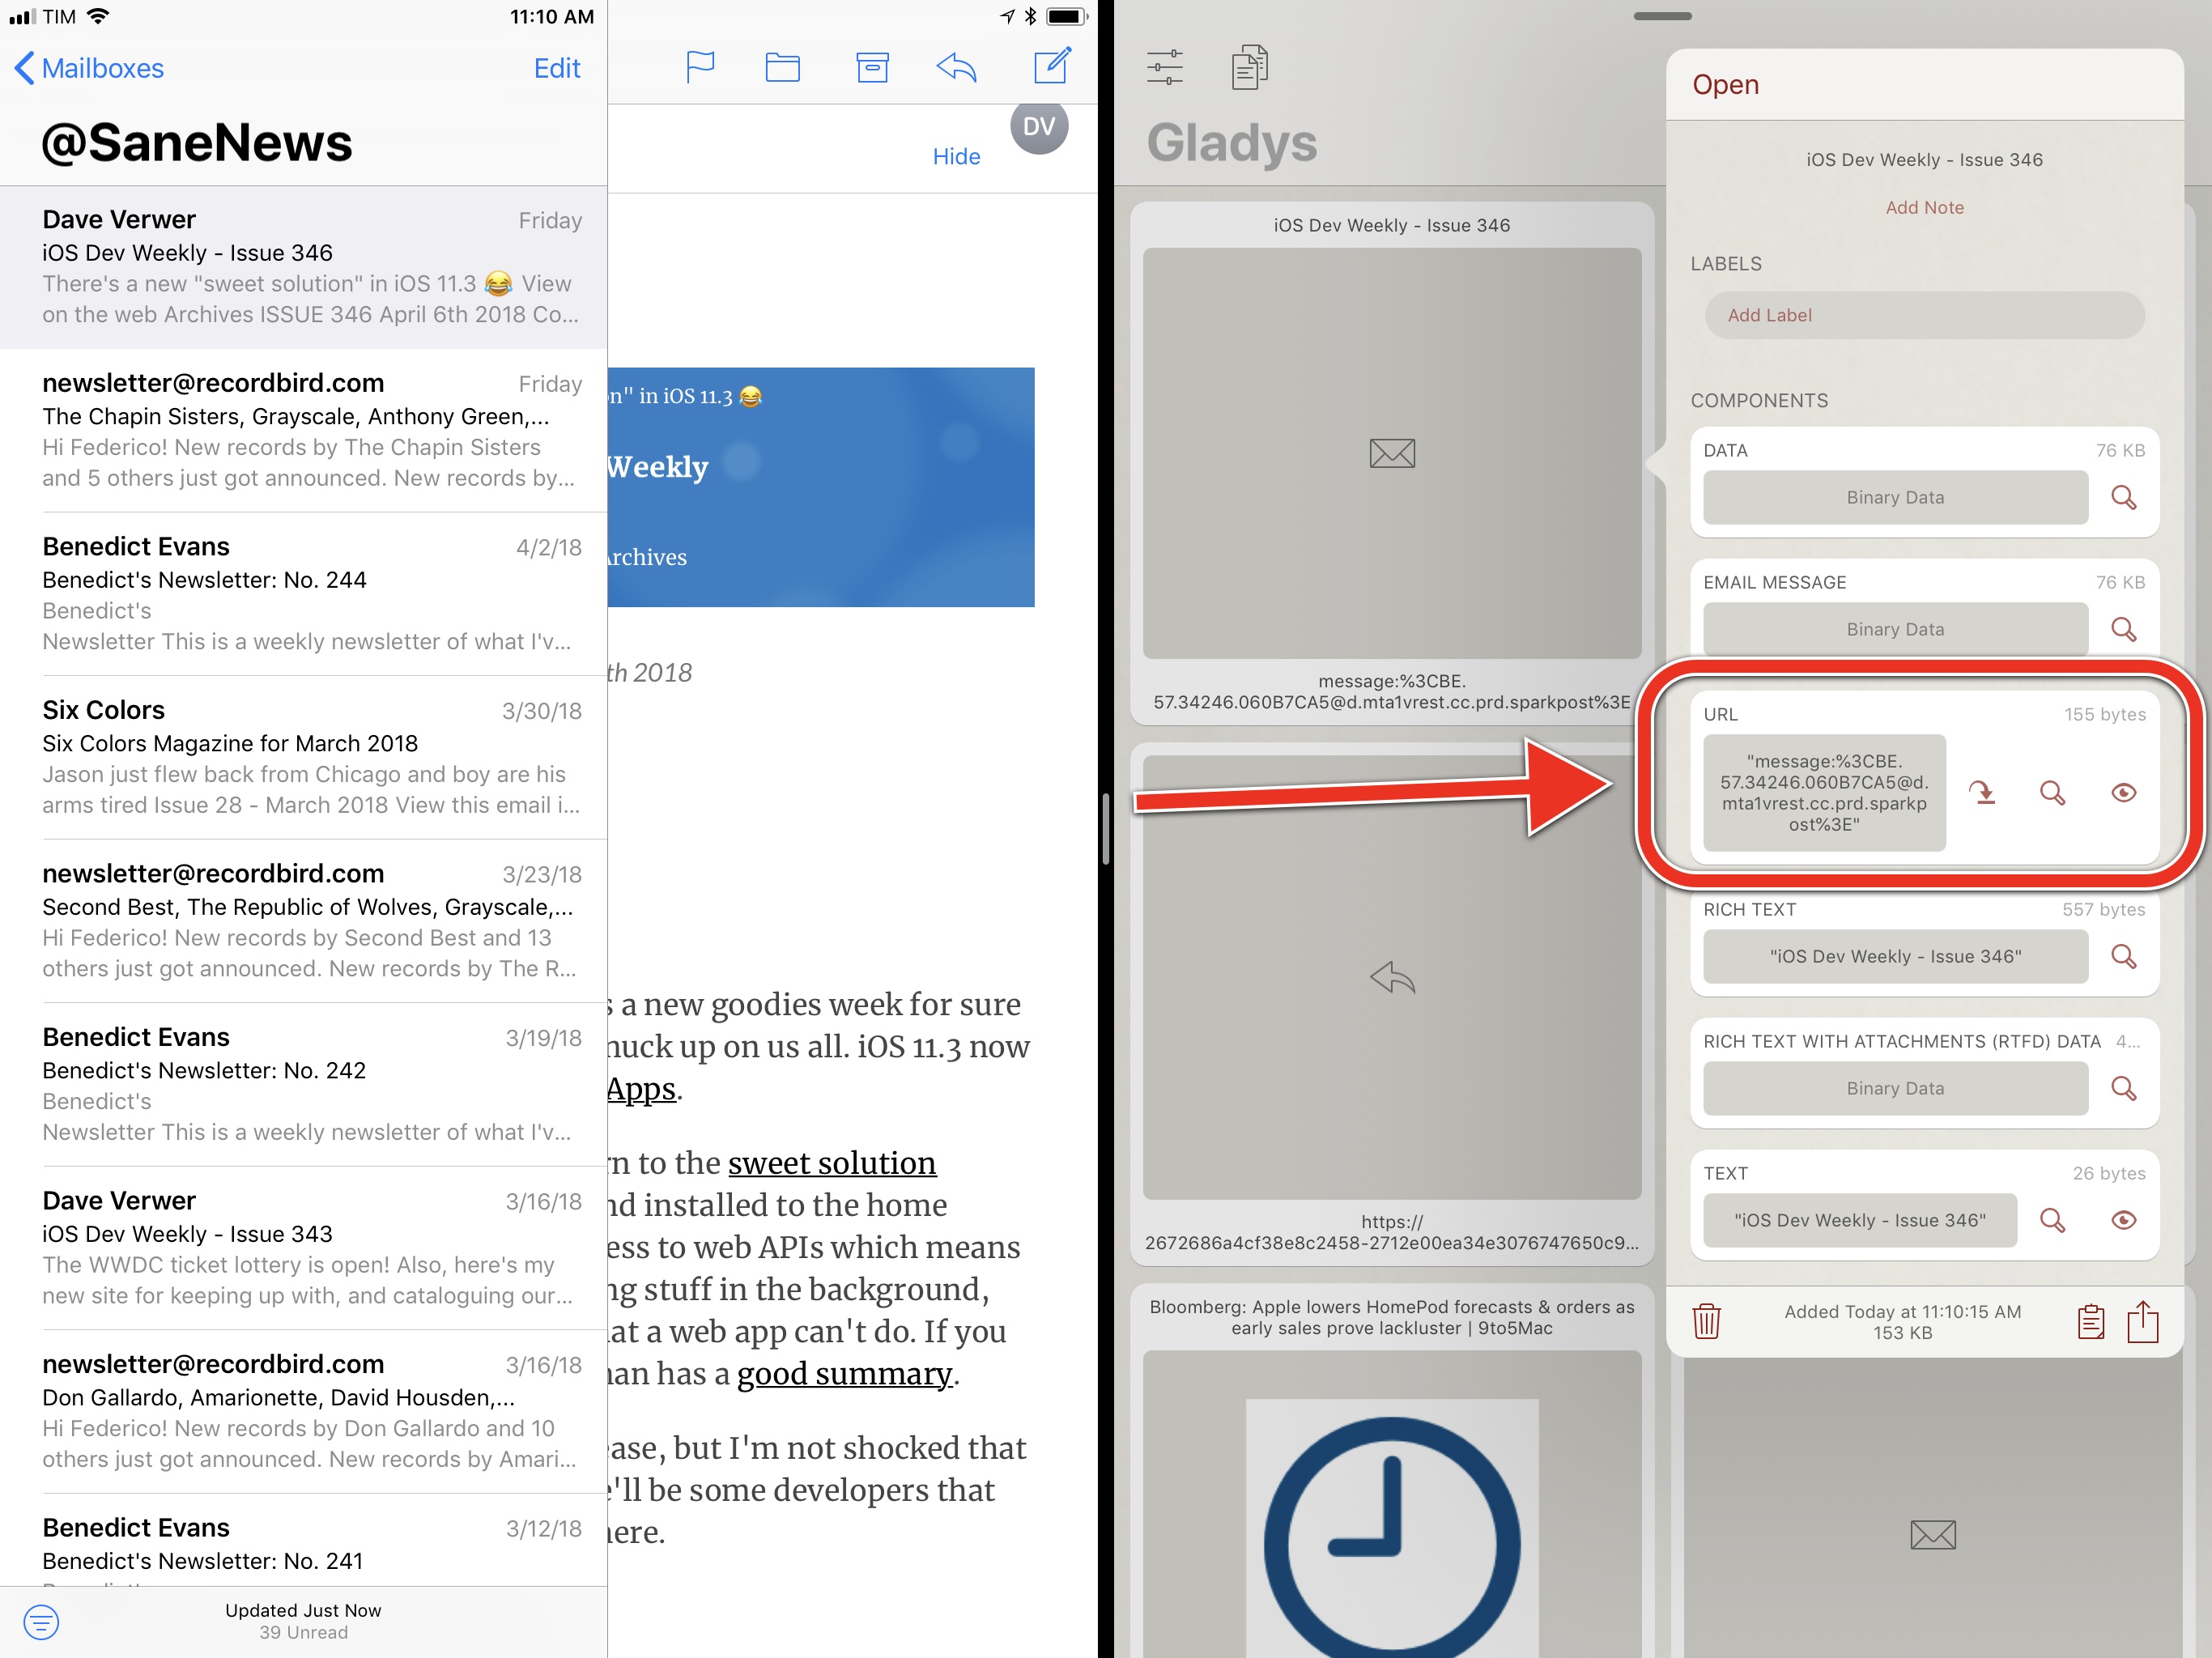
Alternatively, you can use the shelf app Gladys to save an entire email message and only export its URL component to other apps on your device.
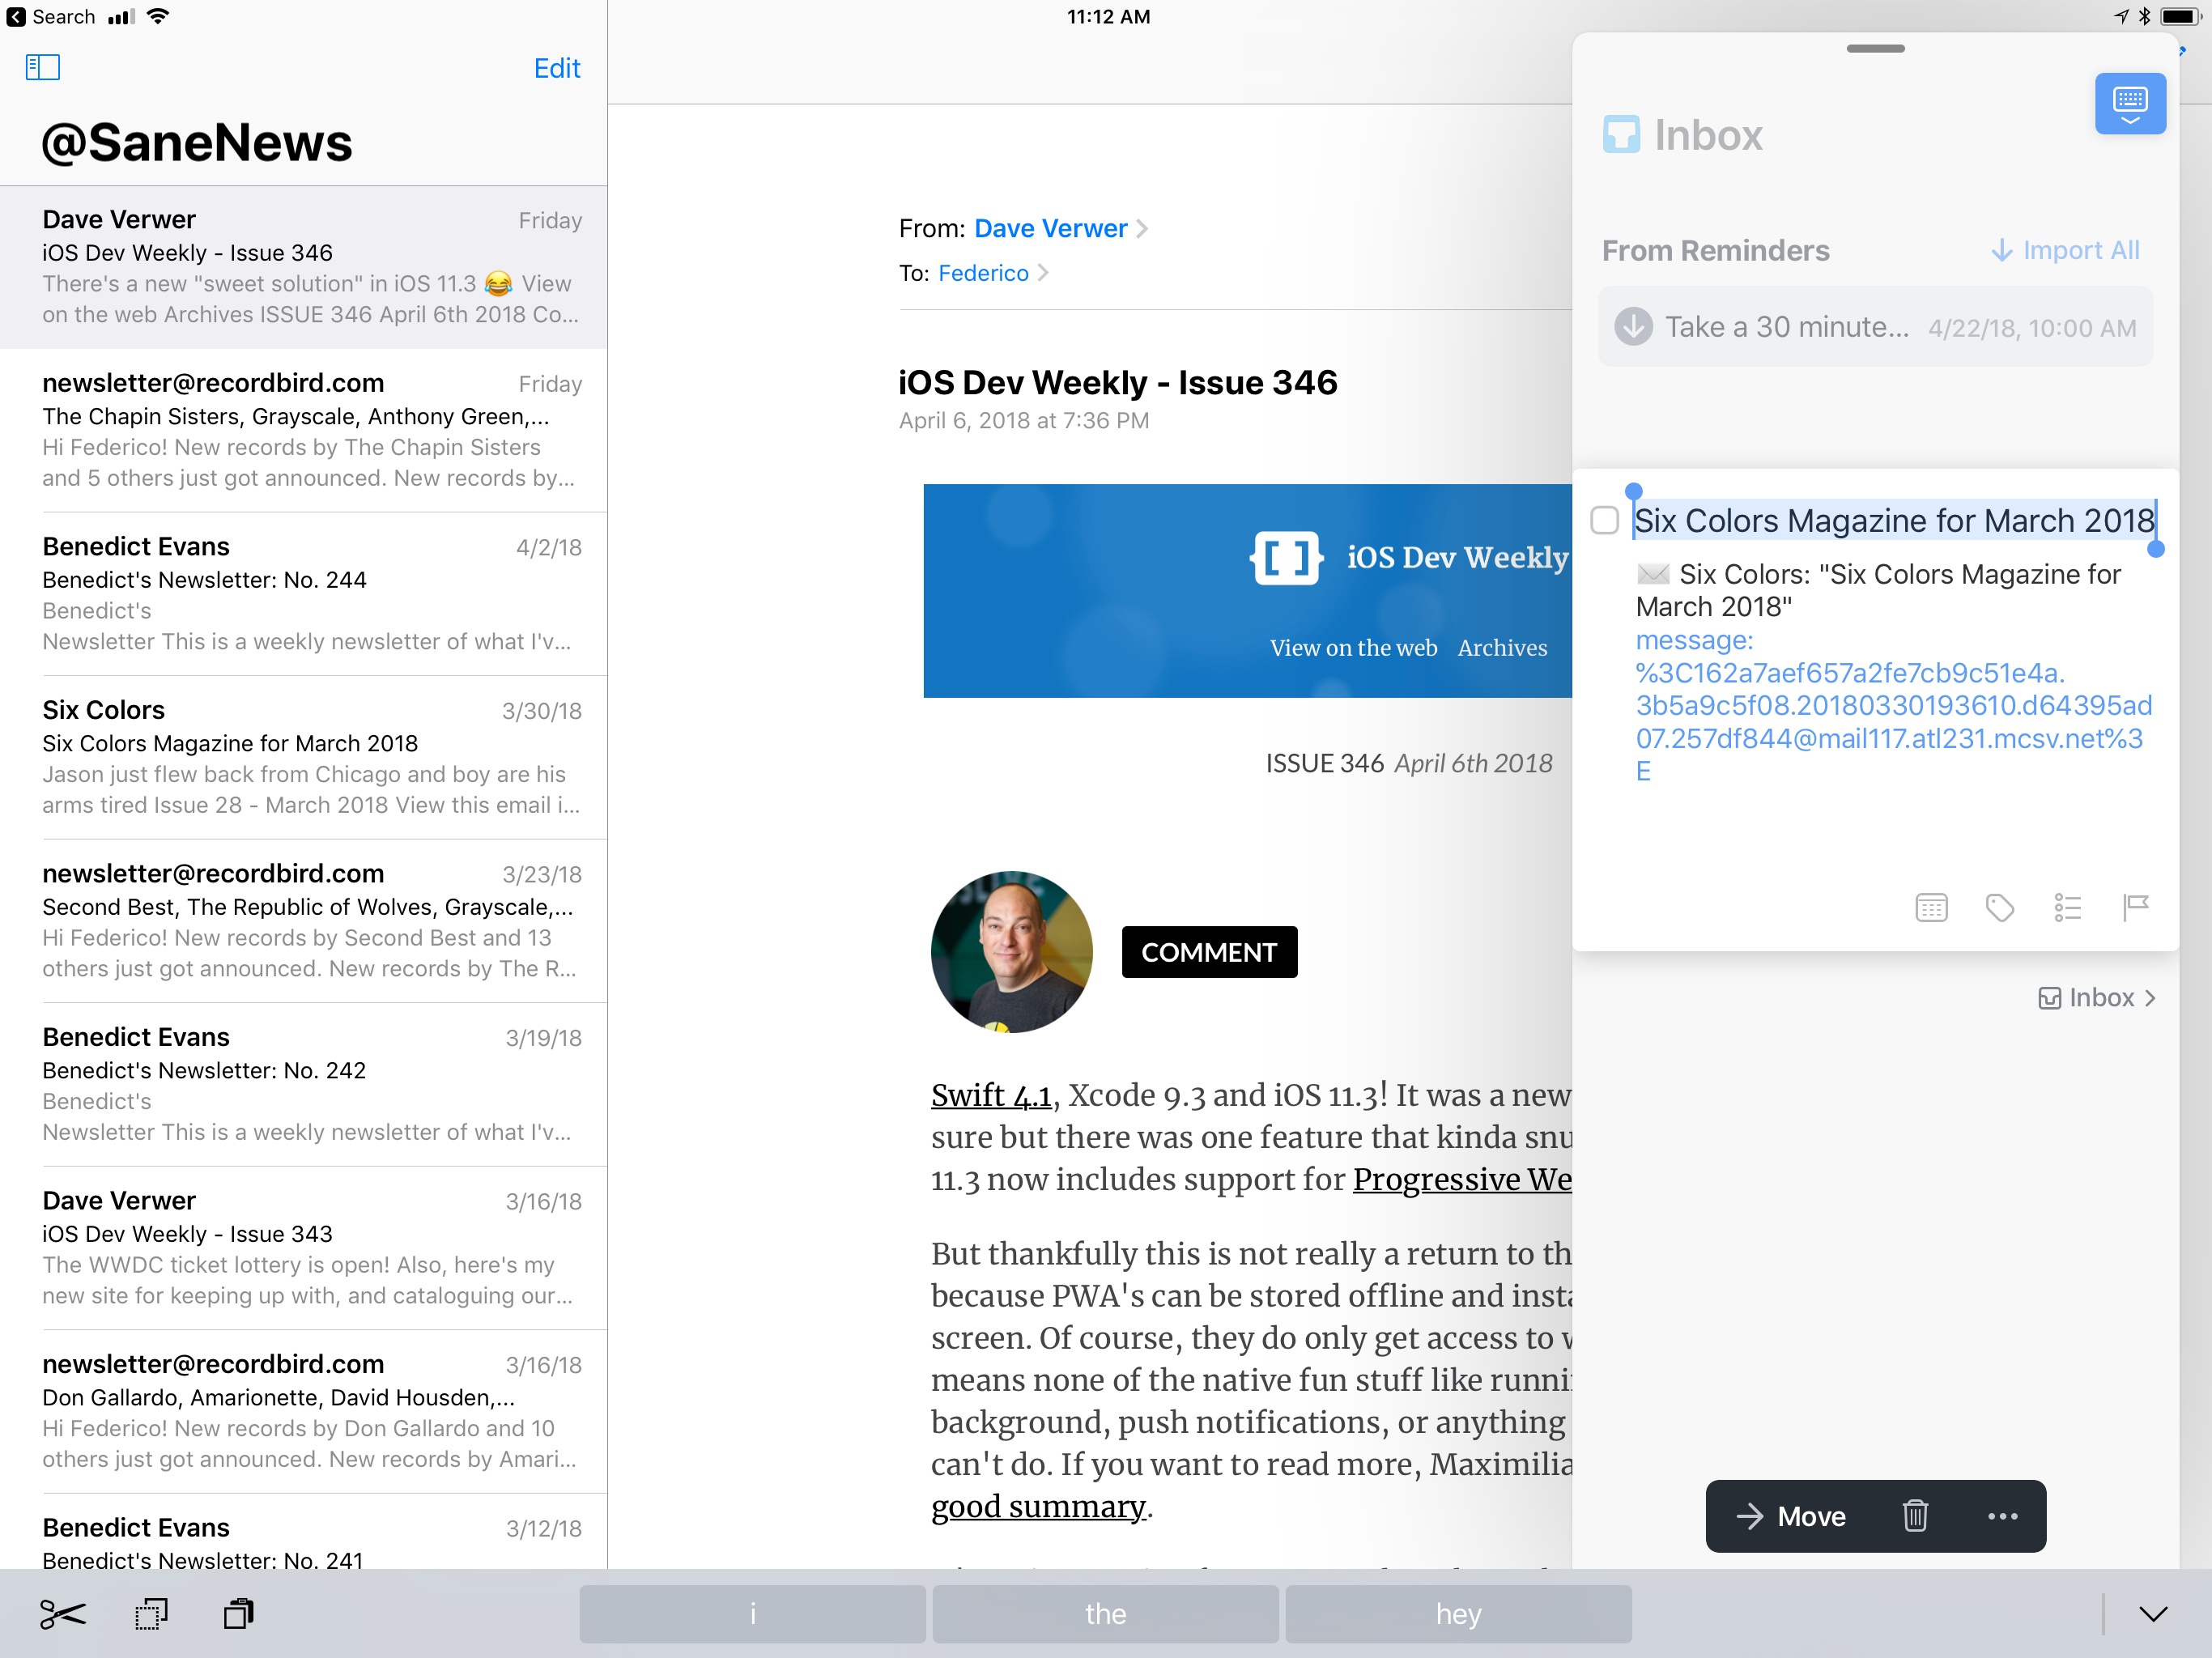
By now, even though Apple never officially documented support for message:// URLs on iOS, a few third-party developers have figured out how to take advantage of those links to integrate their apps with Mail. In my opinion, Things offers the best implementation of the feature: when you drop a Mail message in the app, it is saved with its subject line and a tappable link that reopens the message in Mail.
I wish Apple provided an official API for apps to integrate with Mail; until that happens, individual message links are a good workaround to turn emails into tasks and notes in other apps.
#7: Install Custom Fonts
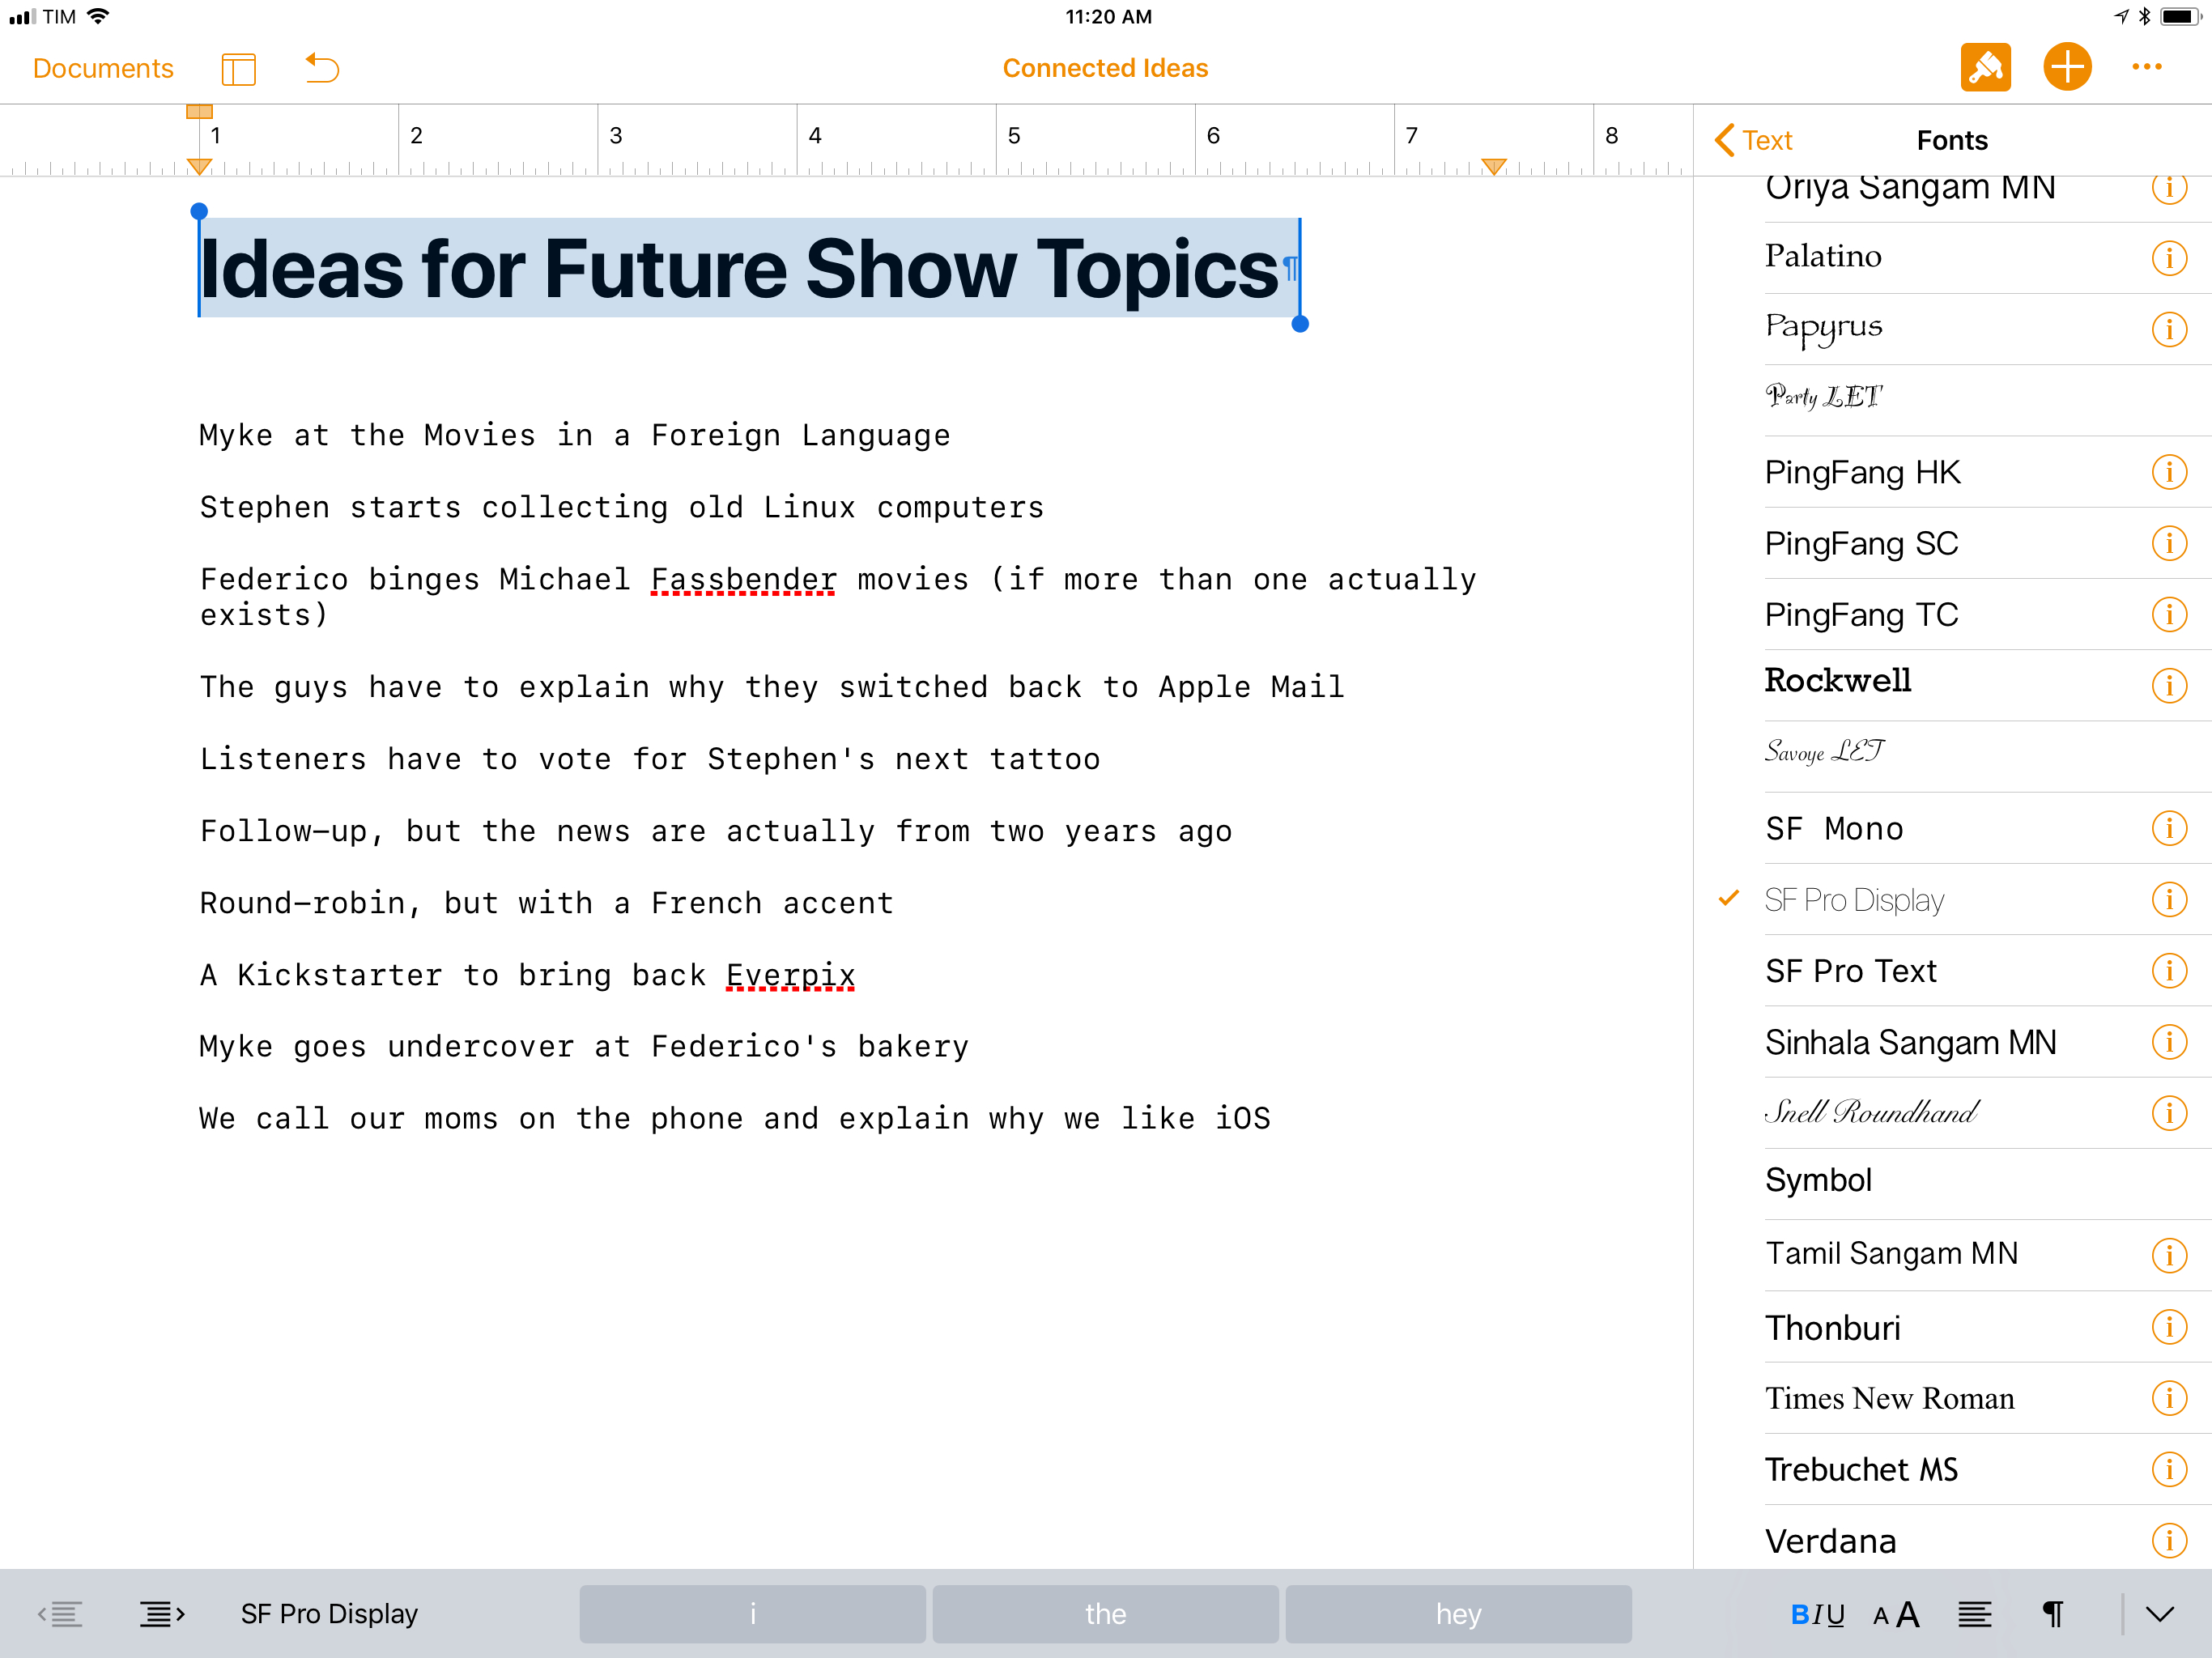
Whenever I share screenshots of my Numbers spreadsheets or Pages documents, readers ask how I was able to install San Francisco Mono on iOS. The simple truth is: iOS, unlike macOS, doesn’t offer a built-in solution for manual font installation, but it can be done through third-party apps and custom profiles. Even better: custom fonts you install on your iPad will be available in any app that uses iOS’ native font selection controls.
The app I’ve been using to install custom fonts on iOS for years now is AnyFont. After copying multiple font files into AnyFont with the ‘Copy To…’ menu in the share sheet, you can select them, confirm that you want to install them, then follow the onscreen instructions to install a custom profile in the Settings app that contains the fonts you want to use. It’s a guided process that requires absolutely no coding or other advanced skills. Once the fonts are installed, you’ll be able to select them in any standard font picker on iOS. You can try this in apps such as Numbers, Pages, Pixelmator, OmniGraffle, or Drafts. As long as the app features a native font picker, you’ll see your custom fonts.
I keep dozens of custom typefaces on my iPad and I’ve installed them all using AnyFont. It couldn’t be easier, and I like how this system lets me personalize my typing experience depending on the app I’m using. If you have a library of fonts that you want to move to AnyFont (or an alternative such as FondFont), I recommend keeping them in a folder synced with Files through iCloud Drive for convenient access on iOS.
#8: Use Text Replacements
Once you have your iPad set up with an external keyboard you’re comfortable with, it’s time to start using text replacements. This feature is supported by the default software keyboard too and is typically used for simple abbreviations, but I’ve grown to use it a lot with my Brydge keyboard as a lightweight TextExpander replacement that works in any app.
Besides obvious shortcuts for my name and address, I’ve set up text replacements for a variety of text strings I usually type or search for on my iPad:
- File names for documents or folders (in the Files app) I frequently find via Spotlight;
- Templates for email messages or tweets I send on a regular basis;
- Emoji I frequently type;
- Unicode characters that would otherwise require a dedicated app on iOS (such as the keyboard command characters in this story);
- Tag and project shortcodes for my task manager;
- Entire sentences that are expanded in Type to Siri to control HomeKit devices or save data into SiriKit-compatible apps.
I’ve become so accustomed to writing and working with apps on my iPad using text replacements, iOS feels broken when I use a device that isn’t logged into my iCloud account and doesn’t have my shortcuts. The functionality of Apple’s text replacements pales in comparison to what you can achieve with TextExpander, but their system-wide integration lets you save time in places where TextExpander will never be available.
#9: Tap and Hold in Safari
There are several interesting and useful shortcuts hidden behind tap & hold gestures in Safari for iOS. It can be tricky to commit them all to muscle memory, so here’s a list of my favorite long-press shortcuts in Safari.
- Bookmarks. Tap & hold to quickly add a new bookmark or add the current webpage to Reading List.
- Plus button. Reopen recently closed tabs.
- Tabs icon. Brings up a menu to close all tabs or the current tab only, plus options to create a new tab or a new private tab.
- Address bar. By default, a long-press here brings up a Copy button to copy the current URL. With a URL or text in the clipboard, you’ll also see options for ‘Paste and Go’ or ‘Paste and Search’, respectively.
- ←/→ arrows. Preview browser history in a contextual menu.
- Safari Reader (text icon on the left side of the address bar). Display settings to always use Safari Reader on the selected website or for all websites.
- Refresh icon. Open menu to request a desktop version of the website or reload the webpage without content blockers.
- Links inside webpages. Tap & hold and wait for the link to lift up to start drag and drop; alternatively, let go of the link after it’s lifted up and you’ll open a standard contextual menu.
#10: Type to Siri
I’ve written about Type to Siri at length in an iPad Diaries column, but I want to repeat my recommendation here as I believe the feature dramatically alters Siri’s role on the iPad. With iOS 11, Siri gained support for an Accessibility option called Type to Siri that lets you text, rather than talk with, the system’s built-in assistant. The feature can be enabled in Settings ⇾ General ⇾ Accessibility ⇾ Siri, and it retains all the functionality you’re used to having in Siri, only in text form.
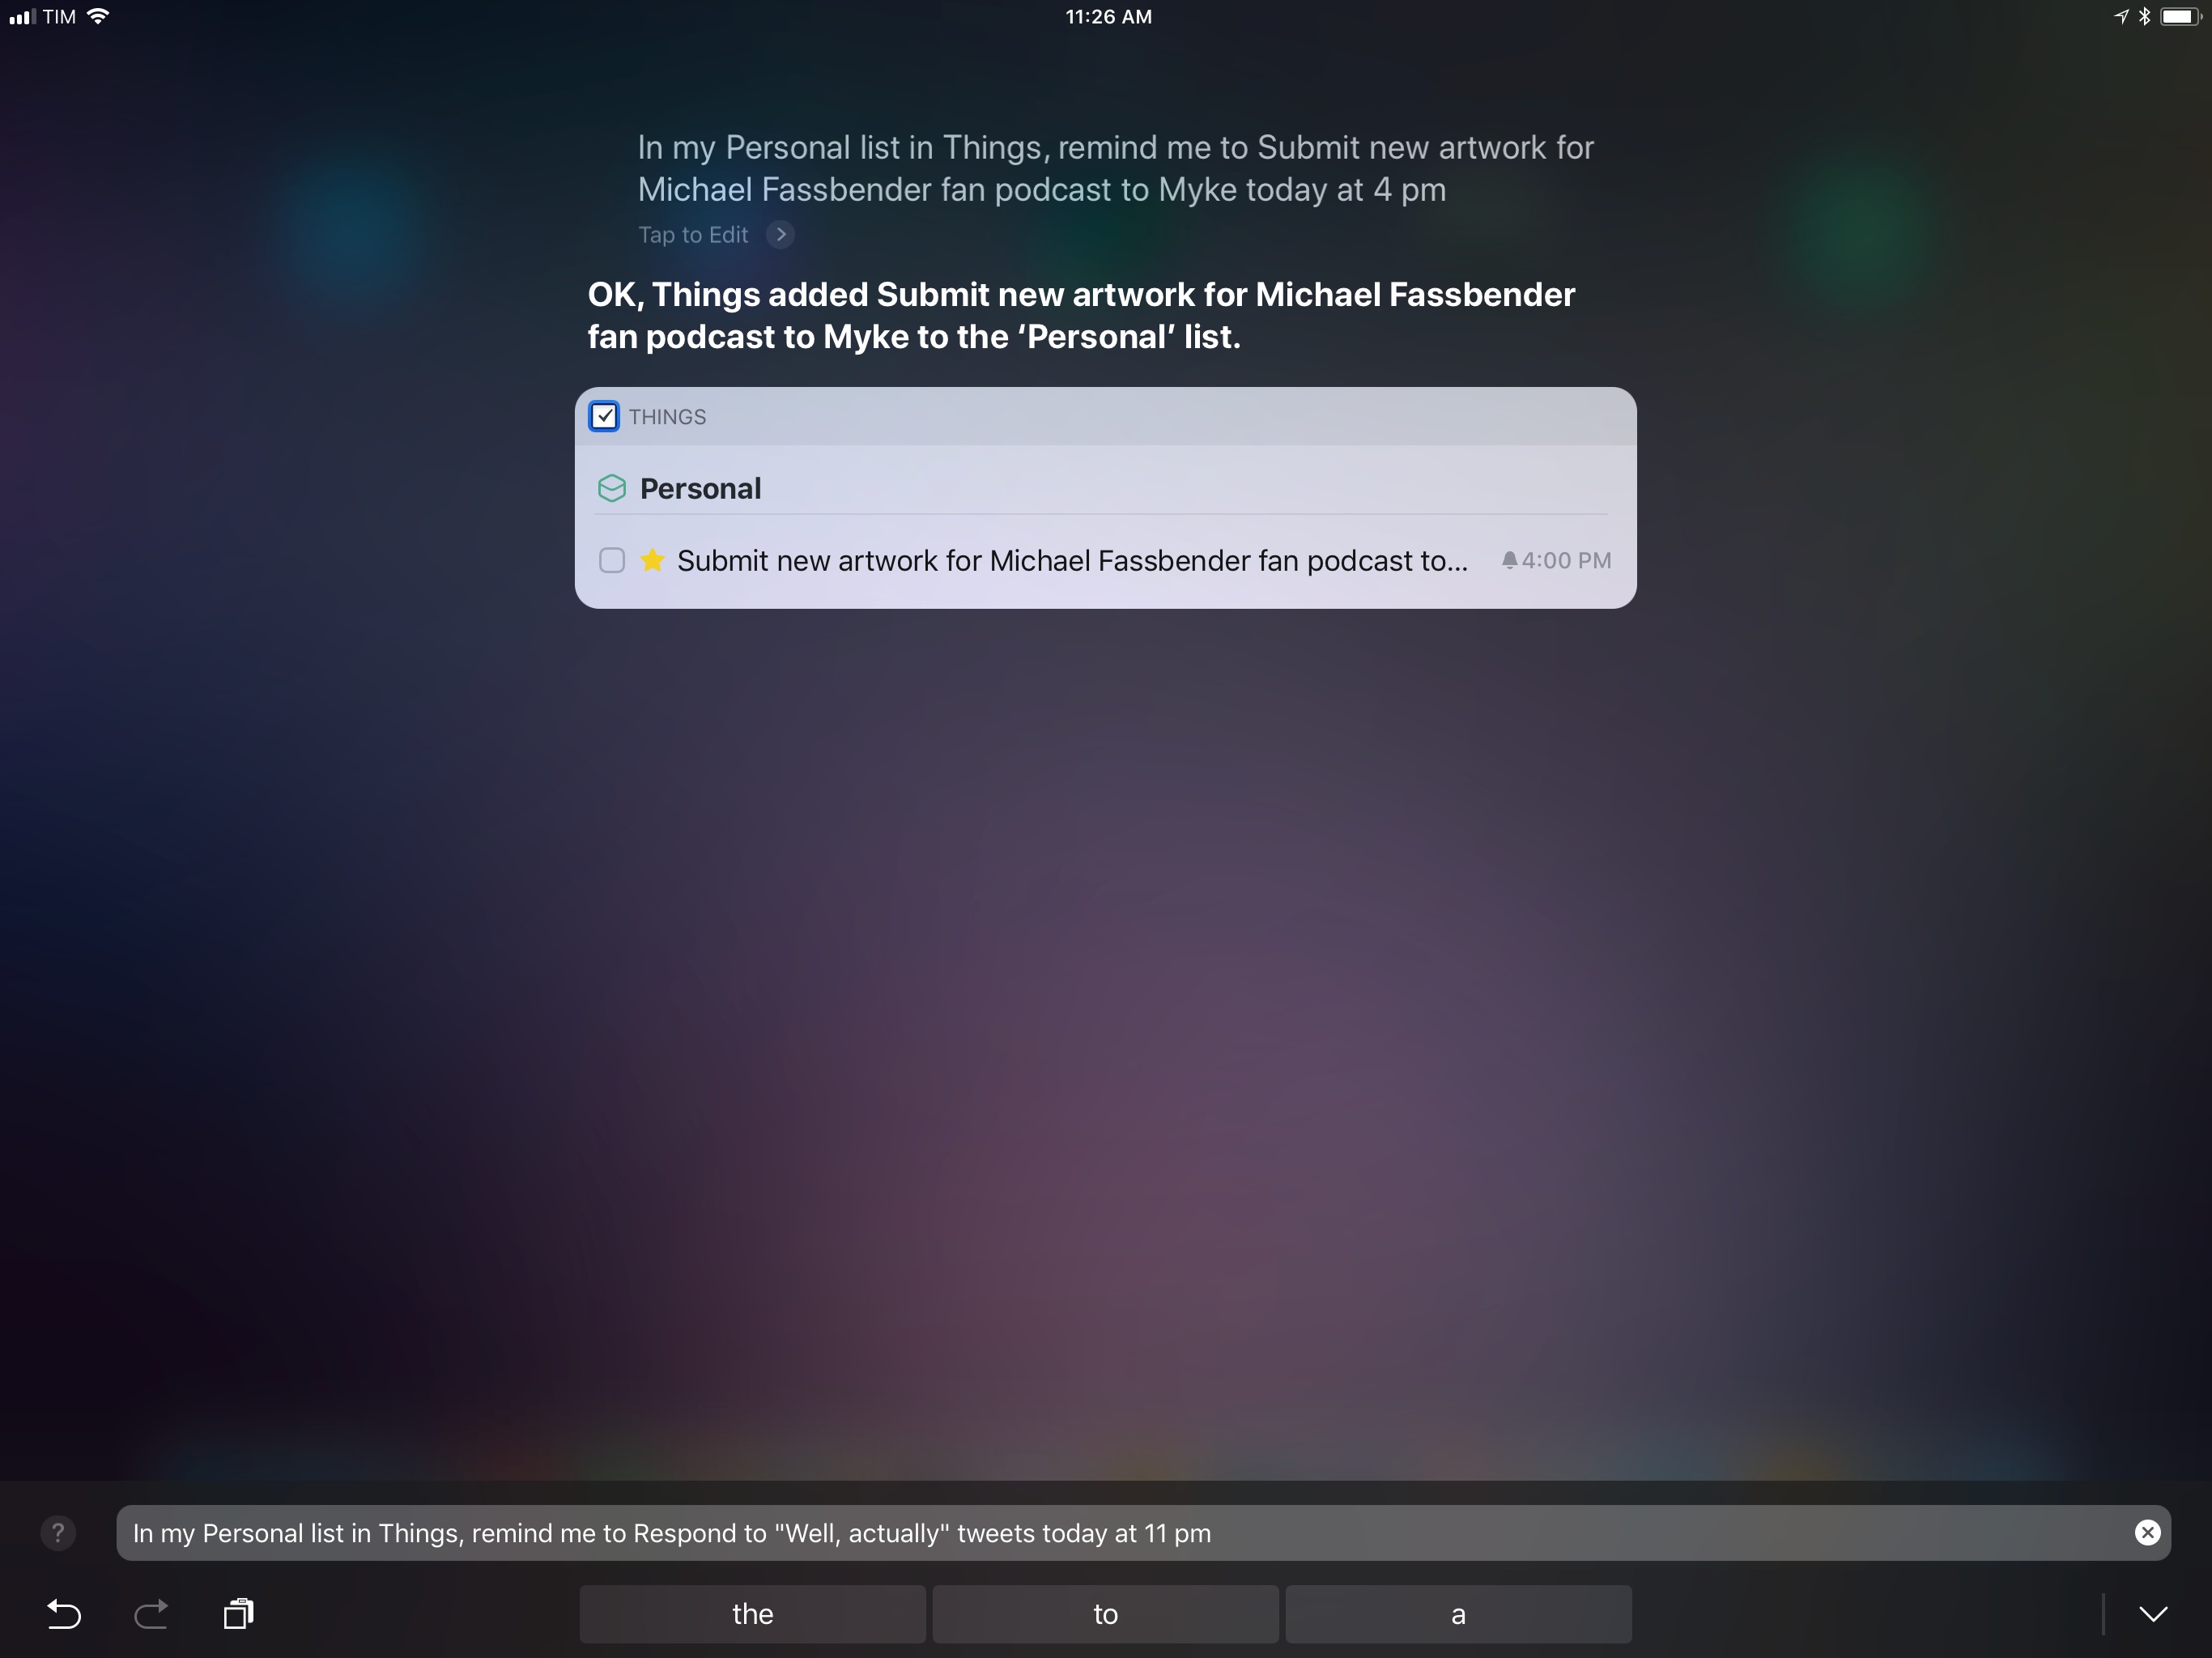
If you work from an iPad connected to an external keyboard, I think you should give Type to Siri a try – especially if your keyboard has a dedicated Siri key that directly opens the assistant’s UI. Besides obvious commands such as simple calculations or currency conversions, you can leverage Type to Siri and combine it with text replacements to perform advanced actions such as saving data into SiriKit apps or controlling HomeKit devices. For example, I set up text replacements as “sentence templates” for Siri to create a task in a specific list in Things; I have a shortcut to set my air purifier to 20% speed; I even created an abbreviation to save a note in Drafts’ inbox without opening the app – perfect for random thoughts that I don’t want to forget.
Normally, interacting with Siri or asking it to save information in third-party apps is a laborious and time-consuming process that feels like an interruption. With Type to Siri and text replacements on the iPad, however, Siri feels more integrated with the system and lends itself to being invoked more often and performing more advanced actions. Type to Siri made me reconsider Siri’s role as a productivity-focused enhancement that complements my iPad workflow.
#11: Open Documents from the Home Screen
Despite being one of the highlights of Craig Federighi’s iOS 11 demo from WWDC 2017, I often receive emails and tweets from readers who either just discovered this feature or aren’t sure about how it works.
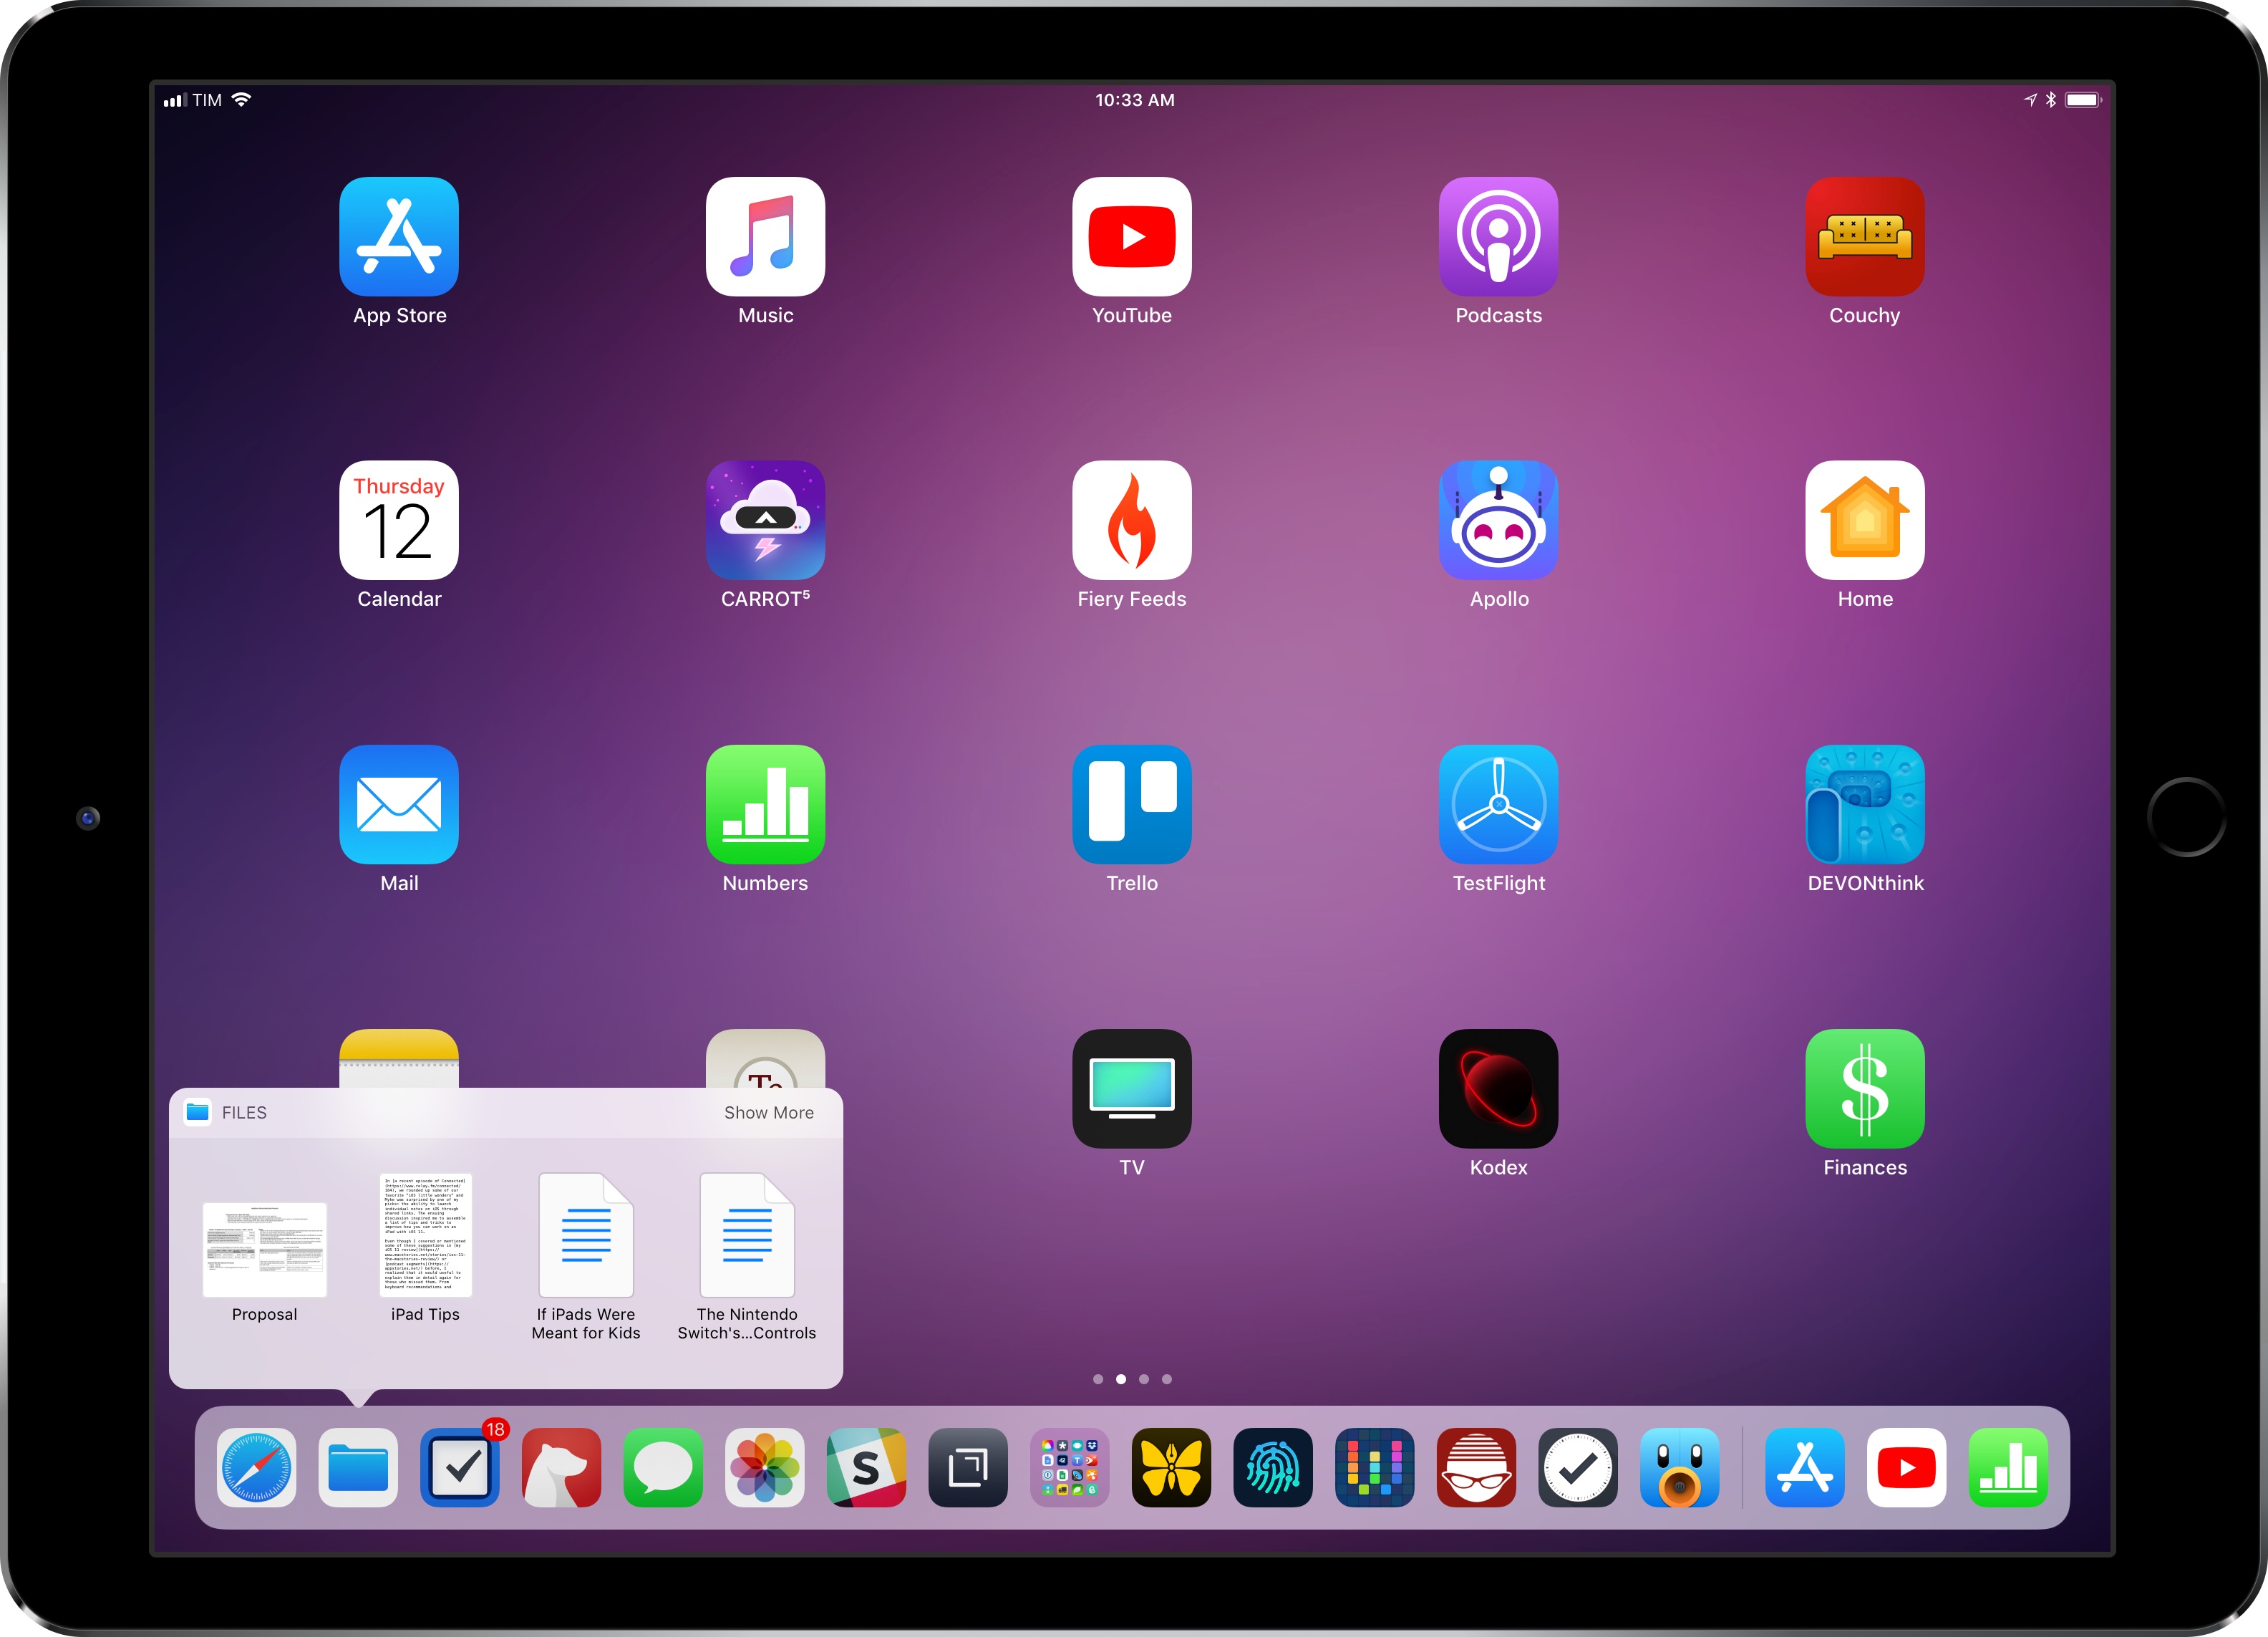
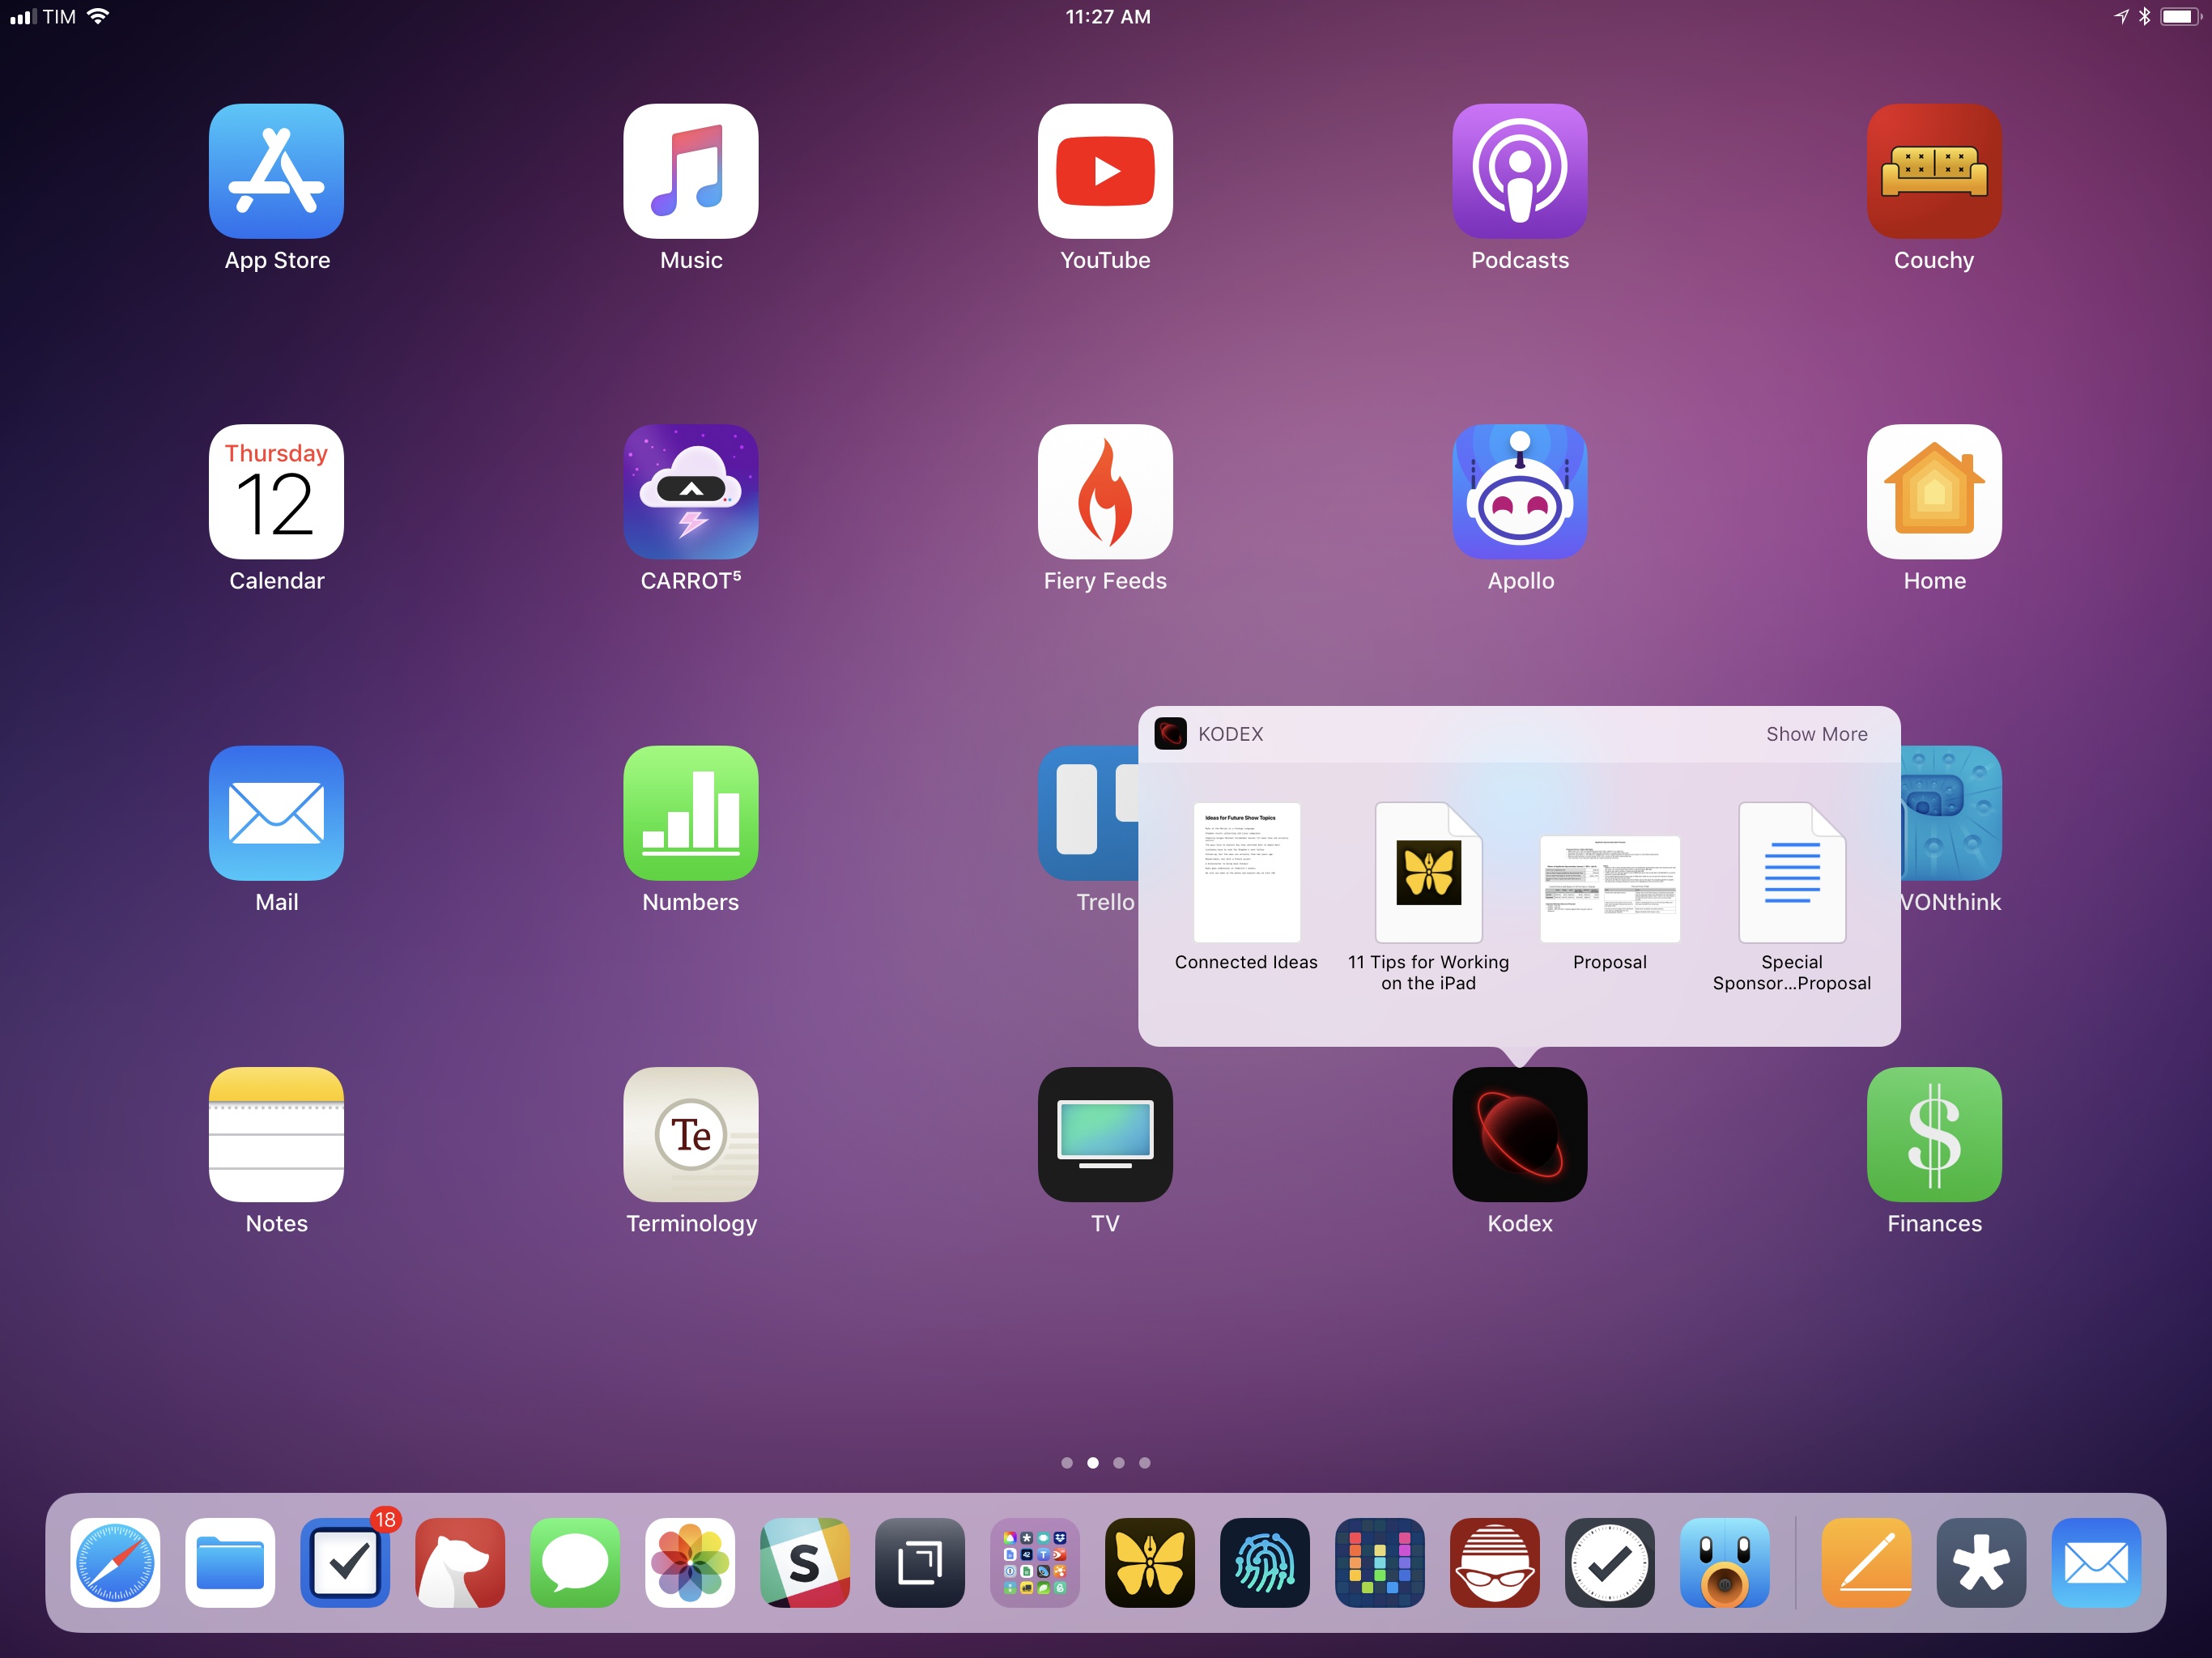
In iOS 11, document-based apps can show you recently opened documents on the Home screen when you long-press their icons. The same gesture that would initiate drag and drop for other icons on the Home screen displays a “widget” for apps that work with documents. This means that apps such as Bear or Trello will not show you recent files; document-based apps like Numbers, MindNode, or PDF Viewer, however, because they implement the native file browser in iOS 11, will bring up a menu of recently opened files on the Home screen.
The menu is useful in a couple of ways. Just like a widget, it can be expanded to show you more documents in additional rows. Then, you can either tap a document to reopen it in the app, or you can pick it up and use drag and drop to export it to another app.
Drag and drop is particularly useful in this instance if you find yourself sharing the same document over and over with the same app or the same people and want to save a little bit of time when doing so. Instead of navigating into the app that contains the document to find it, you can just press the icon, pick up the document from the Home screen (or even the dock) and drag away. If the file is stored in a cloud service, it’ll be automatically downloaded and sent as an offline copy when you drop it.
The impact of iOS 11 on my everyday iPad usage has been profound. While not without its fair share of problems, I don’t miss the days of iOS 10 and I have fully embraced the changes brought by iOS 11 to multitasking, file management, and inter-app communication. iOS 11 is a powerful new foundation for the iPad platform, and one that I’m still optimizing to my needs.
If you already work on the iPad as your main computer, or if you’re planning on doing so in the near future, I hope these tips will help you save a little bit of time every day. For more on working on the iPad with iOS 11, you can read my in-depth review of iOS 11 here, and check out my advanced workflows and iPad tips over at Club MacStories.
- No pun intended. ↩︎


