When the first alpha of Tweetbot for Mac came out in July, I said I would take a look at the app again. Here we are, three months later, with the final version of Tweetbot for Mac available on the App Store.
I concluded my review of the public alpha version with:
Right now, Tweetbot for Mac is, in my opinion, already superior to any other client for OS X — and it still can be improved. More importantly, Tweetbot makes better use of Twitter features than Twitter’s own Mac app, and that says a lot about the importance of third-party clients in this ecosystem.
In calling the alpha version of Tweetbot a “superior” product, I took quite a stance. I had been using the alpha for weeks before the public release, and I had the perspective and context to make a conscious and reasonable decision about my statement. I knew I was going to like Tweetbot and use it on a daily basis. Three months later, that’s still the case.
I’ll get to the point right away. Tweetbot is, in my opinion, the best Twitter client for Mac. From my perspective, no other app gets closer to the amount of polish and functionality that Tapbots poured into their latest creation, making it the most powerful, fast, and elegant Twitter app I’ve seen on OS X to date. In hindsight, it’s also a superior product than Twitter for Mac, which, as you may recall, used to be my go-to client. Three months ago I reviewed an app that I knew was going to be great.
In thinking about how I should approach this new review, I came to the conclusion that you don’t need me to go through the backstory of Twitter clients on the Mac. Here’s what I wrote, again, for context:
Ever since Loren Brichter (creator of the original Tweetie, who sold his app to Twitter and went on to work there) left the company, Twitter for Mac — what I had deemed as the best Twitter client for OS X — fell into an unexplainable state of abandon and lack of updates. You would think it’s in Twitter’s best interest to keep a native client up to date with the latest features of the service; and yet, after a solid first version — which came after years of speculation on Tweetie 2 — Twitter started ignoring the app, failing to bring several of Twitter’s new features (such as inline media and updated search) to the desktop. It only got worse recently: after many updates to Lion, Twitter for Mac has started showing new bugs and glitches that haven’t been fixed by Twitter, alongside the ones that have always been there and were never corrected. And then with the release of the Retina MacBook Pro, Twitter’s lack of support for high-res text and graphics became the proverbial final nail in the coffin of what used to be a great app.
Twitter for Mac still hasn’t received an update since last year. Some say it’s no longer in development.
In my review of Tweetbot Alpha, I briefly touched upon features that were missing from the app:
For instance, there is limited support for keyboard shortcuts, there are some rough edges around the interface, and one of my favorite features of Twitter for Mac — being able to navigate and switch sections with gestures — isn’t yet available. Indeed, Tapbots say that features like better management of multiple windows will be coming in the future, and they confirmed in a blog post that they are planning “ on making everything as beautiful and pixel perfect” as they can. Don’t be surprised if, in this version, some pixels will look misaligned or out of place. Eventually, it will all be fixed.
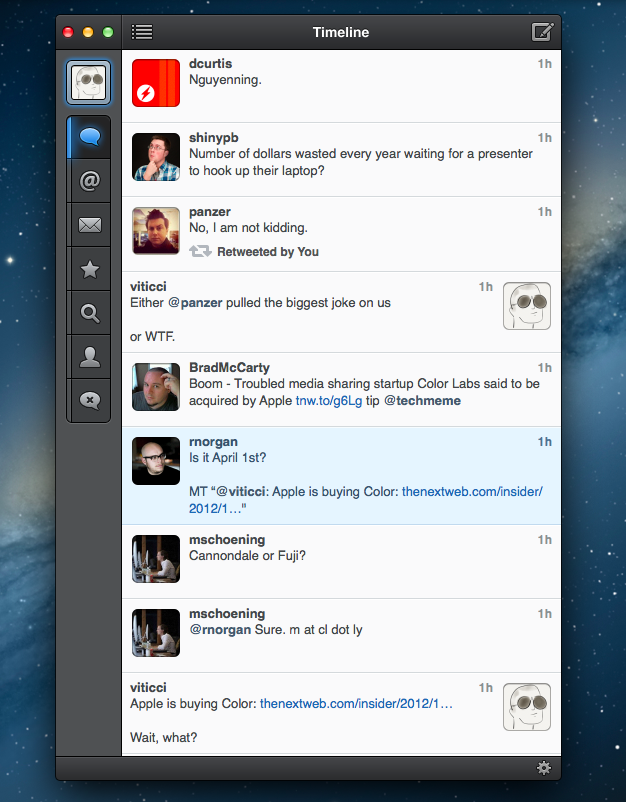
It is with this standpoint that I want to look at Tweetbot again: you don’t need me to know what Tweetbot is or what it looks like. Between the Mac and iOS, we’ve covered Tweetbot extensively here at MacStories.
What follows is my review of Tweetbot 1.0 based on how I use the final version of the app. The little features and the details I’ve come to rely upon, and the overall functionality that makes Tweetbot the best Twitter client for Mac.
Keyboard shortcuts
One of the key features missing from the initial alpha of Tweetbot was support for keyboard shortcuts. At some point, every Mac user – not necessarily the “power” ones – gets curious about keyboard shortcuts, as they can be fantastic timesavers. Tweetbot for Mac doesn’t disappoint: it comes with many different shortcuts for timelines (i.e. “views”) and tweets.
Navigation and Views
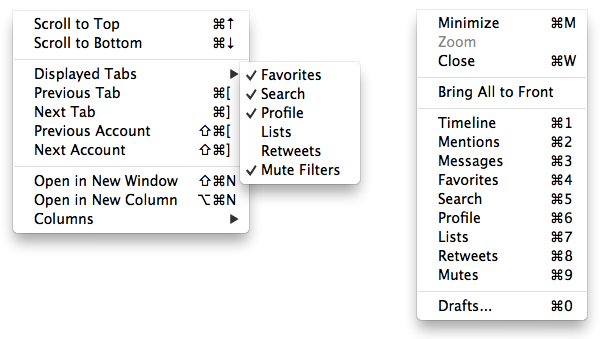
Command + 1…9 to open specific sections of the app. Sections are called “tabs”, and they are available in the Window menu. Available tabs are: Timeline (1), Mentions (2), Messages (3), Favorites (4), Search (5), Profile (6), Lists (7), Retweets (8), and Mutes (9).
If you’re already in a tab and you hit Command +1…9 the app will go back to the top level of the view (eg. you’re viewing someone’s profile, the app will go back to timeline) so you don’t have to hit the Back button. If you’re already in the top level, the shortcut will scroll to the top.
Tabs available in Tweetbot’s sidebar can be customized. From View > Displayed Tabs, choose the tabs you want to exclude from the sidebar by deselecting them. Even if a tab is hidden, you’ll still be able to access it with the shortcuts mentioned above.
A bunch of shortcuts are available in the View menu:
- You can scroll to top or bottom using Command + Up and Command + Down, respectively.
- You can move to the Next Tab using Command + ] and to the Previous Tab using Command + [ – choosing “Previous Tab” when you’re in the Timeline tab will cycle back to the bottom one (Mutes).
- If you add Shift to the Previous/Next Tab shortcut, you’ll get Previous/Next Account.
- Not listed, but you can Page up and down using Space and Shift + Space; this also works with Home and End on keyboards with those keys.
In Tweetbot, you can open Tabs in new windows or columns. You can also open specific views such as user profiles or a saved search in columns or windows. To open the current view in a new window, use Command + Shift + N; to open in a new column, the shortcut is Command + Option + N. You can then remove specific columns from the View > Columns menu, or by hitting the gear icon icon in the bottom right corner of the main window. You can tab and shift-tab to move between columns.
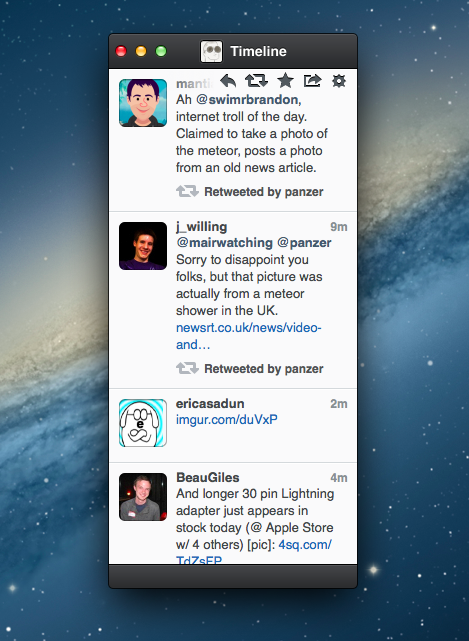
Tweetbot’s windows can be resized. However, the “separate” ones don’t support shortcuts for changing tabs, as they are, essentially, single-purpose views turned into a window.
You can go to a specific user by hitting Command + U and typing its username. Tweetbot will try to autocomplete it.
Actions
Tweetbot comes with several “action shortcuts” for tweets and integration with third-party services.
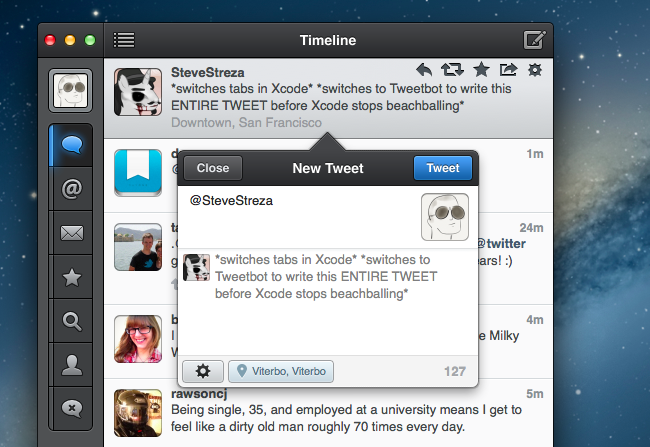
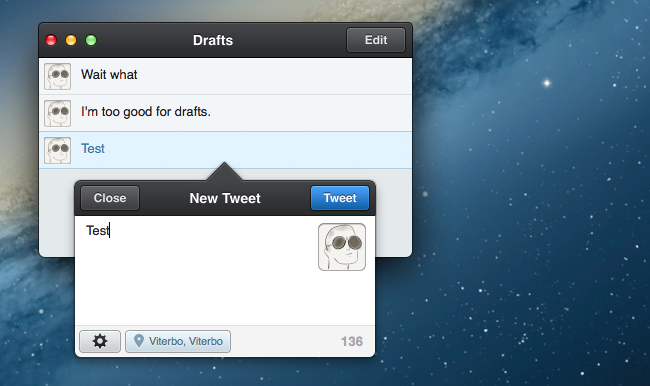
To compose a tweet, hit Command + N, and Command + W to close the compose box. If you’ve typed something in the box and try to close it, Tweetbot will ask you to save the tweet as a draft. Drafts can be opened with Command + 0, which will display a separate window for all your saved tweets; click on one, and the tweet will open again in the compose box, ready to be sent.
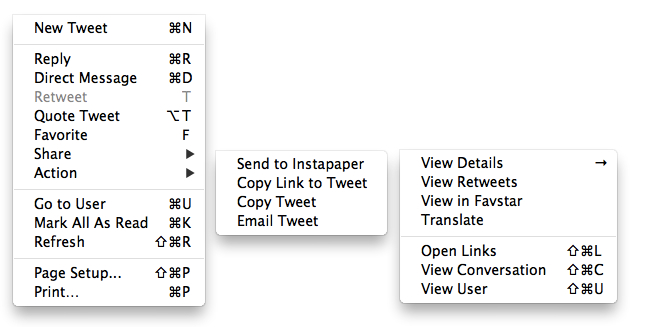
You can perform various actions on selected tweets. Command + R will initiate a reply to the author of a tweet, with additional mentioned usernames selected so you can remove them instantly (it basically defaults to Reply All). Command + D will send a Direct Message to the author; F will mark a tweet as favorite; T will retweet, and Option + T will “quote” the selected tweet. Command + K will mark all tweets in a tab as read.
Tweetbot uses streaming by default, but you can also manually refresh a view by pulling down tweets to unveil the loading bar, or by hitting Command + Shift + R. Please note, though, that if the app is streaming you can’t actually pull to refresh: if streaming fails, you can. You can also pull to refresh views that don’t stream, like Search and Lists.
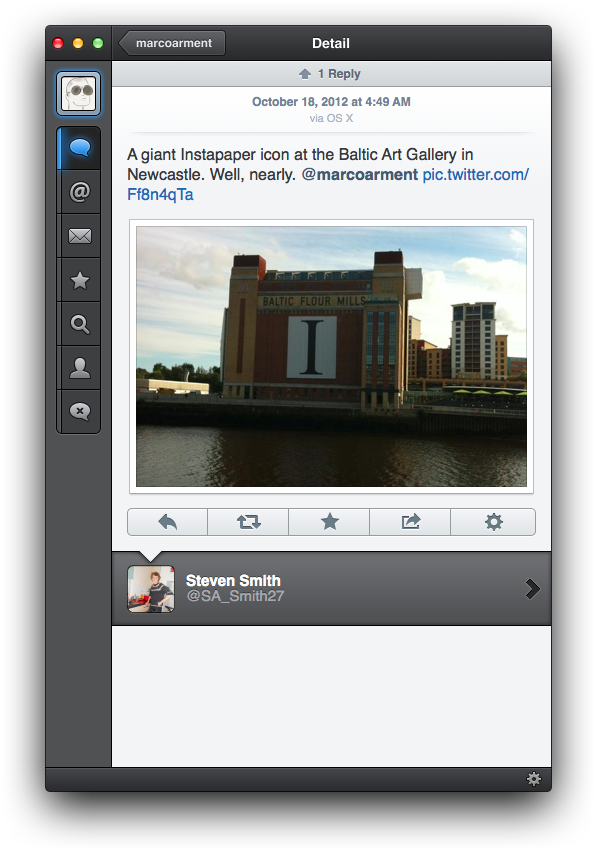
When a tweet is selected, the entire app is navigable using the keyboard: up/down arrows will let you move between tweets, the right arrow key will open a tweet’s detail view and left will always work as a “Back” button. If you are in the tweet detail view and you hit the right arrow, you’ll go to the user’s profile.
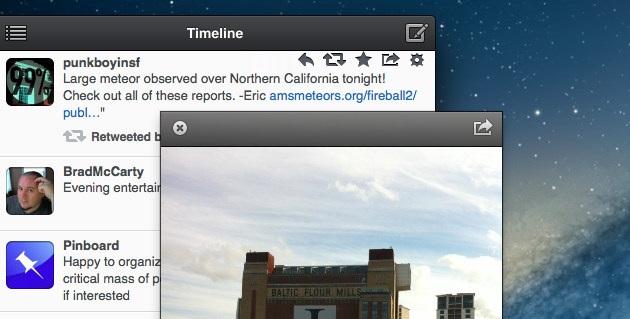
It gets more interesting with actions available inside the Tweet > Action menu. You can open the links contained in a selected tweet with Command + Shift + L: if the link is a regular http:// hyperlink, it’ll open in the default browser; if it’s an inline image, the shortcut will bring up the app’s image viewer.
The image viewer comes with a sharing button to save the image (it’ll be placed in your Downloads folder), copy it, view it on the web, or tweet the URL. To close the image, you can hit Esc or the Space bar. In this first version of the app, I’ve encountered a bug that, when the browser is minimized in the Dock, will bring it up in slow motion (I assume it’s because the shortcut includes Shift, which triggers the slow-motion effect system-wide).
There are two more actions that have been assigned a keyboard shortcut: you can quickly open a user’s profile by pressing Command + Shift + U on a tweet; and if a tweet belongs to a conversation, you can hit Command + Shift + C to view it.
Contextual Menus
Where Tweetbot doesn’t get with keyboard shortcuts, it does with contextual menus. In July, I wrote:
That’s not to say, though, that Tapbots is simply taking a successful iOS app and putting a native Mac wrapper around it. Tweetbot for Mac wants to be a native Mac application, and for this reason Tapbots had to rethink some of the interactions that couldn’t be suitable for a point-and-click system such as the Mac.
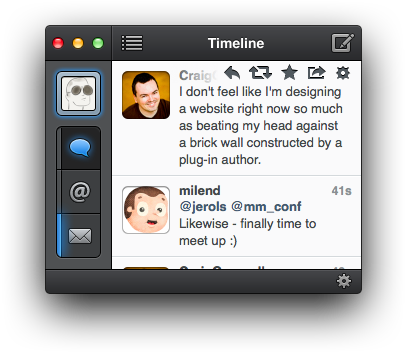
Because on the Mac it is possible to implement the concept of “hover” through the cursor, the tweet drawer’s options (reply, retweet, fave, share, more) are shown when hovering over a tweet, and they are presented inside contextual menus: this helps reducing the number of clicks needed to navigate around tweets, and it stays true to the nature of OS X while adapting Tweetbot’s existing feature to different patterns and possible scenarios.
In Tweetbot for iOS, you can tap & hold on certain elements to bring up additional options; in Tweetbot for Mac, tap & hold becomes right-clicking (or Control-clicking).
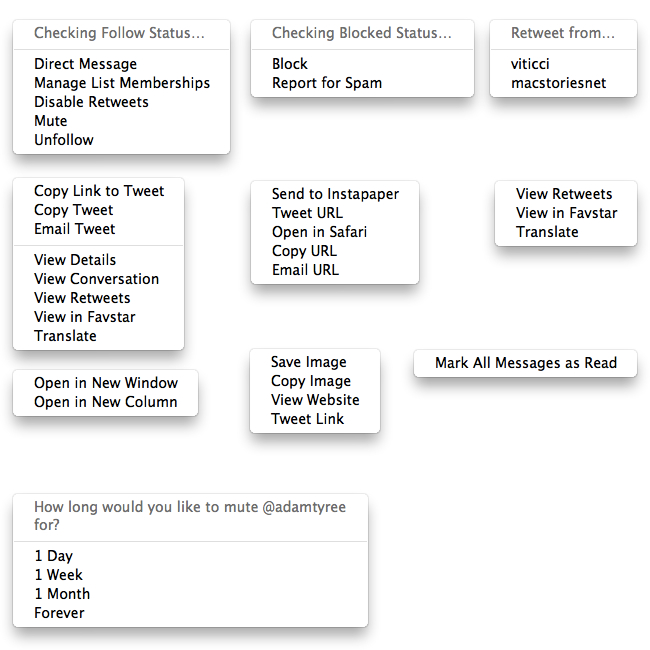
- A right-click on a tweet will let you: Copy Link to Tweet, Copy Tweet, Email Tweet, View Details/Conversations/Retweets, Open in Favstar, and Translate.
- If you right-click on a link, you can send to a Read Later service, Tweet the URL, Open in Browser, Copy, and Email the URL.
- Right-click on a user (link or profile picture) will check follow status, and offer options for DM, Manage in Lists, Disable Retweets, Mute, and Unfollow.
- Right-click on a sidebar tab will let you open it in a new column or window.
- Right-click on your own username will allow you to view your profile in Favstar; the same can be done by double-clicking on the Profile tab.
- Double-clicking any tab scrolls it to the top (or to last-synced position).
- Control-clicking on the retweet action icon in Timeline will let you choose the account to retweet from.
- Control-clicking on the fave action icon in Timeline will let you award the “Tweet of the Day” through Favstar.
Overall, I find the selection of Tweetbot’s contextual menus rich and intuitive – it’s in line with the iOS counterpart (therefore making it easy to switch between the two), yet, at the same time, it stays true to the nature of the Mac.
Gestures
There’s one area of the app where I think Tapbots could have done more: gestures. Right now, Tweetbot only supports:
- Two finger swipe –> Status details
- Two finger swipe <– Conversation
In my Twitter for Mac days, I quickly became a fan of the three-finger gesture that allowed you to swipe vertically to move between sections in the sidebar. I wish Tapbots did the same for tabs in Tweetbot. I’d also like to see gestures from iOS, such as triple taps, finding their way to the Mac. I do appreciate how Tapbots decided to render text natively in the app, thus enabling OS X system features such as triple tap to define in Dictionary within the Timeline (however, text is only selectable in the tweet detail view).
To overcome the lack of vertical swipes to change tabs, I set up two BetterTouchTool gestures for the job: swipe up to go to the next tab, swipe down to go up (per Apple’s own scrolling paradigm). On my computer, which has keyboard input set to Italian, I had to go with one extra step to pipe the shortcut for changing tabs through Keyboard Maestro, as I showed yesterday; if you don’t want to use Keyboard Maestro, you could achieve the same “hack” using BetterTouchTool and GUI scripting, or anything that associates gestures with Tweetbot’s Previous/Next Tab menu. I also noticed a visual bug in which, occasionally, the selected tab won’t be properly highlighted in the sidebar.
Using Tweetbot
Here’s how I use Tweetbot: I leave it open all day, reading my timeline and checking for links to interesting stuff that happens online. If someone mentions me, I want to double-check what I’m replying to, and I want to be able to see an entire conversation. I mark a lot of tweets as favorite (more here), I have a saved search for “MacStories”, and I mute a lot of hashtags or keywords I’m not interested into (such as sports and politics). Every once in a while, I try to be a witty and funny guy with Matthew Panzarino or my colleague Don.
I need a Twitter client that can handle the workflow described above and, more importantly, remember my position in the Timeline.
Tweetbot fits like a glove. Maybe it’s because I got used to the app over time. Or perhaps I’m just particularly good at feature requests. Any way I look at it, I can’t seem to find any other client that can achieve the same degree of functionality.
There’s a fine line between consistency and uniqueness on each platform, and Tweetbot walks it gracefully. The design cues are the same, the interactions are shared across devices, but there’s always a little implementation detail or a subtle graphical change that reminds you which Tweetbot is which. Quite paradoxically, there are more differences between various instances of Tweetbot than between Tweetbot and Netbot.
Columns
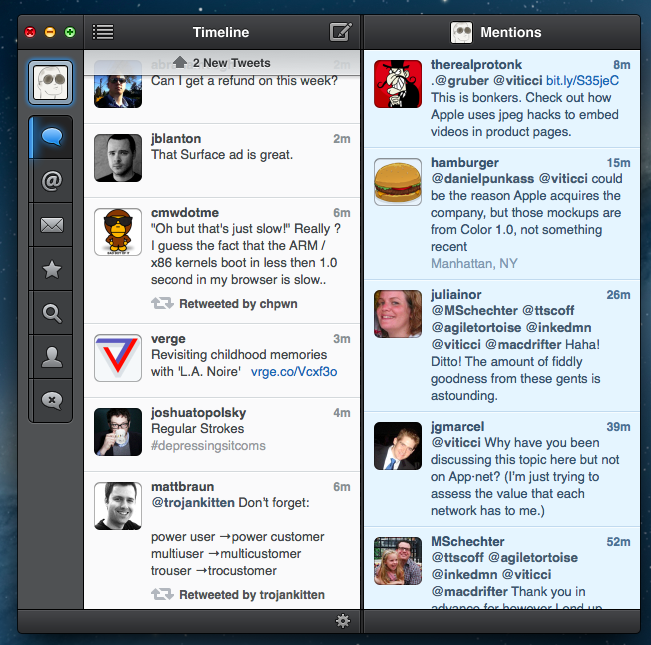
Tweetbot for Mac lets you put sections and views in columns. As those who’ve used apps like Tweetdeck before may remember, columns can become an important “productivity booster” for people who use Twitter for, say, customer support and need to keep an eye on replies and saved searches.
With the aforementioned “Open in New Column” command, you can do exactly that. During major Apple events or news, for example, I like to keep columns open on saved searches and MacStories’ mention stream so I can stay on top of the tweets being shared.
In Tweetbot, columns “snap” onto an existing window on the right. You can create multiple columns, but you can’t switch the section focus of a column once it’s been created. To “detach” a column to make it a window and close it, grab the “handle” in the bottom bar and drag the column away. There are still some bugs with attaching columns of different sizes to the main window.
For a future version of the app, I’d like to see full-screen support, as it makes sense for layouts of 3+ columns.
Custom Uploads
Tweetbot for Mac is, as far as I know, the only Twitter client that supports custom API endpoints for media uploads. I asked our Don Southard to put together a solution that would leverage our Rackspace CDN to handle images and videos; he came up with an easy way to share images in Tweetbot natively, using our own server. You can find his explanation of the feature below.
Custom Uploads
Tweetbot is the only Twitter client for Mac (that I know of) that supports the ability to upload your photos to a custom image service of your choice. This includes the ability to host your own image sharing service on a web server with nothing more than a few lines of PHP. So what we made is a simple PHP script that we self-host; it accepts the image from Tweetbot and responds with the uploaded URL.
Tweetbot provides short but useful information about how it uses HTTP POST to upload the picture and what information is passed along with the image.
For the MacStories image upload service we opted to use our Rackspace Cloud Files account to host the images. They have a great PHP library that does all the hard work of getting the image objects on to the server. After the image is uploaded to Rackspace the script only needs to echo a JSON encoded response. This code is saved to a PHP file on your web server along with the Cloud Files PHP library.
Update 10/19: Modified the scripts adding a check to make sure they can only receive images or videos (not scripts or other files). Keep in mind, the URL of the PHP file is private – don’t share it with anyone.
<?php// include the APIrequire('cloudfiles.php');// Rackspace Info$username = "USERNAME"; // username$key = "XXX"; // api key// Connect to Rackspace$auth = new CF_Authentication($username, $key);$auth->authenticate();$conn = new CF_Connection($auth);// Get the container we want to use$container = $conn->get_container('Mobile_Uploads');// store image information from Tweetbot$localfile = $_FILES['media']['tmp_name'];$filename = $_FILES['media']['name'];// Image filetype check source:// http://designshack.net/articles/php-articles/smart-file-type-detection-using-php/$imginfo_array = getimagesize($localfile);if ($imginfo_array !== false) {$mime_type = $imginfo_array['mime'];$mime_array = array("video/quicktime", "image/png", "image/jpeg", "image/gif", "image/bmp");if (in_array($mime_type , $mime_array)) {$now = time();$uploadFilename = $now.'-'.$filename;// upload image to Rackspace$object = $container->create_object($uploadFilename);$object->load_from_filename($localfile);// Respond image URL to Tweetbot (Change to your URL)$outputFilename = 'http://files.domain.com/' . basename($uploadFilename);$response = array(url=>$outputFilename);echo json_encode($response);}}else {echo "This is not a valid image file";}?>
Most of you probably do not have a Rackspace Cloud Files account and that’s not a problem because you can also just upload images directly to the web server with only a few tweaks.
Without the Rackspace dependencies this code is even simpler. Save this PHP code to a file (ie. upload.php) on your web server.
<?php//server-side directory$directory_self = str_replace(basename($_SERVER['PHP_SELF']), '', $_SERVER['PHP_SELF']);$uploadsDirectory = $_SERVER['DOCUMENT_ROOT'] . $directory_self . 'img/';// Image filetype check source:// http://designshack.net/articles/php-articles/smart-file-type-detection-using-php/$tempFile = $_FILES['media']['tmp_name'];$imginfo_array = getimagesize($tempFile);if ($imginfo_array !== false) {$mime_type = $imginfo_array['mime'];$mime_array = array("video/quicktime", "image/png", "image/jpeg", "image/gif", "image/bmp");if (in_array($mime_type , $mime_array)) {//generate random filenamewhile(file_exists($uploadFilename = $uploadsDirectory.time().'-'.$_FILES['media']['name'])){$now++;}//upload the file to the webserver@move_uploaded_file($_FILES['media']['tmp_name'], $uploadFilename);//generate the filename that will be given to Tweetbot$outputFilename = 'http://image.yourdomain.com/' . basename($uploadFilename);//respond with JSON encoded media URL$response = array(url=>$outputFilename);echo json_encode($response);}}else {echo "This is not a valid image file";}?>
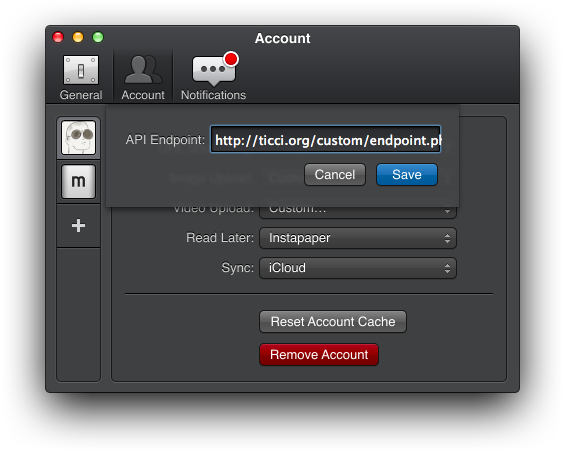
To get Tweebot to send photos to your PHP endpoint, go to Account Settings > Image Upload > Custom.
Enter the full address to your PHP file:
http://image.yourdomain.com/upload.php
That’s it. Tweetbot will send images to your server and you can enjoy the warm fuzzy feeling that comes with hosting, sharing, and owning your own photos online.
In addition to hosting your own PHP script for uploading images, you can also setup a custom domain. In your domain provider’s DNS settings, simply forward that directly to the directory that will be hosting your images.
We have been using Tweetbot’s custom uploads for weeks, and we’re really enjoying it from both Tweetbot for iOS as well as Tweetbot for Mac.
Services
Tweetbot for Mac upholds Tapbots’ tradition to support a plethora of third-party services for sharing and bookmarking. Here are the ones supported in version 1.0:
URL Shortening
- Bitly
- CloudApp
- Droplr
- Custom
Image Upload
- CloudApp
- Droplr
- img.ly
- Lockerz
- Mobypicture
- Pikchur
- Posterous
- Twitgoo
- TwitPic
- yfrog
- Custom
Video Upload
- CloudApp
- Droplr
- Mobypicture
- Pikchur
- Posterous
- TwitVid
- yfrog
- Custom
Read Later
- bitly
- Instapaper
- Pinboard
- Readability
I think the selection is solid; however, I would like to be able to send links to both Instapaper and Pinboard, without having to pick one.
Sync and Notifications
Like the iOS version, Tweetbot for Mac supports Tweet Marker and Notification Center. The settings are exactly the same.
The Mac version also introduces iCloud sync on the desktop, which lets you keep timeline position, as well as read status on DMs and mute filters in sync. In my tests, I had some initial issues in getting Tweetbot for Mac and Tweetbot for iPhone to communicate with each other, and developer Paul Haddad reiterated how iCloud, in its current version, is still far from perfect. Indeed, it took a few restarts and forced quits before both versions were synced up correctly. After that, everything was pretty smooth and fast – I especially like the convenience of keeping filters consistent between devices.
As for notifications, I just like how they stay in Notification Center and allow me to go through them later.
Tips & Tricks
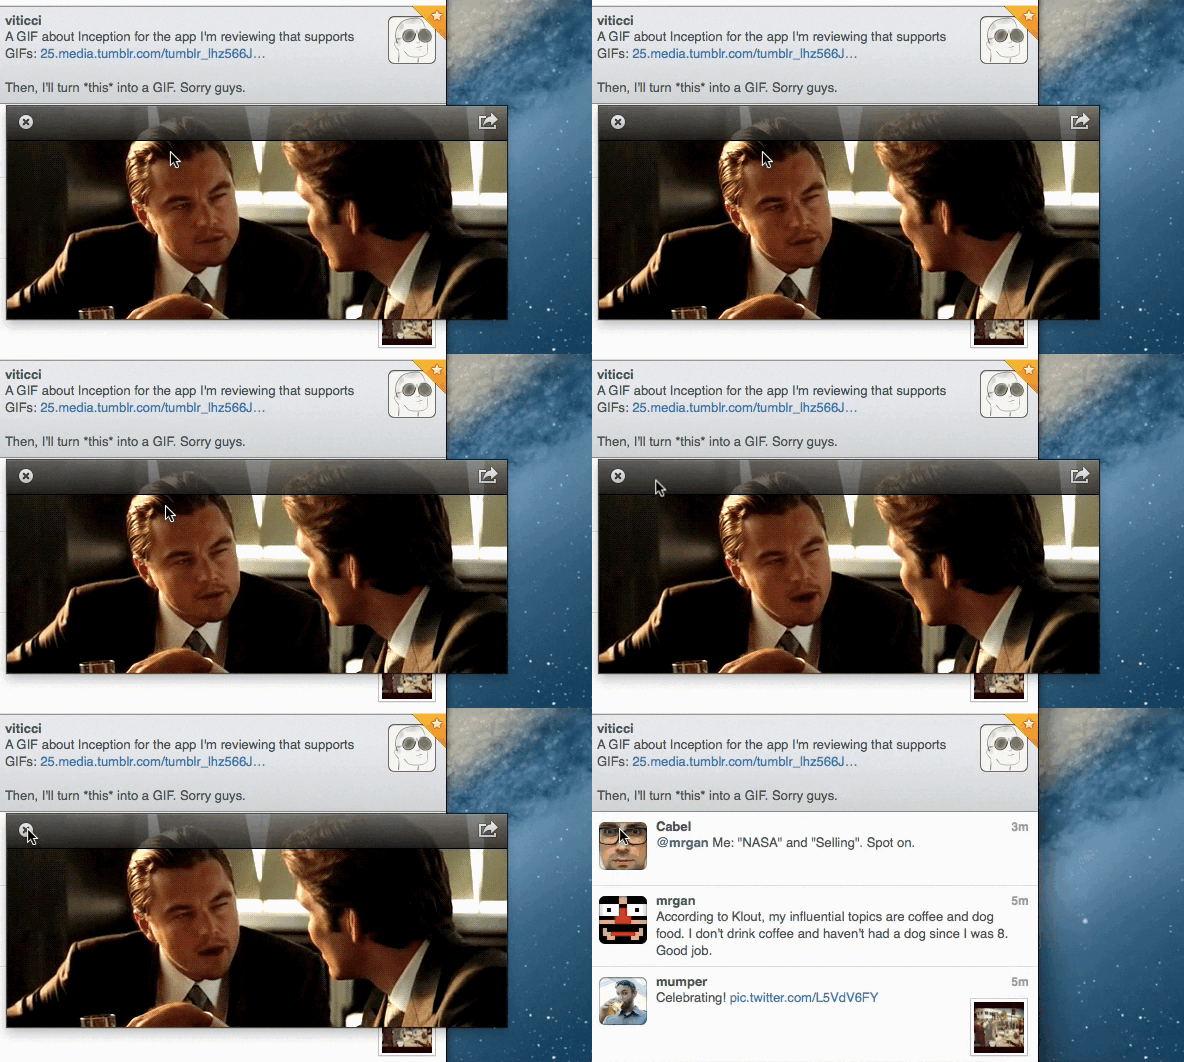
Tweetbot’s image viewer supports animated GIFs.
When someone faves one of your tweets, it gets the same yellow ribbon tweets you fave get. At first I thought I had accidentally faved a tweet of mine. Confusing.
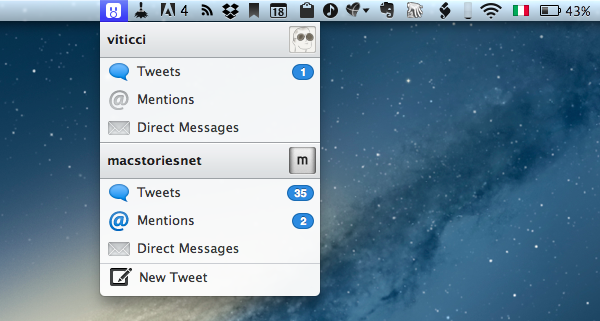
Tweetbot’s menubar item is quite powerful: it lists all your accounts and shows you, through badges, how many unread tweets you have in the Timeline, Mentions, and Direct Messages. It lets you jump to those sections by just clicking, and you can even tweet from the menubar item without launching the full app. I wish Tapbots made a keyboard shortcut for this.
From the tweet compose box, you can switch between accounts by clicking on your profile picture.
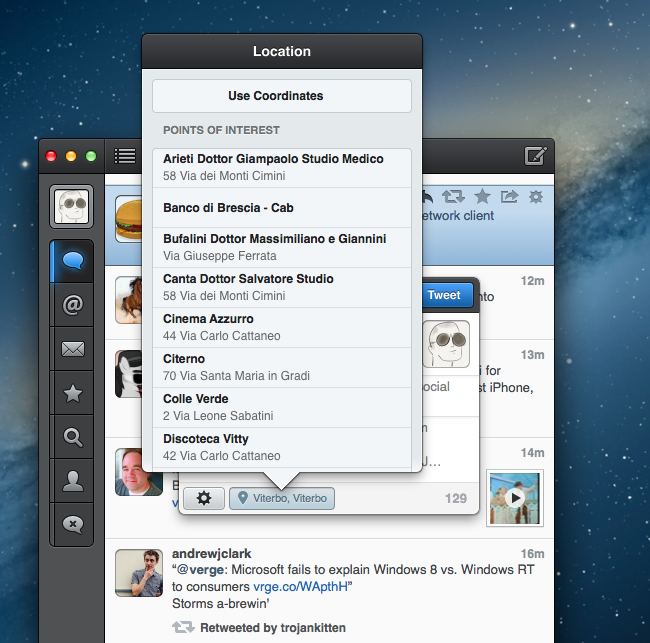
You can access the same location menu of Tweetbot for iOS by clicking on the location data in the tweet compose box.
Unfortunately, Tweetbot 1.0 doesn’t have an AppleScript dictionary.
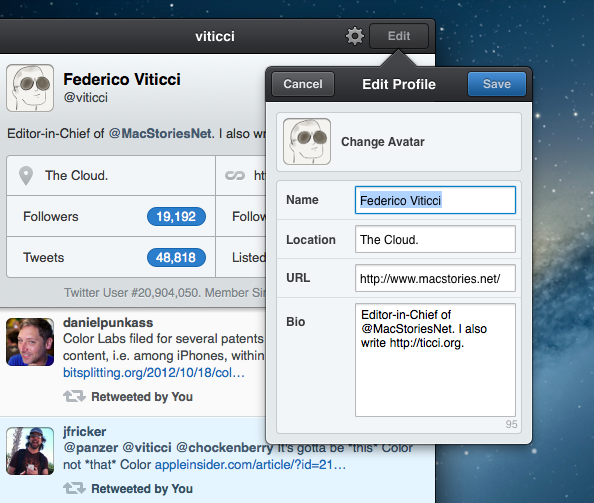
You can edit your Profile without leaving Tweetbot. Just open the Profile tab and click Edit in the upper right corner. You can also change your avatar from the app using the Mac’s standard photo picker.
Clicking on a location in a tweet will open Google Maps in the browser. Same with Translate.
You can drag the compose box to wherever you like.
With the exception of Search, the same URL scheme of Tweetbot for iOS works on the Mac. It is documented here. Below, you can find the code for two bookmarklets I have created to tweet a webpage’s URL and a webpage’s Title + URL (too add these, create a new bookmark and replace its address with the code below).
Tweet title + URLjavascript:window.location='tweetbot:///post?text='+encodeURIComponent(document.title)+' '+encodeURIComponent(window.location.href)
Tweet URLjavascript:window.location='tweetbot:///post?text='+encodeURIComponent(window.location.href)
You can drag tweets out of Tweetbot.
Dragging a tweet to the desktop will create a .webloc file pointing directly to the tweet’s URL; dragging it into iMessage or Mail will insert the tweet’s link as text; dropping a tweet onto Safari’s icon in the Dock will open a new tab for the tweet. This also works with URLs – you can drag those out from within a tweet.
Still The Best
Tweetbot for Mac isn’t the app for people who casually check on Twitter every couple of days: it is priced at $19.99, a clear signal as to the kind of audience Tapbots want to capture. On the other hand, it’s also understandable why Tapbots may want to save precious Twitter tokens for users who really value the feature set of Tweetbot.
Three months ago, what we had was a great Twitter client with several missing features and some rough edges. But, following the premature demise of Twitter for Mac, it already was the most powerful one, suggesting good things would be coming soon. Today, Tweetbot for Mac is faster, more reliable (albeit still not perfect, as some graphical glitches persist), and more functional. It is the rightful evolution of an app that showed its potential earlier this year.
Twitter clients are a very personal matter. Using them on a daily basis, they become deeply entrenched in our workflows and, often, they turn into the apps we’re least likely to give up on. Ask the people who still think Twitter for Mac will eventually get an update. For me, Tweetbot works because it’s got what I need from a Twitter client.
With Tweetbot for Mac, I give my last and official goodbye to the app that used to be Tweetie.
We don’t know what the future looks like for third-party Twitter clients. For now, with the Mac version, Tweetbot has created its own ecosystem inside Twitter.


