With version 4.0 released today, Darkroom has emerged as a photo editing force to be reckoned with on iOS. The highlight of the release is a brand-new iPad app, which is the version I’ll focus on in this review. I ran into a couple of bugs and would like to see Darkroom push its photo management and a few other tools even further in the future. However, the app’s combination of thoughtful design and platform-aware functionality together enable Darkroom to scale its full suite of tools gracefully from iPhone to iPad, which makes it an excellent choice for mobile photo editing.
The Library
One of the things that sets Darkroom apart from a photo editor like Lightroom CC is its tight integration with iCloud Photo Library. Instead of requiring you to manually import images, Darkroom accesses your iCloud Photo Library directly. This approach eliminates the need to have two separate libraries of photos, which can lead to duplication and forgetting where a particular photo is stored.
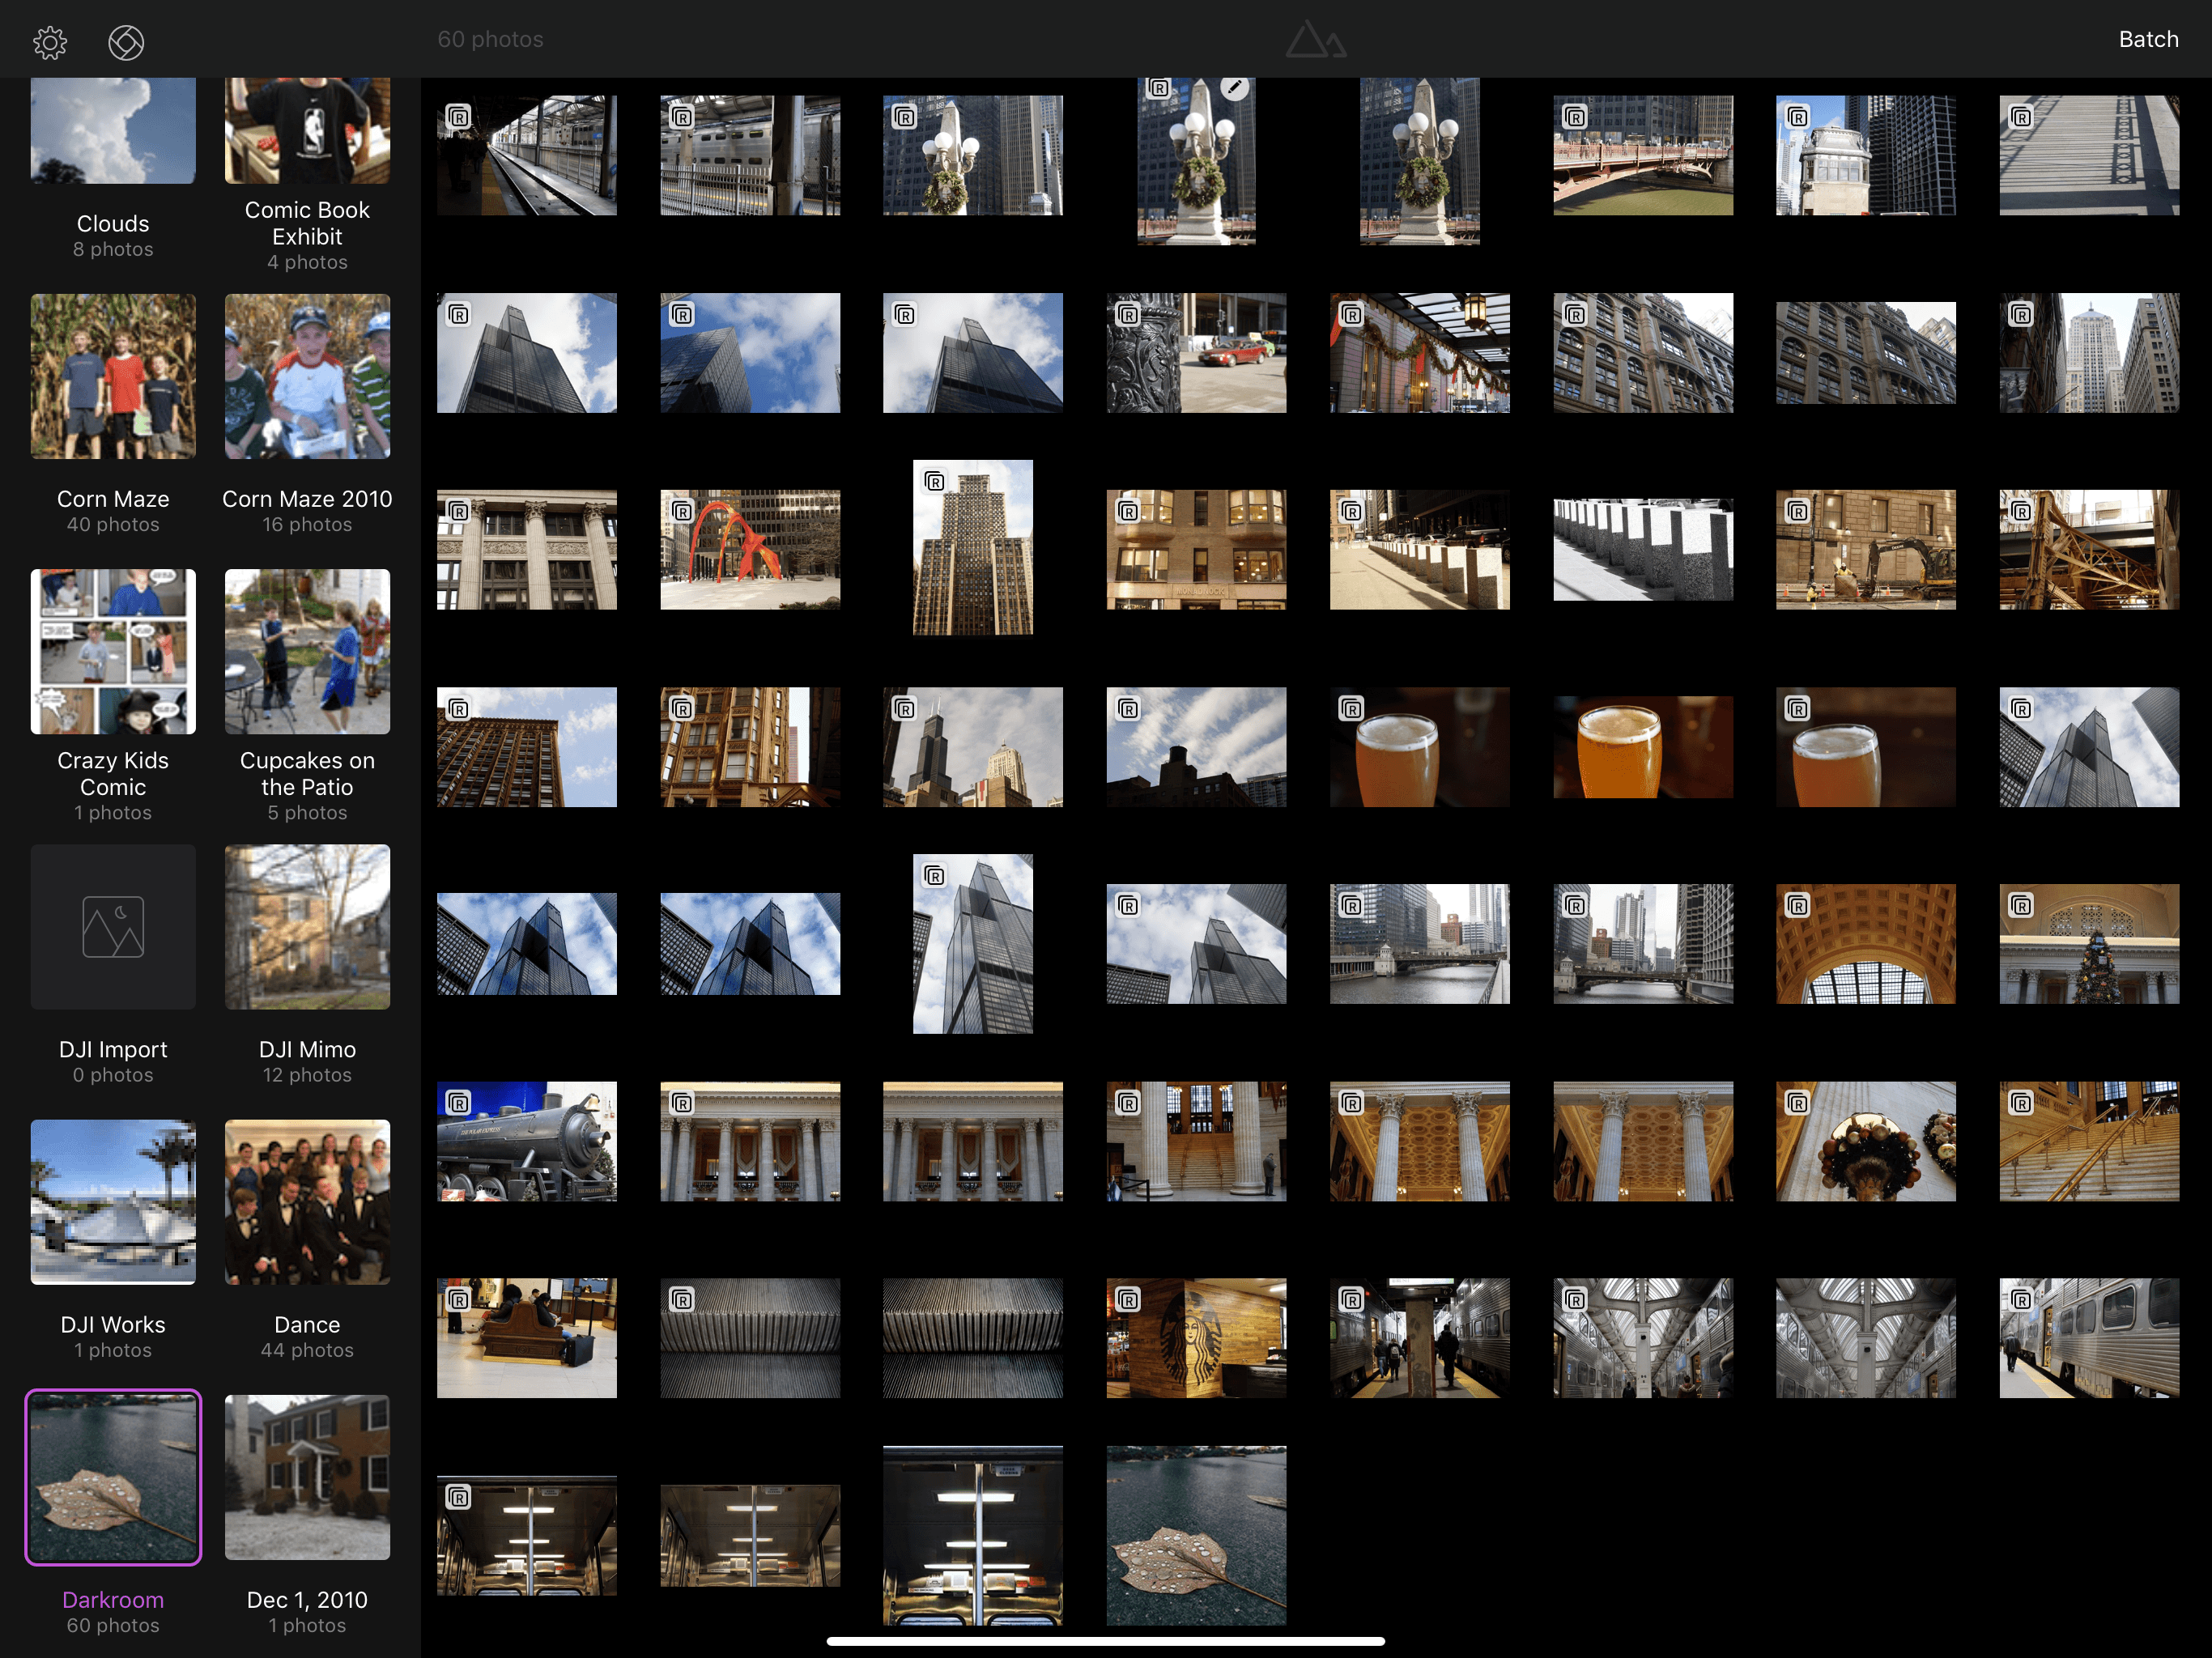
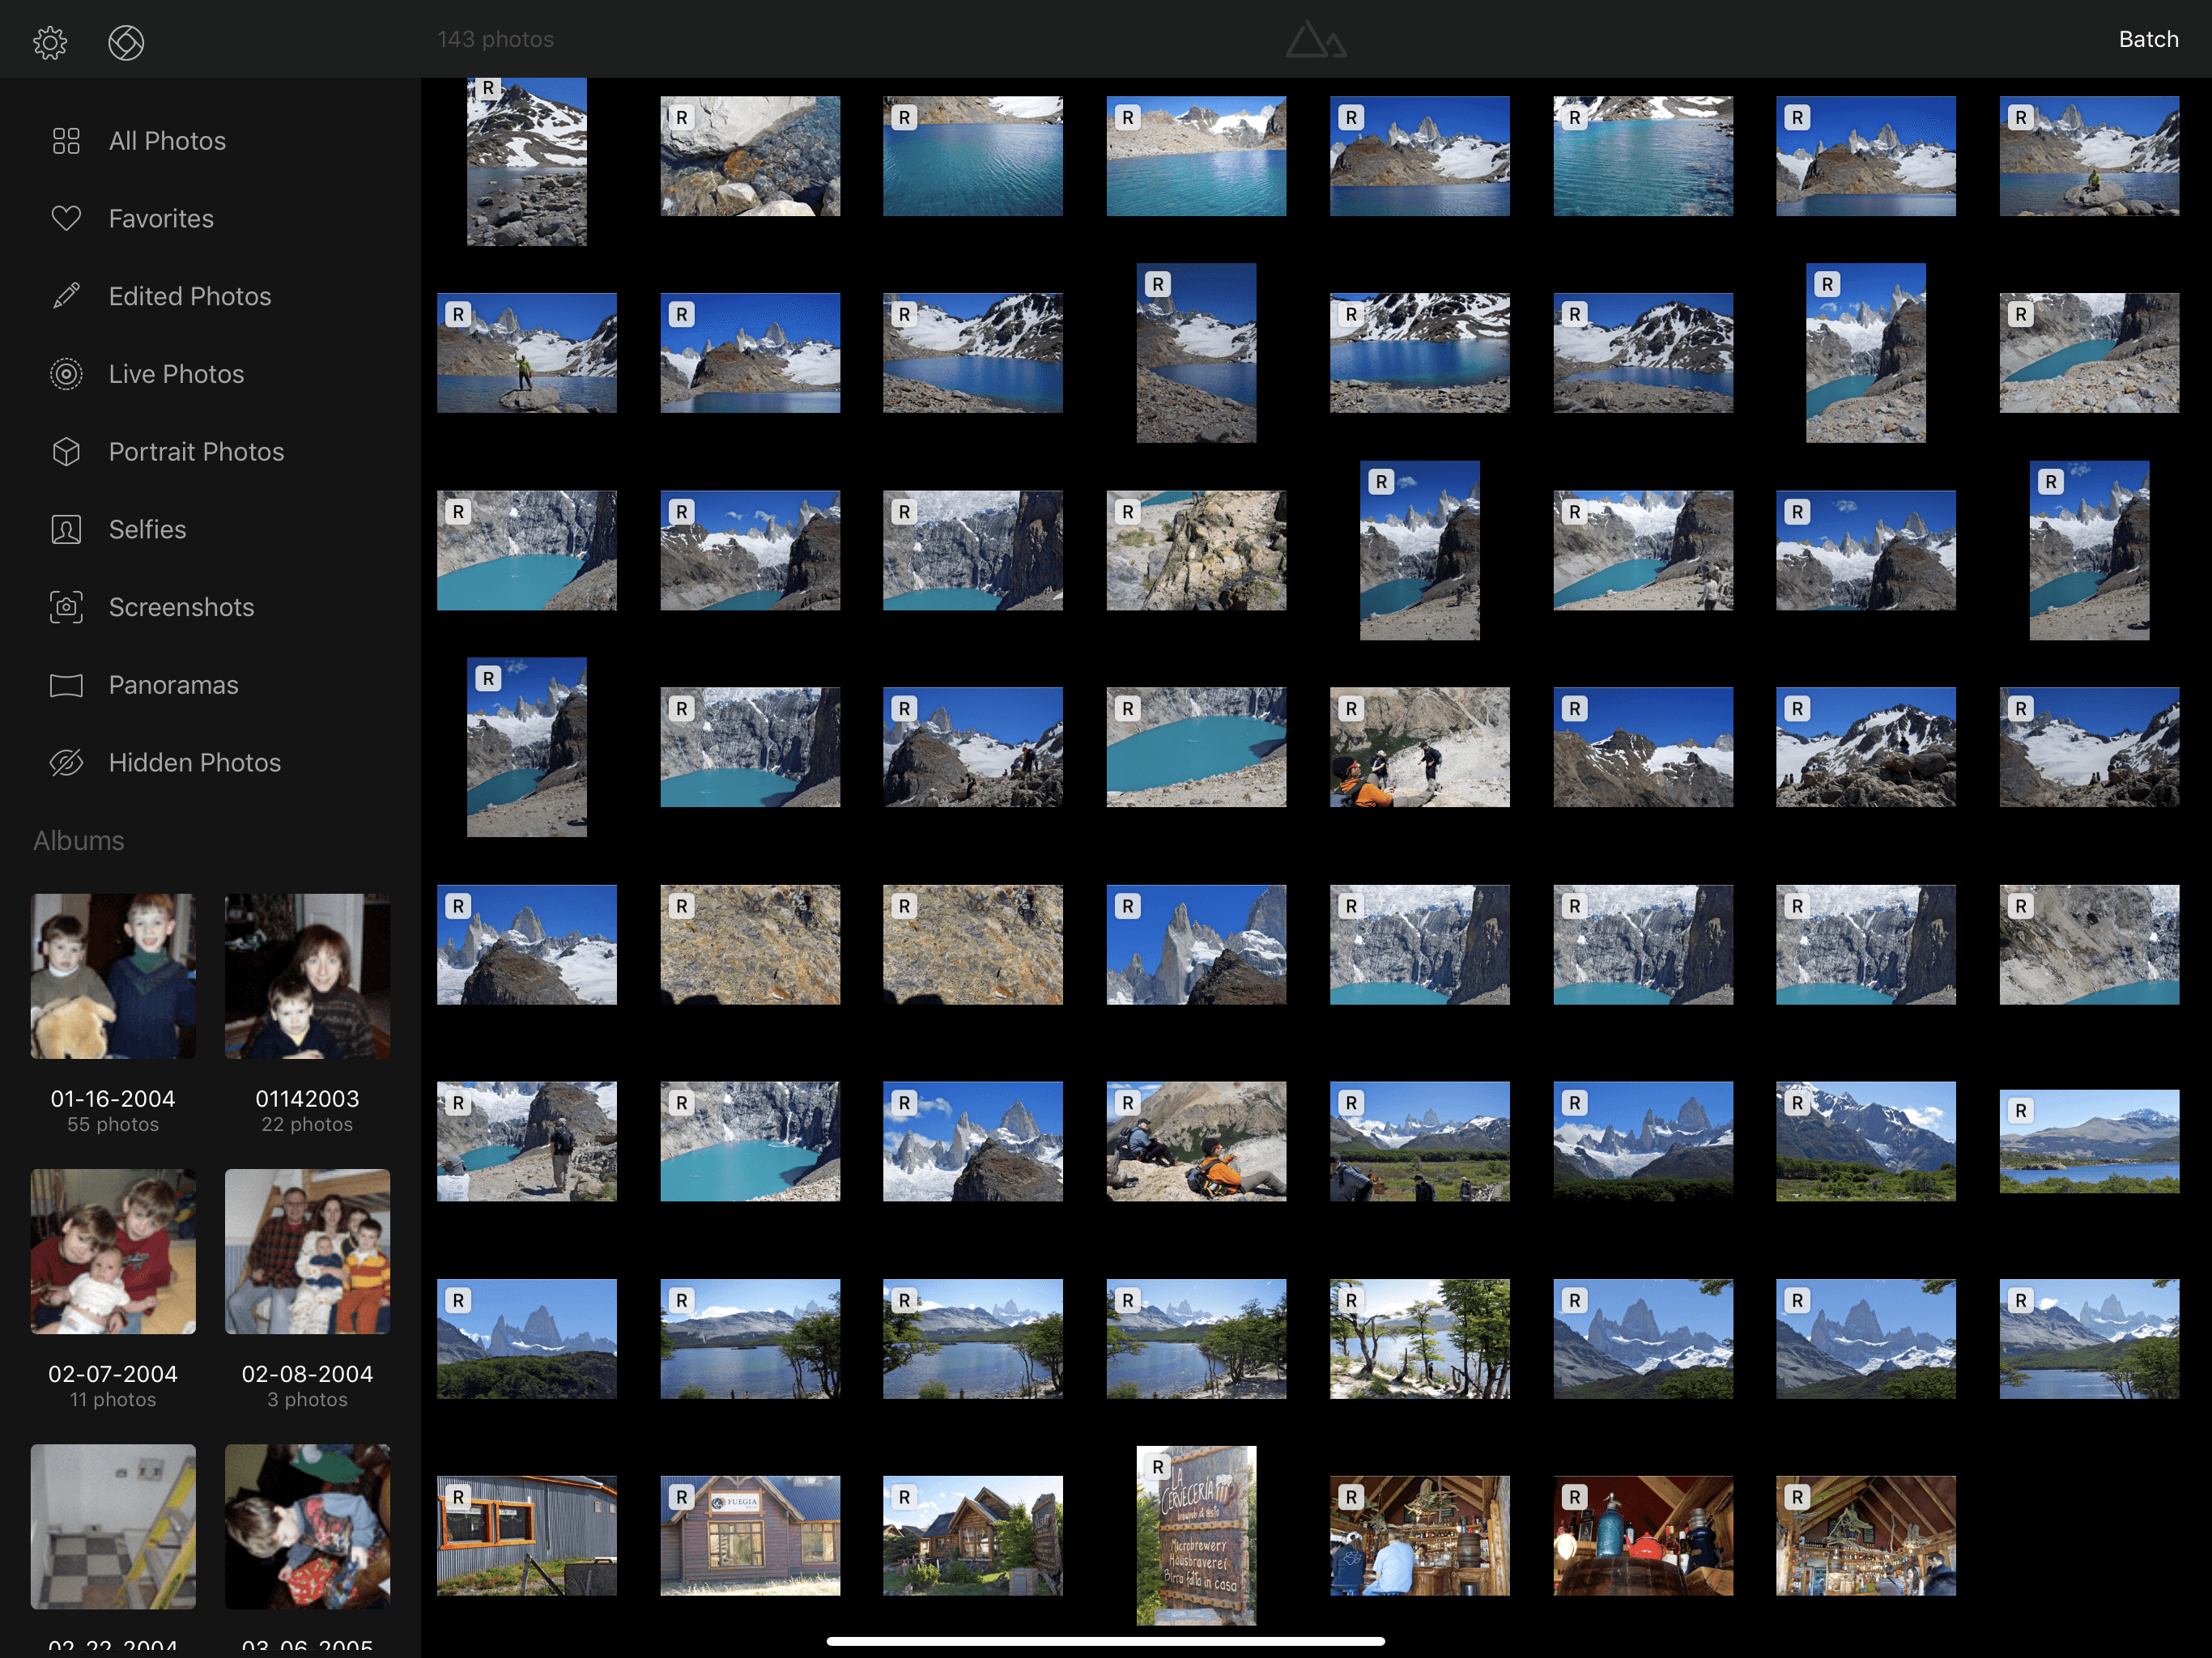
The main library view is divided into two parts. A strip along the left side of the screen displays a list of smart albums generated by Darkroom followed by thumbnails of albums in your iCloud Photo Library. The smart albums include Favorites, photos edited in Darkroom, Live Photos, Portrait Mode photos, selfies, screenshots, panoramas, and hidden photos. The albums in your iCloud Photo library follow in two columns of square thumbnails labeled with the name of the album and the number of photos it contains.
Thumbnails of your photos dominate most of the screen. On a 12.9-inch iPad Pro, the library view is divided into an 8x8 grid of thumbnails so you can see up to 64 images at one time. Image thumbnails include small icons in the corner to indicate things like whether the image is in the RAW format, has been edited, or is a portrait or panoramic shot. To make navigating a large collection easier, Darkroom also has a translucent button that appears at the bottom of the screen when you scroll back through older photos that automatically takes you back to your newest photos.
The easy album access, including the smart albums, is an excellent navigation aid, but I’d like more ways to traverse my photo collection. I’ve got about 40,000 photos in my iCloud Photo Library, and I’d like something similar to the Photos app that allows me to zoom in and out with pinch and zoom gestures to minimize scrolling. I’d also like the option to change the size of the thumbnails in the library.
If you have many albums, browsing them in the sidebar, which displays a dozen at one time on a 12.9-inch iPad Pro, requires lots of scrolling. I also found that if I scroll the album list fast and tap an album before its thumbnail loads, Darkroom’s UI would lock up and I had to quit the app before I could use it again. That’s not a bug most people would typically run into browsing albums in a leisurely way, but if you have a long list of albums to scroll through, it’s a problem and will hopefully be fixed in an update soon.
Depending on the state of the image, long-pressing a photo lets you view its metadata, copy and paste edits, reset its edits, export it, mark or unmark it as a favorite, hide or unhide it, or delete it. Darkroom also allows you to perform a subset of those actions on batches of images by tapping the ‘Batch’ button on the right side of the app’s toolbar. The only tools not available on a batch basis are displaying metadata and copying edits, neither of which make sense in the batch processing context.
Shooting Photos
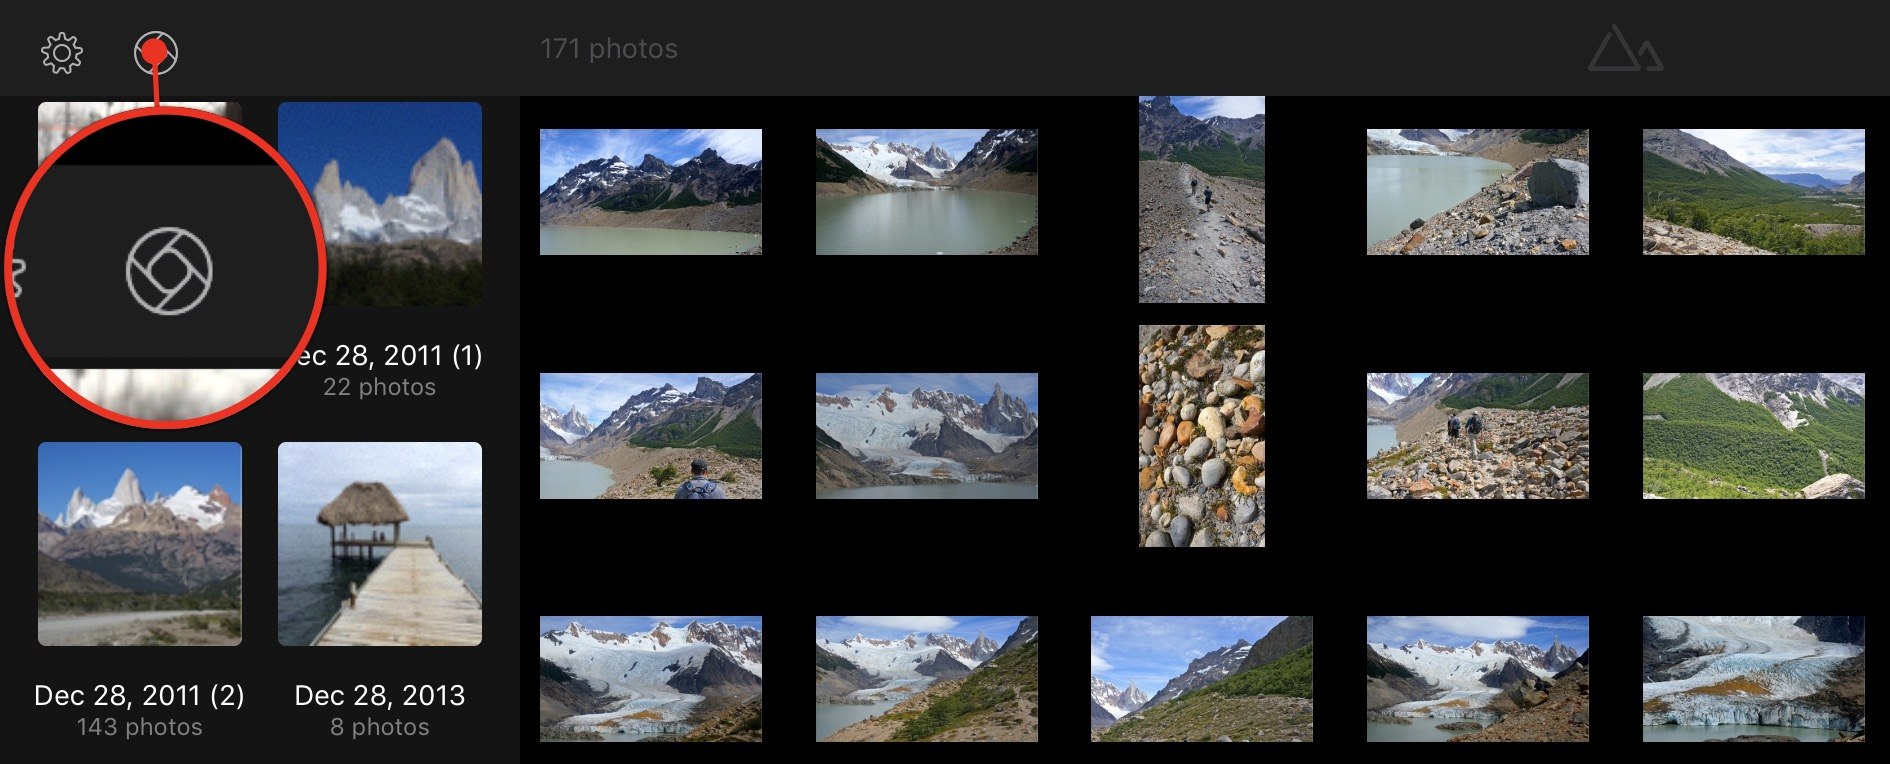
Darkroom doesn’t include a built-in camera app. Instead, it has teamed up with Halide and Moment to provide one-tap access to those camera apps. Halide was added in an earlier release of Darkroom, but the Moment integration is new to version 4.0.
I haven’t had a chance to experiment with the Moment integration yet because it requires an update to that app, which is slated to be released at the same time as Darkroom 4.0, but my understanding is that it will work like the Halide integration.
If you have Halide installed on your iOS device, its icon shows up on the left side of the toolbar in Darkroom. Tapping it opens Halide, from which you can take pictures that will be saved to your iCloud Photo Library and be available to Darkroom. If you have Moment installed too, you will be able to long-press on the icon to switch between apps. In both cases, the advantage of the integration is quick access to a manual camera app without having to return to the home screen to find it yourself.
Editing and Filters
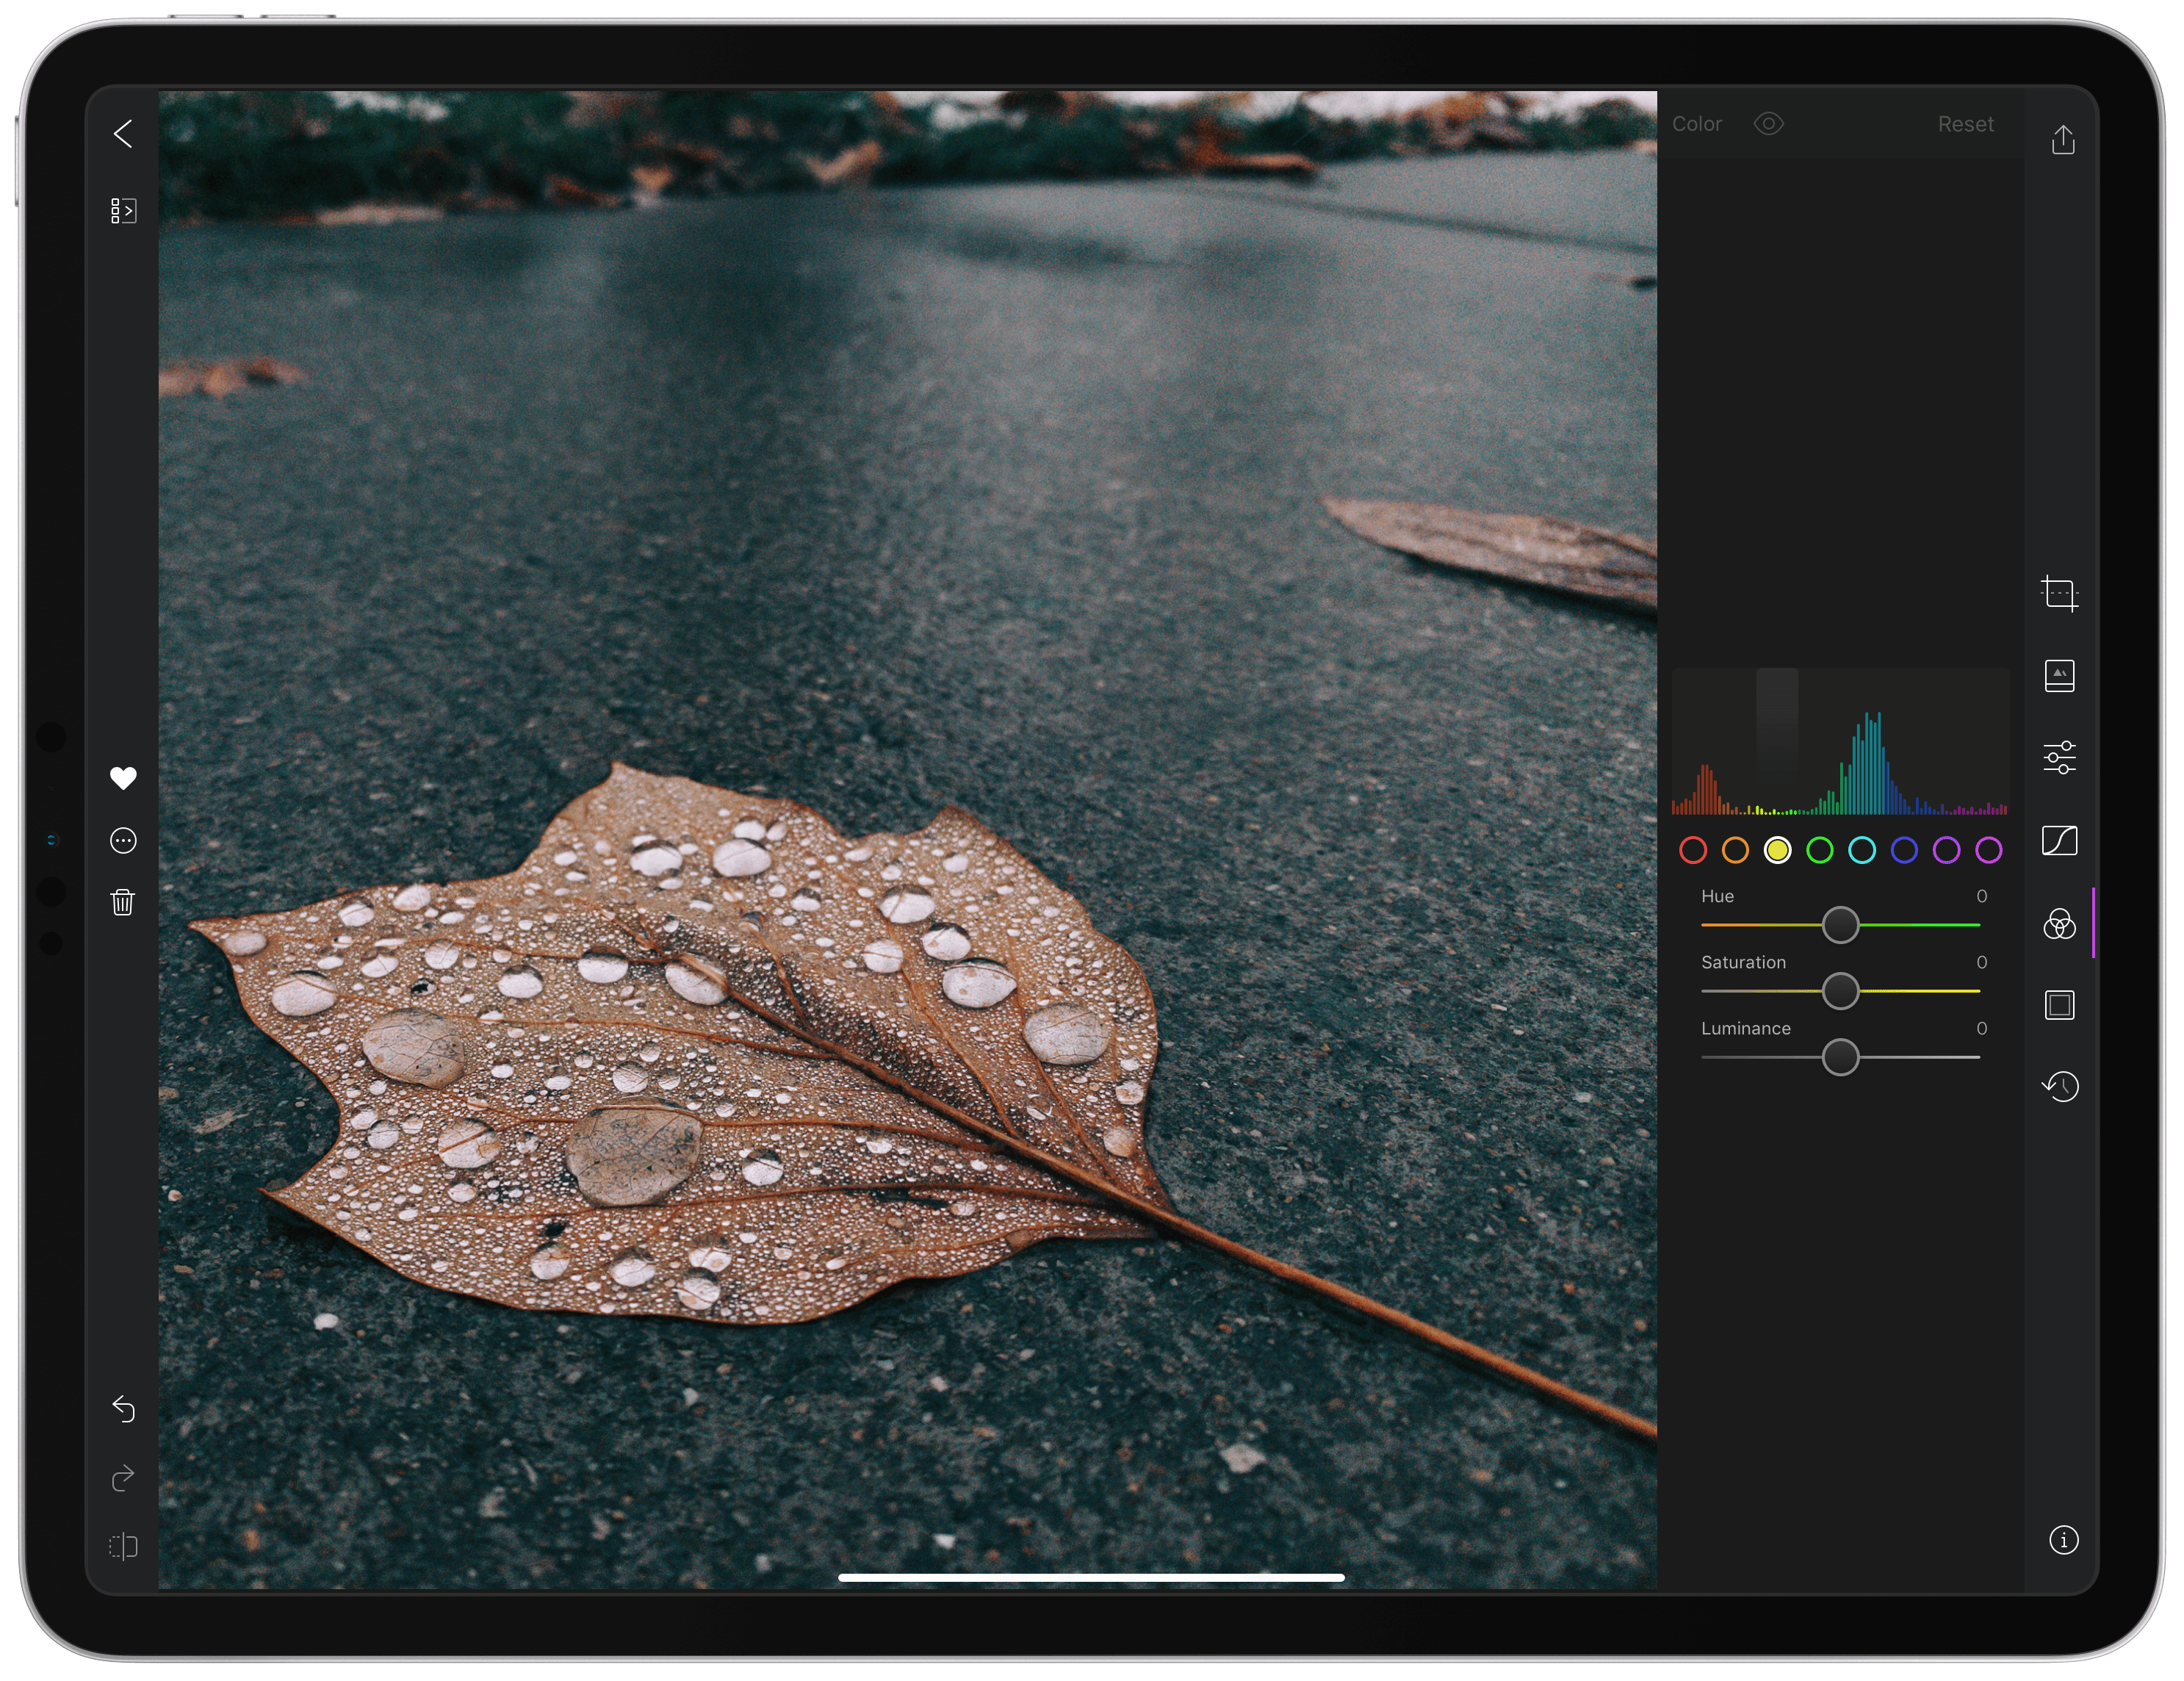
Darkroom includes an extensive set of tools for managing, editing, and applying filters to your images. Tapping a photo opens it with narrow vertical toolbars on the left and right sides. Those toolbars disappear if you tap a photo so that you can get a distraction-free view at any time.
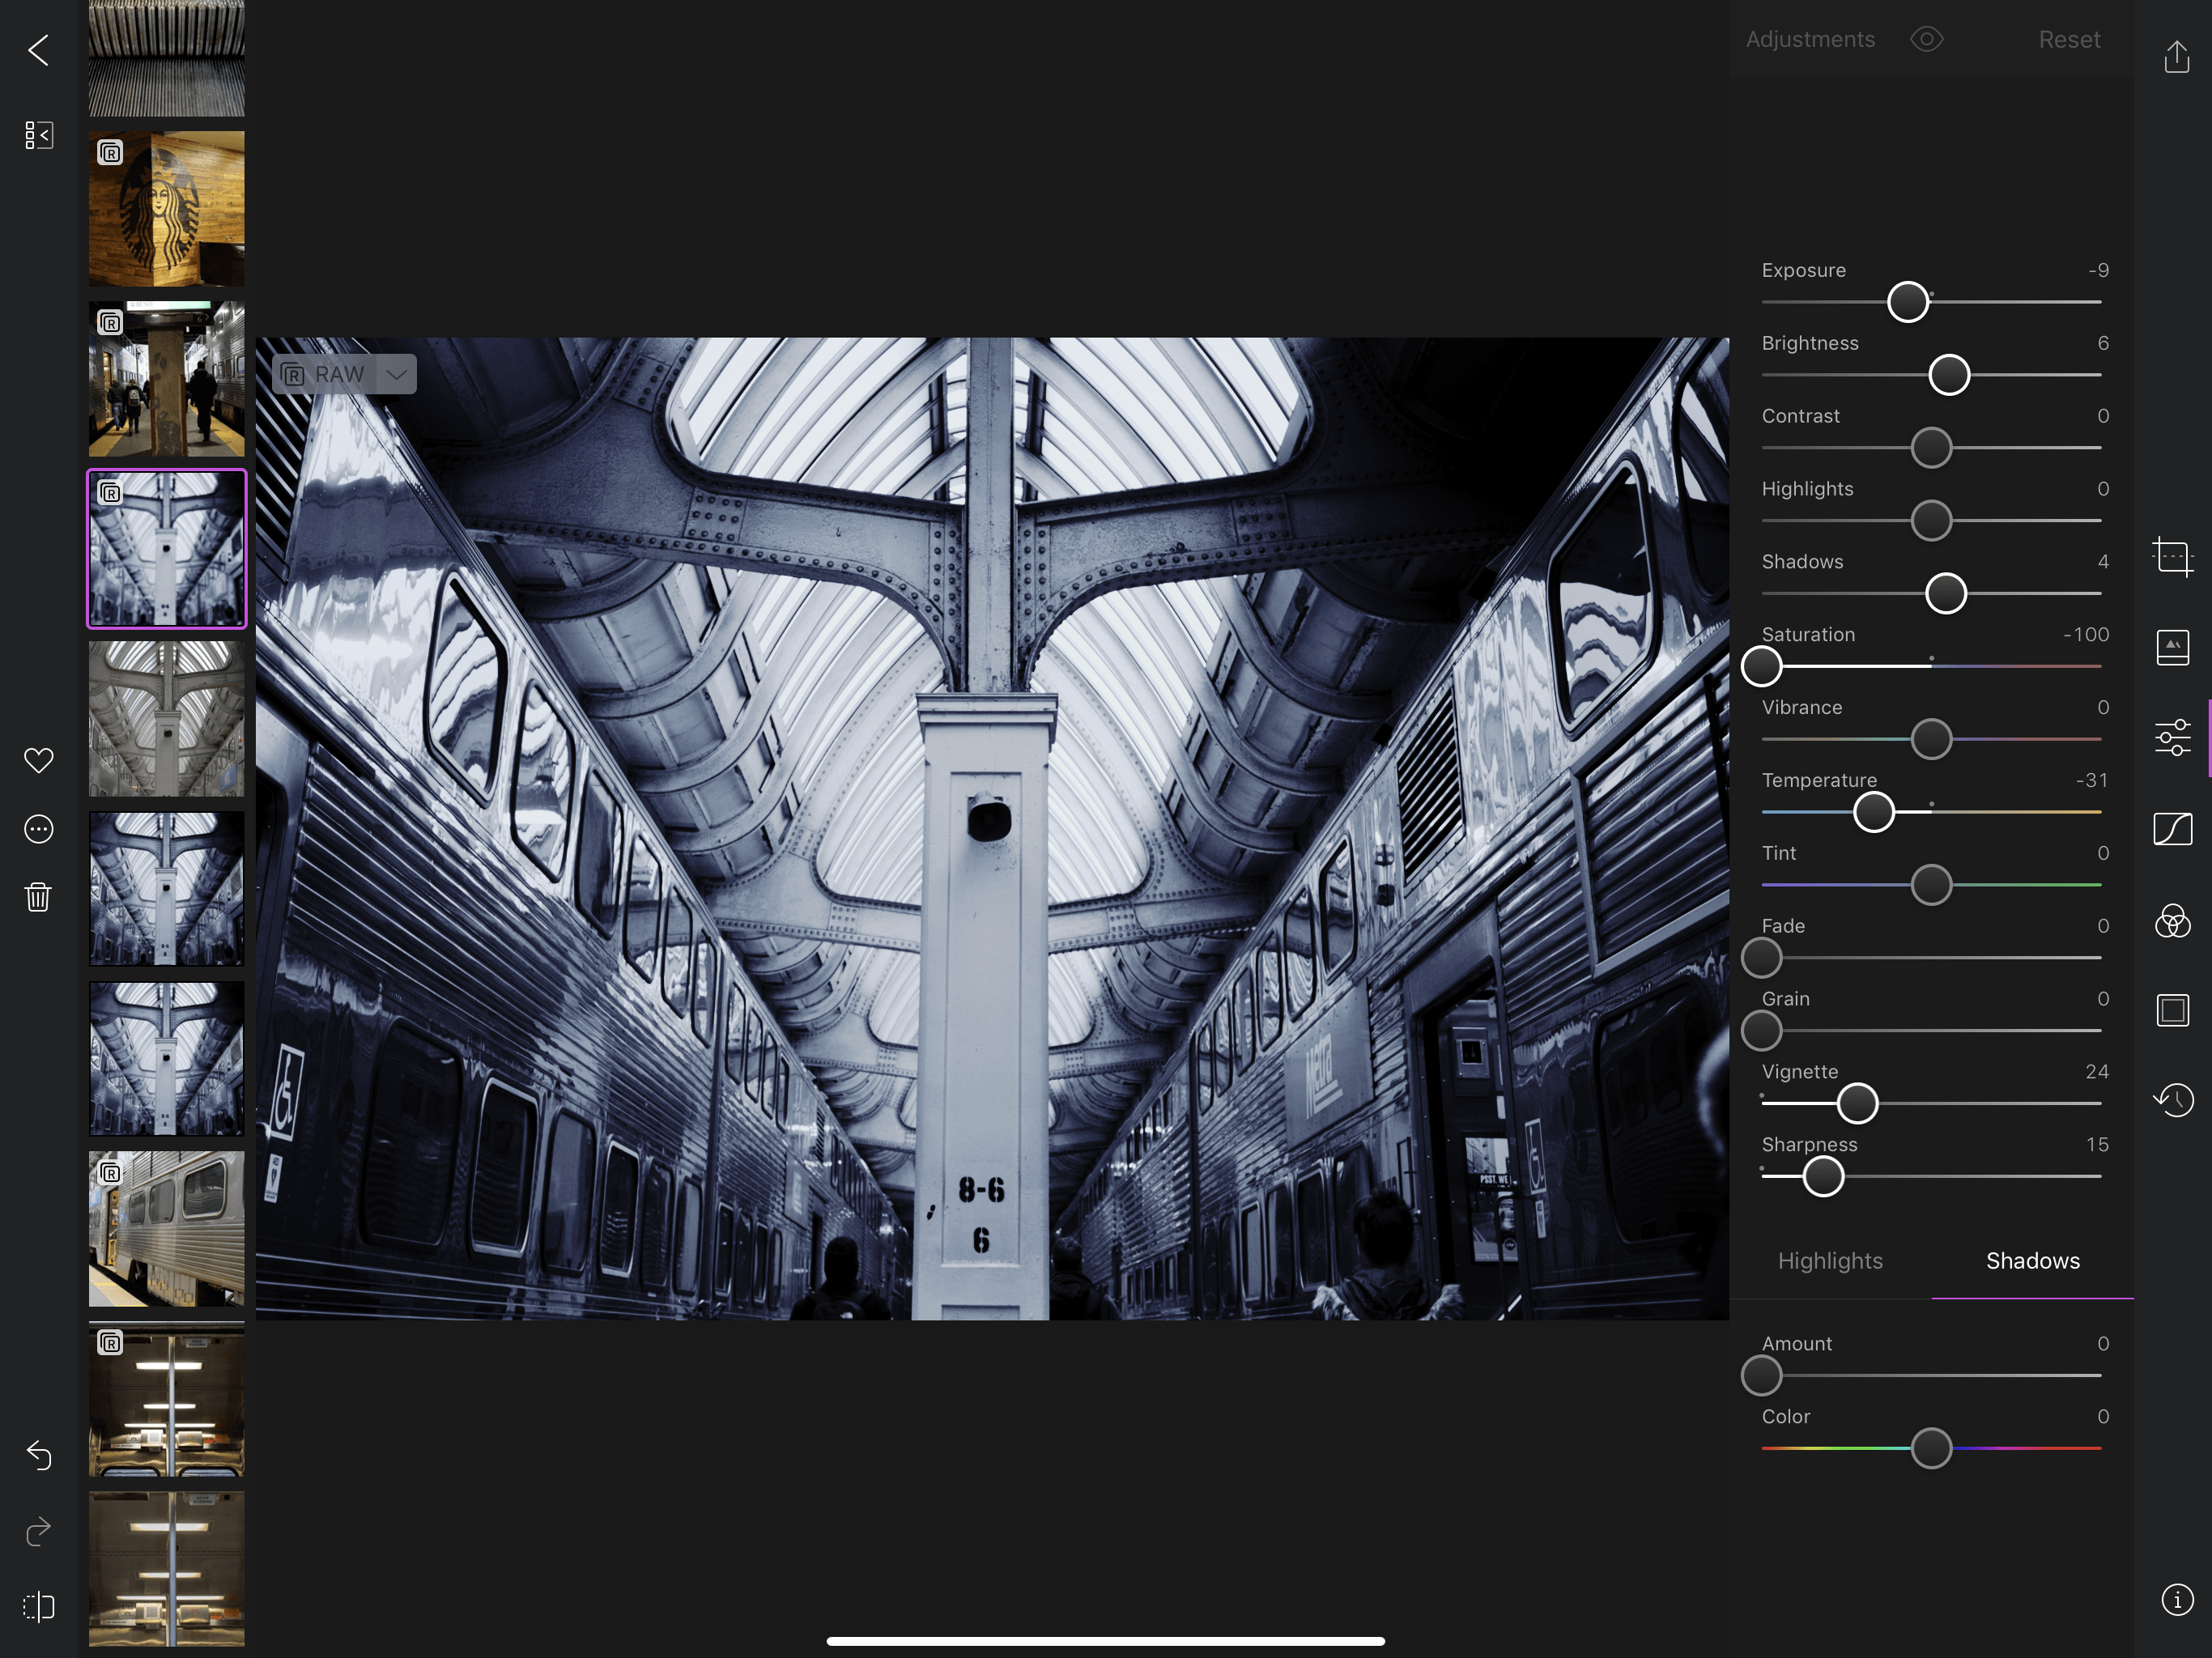
A vertical photo strip of the images in an album can be displayed along the left side of the editing view.
From the left toolbar, you can navigate back to your photo library or display a photo strip of thumbnails. This is a new feature that obviates the need to jump back and forth between the library and the photo you’re editing. Instead, you can scroll the photo strip to glance at the rest of the album quickly. The left-hand toolbar also provides access to the same photo actions that are available when long-pressing an image thumbnail in the library or photo strip as well as undo and redo buttons.
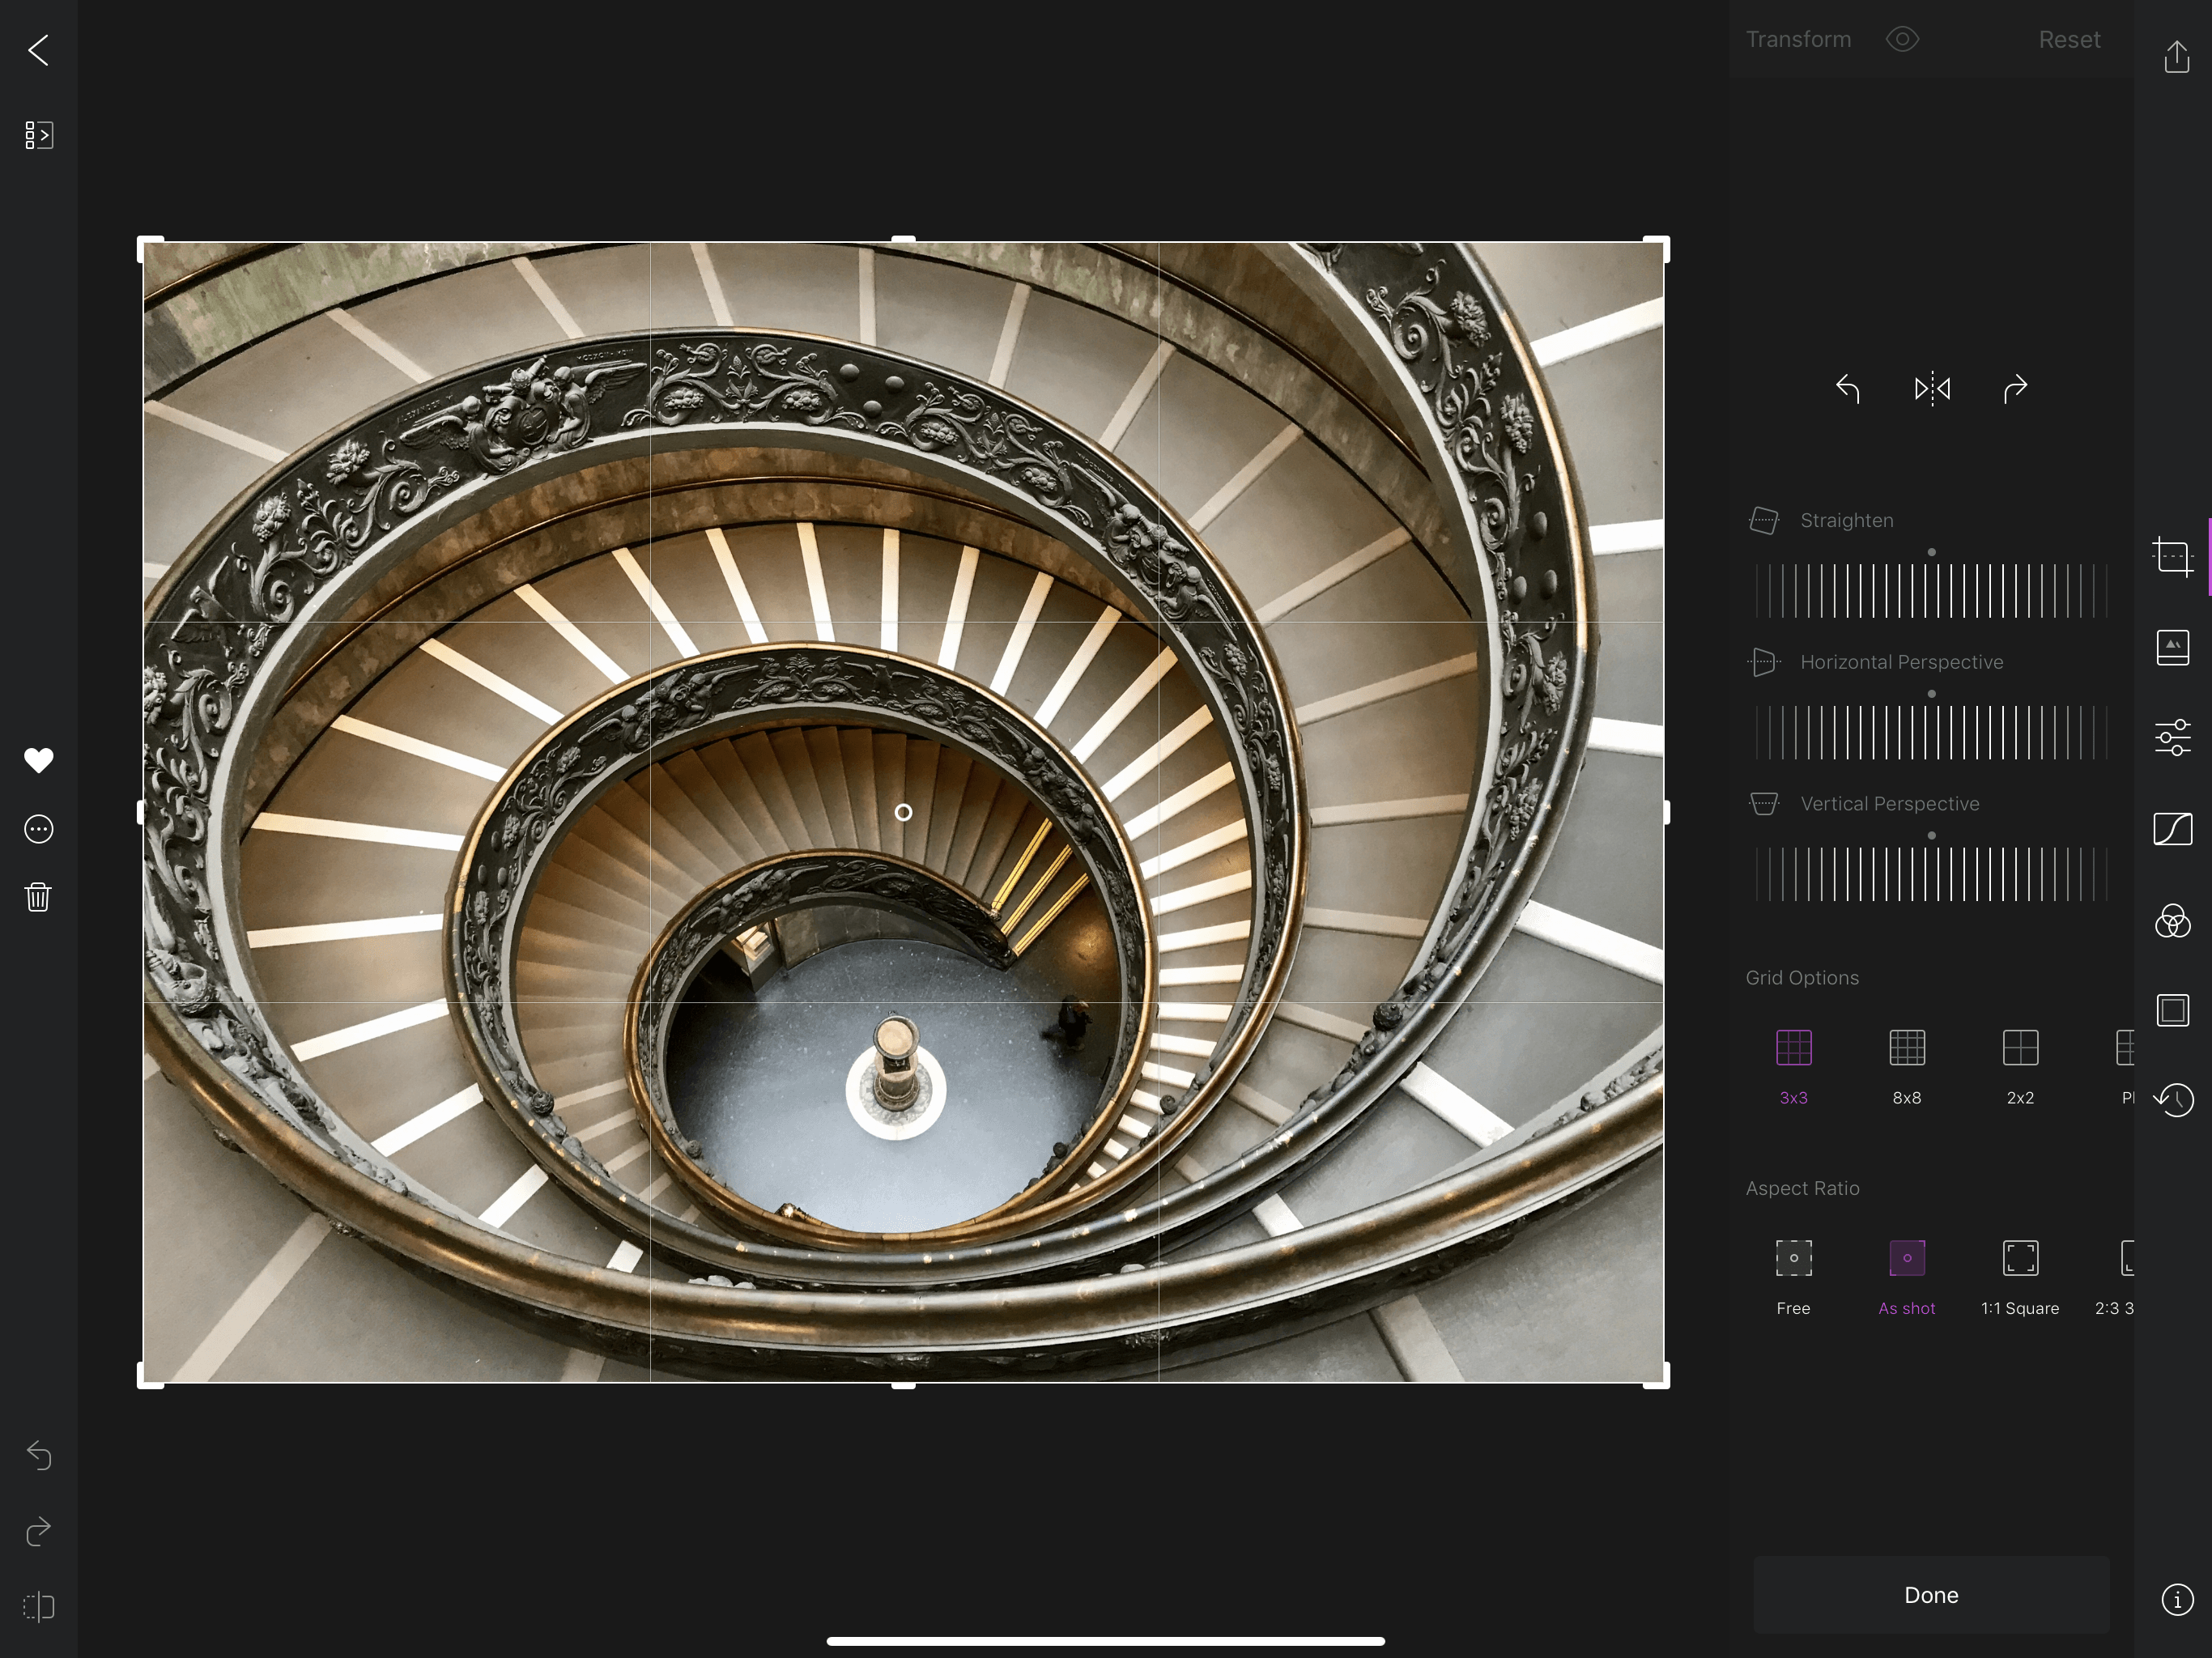
Editing tools and filters are available from the toolbar on the right side of the screen. The crop tool has the conventional crop, straighten, and rotation tools, but also includes dials for altering the horizontal and vertical perspectives of images, multiple grid overlays that can be used to help compose your cropped shot, and an extensive set of preset aspect ratios.
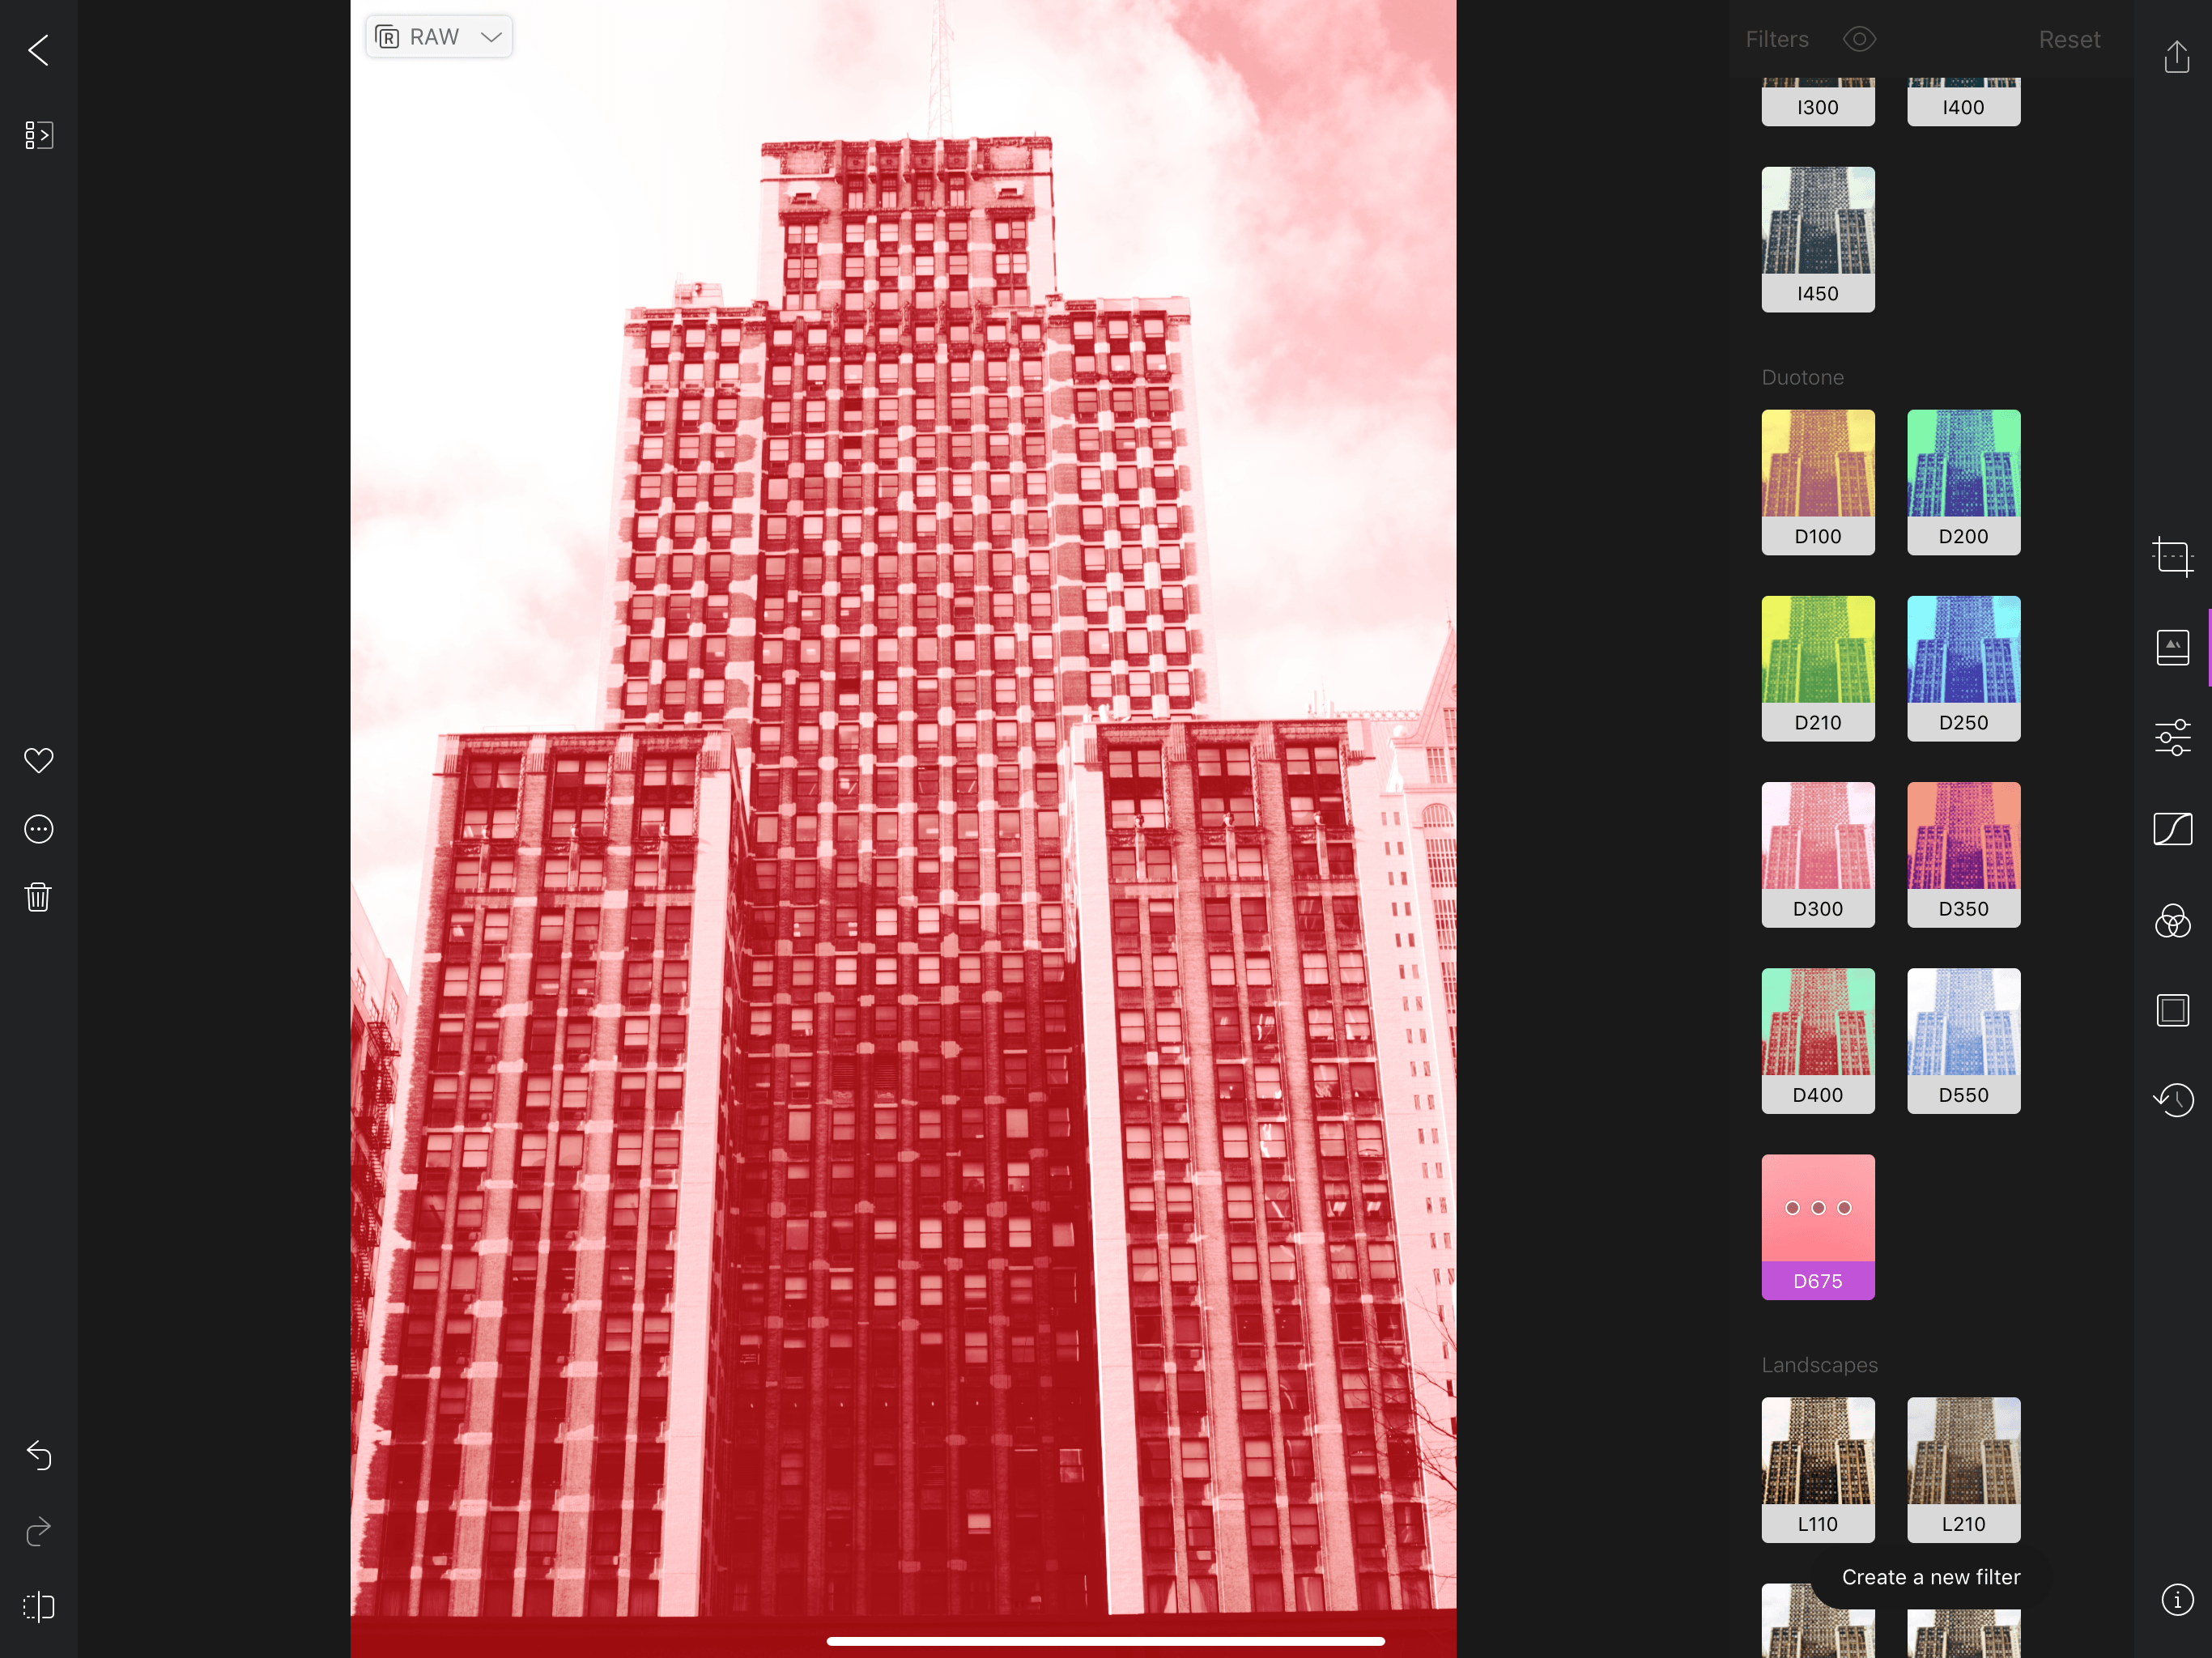
The crop tool is followed by Darkroom’s filters. Many apps get carried away with filters, but Darkroom doesn’t. There’s a nice set of choices available, yet even including the ones available as In-App Purchases, there aren’t so many that it’s too hard to pick one. It also helps that the filters are grouped into categories by style: Darkroom, XPRO, Instant, Duotone, Landscapes, Portraits, and B&W. Tap a filter to apply it, then tap it again to adjust its strength.
One of my favorite features of Darkroom is the ability to create custom filters, which appear at the top of the list of filters under ‘My Filters.’ If you’ve finely-tuned a look using a combination of filters and other edits that you want to save for future shots, head to the filter tool, scroll to the bottom of the list, tap ‘Create a new filter,’ and give it a name.
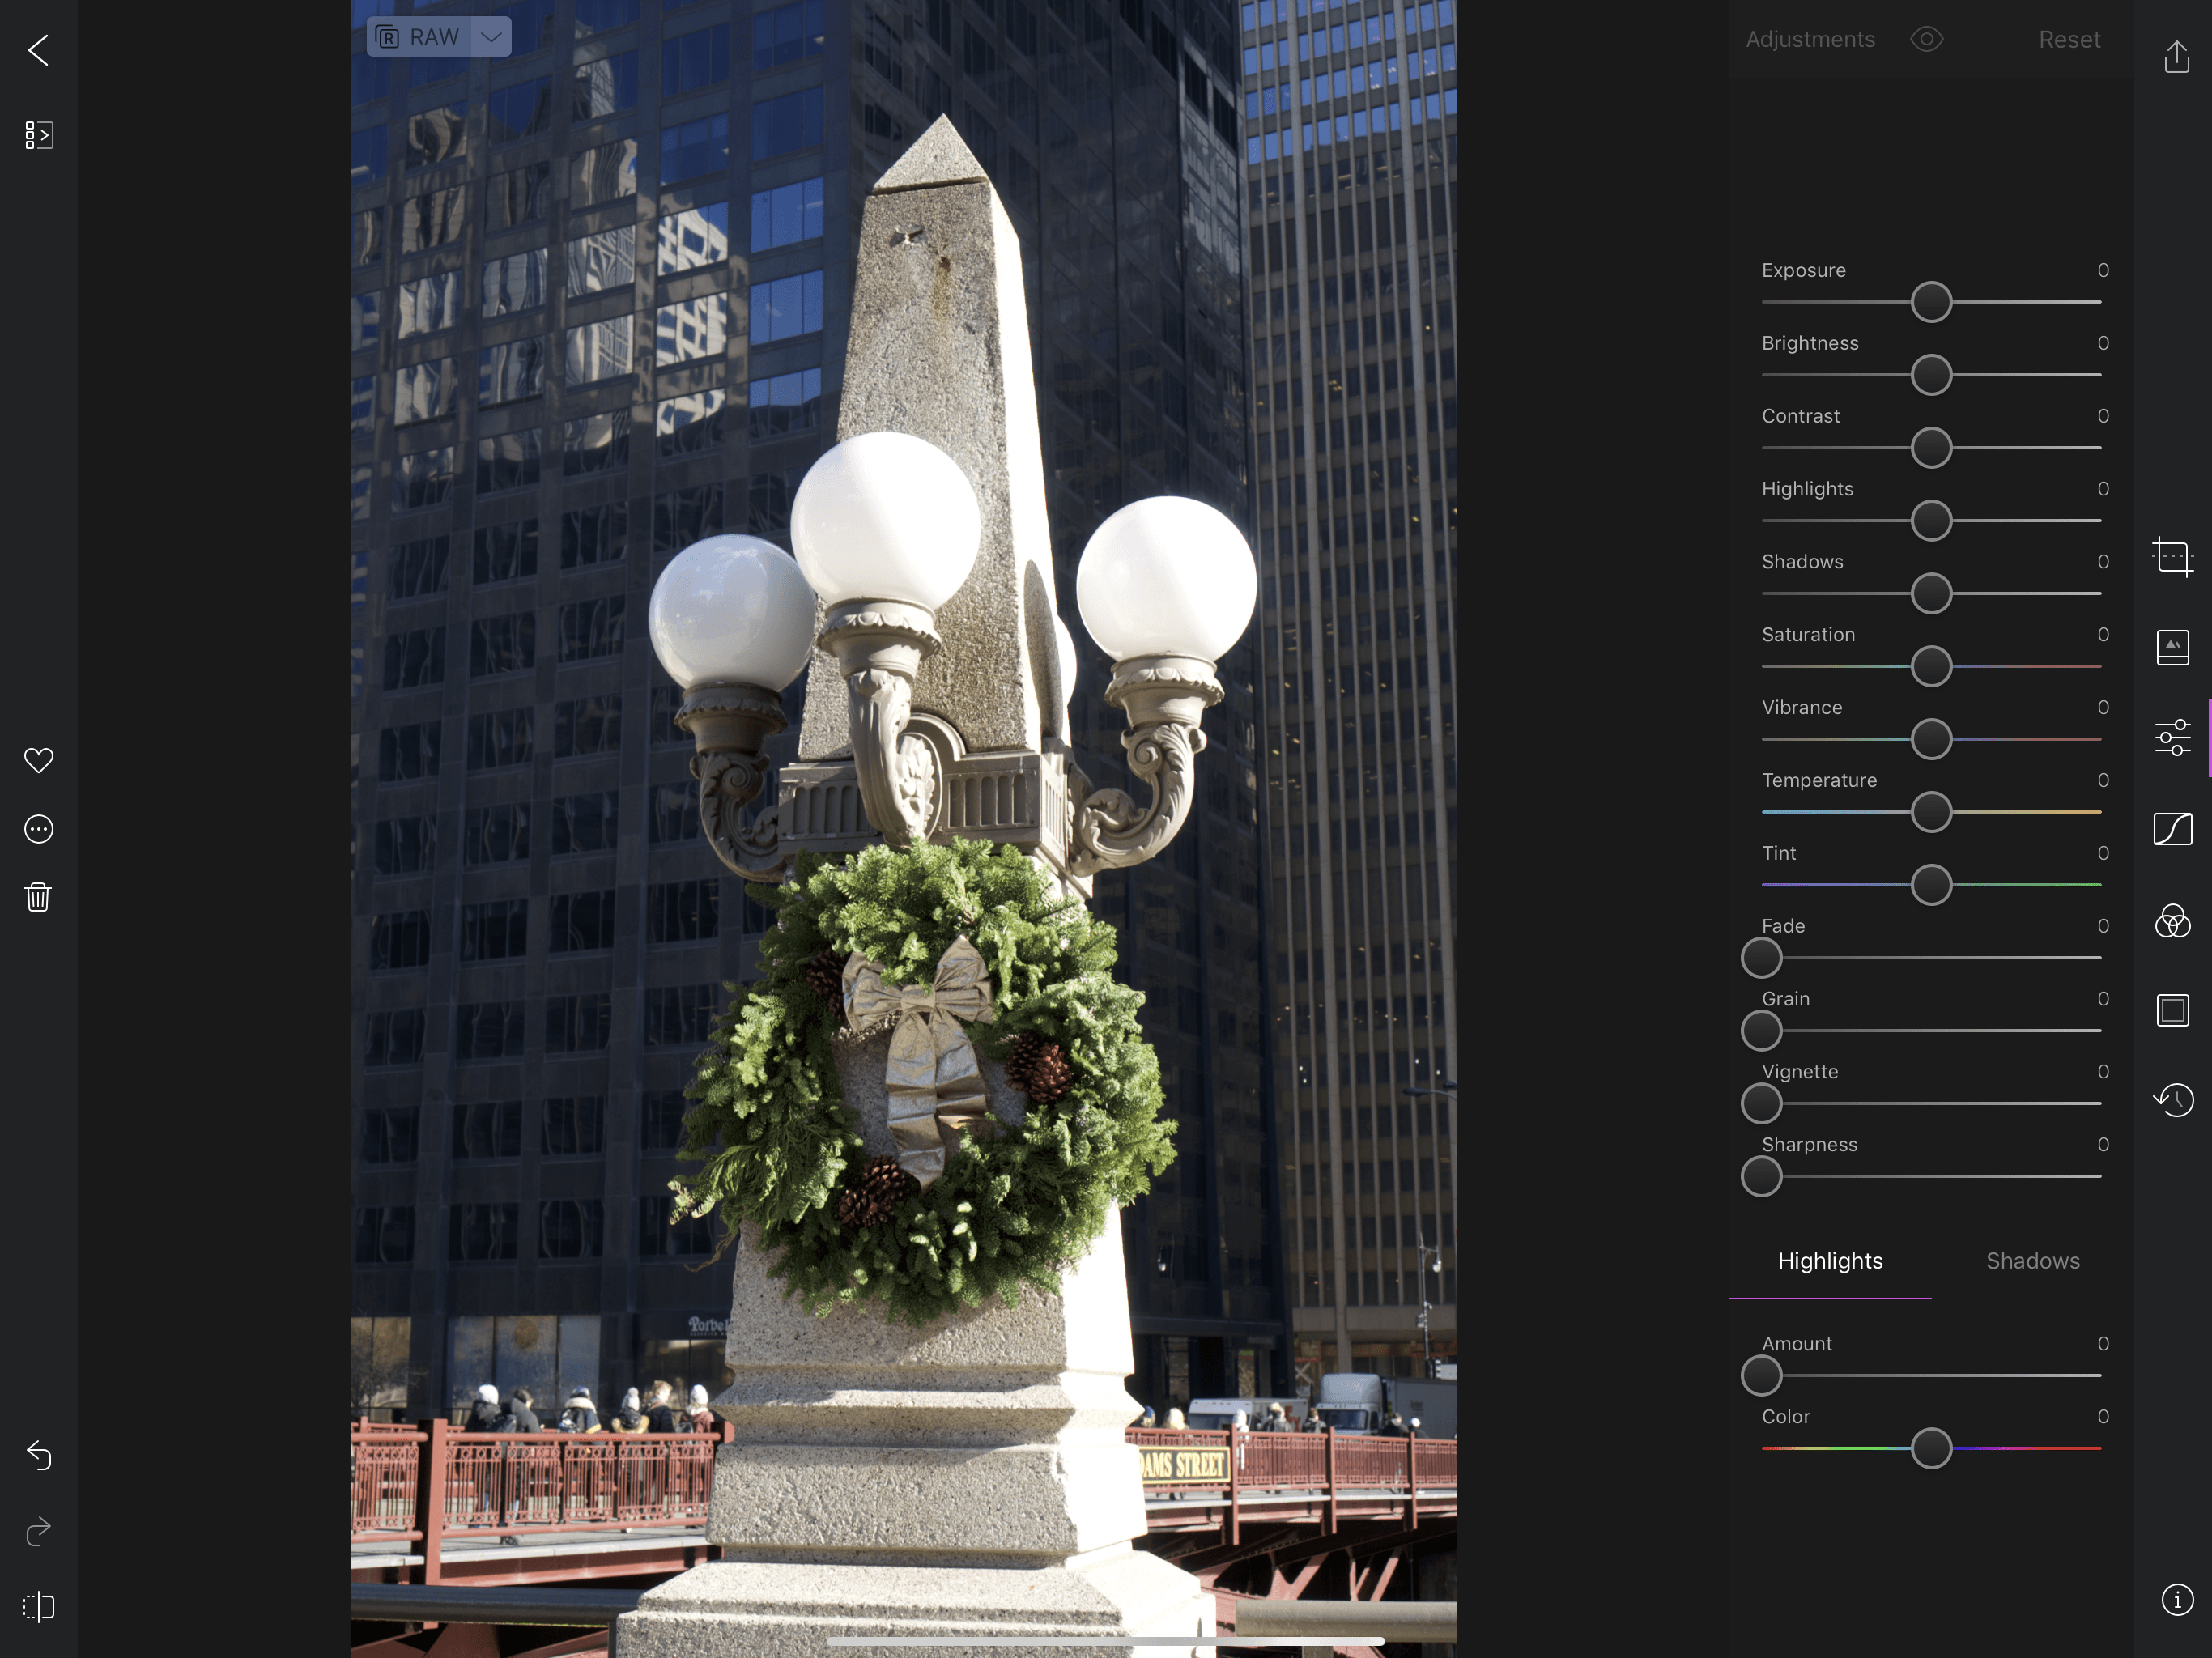
Filters are a fantastic way to dial in a certain look quickly, but you can also use Darkroom’s lengthy list of adjustment tools to edit your photos. Every adjustment has a slider that displays its numeric value, allowing you to set each of the following with precision:
- Brightness
- Contrast
- Highlights
- Shadows
- Saturation
- Vibrance
- Temperature
- Tint
- Fade
- Grain
- Vignette
- Sharpness
The color and degree of highlights and shadows have separate controls too.
Darkroom’s next tool is a color curve that allows red, green, and blue to be independently adjusted or as an RGB group by dragging the points on the tool’s graph. A separate color tool to adjust the hue, saturation, and luminance of different parts of the color spectrum is available too. Your image’s color distribution is visualized using a histogram with buttons below it that allow you to pick which portion of the spectrum you want to adjust.
In my tests, the sliders of the color tool stuttered a little when editing RAW images. Also, adjusting an image’s color and then picking another photo in the photo strip caused the app to crash, but the developers are aware of the issue and looking into it.
Darkroom can also add frames to photos with varying dimensions, stroke widths, and colors, and can display a history of the changes made to a photo with the ability to reset the image to its original state, copy the edits for application elsewhere, and paste edits. There’s an info button for viewing a photo’s metadata too.
Darkroom’s editing tools are impressive for their depth. They are also simple and intuitive to use. The only thing I’d like to see added in the future is an ‘auto-enhance’ button. Even when I’m not completely happy with the results of auto-enhance in other apps, it can serve as a good starting point for making additional manual tweaks.
Exporting, Sharing, and All the Rest
Darkroom’s export options are hiding behind a share button that’s available from the batch action view and when editing an individual photo. Tap it to access not only the system share sheet but options to save images to iCloud Photo Library as copies or as replacements of the original photos. The popup that’s displayed when you tap the share button is also where you can set an inset for a framed image and copy customizable sets of hashtags to the clipboard, which is handy for Instagram users who tag their photos. Hashtag copying can also be accomplished with a Siri shortcut. A gear icon on the export popup takes you to export options where you can pick the file format and quality of the image exported, instruct Darkroom to remove location metadata from photos, and even add copyright information.
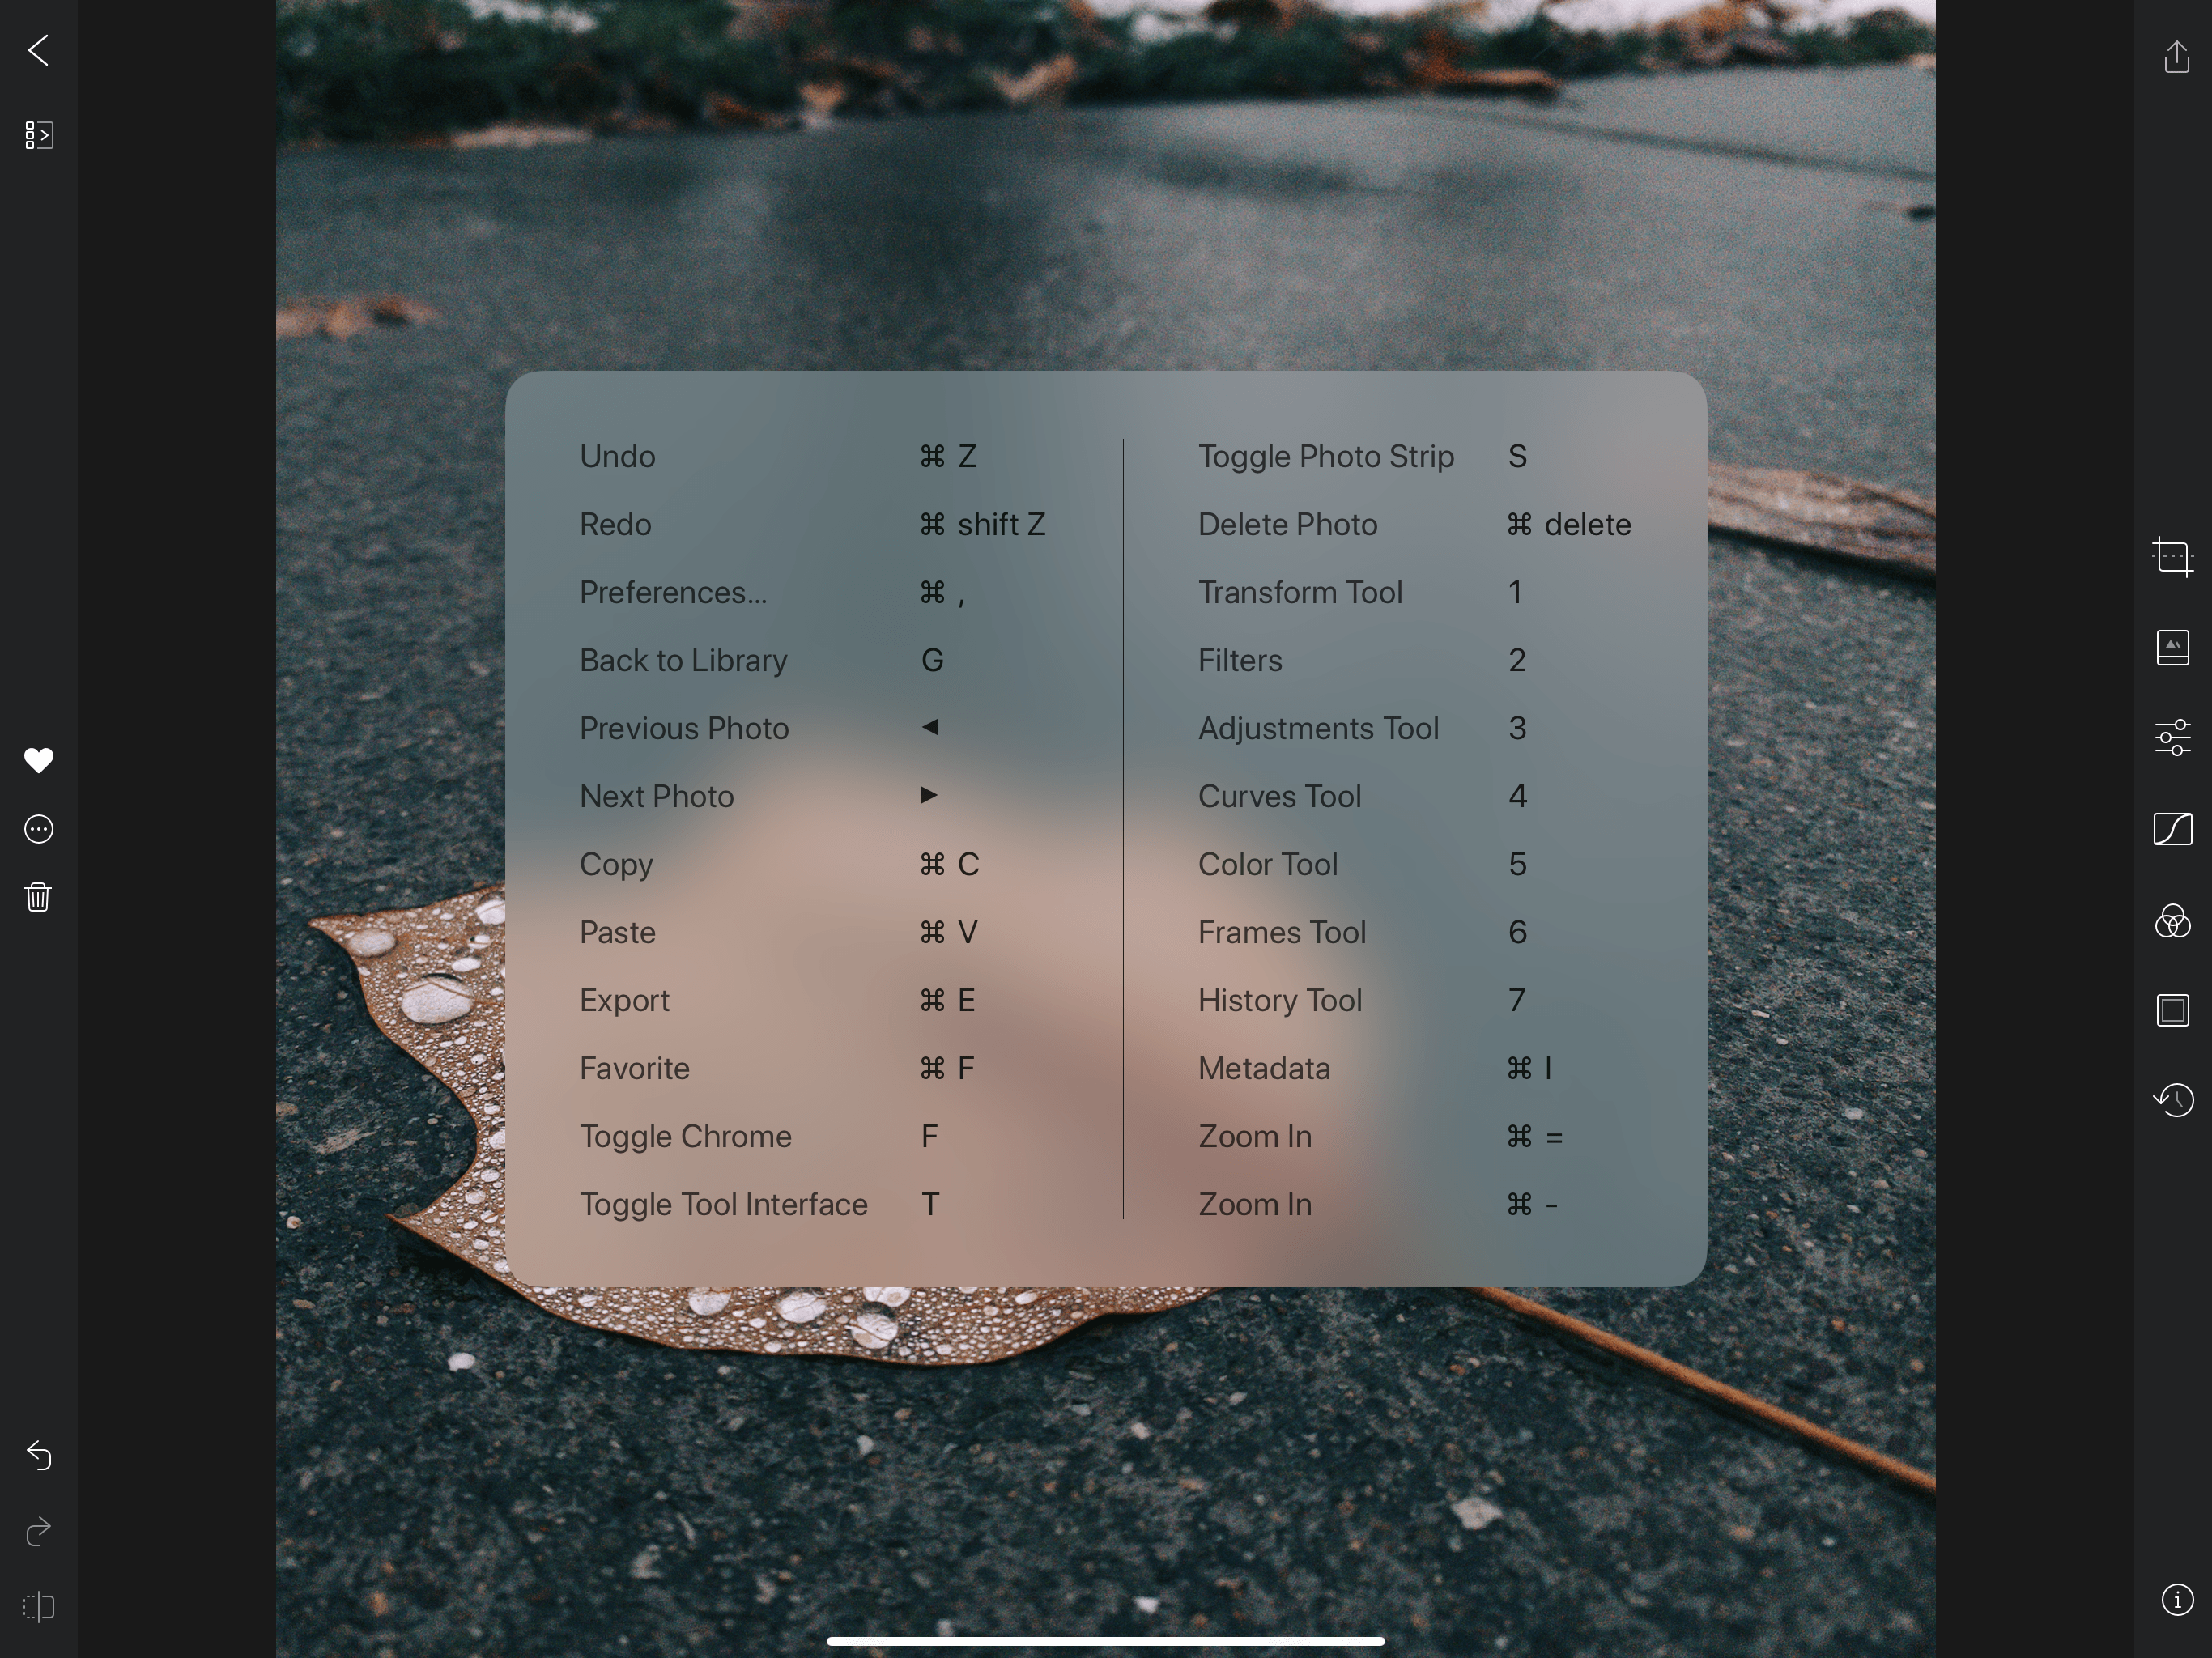
Another point worth noting is Darkroom’s extensive use of keyboard shortcuts. About the only things you can’t do is navigate the albums and photos in the library view, select photos in batch mode, or apply adjustments or filters in editing mode. While I’d like to see keyboard shortcuts for those aspects of Darkroom, Bergen Co.’s implementation is more extensive than most iPad apps and what they have makes moving among the app’s views and modes fast and fluid.
Despite a couple of rough patches, I’m impressed with what Darkroom has become. There’s a lot more to this app than fun filters. With RAW support, a wide range of tools, and iPad support, Darkroom is a full-fledged photo editor. Darkroom also scales nicely from the smallest iPhone screen to the biggest iPad and takes advantage of the unique hardware each iOS device has to offer. Especially on an iPad, Darkroom does an excellent job of offering the tools you’ll want to edit your photos without getting in the way, allowing the photos room to breathe as you edit. I’m glad I have the ability to edit in Darkroom on my iPhone, but the iPad is where the experience is best, which is why it’s great to have that option with the release of Darkroom 4.0.
Darkroom is available on the App Store as a free download with some filters and tools like curves and color adjustments available as In-App Purchases.


