It wasn’t originally a New Year’s resolution to keep better track of my spending, but by the way things have turned out, it almost seems as if it was one. Early in January I began looking for a good Mac app for exactly this task. Originally I had hoped that Saver, an app I reviewed last year had since released an iPad app that I had not heard about – I really liked the app but wanted it on the iPad or Mac. Unfortunately Saver is still iPhone only, so I looked around a bit longer, asked around and tried a few apps on the Mac. I wasn’t thrilled with what I found. They all seemed a little to complex for what I wanted, so I kept looking. I forget how, but I eventually stumbled upon MoneyWiz which is available on the iPad and iPhone (at the time it was called SilverWiz). The developers haven’t yet released a Mac version (they’re working on it and expect to launch it in Spring this year), but they did give me an early look at the recent update to MoneyWiz for iPad (version 1.3), which launched late last week.
MoneyWiz for iPad does a couple of things: it keeps track of your expenses, allows you to set budgets (and track your progress), and provides you with the ability to create reports on various aspects of your financial situation. More importantly, I found MoneyWiz to be very flexible, not overly complex like some of the Mac apps I tried, and, at the same time, full of a wealth of features that should be sufficient for most individuals.
Tracking Your Accounts
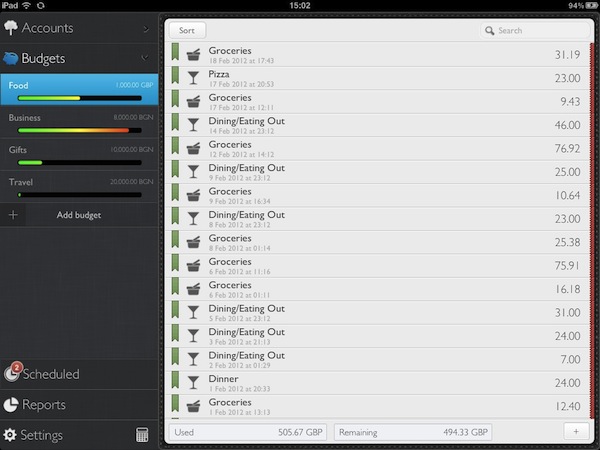
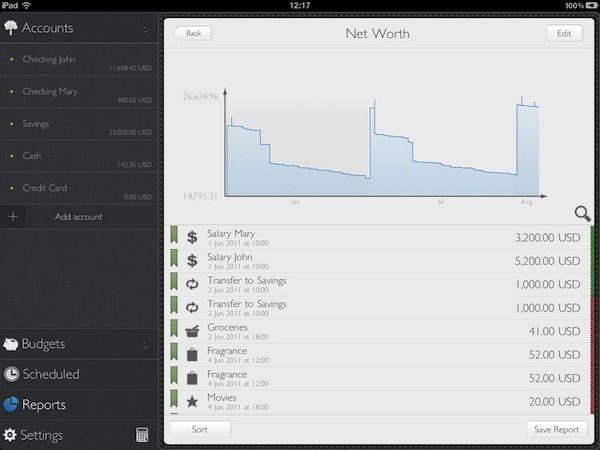
Ultimately this is what you’ll be doing most of the time you are in MoneyWiz; adding expenses, incomes and records of money transfers into the accounts you hold. MoneyWiz works by displaying your various Accounts on the left hand-side of the screen, and once you tap into any one account you can see all your transaction records that you have entered for that account. Unlike other apps, the MoneyWiz design for this screen is particularly clean and refreshing. Records are listed with a short description, time of transaction along with an icon that represents that category of which the transaction is from. If you look to the very edge of the screen (to the right), there is a little tag that will be in red (if it’s removing money from your account) or green (if it’s adding money).
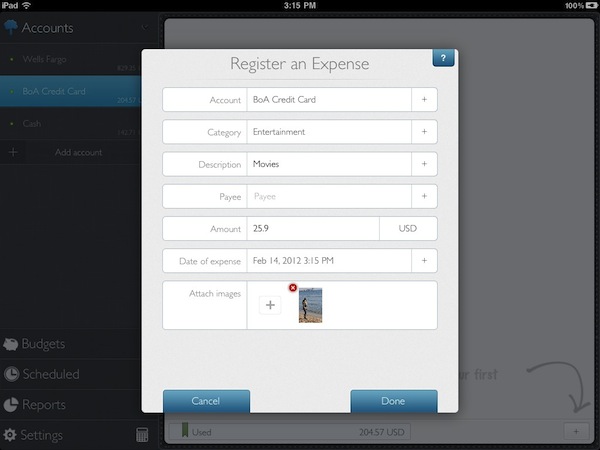
Also in this screen is the ability to search for a transaction, sort by various ways and even filter through a few variables. Tap on any transaction and you can see more detail, including any notes you have associated with the transaction — this is also the method by which you can edit, duplicate or delete a transaction. Adding a new transaction is as simple as going into the appropriate account and tapping the + button in the bottom right. It’ll open a pop up that lets you enter all the relevant fields – it’s all very straightforward. There are two things that I really like with what the developers have done here. Firstly, there is the option to upload an image that corresponds to the transaction – great if you want to keep a copy of the receipt electronically. Secondly, when entering the value of the transaction, you can change between currencies and it’ll either automatically convert using the current exchange rate, or you can override the rate with whatever you’d like.
In addition to being able to record a transaction (recording an expense, income or transfer between accounts), the + button also enables you to adjust the balance (helpful if your records are slightly out of whack) and enter a reconcile mode (allows you to tick off every transaction record against a bank statement). One small tip: if you want to easily see what your net worth is (summing all accounts), just pull down on your account list, and a net worth box is displayed – I just wish this was permanently visible (even if it required a settings change).
Budgets
Some people really swear by setting budgets, monitoring them frequently and adjusting habits accordingly. I’m not one of those people, but I set some budgets to test out the app and I get the feeling that maybe I should be one of them. I set up two budgets with a pretty generous limit and surprised (or perhaps more appropriately, shocked) myself when I went over budget pretty quickly.
Nevertheless, it’s super easy to set up budgets with MoneyWiz. Just venture over to the Budgets section, tap Add budget and fill out the pop-up form which asks a couple of questions. Essentially it works by monitoring selected categories and tracks whenever you do spend money with a transaction tied to those categories. There are a bunch of options to control how it works so no matter how complicated your budget scheme is, MoneyWiz should cover it without an issue at all.
Once you’ve set up a budget, it’ll be displayed in the left sidebar like an account, but it will also include a progress bar, slowly filling up as you get close to budget. In the main screen all your transactions from the categories being watched for the budget are displayed. Down the bottom of the main screen you can set up two little monitors that display either: used, remaining, days left or daily allowance.
Scheduled
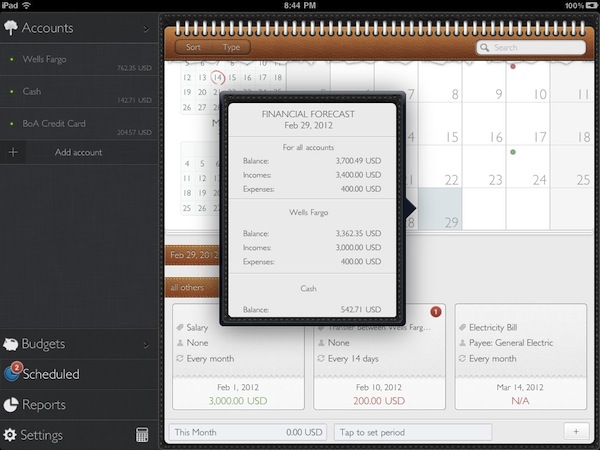
Have repeating transactions or know about a transaction that is set to take place in the future? MoneyWiz can handle all that as well inside the Scheduled tab. Simply enter a transaction like you would elsewhere and you can set the date and time for when you would like it to execute and if it’s a repeat transaction, just set the period for how frequently it is to take place. As you can see above, the whole design of this screen is very neat, merging a calendar that shows your future transactions, along with a list that details all others that don’t fit onto the time period being displayed by the calendar.
Reports
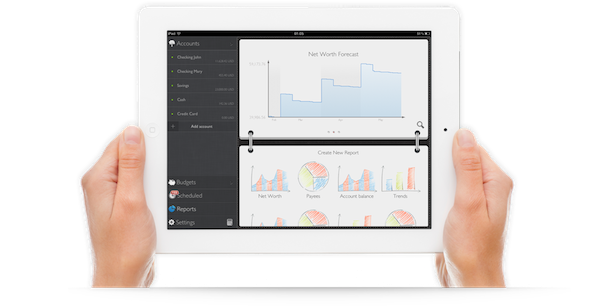
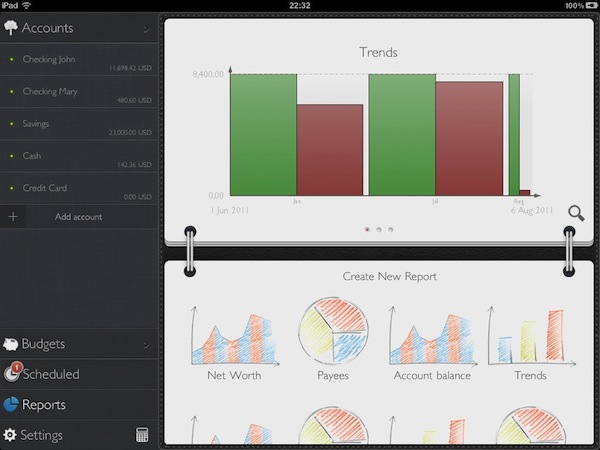
The final keystone feature of MoneyWiz are the reports and unlike the rest of the app where I found it to be clear, consistent and simple, I found reports to be a little complex at first. In Reports, the main screen is divided into three sections; the first is live report of Trends, Net Worth Forecast and Compare Budgets (swipe to view them all), then there is the ability to create a new report from one of the 9 options, and finally is a list of any saved reports.
I liked how the app automatically created those live reports placed up at the top, but I was confused that when I tried to create a new report, I couldn’t add it to that top section. Reports you create can be saved to PDF, CSV and even locally (when saving locally, it can be a static file). So in a round about way, you can set up a new report preset for the future by saving a live, local version of a report and it will be listed at the bottom of the page. The reports are good, even if they aren’t the prettiest (unlike the rest of the app, the graphics obviously have to be generated by code, rather than carefully made in Photoshop) and like the rest of the app, you have plenty of lee-way in customising them to suit your needs.
I kind of wish this screen was streamlined to just showing live reports that you could choose from, and if you wanted to view one that you didn’t “pin” to the screen, it would load instantly. The app could just load it with default settings (or perhaps the last used ones), and then give the user the option to edit those, updating whenever that happened.
Minor Notes
- MoneyWiz is also available for the iPhone and there is a free sync service between MoneyWiz apps (turn it on in the settings). It worked without issue for me and was quick at updating changes.
- Password protection is available for those who want to make sure there data is hidden from prying eyes.
- The little calculator icon on the sidebar literally opens a very neat pop-up calculator, super handy. It even has a currency converter in it. Great idea by the developers.
- You can make reports full-screen by tapping the magnifying glass, and tap on the graphs for a pop-up that gives more details (such as value at that date selected).
- For those who like to see a running balance next to their transactions, there is an option in the settings to turn this on.
Finding a good app to manage your personal finances can be a tricky affair, I tried out a number of apps and was never really happy with the way the apps did certain tasks, or displayed certain pieces of information. With MoneyWiz, it instantly felt natural and logical to the way I want to manage my finances. I’m sure others may feel differently, but if you’re liking what you’re reading and seeing in the screenshots, I’d certainly encourage you to download it and give it a go. It also doesn’t hurt that I quite like the visual appearance of the app with subtle textures such as linen, stitches, leather and even torn paper – but if you despise the new skeumorphic design that Apple has been pushing lately, you may want to stay away, as it is similarly used here. Although despite saying that, MoneyWiz is a little more subtle about it – the textures aren’t quite as strong and loud as they are with some of Apple’s apps. In any case, I know I’ve found the app I’ll be using for my personal finances and I look forward to trying the Mac app when it’s released sometime in the next few months.
MoneyWiz is available on the iPad App Store for $4.99.


