In my post about the current state of music-making and discovery on the iPad, I concluded with a roundup of the best, most sophisticated software to professionally create music on the iPad. As I did with shuffler.fm and discovery, I would today like to add a new app to the list of the best software synths available for the iPad. The app that I found worthy of being added is the newest product by music software company Yonac Inc, called Magellan.
Yonac made a name for itself by producing an extensive amount of music-related apps since early 2010. One of their most elaborate and popular efforts has been the Shredder guitar synth to create analog and digital synth leads or pads by playing guitar into the iPad through an interface like the IK Multimedia iRig or the Apogee JAM. The company was also right there when the iPad got unveiled. They developed and promoted one of the very first synth software for the iPad, the Yonac miniSynth.
Magellan is their new masterpiece. It’s a fully fleshed-out virtual analog synth with a lot of power. Let me sum up its basic feature set: two synthesizer engines running at the same time, each of them equipped with three oscillators for basic sound generation, frequency modulation, a step sequencer, and two filters plus eight effects. The app has got an easy to understand interface and produces an immense variety of sounds in very high audio quality. This review not only judges the quality and usability of Magellan, I will also give so detailed instructions and tricks so that you immediately can start making sophisticated music tracks with the app right after you’ve downloaded it. So, if you are curious, stay a while and let me explain you how Magellan works and why it may become a strong competitor to other high-end iPad synths like the KORG iMS-20 or the Sunrizer.
Basic Panel Arrangement
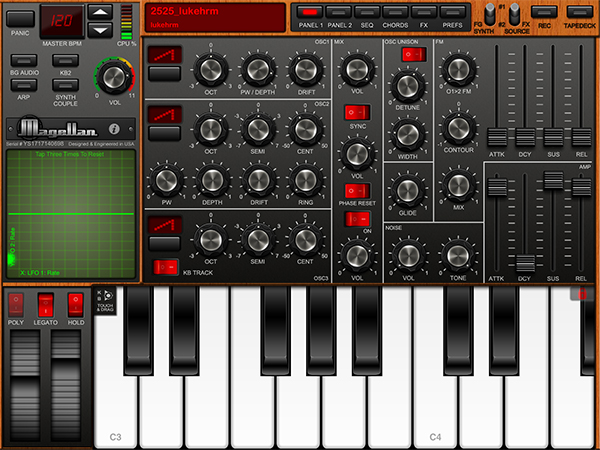
After the first launch of Magellan, the immense amount of buttons and the panel arrangement can be very confusing. Basically, any window displaying a part of Magellan is divided up into four panels: the title bar, the side panel, the on-screen keyboard, and the editing area. Using the title bar, framed using wood graphics, you can access all features to create your sounds. On the very left of it you find the preset selection menu. Tap on the “display” to bring up a pop-down menu. The presets are sorted into basic banks like “Arp” (arpeggiators) or “Lead”. You can save your sounds right in this menu into existing sound banks or create an unlimited amount of new ones to sort your own creations just how you like it. In addition to its over 240 (mainly very good) sound presets, Magellan also includes a bank with 32 presets made by Sunsine Audio, a very renowned preset producer — the company offers presets for a vast variety of iPad software including the Moog Animoog for an inexpensive amount of money on their website. You can add additional presets you downloaded on your computer or received from other Magellan users via email and iTunes file sharing.
Right to the preset selector in the title bar, you find the panel selector to switch between the different parts of Magellan: Panel 1 (oscillators and modulation), Panel 2 (filters and LFOs), the sequencer, chord and chord progression maker, effects, and song preferences. The rest of the title bar consists of two switches and the recording features. I’ll come back to these features later on.
Below the title bar, you find the main panel. This is the area of the screen where the specific knobs and controls appear when you select an editing part using the panel selector in the title bar. Located to the left of these two parts, the developers set the side bar displaying all important song information and settings like velocity (using a tap-tempo, blinking BPM indicator), master volume or CPU usage. The sidebar also includes a square touchpad that also plays a huge role in the sound manipulation options of Magellan, which also will be discussed later.
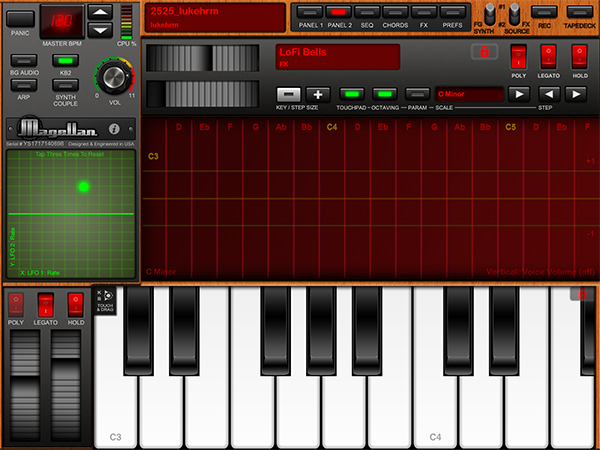
Finally, at the very bottom of the screen, an on-screen keyboard can be found. Its key size is variable. There are pitch and modulation wheels as well as legato, hold, and polyphony switches to manipulate the playing characteristics of the keyboard left to the keys. Magellan also offers a second on-screen input method: an intuitive and even more flexible touchpad with red background, connected to a musical scale. With sliding and dragging in the different key fields, you can create fluent glissandos as well as triggering filters and volume. And if you own an iPad USB Camera Connection Kit, you can also attach a USB-powered MIDI keyboard to Magellan and control one of the two synths available with real hardware. Magellan features CoreMIDI, making the addressing of 80 different channels, MIDI clock capability, and CC mode to control parameters instead of keys with external hardware possible.
Oscillators And Frequency Modulations
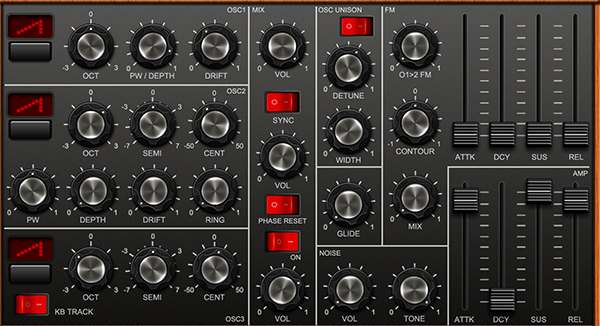
To actually play Magellan, and dislike using presets, you obviously have to create your own sound. The sound editing and creation process starts in Panel 1 with the oscillators. Magellan features 3 independent oscillators, two of them featuring true PWM wave generation, listed at the very left of the panel. Each oscillator can output multiple kinds of waveforms like square or saw waves; but they all feature different manipulation features, making endless combinations possible. The first one has the most basic equipment: octave switch, depth and drift. The second one, which also has PWM wave generation, additionally incorporates ring modulation. And the third one’s pitch cannot be modified in octave, but semitone steps for slight adjustments.
In the next column you can blend the volume of the three oscillators to find your preferred mix. Using the red switches you can also keep the oscillation of the first two waves in sync, reset the phasing, or completely turn off the third oscillator to concentrate the sound on number two and three.
The third big column lets you edit three basic sound characteristics of the oscillators: unison sound with detune possibility (to create a so-called “super saw oscillator” with up to 12 wave generators running simultaneously), glide to specify how the synth sounds when you’re switching from one chord or tone to another, and the amount of noise overlay. The last two areas left in Panel one are the frequency modulation (FM) and the ADSR (attack, decay, sustain, release) amplitude envelope. In the FM section you can set up a modulation setting with blend and an individual ADSR envelope.
The most important thing you have to remember while reading this review is that these features are all available on two different synth engines running at the same time. Meaning that if you combine the two synths using two on-screen keyboards with two different sounds or even couple them to create a double-layered sound (which is possible via the side bar), you can modify them independently and play them parallel. For instance, one synth could be a pad for basic foundation sounds and the other an arpeggiator for melodic elements. Speaking in overall numbers, you can manipulate six osciallators, four filters, and so on. This is what the two switches in the title bar are for: you can switch between the panel settings of synth #1 and #2, and set which one should be dominant in the mix. The possibilities are endless.
Filters And LFOs For Extended Sound Manipulation
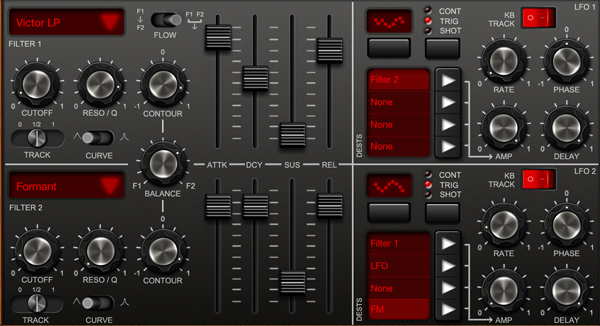
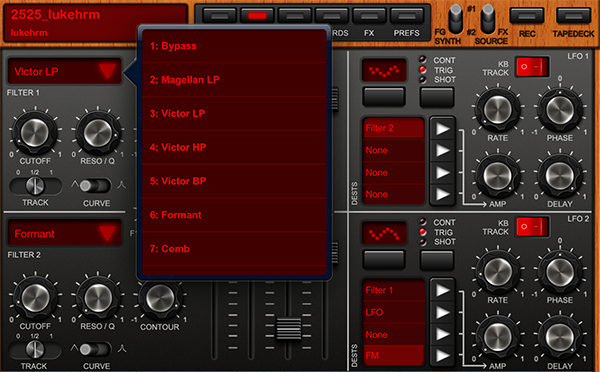
After you’ve created the basic parameters of the sound generating oscillators, it’s time to enhance the sound to give it a more personal touch. There are no better options to do so than using filters and LFOs. Magellan features two filter banks with 11 different filter types (including several low- and high-pass filters, notch, combined and many more) you can blend together and connect using serial or parallel mix. Again, both filters have individual ADSR envelopes, plus cutoff, resonance, and contour controls. You can even change their curve movement behavior between saw and exponential increase and decrease using a switch below the knob controls. Magellan’s filters also offer true bypass ability, if you don’t want these extra sound modifications to keep your final product simple.
Right beside the two filters you can access the individual synth engine’s two LFOs. LFOs, short for Low-Frequency Oscillator, are not used for direct sound generation (the human ear cannot hear such low frequencies), but they are added up to specific parameters like noise volume, oscillator or filter mixes in order to change their value in wave movement. This can either happen continuously, triggered by a played note on the keyboard until it gets released again, or as a small shot at the beginning of each note.
Magellan’s LFOs offer all of these three trigger options. They can be changed left to the LFO waveform selector. You can set up to four different parameter destinations using the selection panel below the waveform display. Then you set the LFO movement rate (fast to slow), phase, intensity of the amplitude (thus the intensity of the LFO effect on the set parameters) and the delay of the LFO effects compared to the triggering time.
As you might already notice, Panel 2 is the perfect place to specify minimal, but important changes to your sound and is the perfect place for session usage. With just two taps, you can change the whole characteristics of your sound by changing the LFO destinations or activate a high-pass filter to make your sound deeper and darker. You can also make slight, moving changes while playing, the perfect controls for such effects are the cutoff, contour and release controls in the two filter areas.
Effects And Modulation Pad
Speaking of live changes while playing: effects and modulation wheels are also very popular tools for this purpose. I will skip the sequencer and chord sections for now, although they are next in the title bar order from left to right. I will come back to them in a few paragraphs, because they are really professional tools for which you need more time and musical knowledge to fully get into. But you don’t necessarily need them for creating cool sounds with Magellan, so they are not as important as the effects panel.
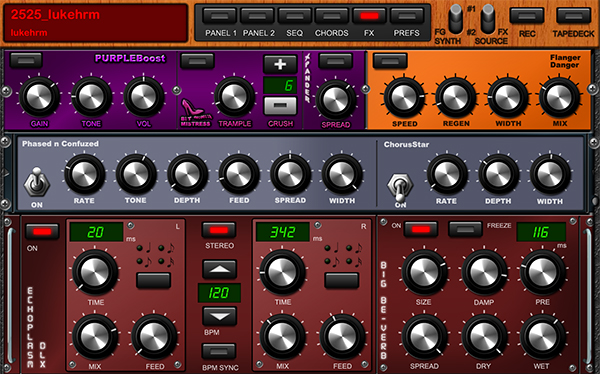
Tap on “FX” in the title and the main editing area changes into an on-screen effects rack. Here you can activate and modify eight different type of effects with cool names: the PURPLEBoost booster, BIT MISTRESS bit crusher, Xpander width enhancer, the Flanger Danger flanger, the Phased n Confuzed phaser, ChorusStar chorus, the Echoplasm Dlx delay, and the Big Be-verb reverb. They are all equipped with the controls you would expect and work pretty well. As always, when it comes to software synthesizers, the modulation effects, namely being flanger, phaser, and chorus, are a bit boring and tend to make the sound a bit less smashy, but with the (stereo!) delay and reverb effects you can’t make any mistake, they’re really well executed and sharpen your sound’s atmosphere.
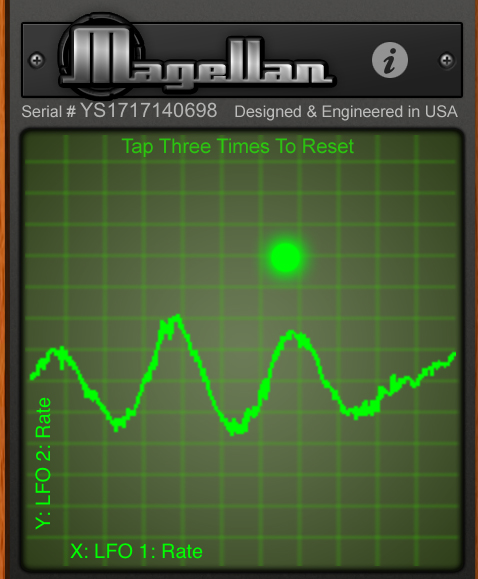
Now that I have discussed all modulating and sound-affecting elements of Magellan, I think it is a good time to talk a bit about another great, if not the best feature of Magellan: the x/y-modulation matrix. Located in the sidebar right below the BPM display, master volume control and basic controls for coupling the two synth sounds, and a panic button to immediately stop the sound, you will find the green, square matrix I already talked about. The sidebar with the matrix is visible in all sound editing modes (Panel 1, Panel 2, FX, chords, and preferences); only in sequencer and arpeggiator mode (the latter is toggled using the ARP button in the standard sidebar) it disappears. This matrix can combine any two “modulatable” parameters into one coordinate system. You can drag the fix point around to change the parameters for live sound modulation of two, maybe totally different parameters like noise volume and filter mix. When you tap three times onto the matrix the destination parameters get reset to the original setting, located at (0|0) in the matrix system. The destination parameters of the matrix can be easily set up in the synth preferences I will discuss later too.
Creating Multiple Layers Using Arpeggiators And The Sequencer
These are the rather basic methods to create and manipulate sounds. With them you can create pads and lead sounds which can be recorded and used elsewhere, e.g. combined with a drum machine or some samples in a professional desktop mixing environment. For this production method though, you need multiple apps or sound sources which you can combine in to a final song. This obviously gives you more sound possibilities, but it also means a lot more work and experimentation to find fitting sounds. With the two synth engines running simultaneously as well as arpeggiator capability and the built-in sequencer, Magellan can also create multi-layered songs without the need for external sounds.
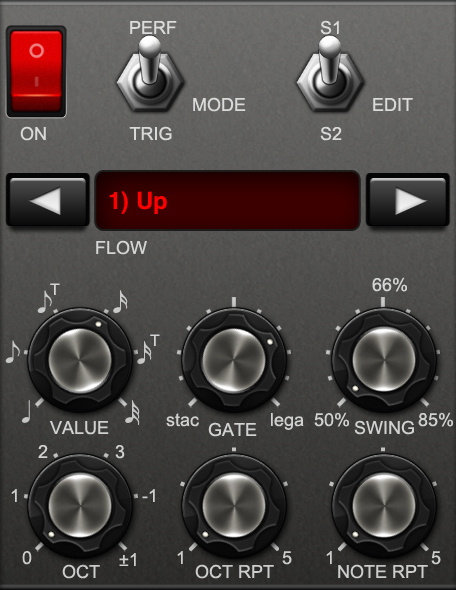
The arpeggiator is, compared to other apps like the Sunrizer, very easy to configure. Tap the “Arp” button in the sidebar, the modulation matrix disappears and the arpeggiator control panel comes up. Change the main switch to “on”, configure movement direction, speed, octave behaviour, and the amount of skipped notes. Tap the arpeggiator button again (it is now red, indicating the active feature) and you can use the modulation matrix on the newly created moving sound as well.
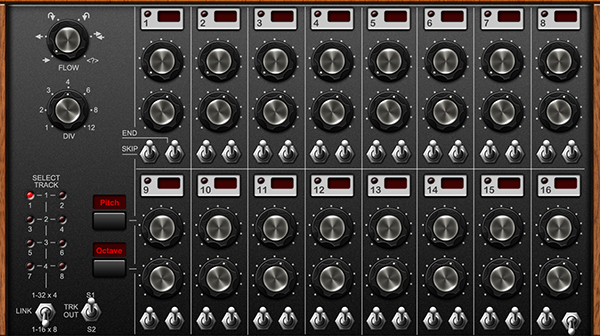
The step sequencer goes even one step further. Using it, you can create multiple melody lines, saved in up to 16 patterns to create a constant song foundation. Each step on the sequencer can gets a note assigned to it, either by selecting the step and tapping it on the on-screen or MIDI keyboard, or by using the two knob controls to select tone and octave. Using the two switches on each step below the note controls, you can skip the respective step or set it as the pattern’s ending point. Using the flow and div control you can make up the pace and behaviour you would like to have
But to be honest, I have never been a fan of software step sequencers. This one is no exception. It is constructed far to complicated and not a bit intuitive. Sometimes, it immediately starts playing, but sometimes you cannot get it running and god only knows why. The edit mode is confusing and makes you think that this is a part you’re not suited for as a layman new to the game of analog synthesizers. It is okay that you need patience for creating new sounds, but it should never be a science to find out how it works.
Chords And Scales
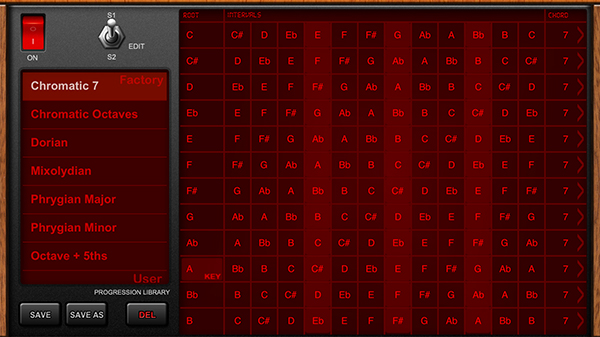
The same is true for the last feature, the chord maker (hidden behind the chord button in the title bar). For this part you do not need as much technical knowledge (as it is the case concerning the sequencer), but a quite good understanding of musical theory. Luckily, I know a bit about this, since I learned classical guitar for several years and went to theoretical music classes. And if you understood it at least a bit, it can also be a really powerful element of Magellan for creating your own sound.
With the chord maker, it is easy to prepare a song in a specific melodic concept. Turned on, you can choose any musical scale (combination of the twelve different tones in an octave), and make the keyboard corresponding to it. This way you can easily create a certain atmosphere, as for instance the melodic minor scale sounds a bit Arabian and the church scales like phrygian sound, well, like ancient church chorals. If you want to go even further, you can assign scale-fitting or self-defined chords to a single key on the keyboard. This way you can play multiple notes fitting to each other using one single key.
Combine these features with the step sequencer on the second synth, and you have two parallel sound strings: a repeating melody (either as a maybe hold arpeggiator or a sequencer pattern) as a song foundation, and a harmonic, maybe chord-based foreground synth with which you can play over it. There are endless combination possible. The only feature Magellan is obviously lacking of is a drum machine to create beats without melodies, but as you might already know, there are some pretty good apps for this purpose available too.
Settings, Recording And Export
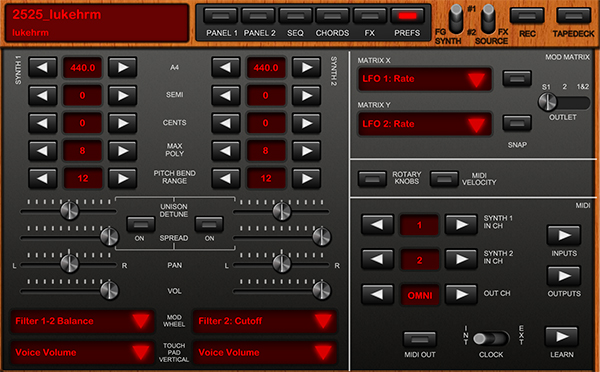
The chord maker was the last big sound editing feature of Magellan. To master them even more, go ahead and download the Magellan manual Yonac made available as a free download from their site. There is just one thing in the title bar I did not discuss yet: the preferences. Here you configure the basic elements of your sound like the tuning and pitch range of the two synths, the left/right panning for stereo effects, their individual master volumes and much more. You have also control over the MIDI inputs, and this is also the place to set the modulated parameters when you use the modulation wheel or coordinate field using several drop-down menus.
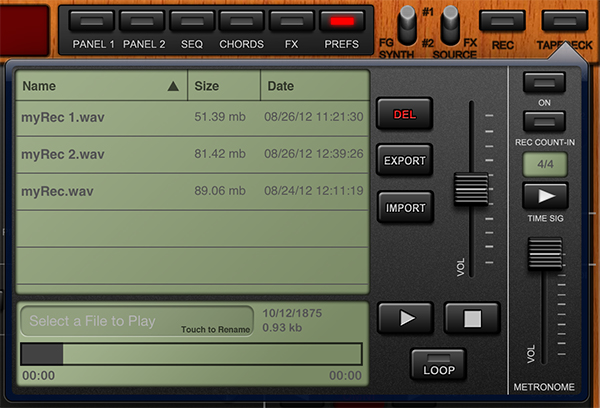
Last, but certainly not least, is Magellan’s recording feature. Star a recording session is the simplest part: just hit the record button in the title bar and start playing. Magellan plays back a metronomy for perfect intonation. If you’re done with the recording session, you can organize and export the created .wav files using the tapedeck feature, which appears in another drop-down menu below the button in the very top right corner of the screen. The files are displayed in a list, can be played back with adjustable volume, renamed, deleted and looped. In the tapedeck menu you can also set up the characteristics of the metronome — from time signature (of which Magellan features all you could imagine) and playback volume.
If you want to export your recordings for further editing on your desktop, you can do so by hitting the export button. You can send it via email or WiFi export to your computer of friends, upload it to SoundCloud, or use AudioCopy or SonomaCopy to transfer it to another iOS music app with AudioCopy support for further editing.
UI And Usability
As you can see, Magellan offers an immense feature set, but that does not mean that it’s really useful for the user group its developers are aiming at. Many low-priced software synthesizers meant to be an entry into the world of the digital creation of music do not fulfill the user’s expectation of easy interfaces and quick entry without the hassle of reading manuals and understanding detailed music theory. Magellan mostly fulfills these requirements, except for the, in my opinion, too complex step sequencer and the chord maker. The latter isn’t a feature necessary feature you have to master to use Magellan.
The app’s user interface is nothing extraordinary, which is the case with the patch and sequencer panels of the KORG iMS-20. But it has two big advantages: the retina graphics the iMS-20 still lacks of, and the button and movable controls. They are executed and rendered very good and even managed to make me forget the awful wood graphics implementation as the “hardware” border. Magellan does not just sound like a virtual analog synth, it also mostly looks like one.
Oh yeah, do not let me forget to praise the app’s sound output quality. You indeed need to turn the device volume to maximum to hear something, but when you record and export something to your desktop it sounds just fantastic. Magellan exports in 44100 Hz, 32 bit .wav audio, a quality that is widely considered to be better than CD audio. To give you the opportunity to see and judge the audio quality for yourself, I recorded three tracks in a two-day session solely using Magellan as the sound creation device, with a little help from Garage Band on my Mac for post-production. You can download it for free on Bandcamp. For more information visit my personal website.
Wrap-Up
Magellan is a very welcomed addition to my constantly growing suite of iPad software synthesizers. It features great sounds and an even better manipulation feature set. Except the step sequencer (which I admit is very difficult to execute intuitively from a developer’s point of view), the UI looks good, sometimes even great, and every feature is easy to understand. The app makes you try out what it is capable of, something I consider very important when it comes to music making: you have to become curious. In the case of Magellan, I still am. I’m excited what this thing can produce, even after over two weeks of intensive testing.
Magellan for iPad is available for a limited time introductory price of $4.99 in the App Store


