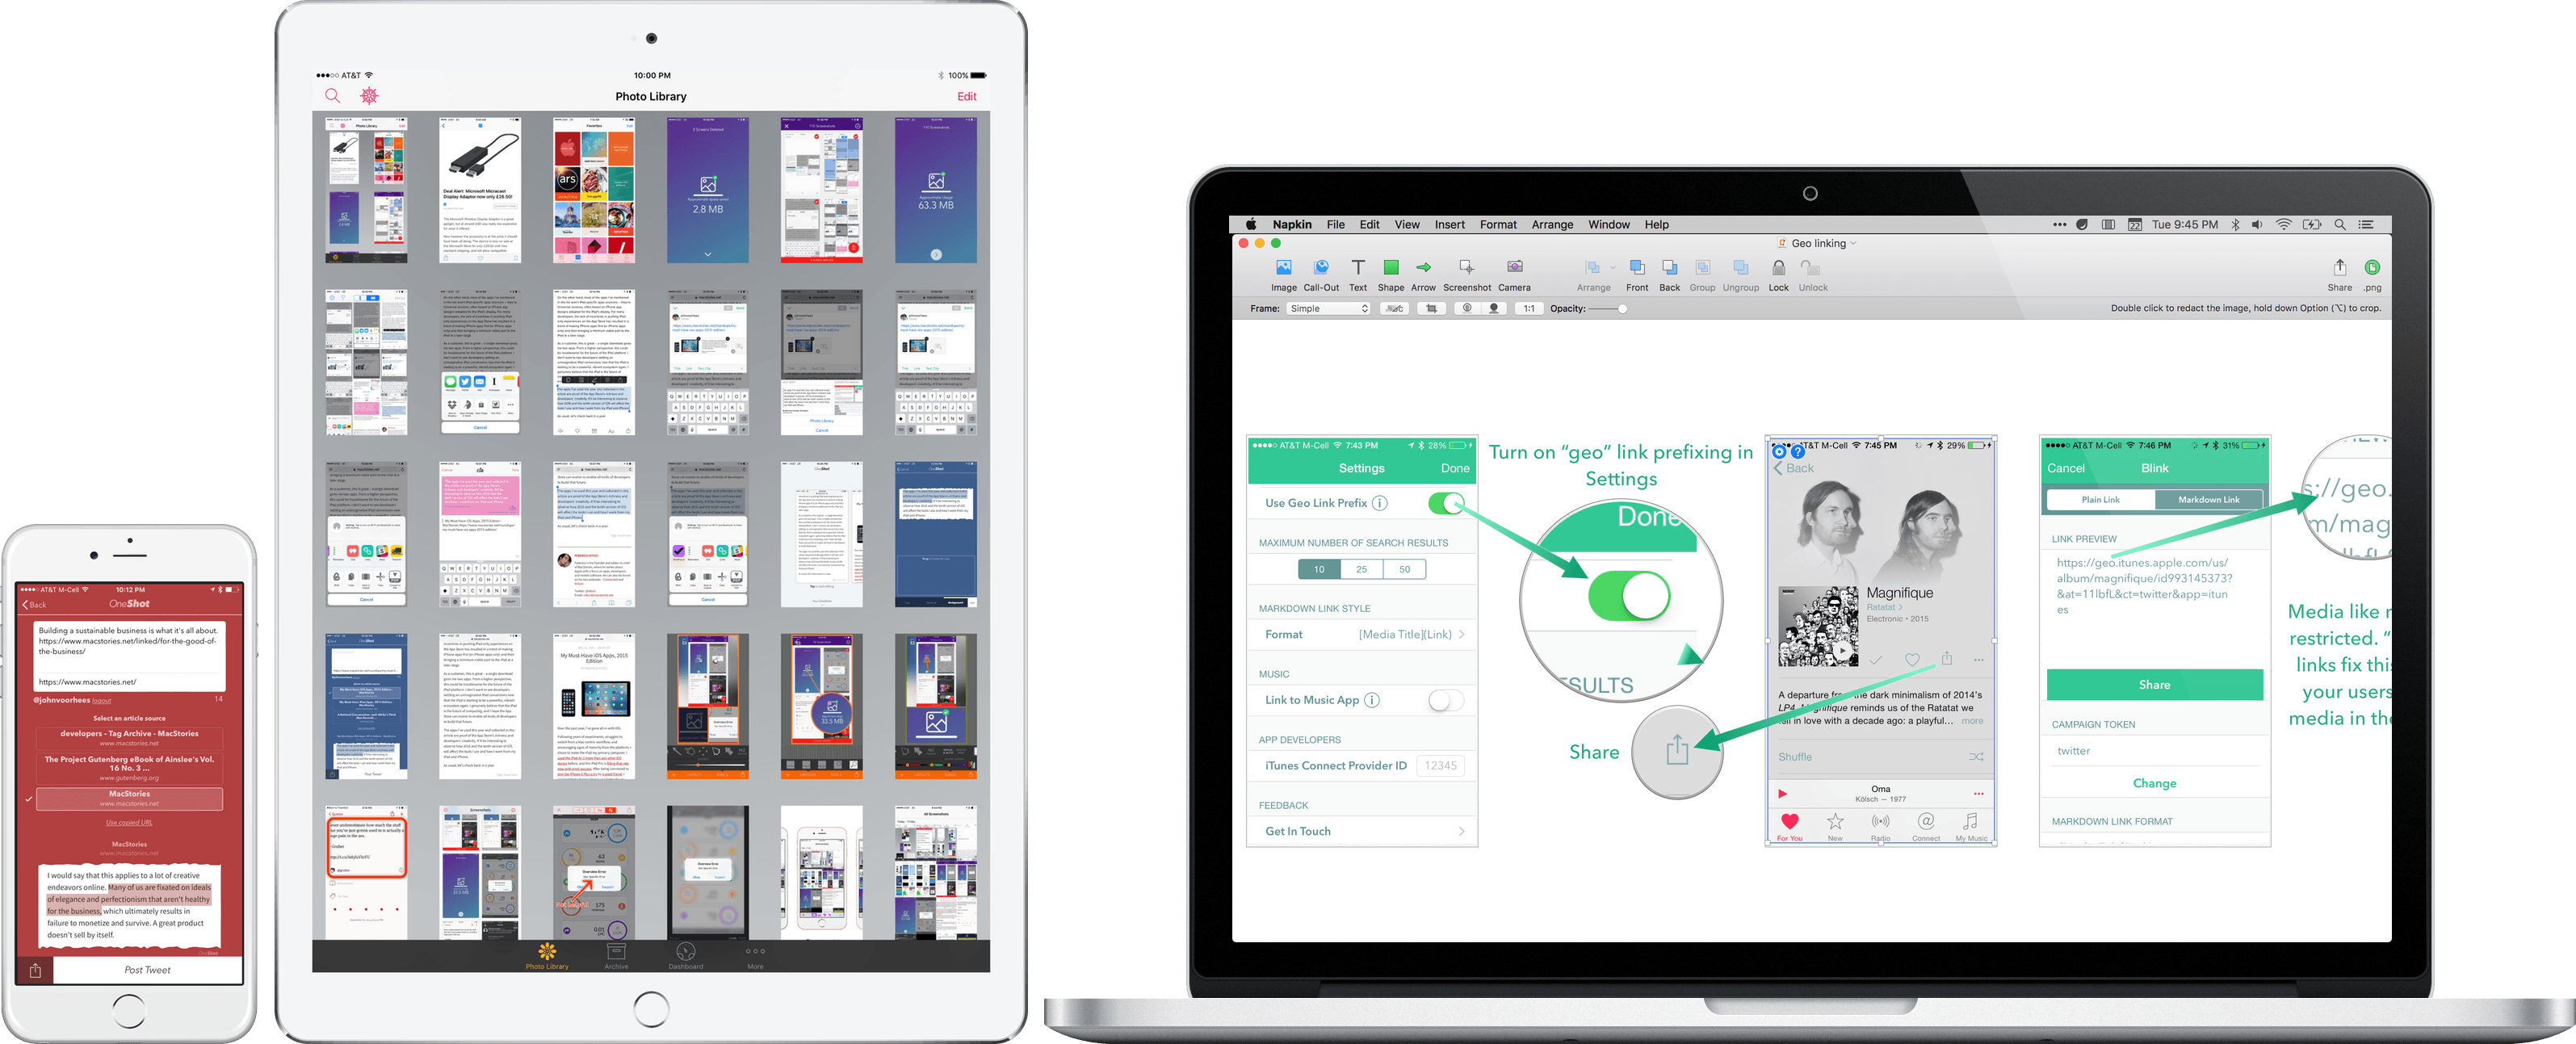
The easiest way to make a point about an app is often with a screenshot. This is especially true on Twitter with its 140 character limit, but it is equally true in a wide variety of other contexts. Designers use screenshots to communicate with clients and developers, or create mood boards and Pinterest-style collections that convey a look and style visually. Developers create screenshots to market their apps and writers use them to illustrate ideas for readers.
Regardless of the context, every screenshot is fundamentally about communication. But sometimes, a quick screenshot isn’t enough – you want to call out a feature or perhaps you have so many screenshots you need a tool to manage them. That’s where screenshot apps come in.
Screenshot apps tend to fall into one of two categories: managers and editors. On iOS, screenshot management apps dominate, likely because until Apple added a ‘Screenshots’ album to the Photos app with iOS 9, there was no good way to separate screenshots from snapshots of family and friends. On the Mac there are fewer apps, but their feature sets tend to be deeper.
The screenshot app market intrigues me. Although most apps address one of a couple basic problems, execution varies widely and there are gaps in functionality, especially on iOS. As a result, the screenshot app category is somewhat fragmented, but in a good way, leaving room for interesting solutions from clever developers.
Screenshots serve an important role at MacStories as revealed by the number of Federico’s 2015 must-have apps sprinkled throughout this article.1 After all, any post about apps that you read here is likely to include at least a few screenshots. But what works for MacStories may not serve your needs. Therefore, this article casts a broad net to provide an overview of the top screenshot apps on iOS and Mac and help you find the apps that meet your specific needs.
Screenshot Basics
Specialized apps are not strictly necessary for creating screenshots. The basic tools for taking, managing, and sharing screenshots are already part of iOS and OS X. Especially if you need to fire off a quick screenshot without any annotation, Apple’s built-in tools are adequate.
iOS and Apple Watch
Simultaneously pressing the power switch and Home button takes a screenshot on iPhones and iPads. The images are automatically saved to your camera roll in Apple’s Photos app. Since iOS 9, screenshots are also automatically included in a Photos album called ‘Screenshots’, which makes them easier than ever to manage separately from your other photos. On the Apple Watch, pressing the Digital Crown and the side button takes a screenshot, which is also saved to the Photos app on your paired iOS device.
Mac
There are several keyboard shortcuts that make it easy to take screenshots on the Mac.
Full Screen
Press Command (⌘)-Shift-3 to take a screenshot of your Mac’s entire screen, which is saved to your desktop2 as a PNG file.
Partial Screen
Press Command (⌘)-Shift-4. When the pointer changes to crosshairs, drag out the area you want to capture. Holding down the Shift, Option, or Space bar keys changes the way the crosshairs selection behaves. When you have selected the area you want, release your mouse or trackpad button and the screenshot will be saved to your desktop as a PNG file.
Window
Capturing a single window is like capturing a section of your screen, except that the pointer turns into a crosshairs, press the Space bar. The crosshairs will turn into a camera and clicking on a window with your mouse or trackpad will take a screenshot of that window and save it to your desktop as a PNG.
If you find yourself using screenshots often and have a need for basic editing tools, try a third-party solution because they extend what you can do with screenshots far beyond the tools built into iOS or OS X.
Cross-Platform Apps
Dropbox
Dropbox has basic screenshot support on OS X that grew out of its Camera Upload feature. When turned on, Dropbox automatically moves screenshots taken using OS X’s built-in keyboard shortcuts to a ‘Screenshots’ folder in Dropbox and copies a link to the screenshot to the clipboard. On iOS, Dropbox uploads screenshots along with other camera roll photos to a ‘Camera Uploads’ folder, but a link to the file is not copied.
It is handy to have OS X screenshots centralized in one Dropbox folder similar to iOS 9’s dedicated ‘Screenshots’ album, but Dropbox includes no way to edit screenshots. What’s more, the fact that iOS screenshots get dumped in with iOS camera uploads instead of Dropbox’s dedicated ‘Screenshots’ folder undermines its utility for anyone who take screenshots on both platforms.
Droplr
Droplr is a service with Mac and iOS apps for uploading links, text, images, and files and then sharing them via short URLs. On the Mac, Droplr has limited screenshot support that allows you to drag out and copy an area of the screen. On iOS, Droplr’s app includes a share extension to upload screenshots to Droplr from the Photos app.
Both apps’ editing tools include:
- The choice of six colors;
- Arrows;
- Rectangles;
- Ellipses;
- Free-hand drawing;
- Text; and
- The ability to obscure sensitive information.
If you have limited editing needs and prefer to share links to your screenshots instead of the image itself, Droplr is a good choice. Droplr has a free tier that limits the file size that can be uploaded and monthly bandwidth limits. Droplr’s paid tiers are less restrictive and start at $4.99 per month.
iOS Apps
Screenshot apps took off on iOS because screenshots are stored alongside photos in your camera roll, which is messy if you take a lot of screenshots. As a result, many iOS screenshot apps focus primarily on managing screenshots outside the camera roll. Their utility was reduced by Apple’s inclusion of an album dedicated to screenshots, but as with any built-in feature, Apple’s solution leaves plenty of room for improvement and extension of functionality by third-party developers.
Screenshot Managers
Many screenshot managers work by detecting images with the dimensions of a device’s screen. iOS devices take photos with different dimensions, so photos won’t show up in screenshot managers unless they have been carefully cropped to match the exact dimensions of a particular device. Likewise, if you crop a screenshot, it won’t show up in your screenshot manager because it doesn’t match the dimensions of a device. Although most screenshot managers work in the same basic way, they differ with respect to the device dimensions they detect and how they manage screenshots.
Screeny
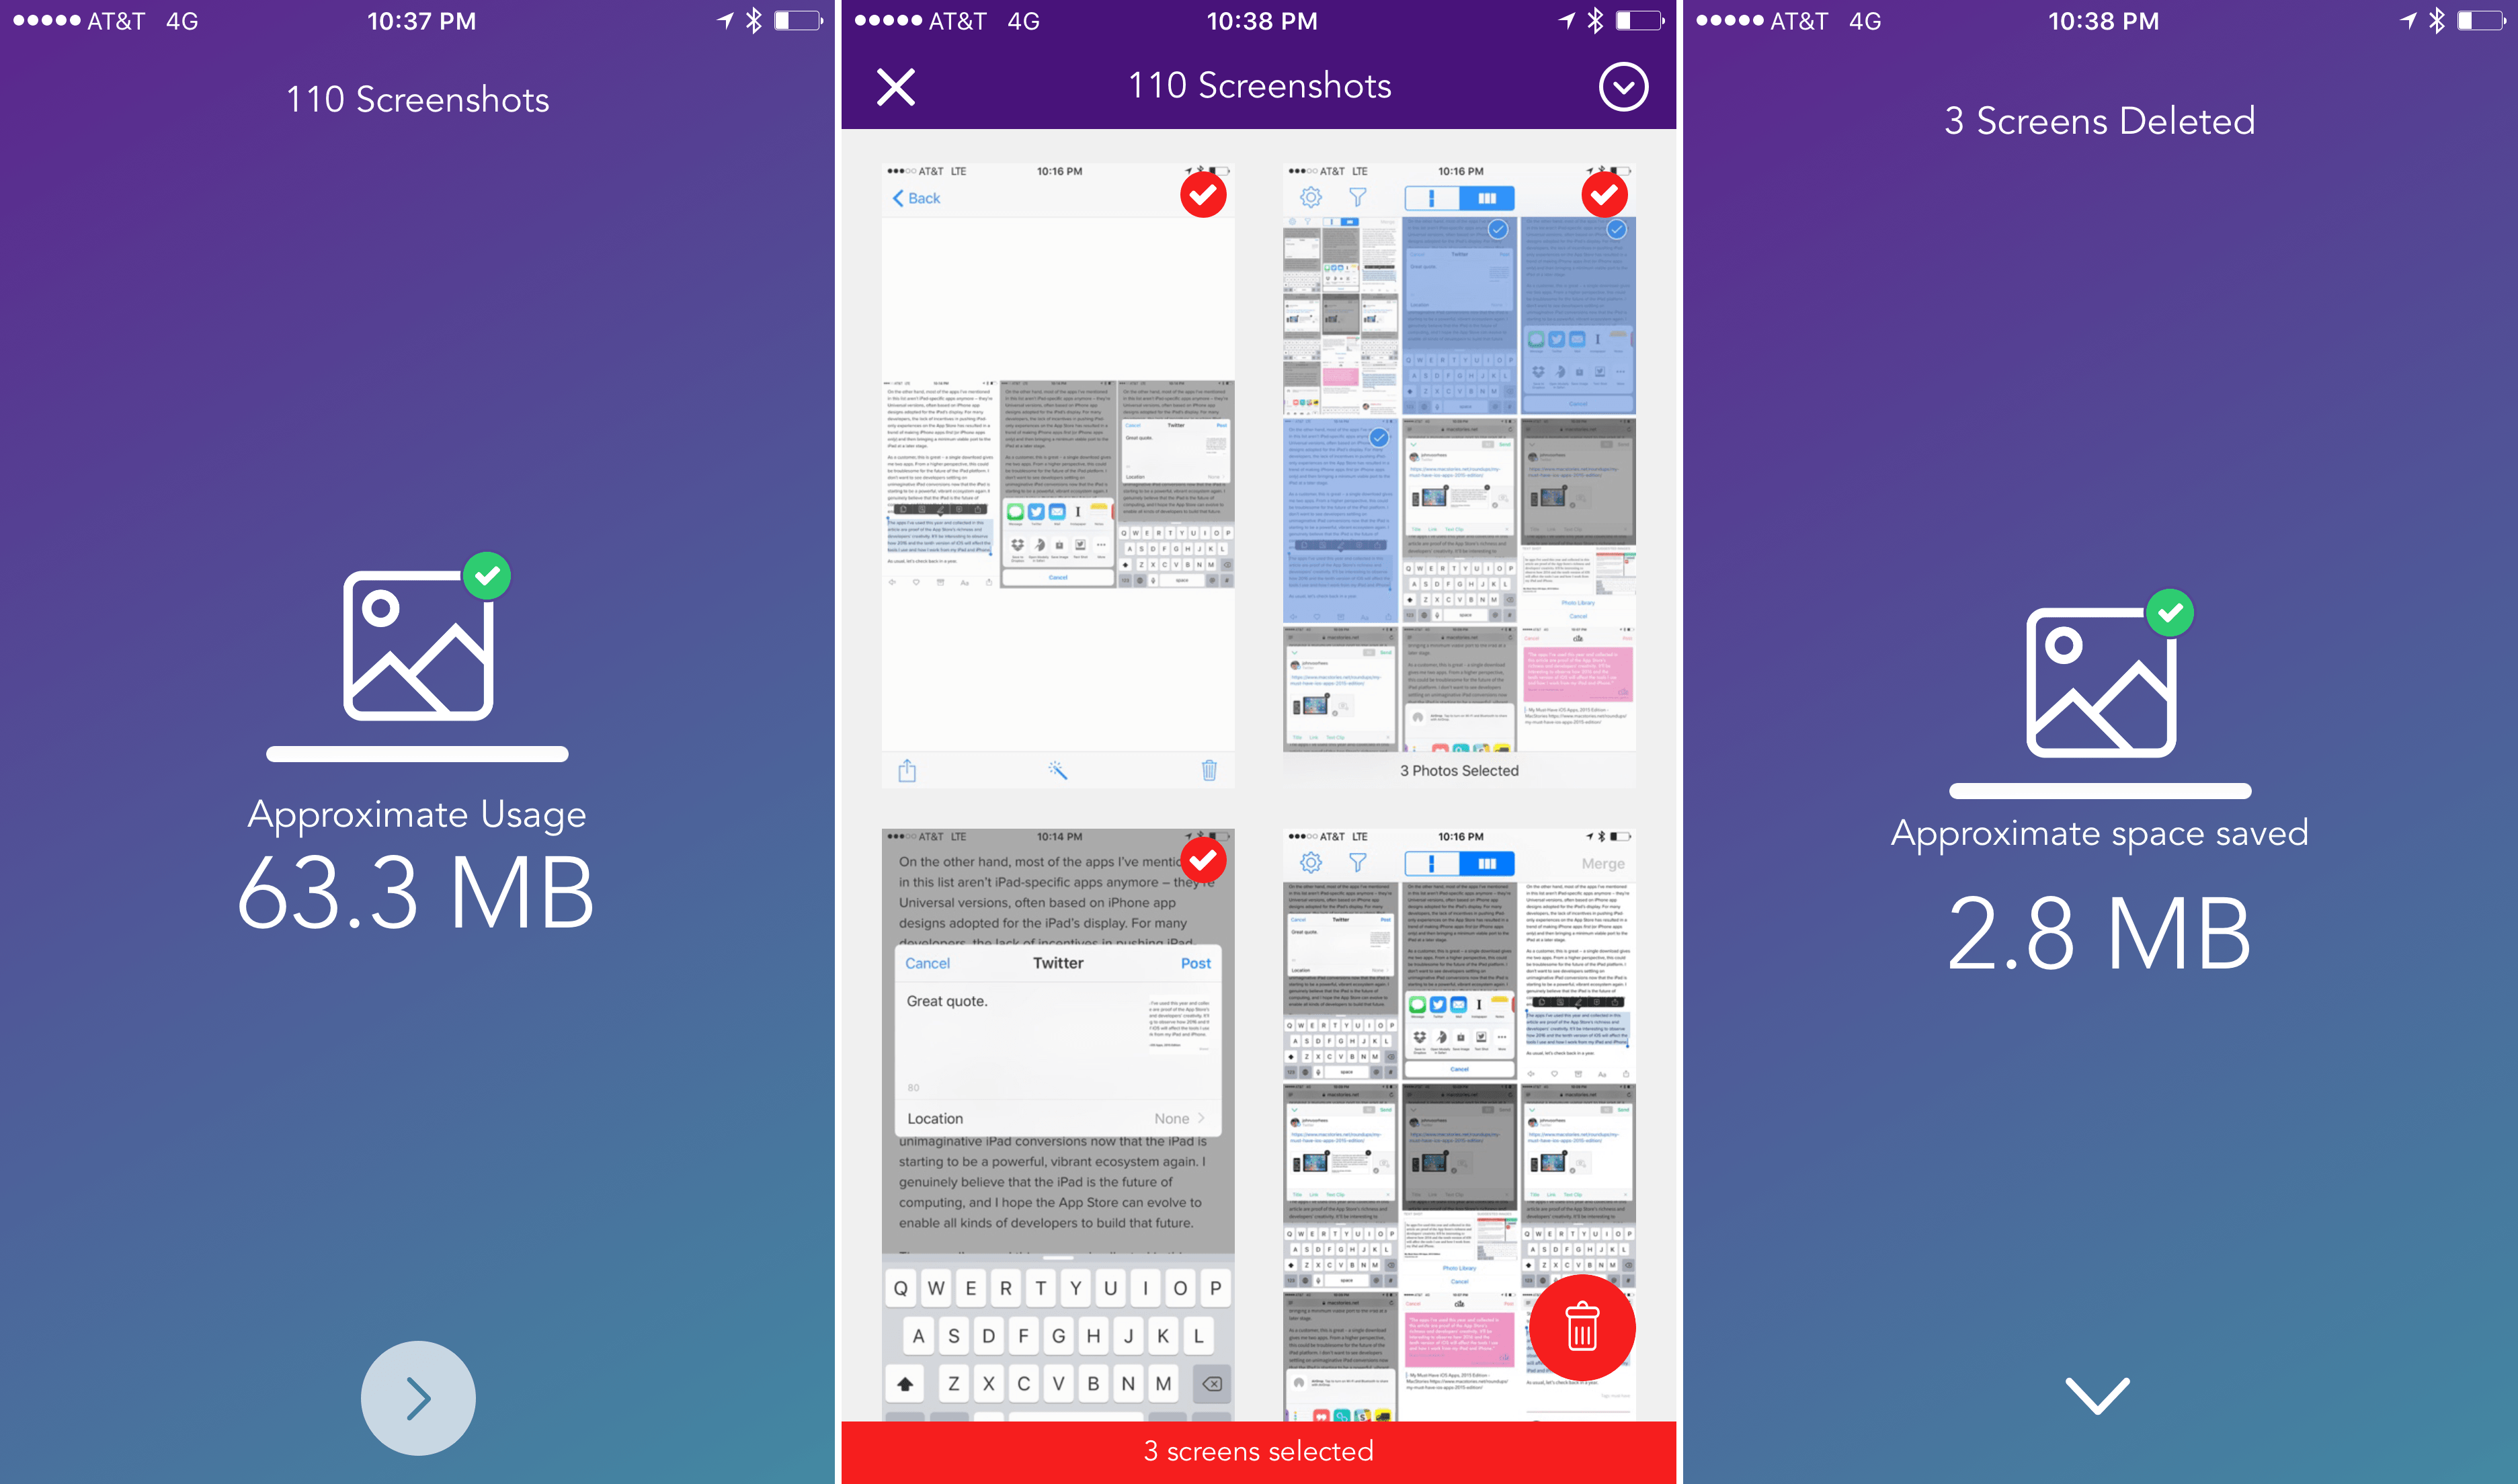
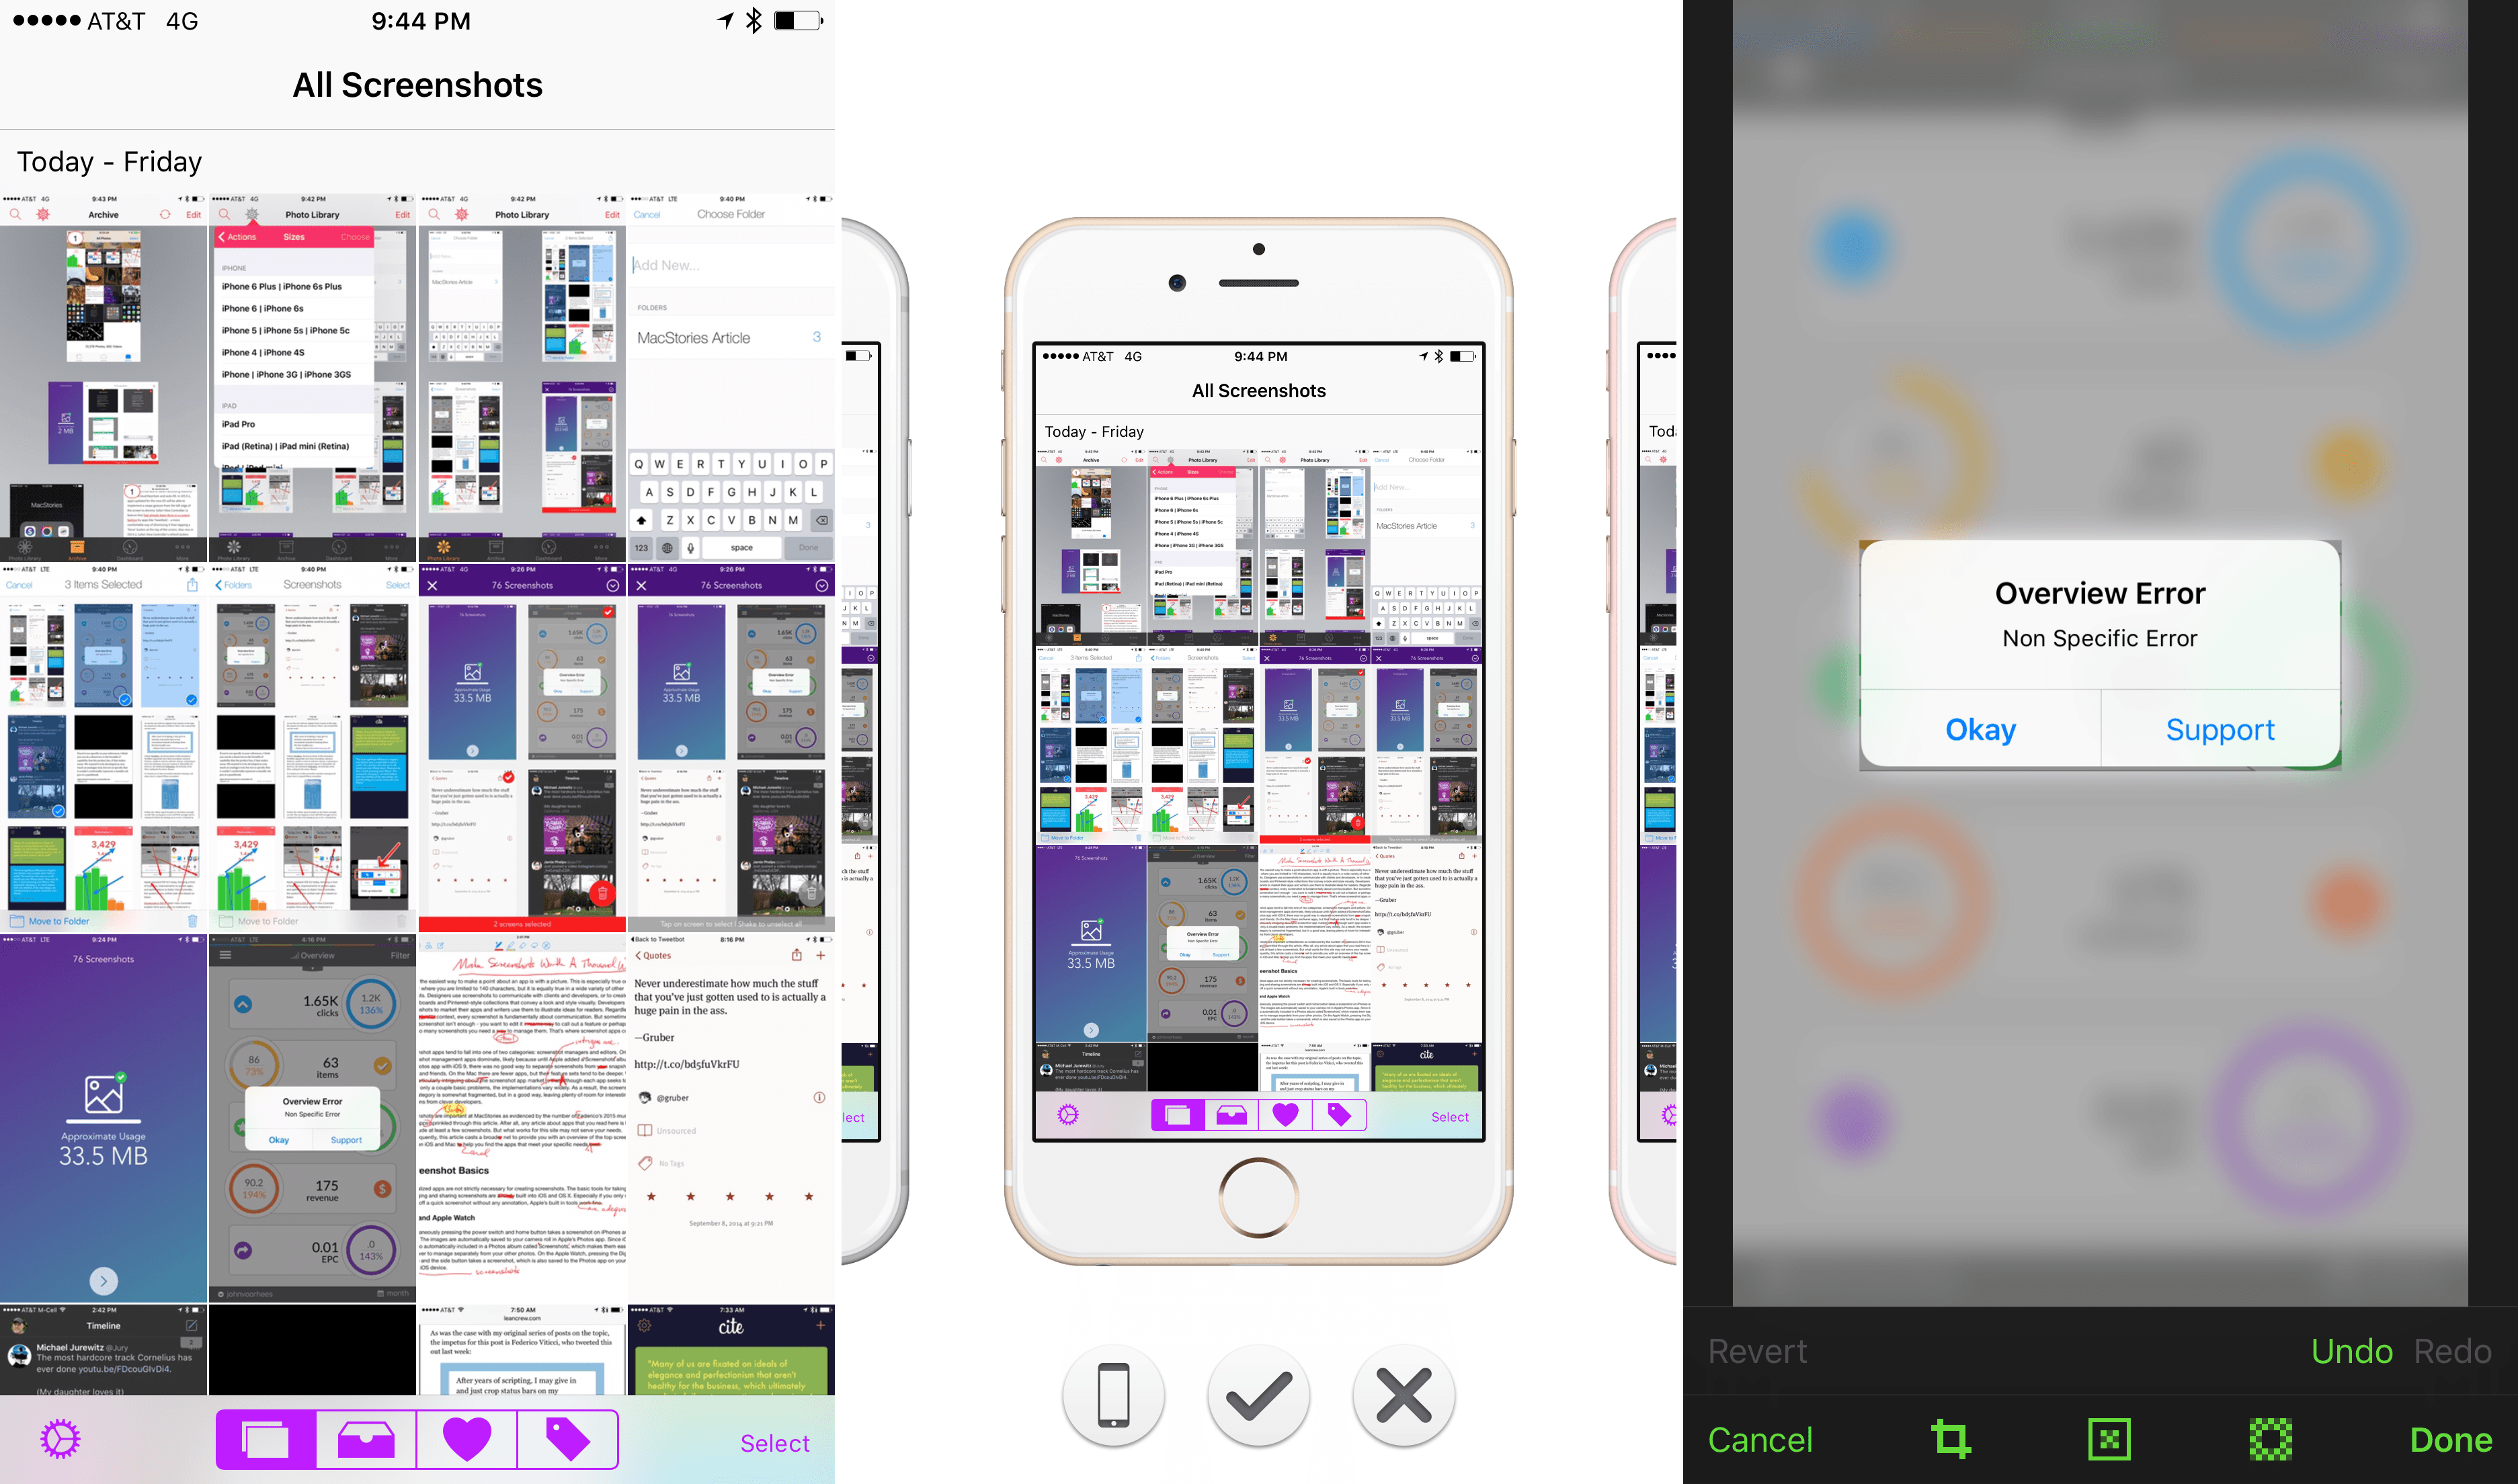
Screeny is one of the simplest screenshot managers. Screeny scans your iPhone camera roll for iPhone and Apple Watch screenshots, reports the amount of space they occupy, and presents you with thumbnails of each. On the iPad, Screeny detects iPad and Apple Watch screenshots. There is no way to preview screenshots full-screen. After you select screenshots that you don’t want to keep, tap the trash can icon and confirm that you want to delete the screenshots. Screeny reports the space you saved by deleting the screenshots and gives you an opportunity to rescan your camera roll to restart the culling process.3
Screeny is now a Universal app, eliminating one of the criticisms in Federico’s original review of the app. In my tests, Screeny detected only 68 screenshots going back to earlier this Fall,4 while other screenshot managers detected hundreds of screenshots in my photo library spanning many years. That said, Screeny is probably the fastest way to cull your recent screenshots and worth considering if your screenshot needs are limited.
Screeny is available on the App Store for $0.99.
Screenshotter
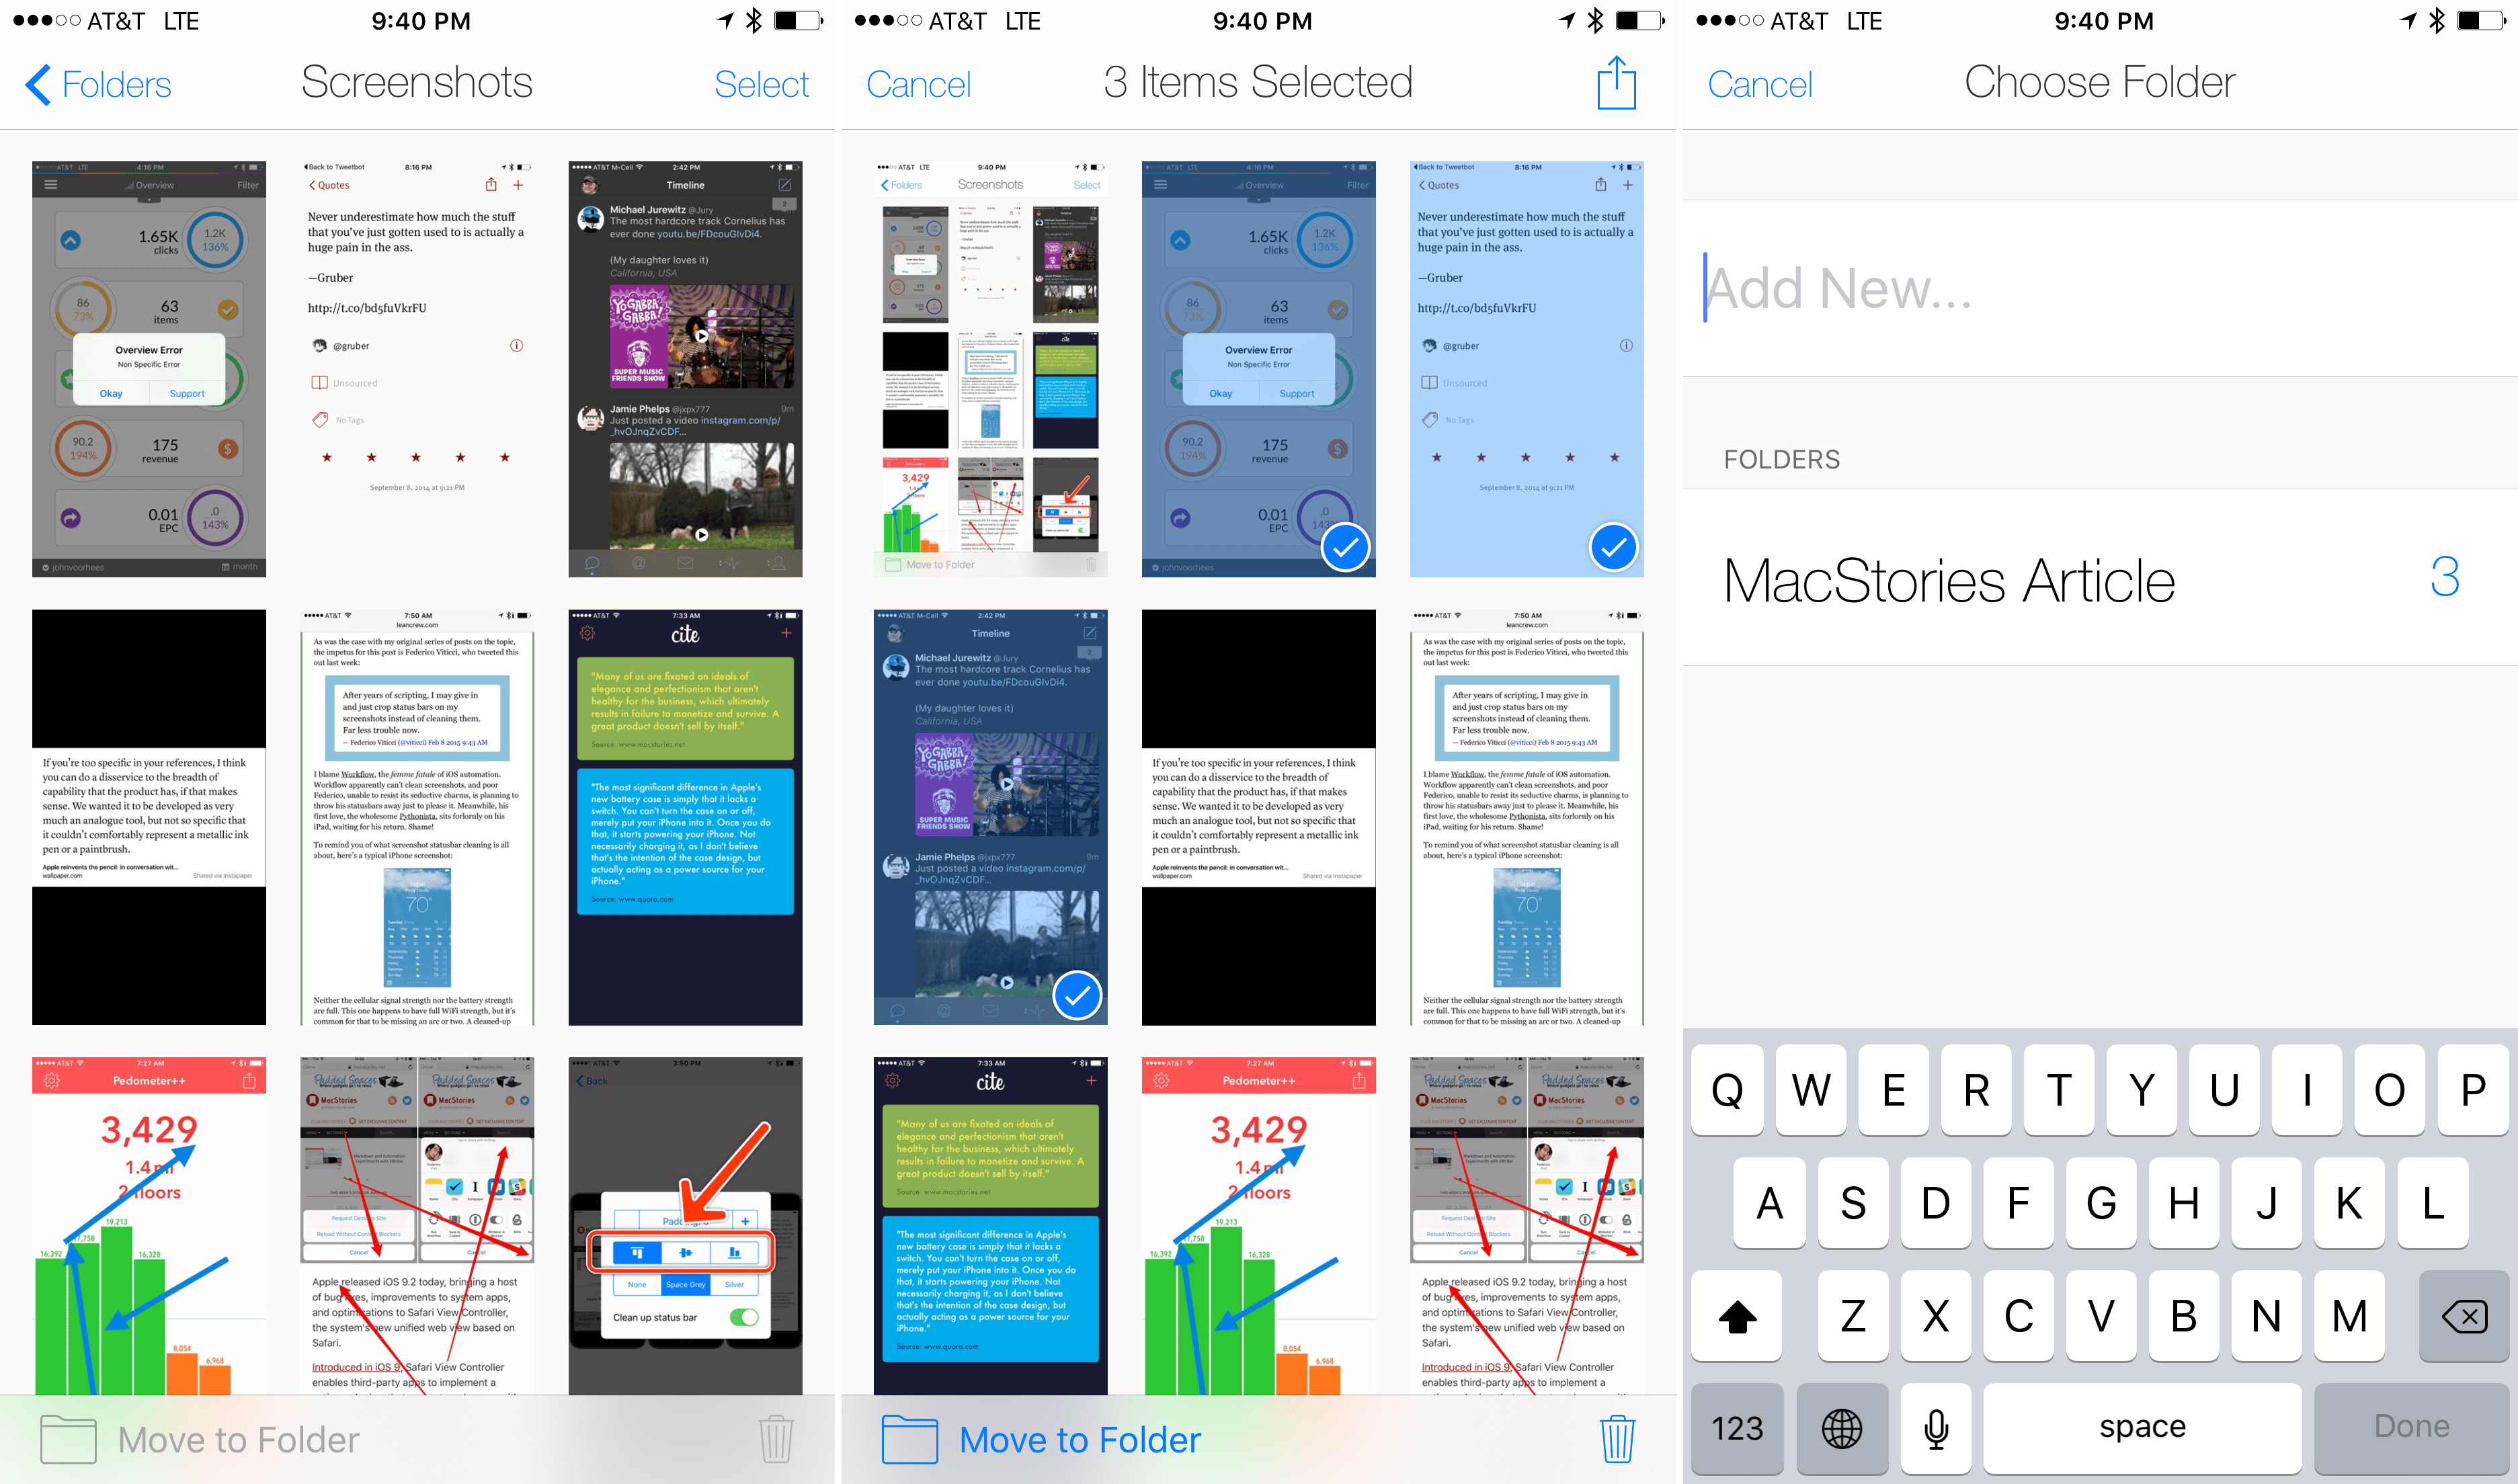
Screenshotter goes a step further than Screeny allowing you to organize screenshots into folders and back them up to iCloud, but does not support Apple Watch or iPad Pro screenshots. Screenshotter, which was developed as an internal tool for the designers of Cluster, a private social media service, presents thumbnails of the screenshots on your camera roll. Tapping a thumbnail gives you a full-screen preview of the screenshot. You choose screenshots by tapping the ‘Select’ button and then tapping the thumbnails. Once selected, screenshots can be organized into folders that sync to iCloud making them available on other iOS devices and iCloud Drive on a Mac. In my tests, Screenshotter detected over 600 screenshots, far more than Screeny.
A significant limitation of Screenshotter is that the state of your full screenshot library does not sync. If you move a screenshot into a folder, the screenshot is removed from the full screenshot library on that device and the folder and its contents will sync across any iOS devices that have Screenshotter installed and iCloud enabled. When you go to a second iOS device, the folder and its contents that you created on the first device will be synced, but the full screenshot library will still contain the screenshot that you moved into the folder on the first device. If you move the screenshot to the folder on second device, you end up with a duplicate screenshot synced across both devices. Over time, this makes it hard for someone who uses multiple iOS devices to know which screenshots in their library have been organized into folders and which have not.
Screenshotter is available on the App Store for $0.99.
Screenshot++
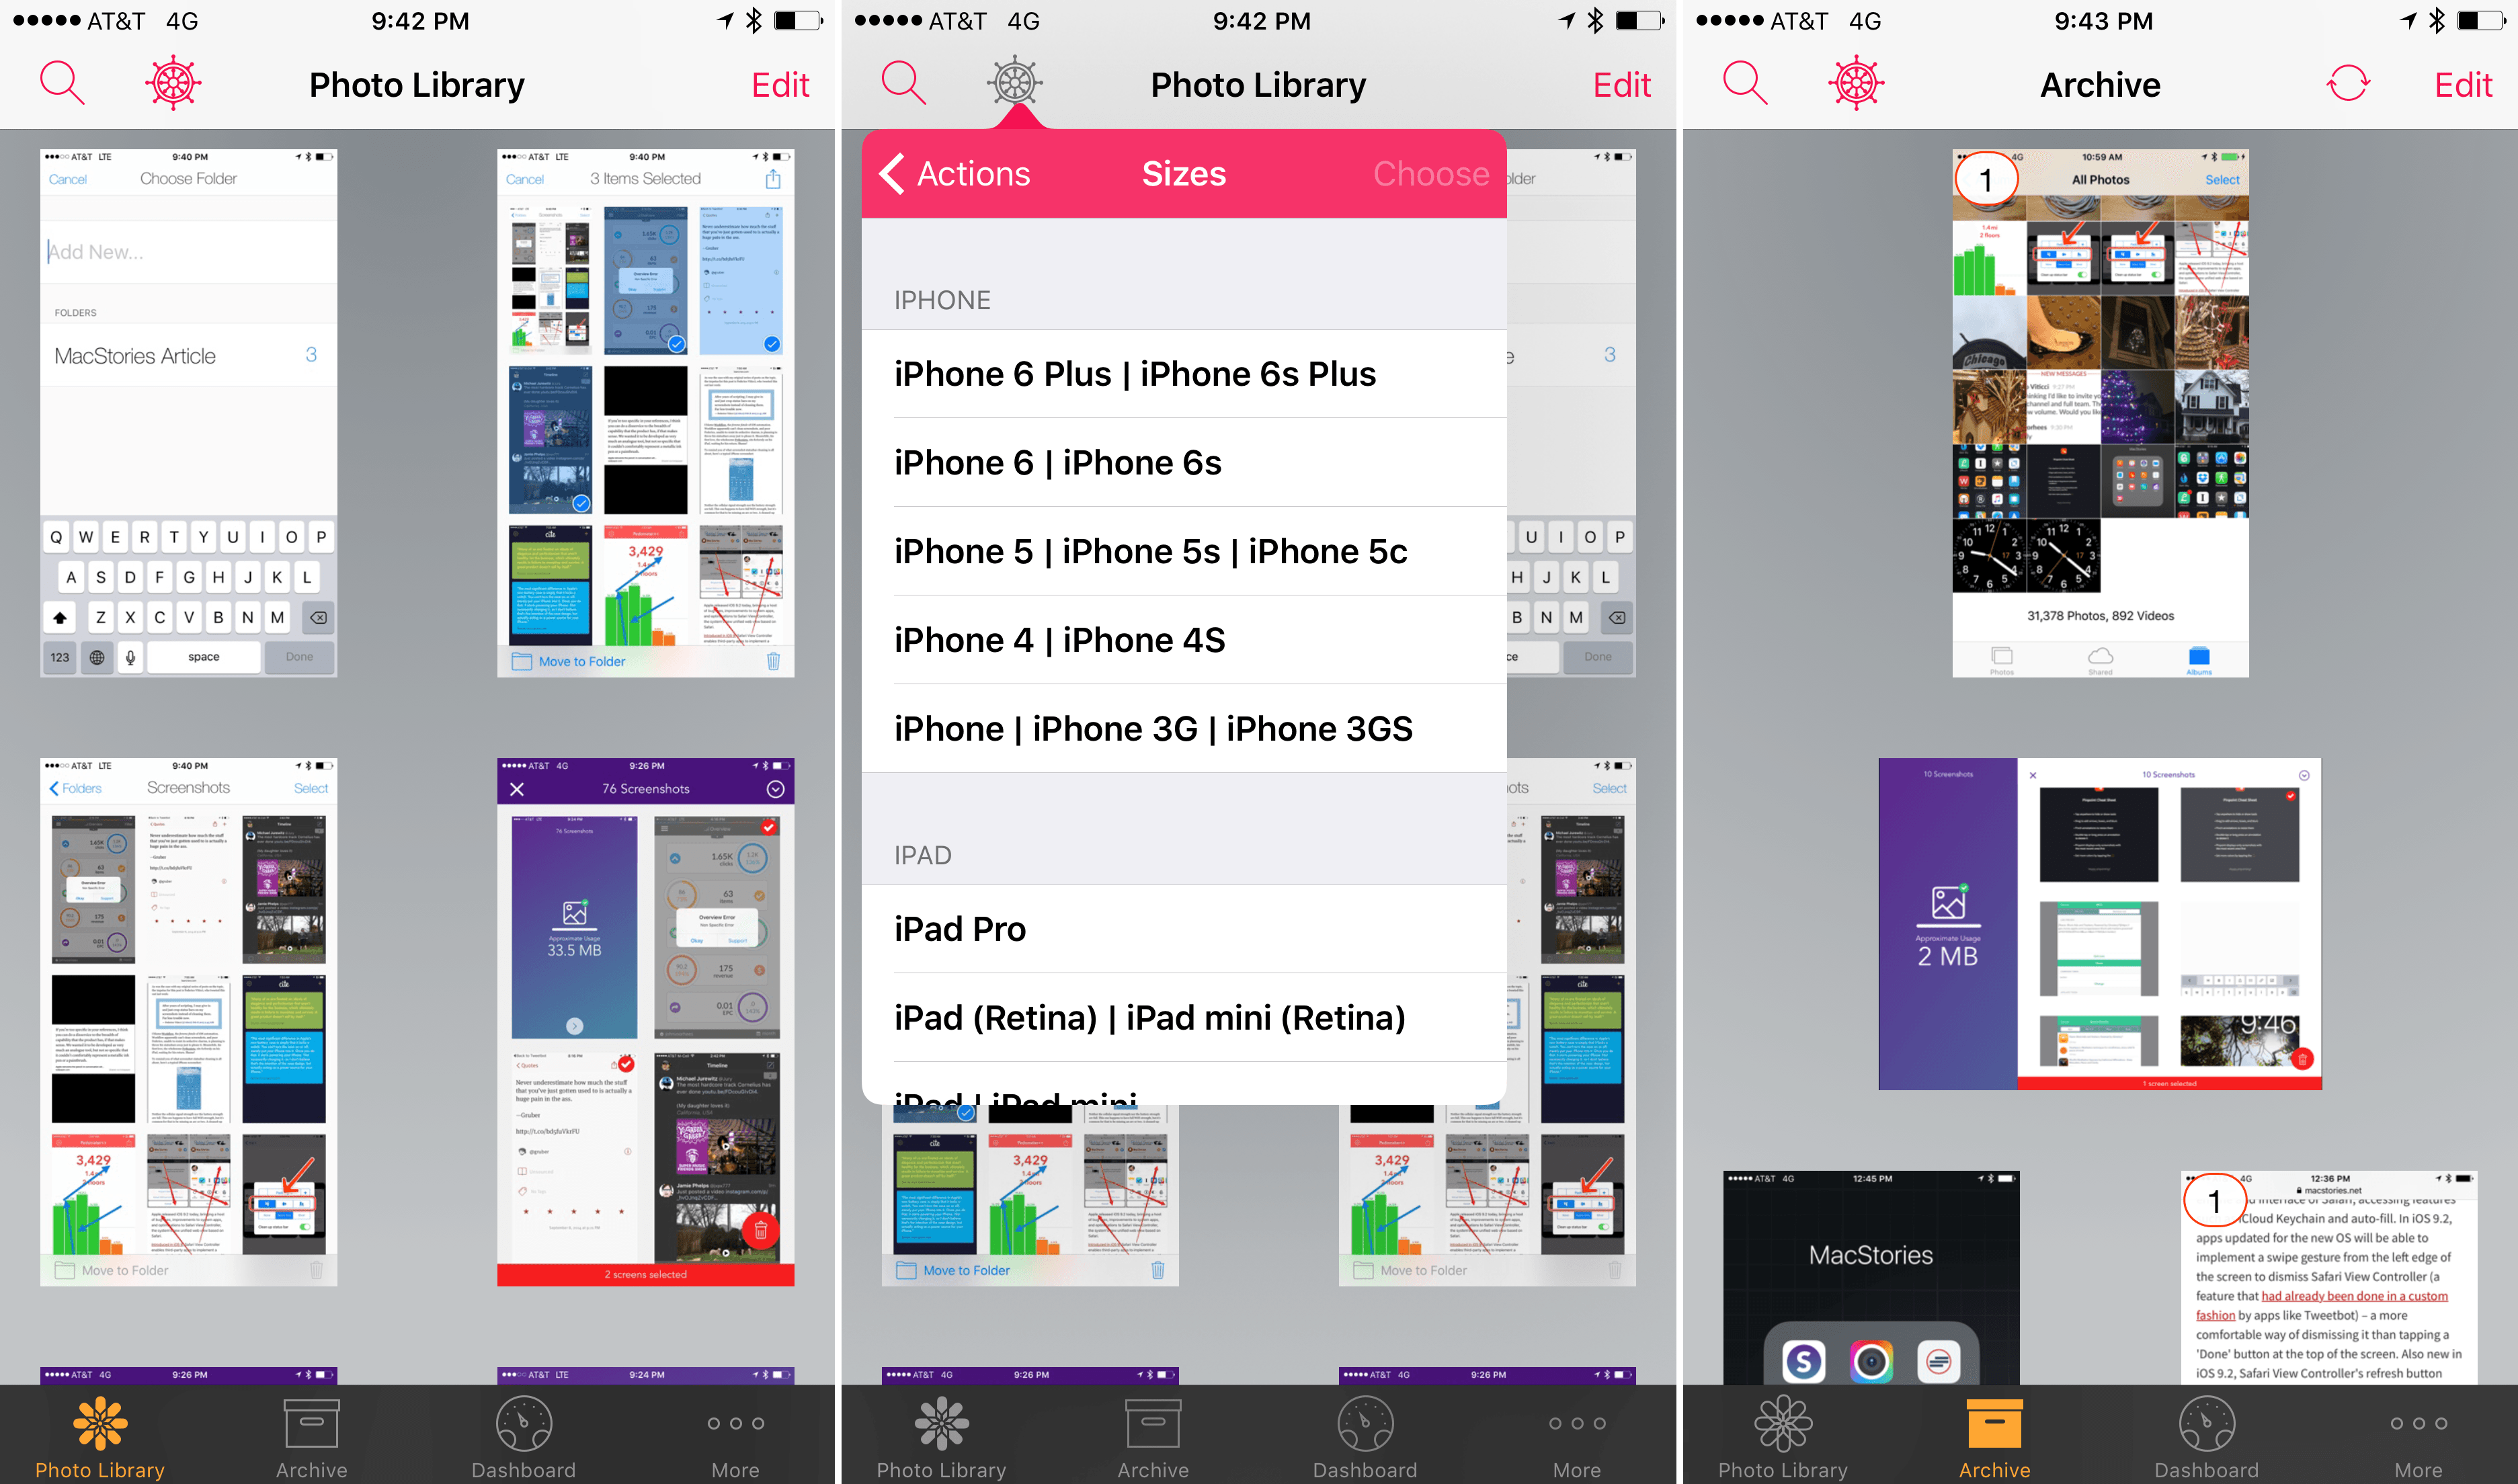
Screenshot++ from Wesley Dyson is the fullest-featured screenshot organizer of the lot. You can display and select screenshots based on every Apple iOS device and exclude screenshots from selection based on pre-defined time parameters such as screenshots created in the last week. Screenshots can be archived, at which point Screenshot++ allows you to delete the original from your photo library. Once archived, you can tag screenshots for easy filtering later. The archive view also includes a sync button to manually update the archive with screenshots archived on other devices.
The Dashboard tab lets you know how much space you have saved by removing unwanted screenshots and displays statistics on the total number of screenshots on your device and in your archive as well as the space they occupy by device category.
Screenshot++ is available on the App Store for $3.99.
LightScreen
LightScreen straddles the screenshot manager/editor line. Like Screenshot++, LightScreen does a solid job importing many screenshot types including those of the iPad and Apple Watch. It can also import images from your photo library. LightScreen supports liking and tagging screenshots as a means of organizing them, but it does not allow you to filter the screenshots by device type or time frame.
LightScreen includes a few unique editing features that are uncommon, even among apps whose focus is editing. LightScreen has a button labeled ‘Ancoo!’ that lets you view your screenshot framed by several different iPhone and iPad models. You can also grab the RGB values for any color in your screenshots, crop screenshots, obscure sensitive information, and highlight part of the screenshot by blurring all but a user-selected region of the image. LightScreen is also unique for its Apple Watch app that lets you view your watch screenshots, share them to Twitter and Weibo, and tag them with any tags you have set up in the iOS app.
LightScreen is available on the App Store for $4.99.
Screenshot Editors
Pinpoint
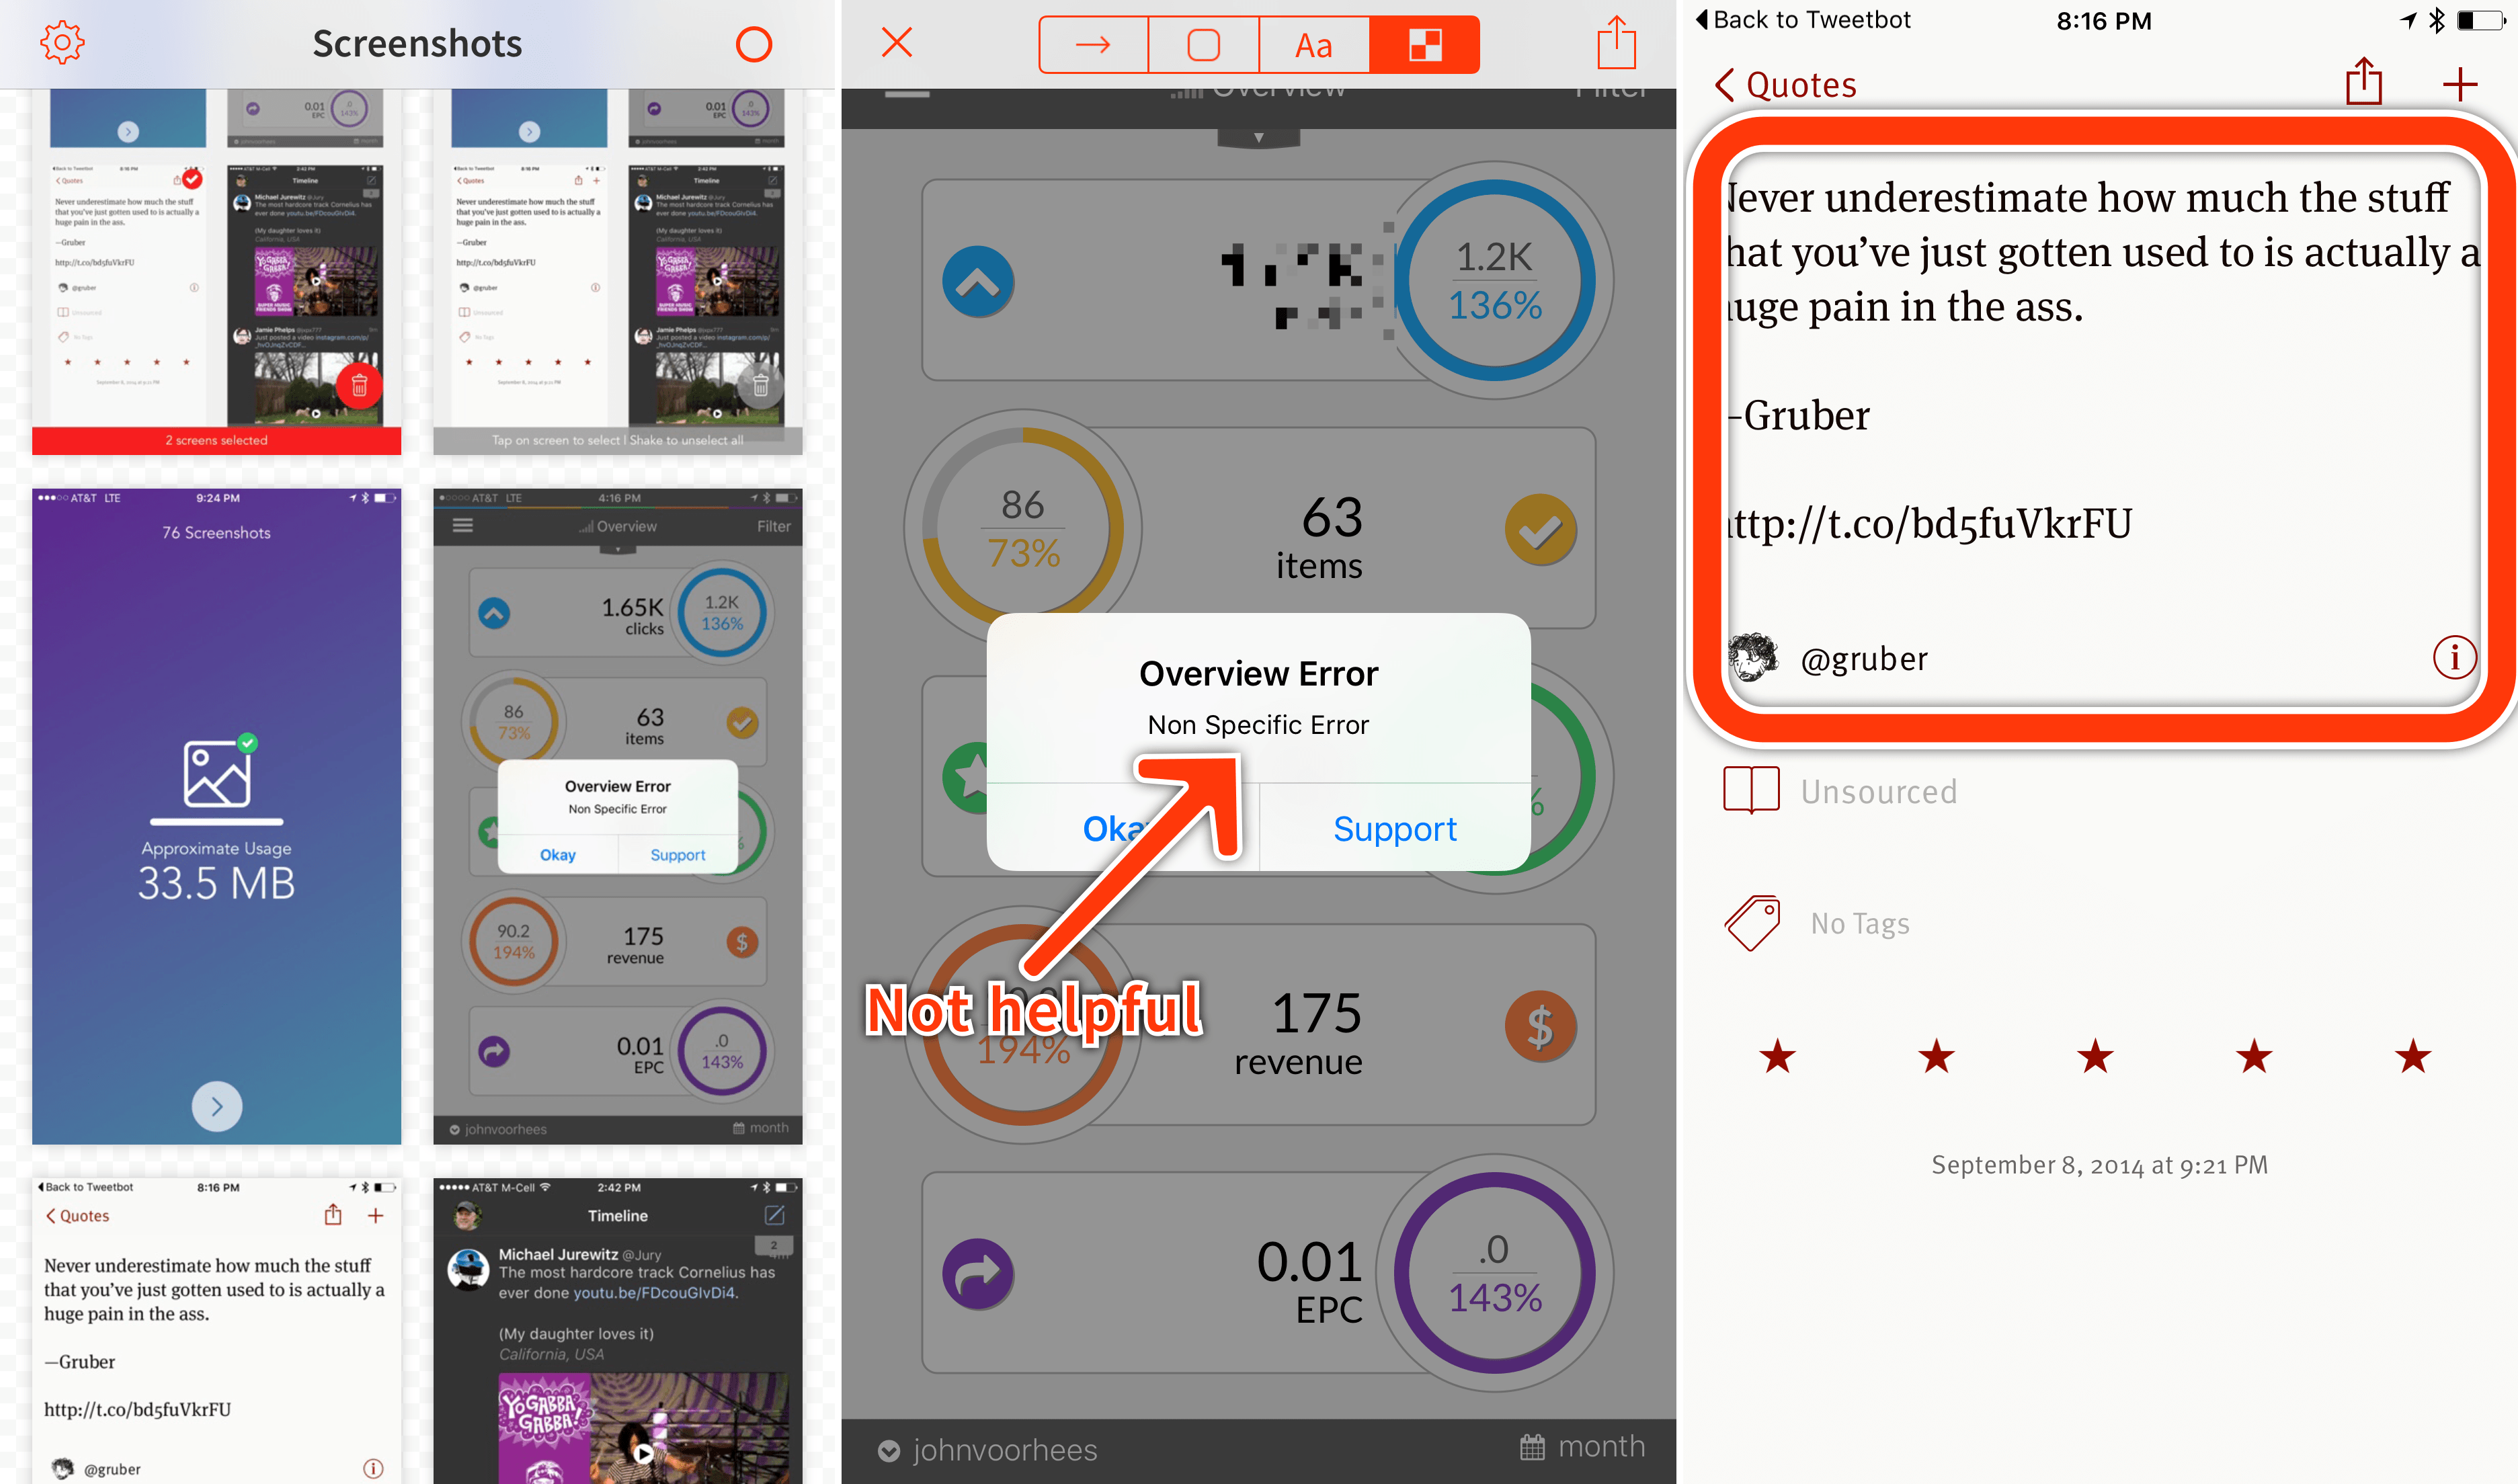
Pinpoint started life as BugShot, an app developed by Marco Arment in 2013 to help him and his beta testers report UI bugs. The app was acquired by Lickability in 2015 and relaunched as Pinpoint with additional functionality. There is a workman-like simplicity to Pinpoint that I like – it has just four tools: arrows, rounded rectangles, text, and the ability to obscure information by pixelating it. The screenshots available for markup are limited, however, to the type of device you use to edit the screenshots. In other words, iPhone screenshots are available for editing on an iPhone and iPad screenshots are available on an iPad. Apple Watch screenshots are not supported.
Pinpoint excels by including the essential tools for quickly marking up a screenshot to call attention to a particular element of the image. Arrows, rectangles, and user-defined pixelation areas can be dragged around the canvas, but not rotated, and enlarged or shrunken by pinching and zooming. Text is also draggable, but not resizable. My one wish for the app is that it support all screenshot types regardless of the type of device on which it is installed.
Pinpoint is free to download on the App Store and ships with one color choice for arrows, rectangles and text: orange. Seven additional colors are available as in-app purchases for $0.99 each or $4.99 for all seven.
PointOut
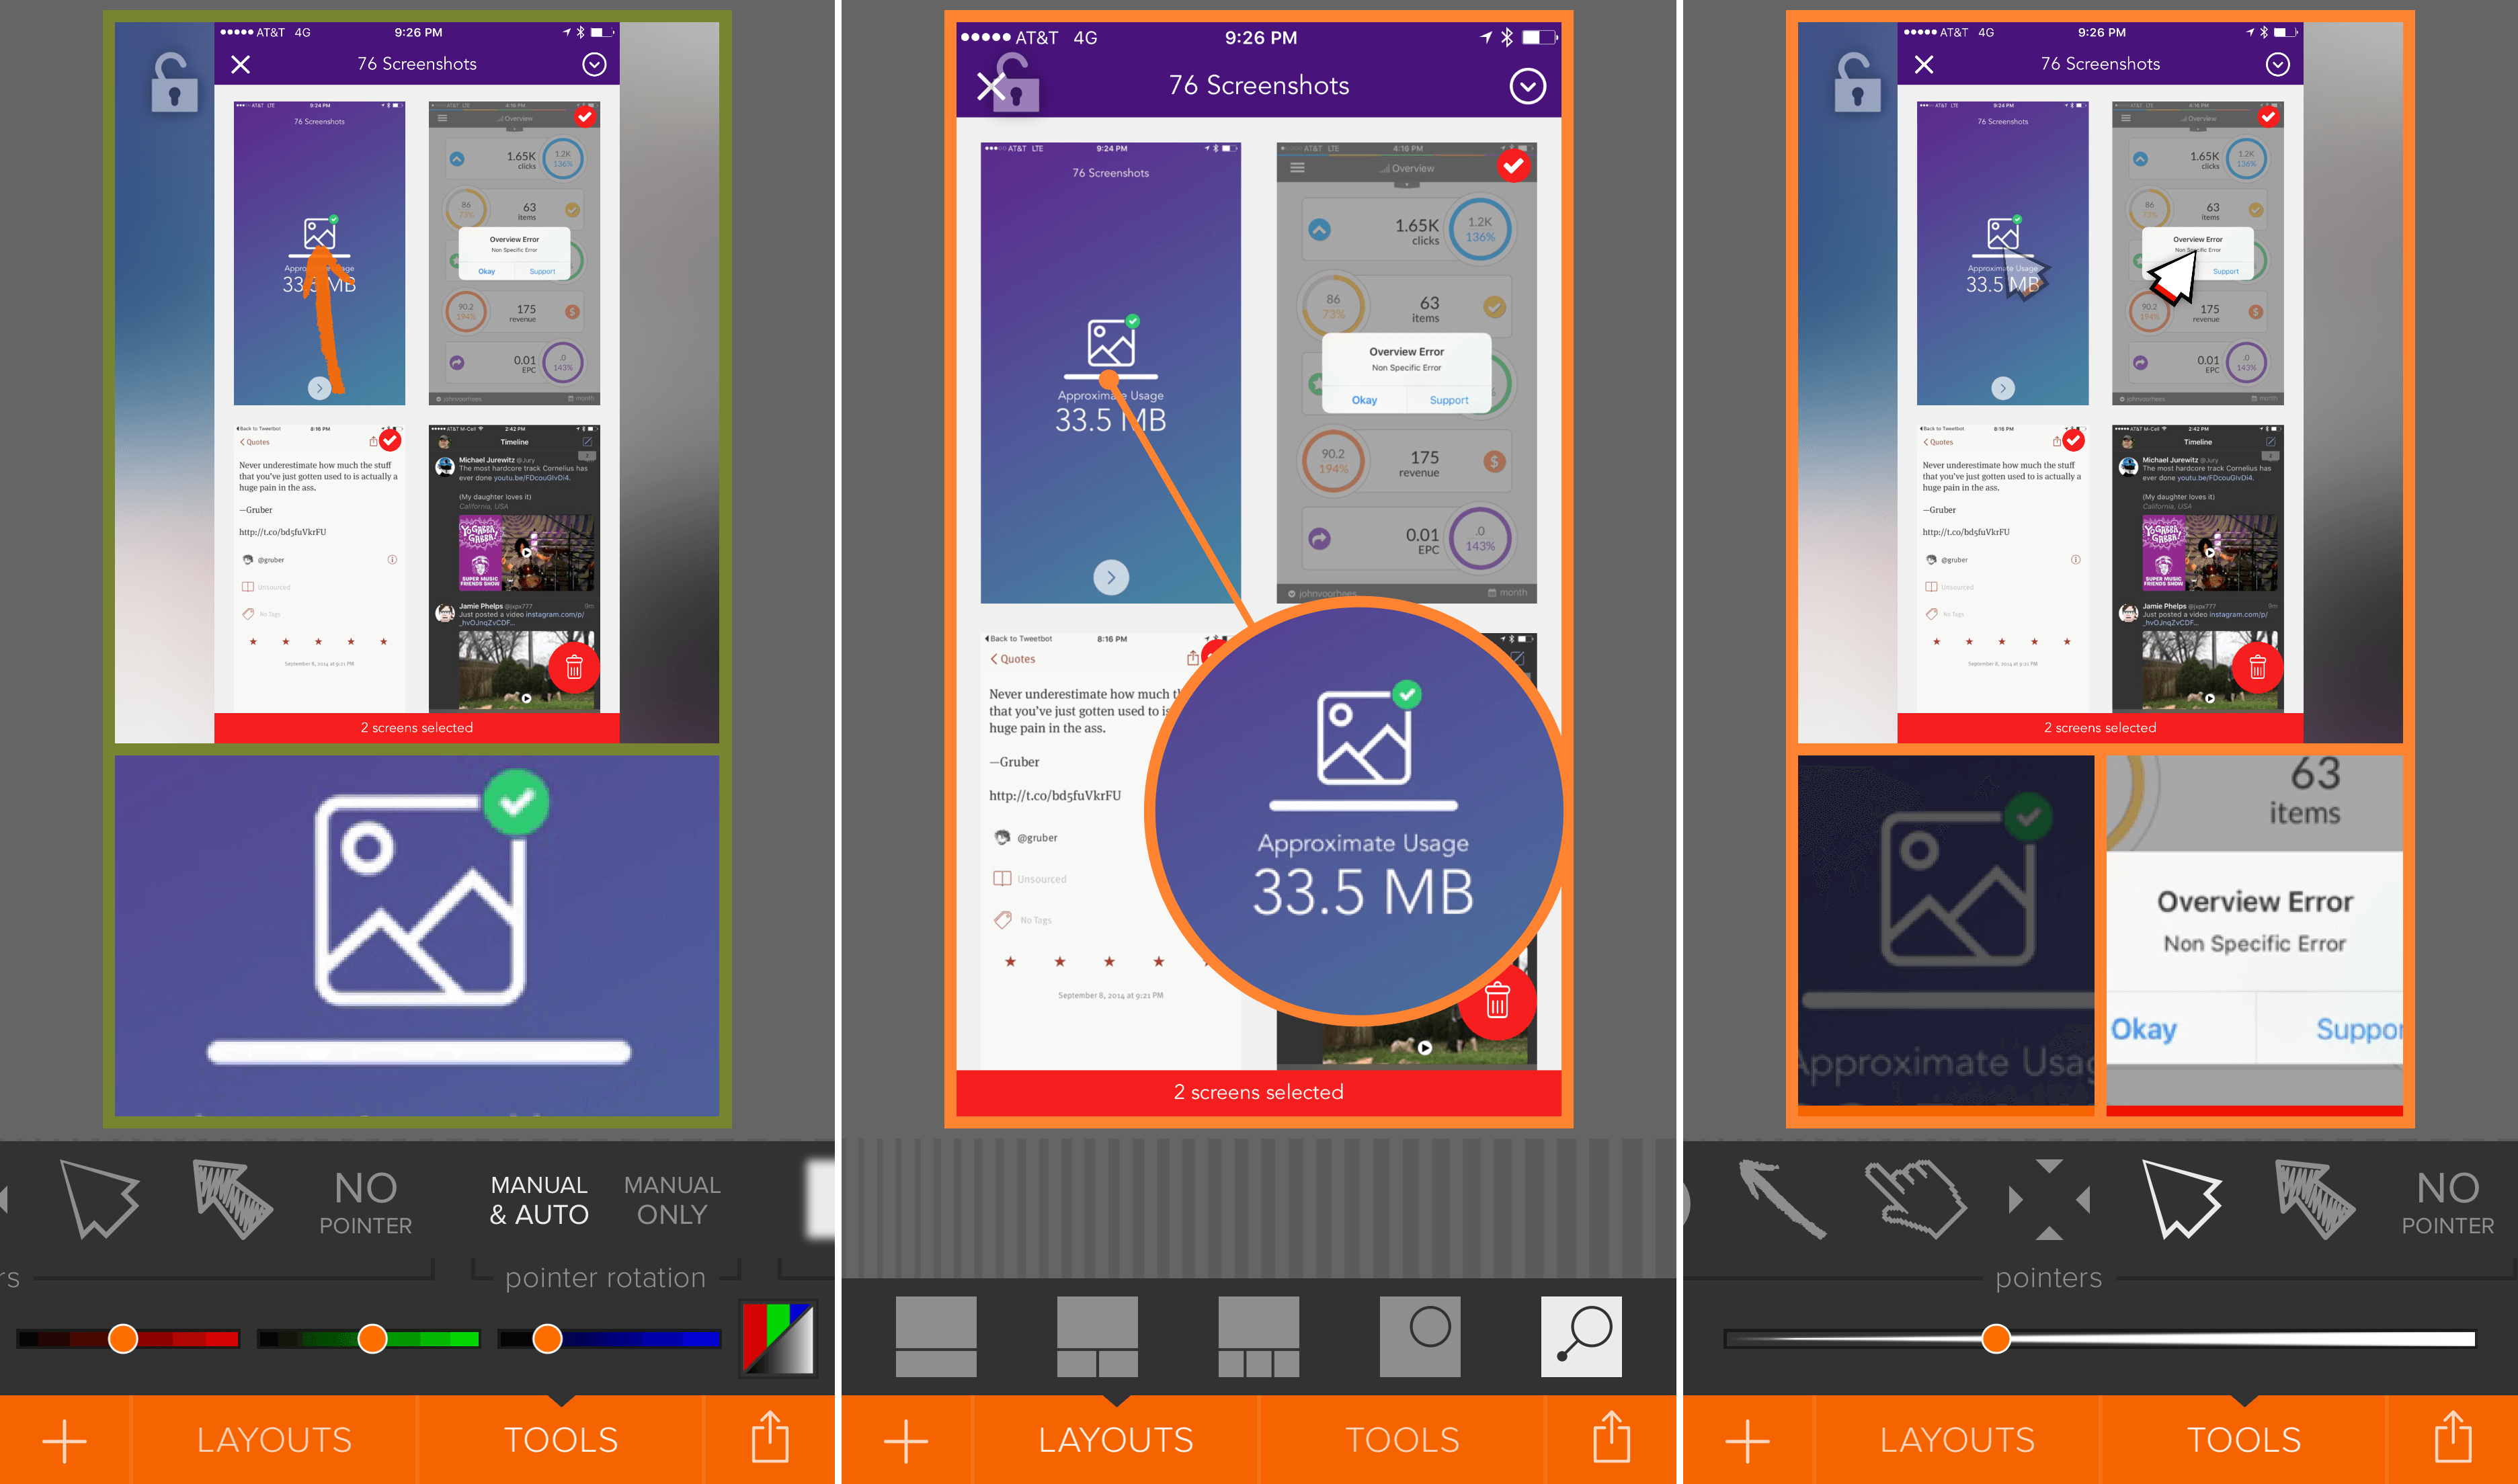
PointOut takes a more layout-heavy approach than Pinpoint. Though not strictly a screenshot app because it can edit any type of image, PointOut offers three multi-pane and two single-pane layouts that allow you to focus on multiple elements of a screenshot using pointers, a magnifying glass image, or a loupe. You can edit every element of the canvas, including the orientation of the panes, the thickness of the stroke separating the panes, the type of pointers used, and the color scheme.
PointOut has a steeper learning curve than Pinpoint, but is particularly useful if you want to highlight something in a more polished way for inclusion in a presentation or published article. PointOut is free to download on the App Store with a tip jar business model that lets users support its developer.
The iOS Status Bar
Some people prefer the cleaned status bars of their iOS screenshots that show full cellular signal and battery strength. One method of doing so is a set of Python scripts developed by Dr. Drang he calls Cleanbar that he runs from Launch Center Pro to replace certain status bar elements with their cleaned versions.
Another option for status bar cleaning is to connect your iPhone or iPad to your Mac. Beginning with Yosemite and iOS 8, you can record screencasts of iOS devices via the built-in QuickTime app. Start a new QuickTime recording using your iOS device as the source, but instead of clicking the record button, simply start taking screenshots. QuickTime automatically cleans up your cellular strength indicator, battery level and changes the time to 9:41 am.5
Alternatively, you can remove the status bar altogether with an image editor like Pixelmator or a dedicated app like Status Barred. Status bar removal is the preferred route for many developers because the iTunes App Store guidelines recommend removing status bars from screenshots submitted to the App Store.
Text Shots
A picture may be worth a thousand words, but in a 140-character Twitter world, 141 characters will do. Text shots are a variant of screenshots that started as a clever way to get around Twitter’s character limit. To post a longer message, people began to take screenshots of excerpts from articles on the web or longer passages typed into a text editor and post them as photos on Twitter, hence the term ‘text shot’. It didn’t take long for developers to create dedicated text shot apps and build them in as a feature of other apps.
OneShot
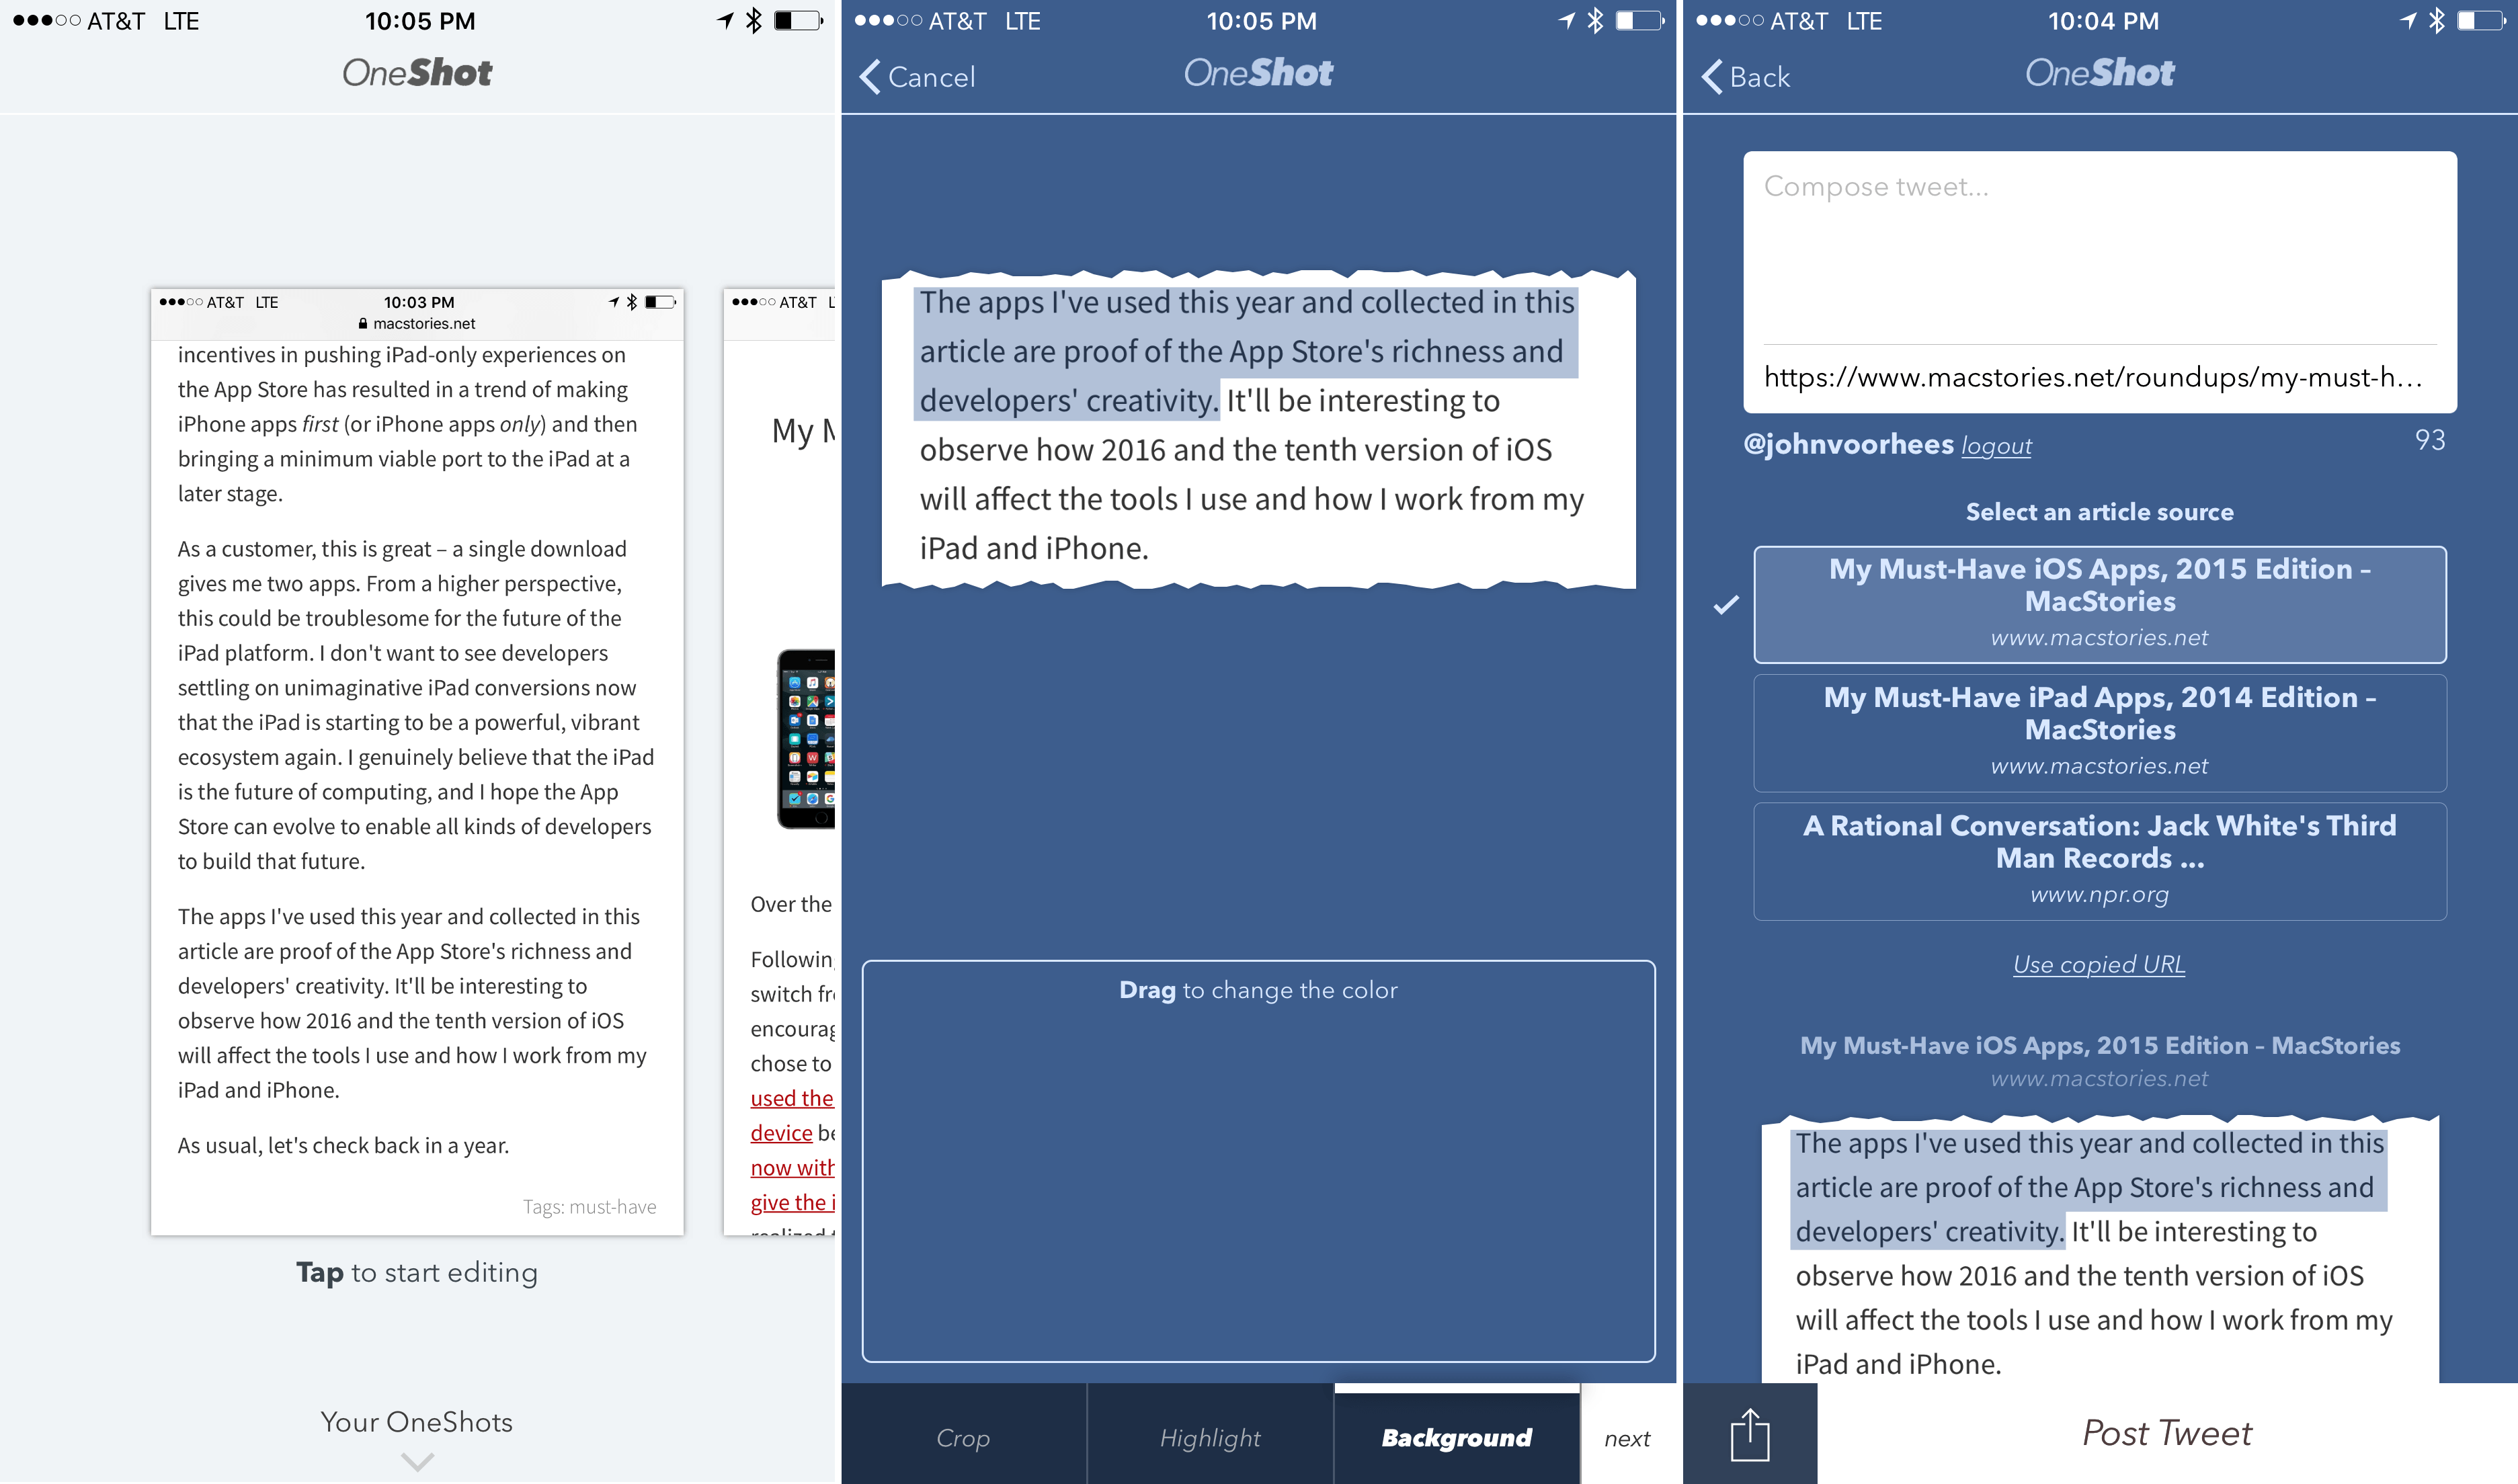
With OneShot you can convert any screenshot into a highly customizable text shot.6 After you take a screenshot that includes the text you want to use, open OneShot, choose the screenshot, and crop it to include only the part you want to keep. OneShot preserves images and detects the text in the screenshot, which allows you to highlight part of the text. You can even customize the background and highlight color by dragging your finger beneath a preview of the text shot. The final step is to choose the source URL for the text shot and send it.
OneShot has a dedicated ‘Post Tweet’ button, but you can also share your text shot via the iOS system share sheet. One refinement that I would like to see in OneShot is the inclusion of the source URL when sharing from the share sheet. The source URL is only included when using OneShot’s ‘Post Tweet’ button.
OneShot saves past text shots for reposting or accessing the original source material at a later date. OneShot’s strength is the level of customization it allows. I’m not a huge fan of the faux torn paper frame added to the text shot, but it does convey that it’s an excerpt of a longer work, which is useful.
OneShot is available for free on the App Store.
Cite
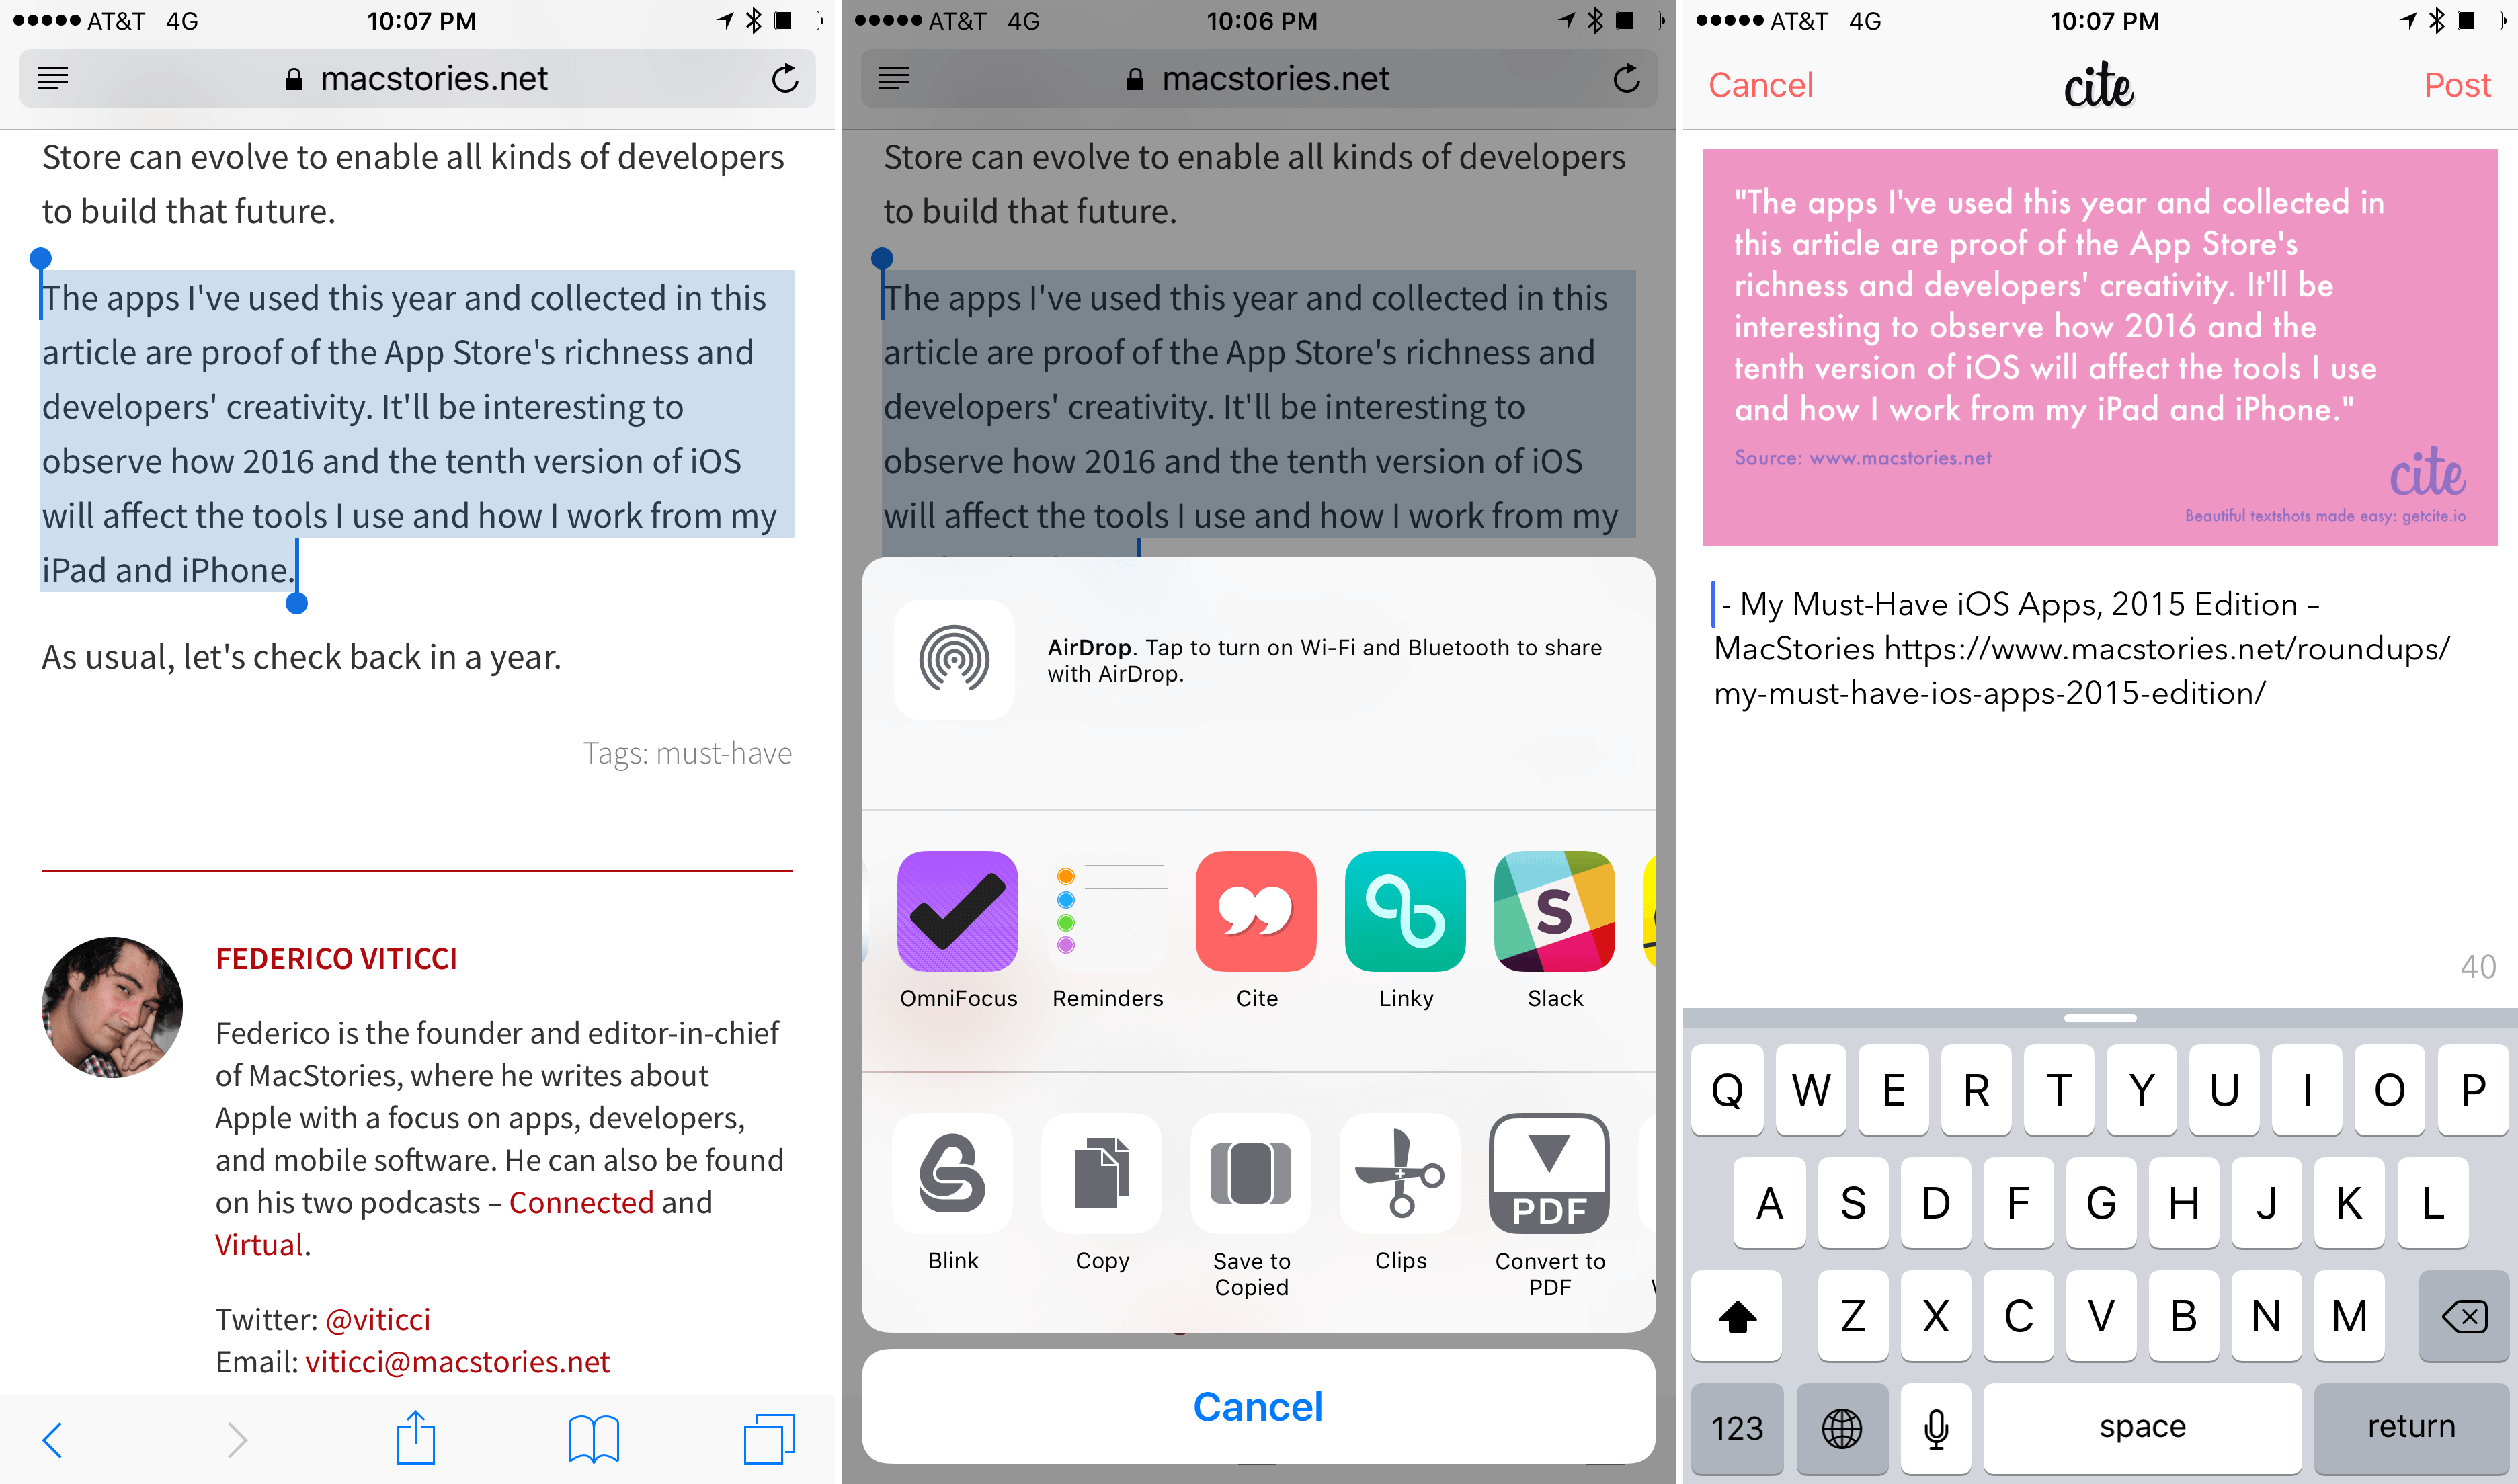
Cite, from Marcel Wichmann and Florian Albrecht, is a different take on text shots. Instead of relying on screenshots, Cite uses text selection in Safari, along with a share extension to create text shots. The advantage of Cite’s approach is that it doesn’t result in a screenshot that is saved to your camera roll. The downside is that text selection in Safari can be fiddly at times.
Cite also lacks the customization of OneShot and is iPhone-only. Each text shot is colorful, but is not user selectable. Also, because Cite relies on text selection instead of screenshots, it cannot handle images. Nor can Cite share its text shots to apps other than Twitter or generate text shots from apps other than Safari. Cite’s limitations may be a deal breaker for many, but if you spend a lot of your web time in Safari and do not feel constrained by its limitations, Cite’s share sheet integration is a handy way to share passages of text on Twitter that are longer than 140 characters.
Cite is available for free on the App Store.
Linky
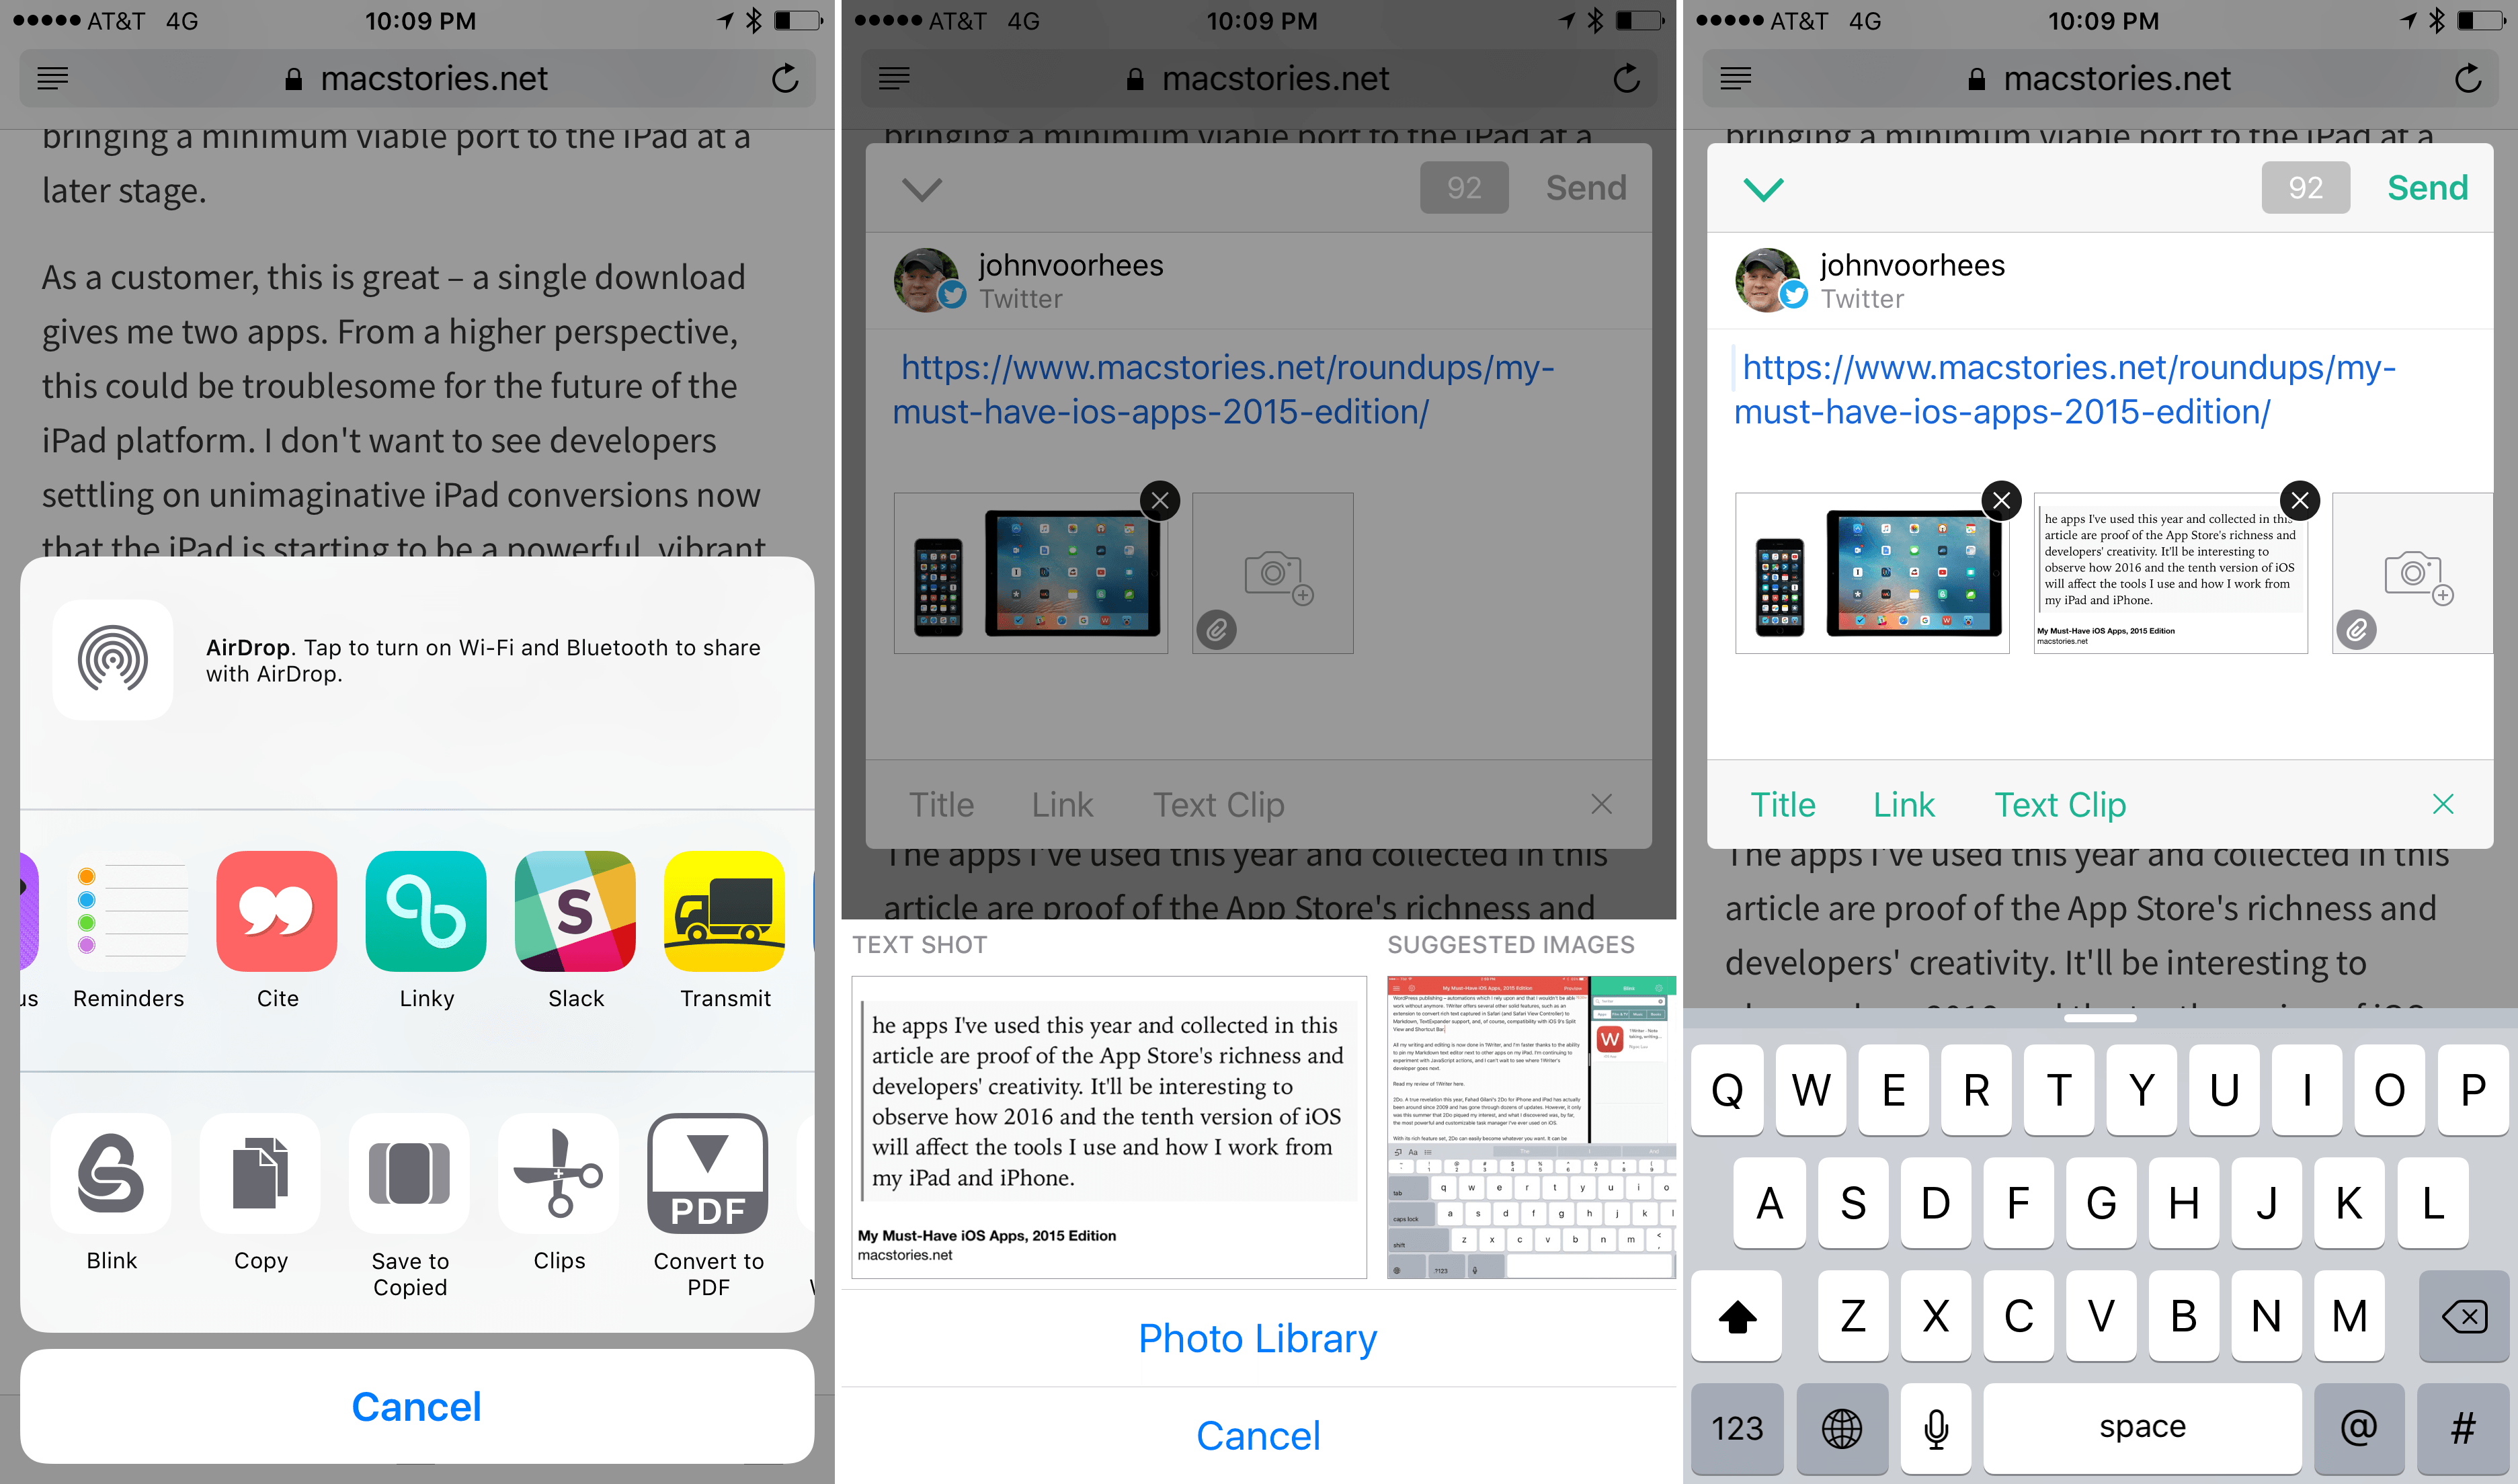
Linky from Pragmatic Code can share links from Safari via its share extension or its own built-in browser via Twitter, Facebook, or App.net. In addition to the link title and URL, Linky can generate a text shot if you highlight text on the page you are sharing. To add a text shot, tap the ‘Add Image’ button in the extension. In addition to suggesting other images on the page and your camera roll, a text shot will be generated that you can add to your post.
Linky is available on the App Store for $3.99.
Instapaper
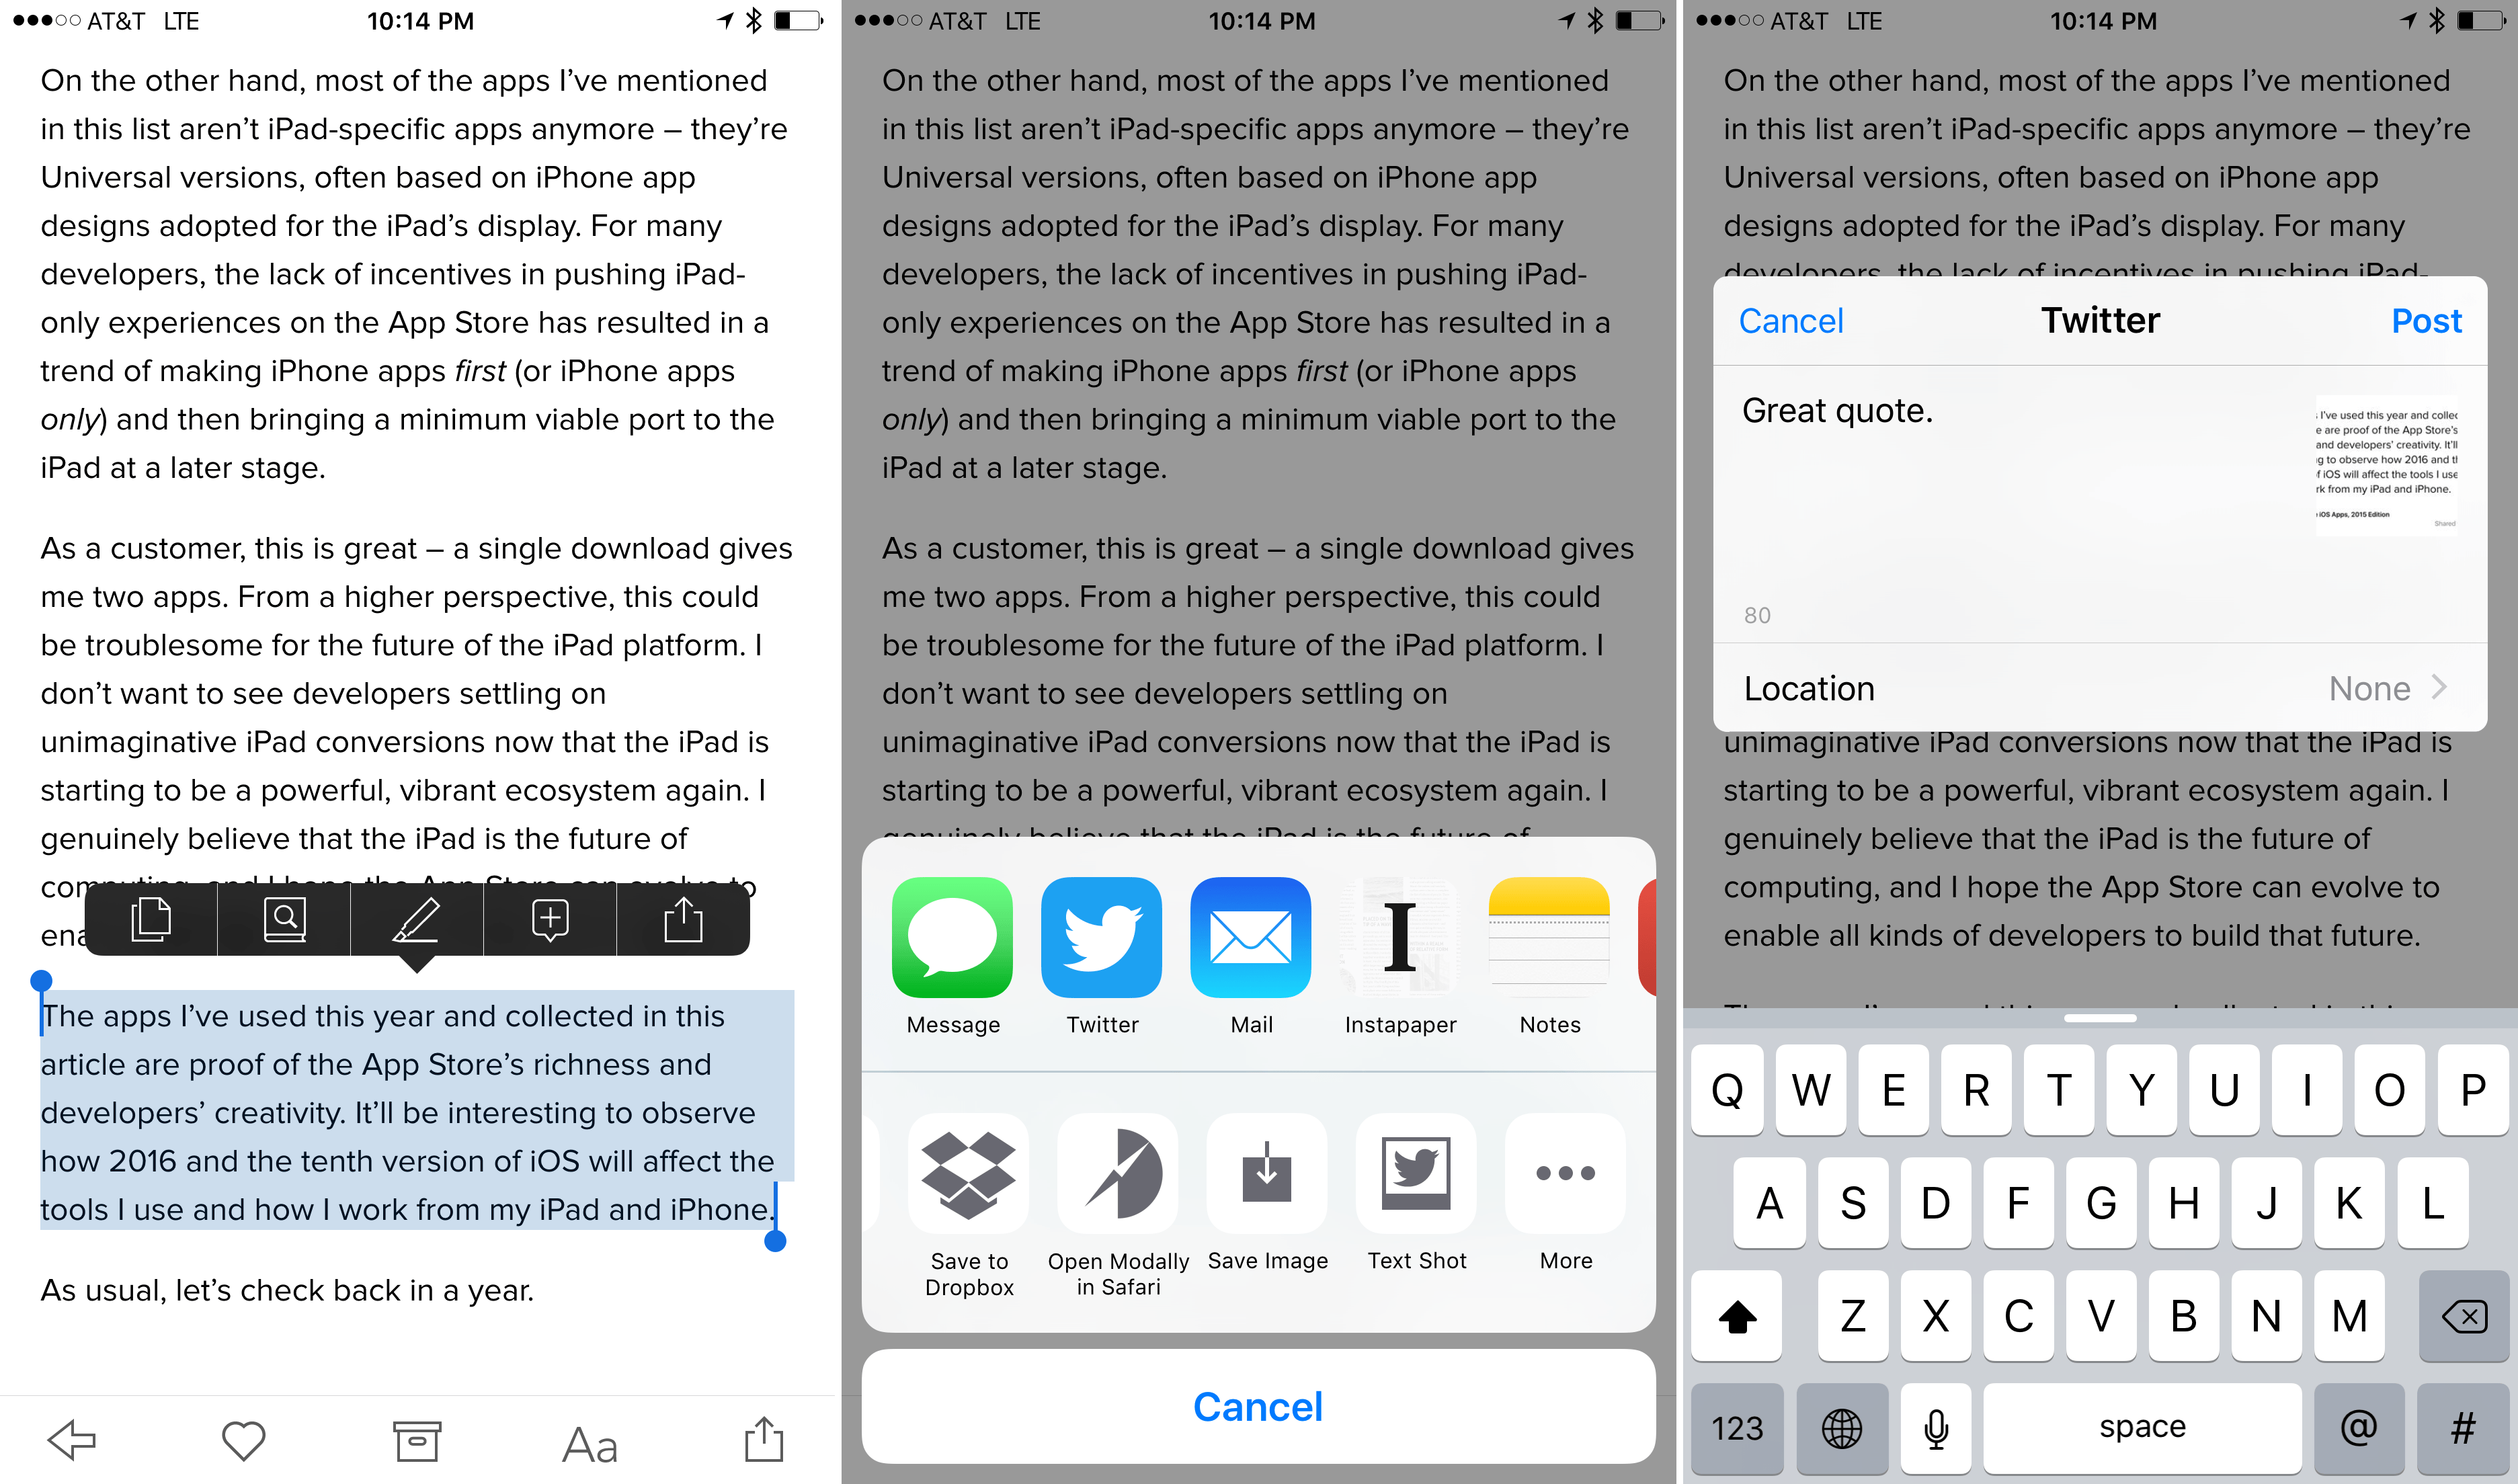
Instapaper, long known for its superior typography, makes handsome text shots. Simply highlight text in an article that is in your read-later queue and choose the share button from the popup contextual menu. From the share sheet, select the ‘Text Shot’ action extension, which will open a Twitter compose sheet with a text shot attached and a link to the source material.
The text shots created with Instapaper are simple and look great. Set against a white background with black text, the typography of the text shot matches the typeface chosen for reading Instapaper articles. At the bottom of the text shot is the title of the article set in bold with the source URL just below it. On the right, opposite the source URL is an understated and unobtrusive “Shared via Instapaper” that does not take up any additional vertical space in the text shot.
Instapaper is available for free with in-app subscriptions to certain features on the App Store.
Other Utilities
LongScreen
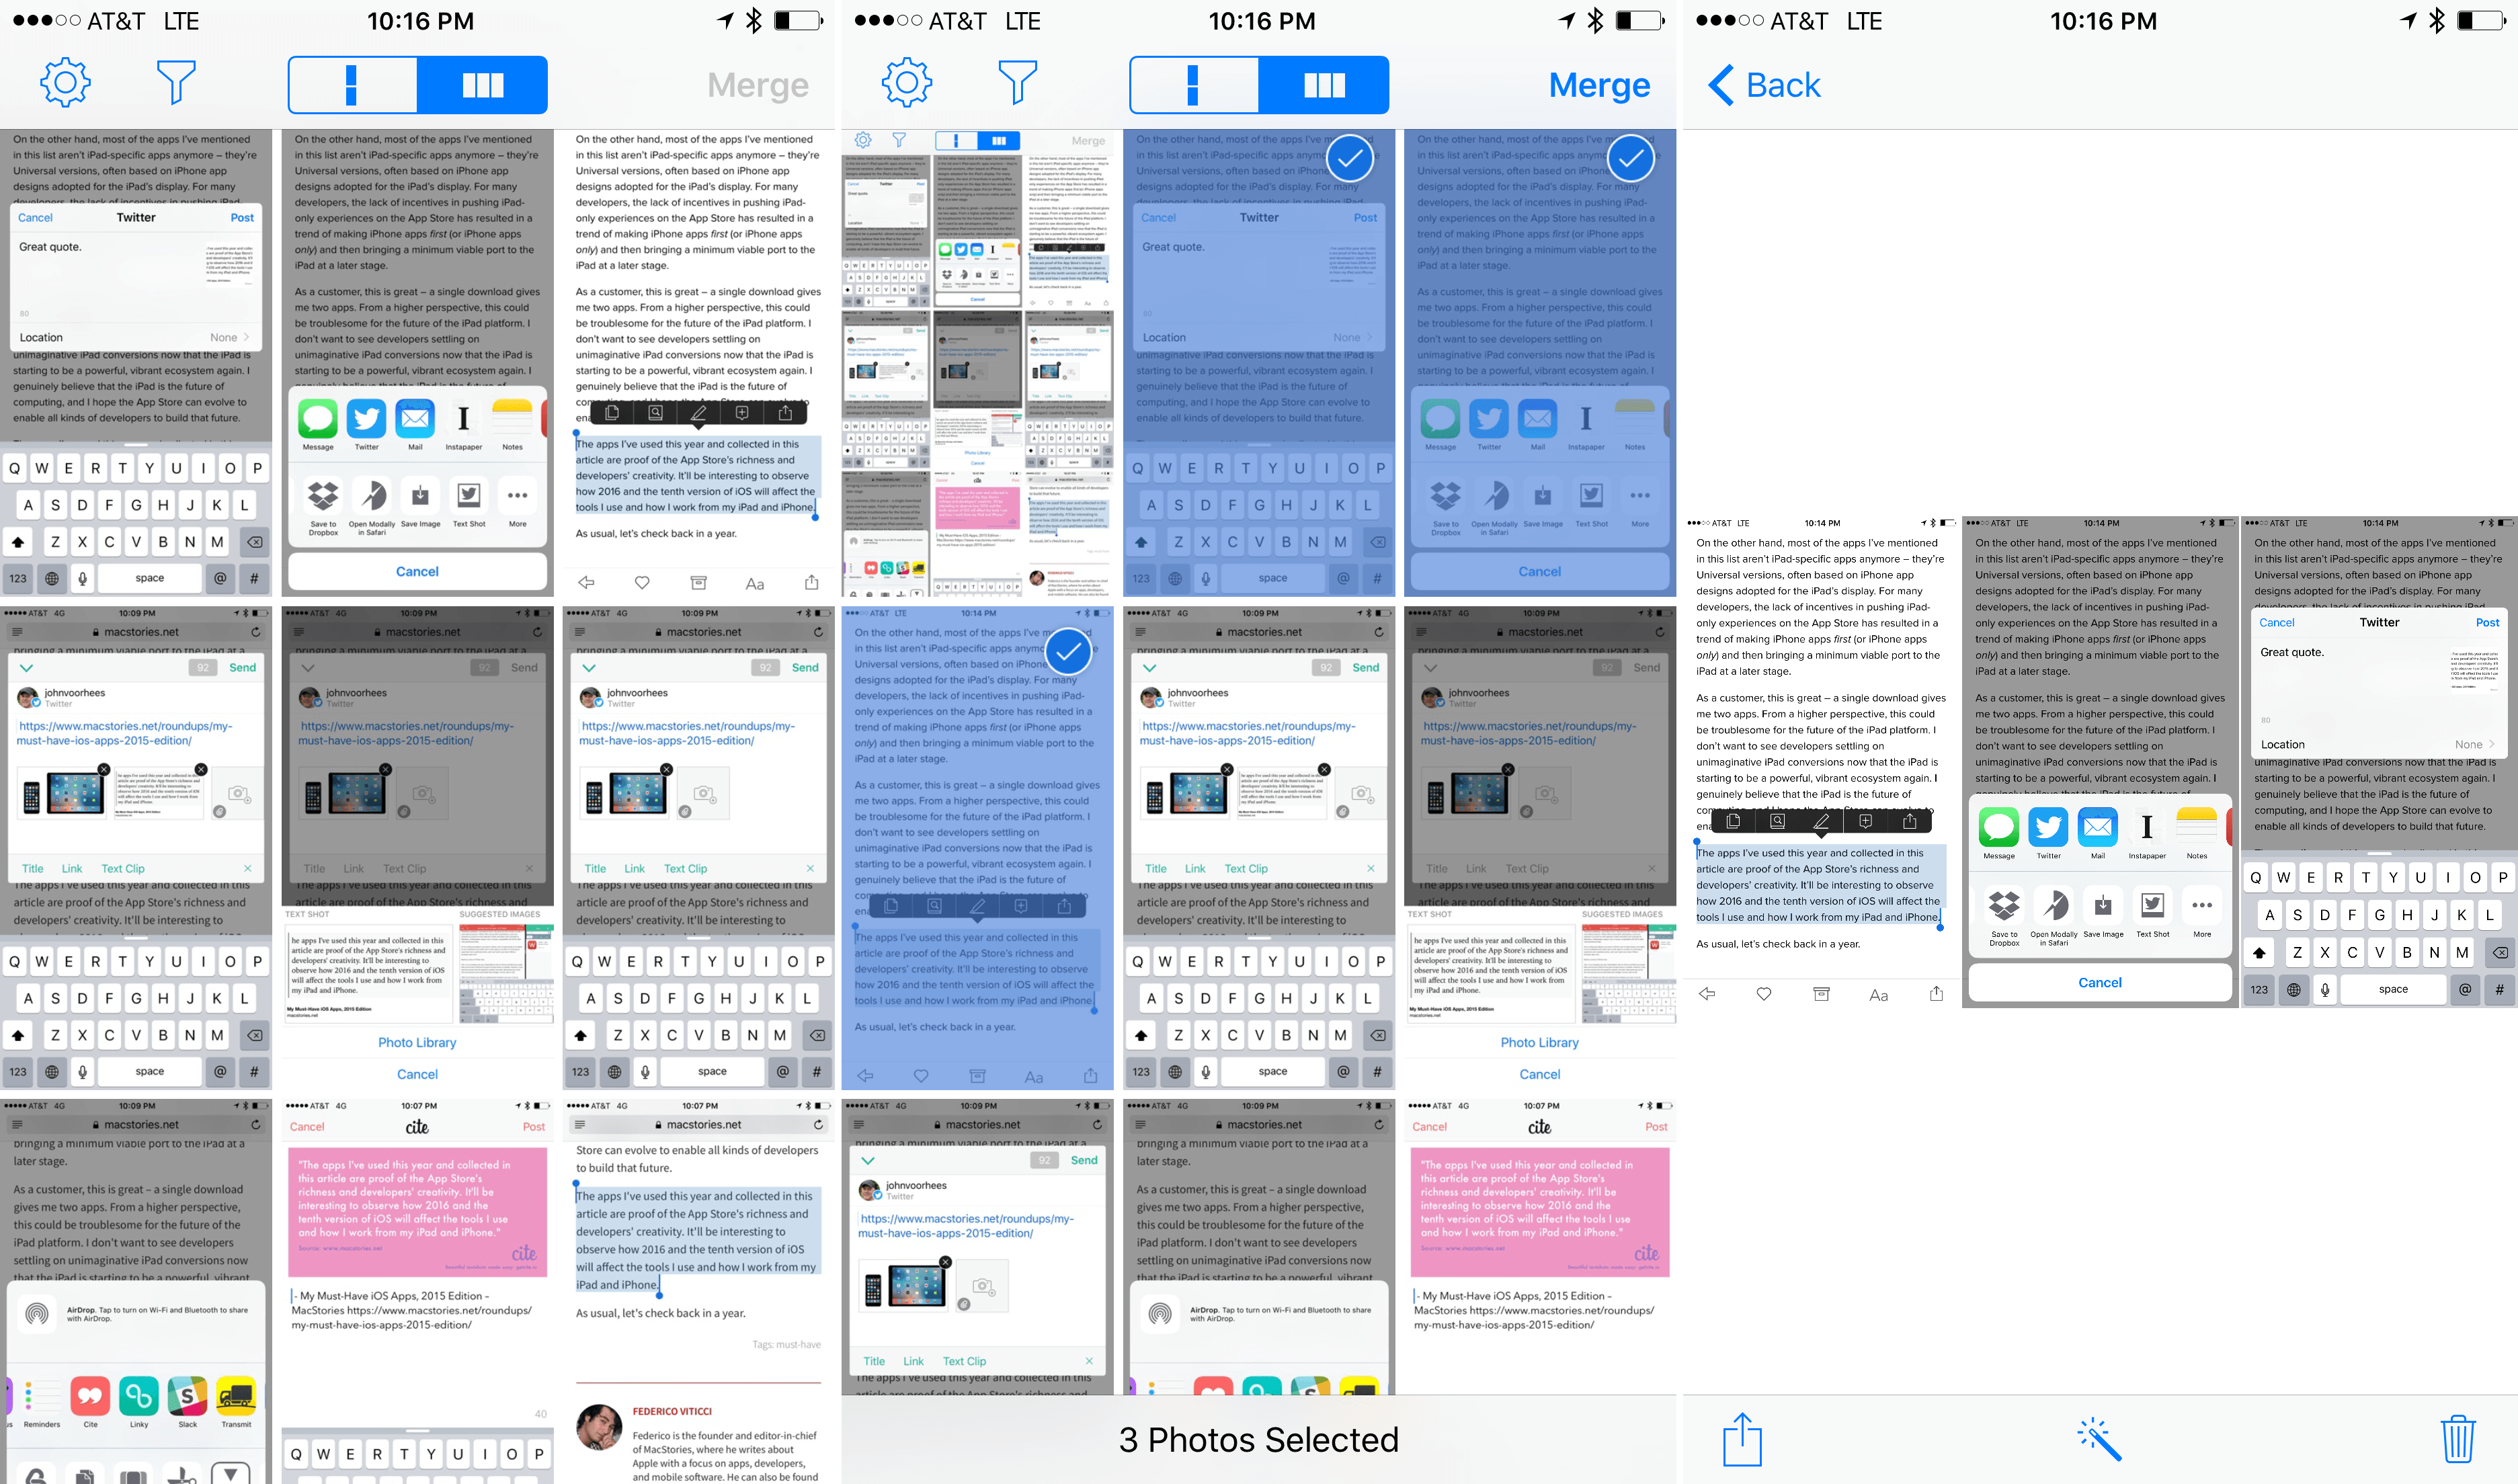
LongScreen is a great example of an app that does one thing especially well – stitch together screenshots. Take a series of screenshots with a little overlap, select them in LongScreen, and it will stitch them together vertically into one long screenshot, which is especially useful for capturing iMessage or Twitter conversations.
You can also place screenshots side-by-side, mixing and matching different sized screenshot. LongScreen lets you choose whether to align them by their top or bottom edges or center point. Other nice touches include the ability to frame your screenshots with images of their related hardware, to clean up the status bar Dr. Drang-style, and to adjust the padding between screenshots.
LongScreen is available on the App Store for $3.99.
Workflow
Workflow deserves special mention. Combining Workflow’s actions makes automating complex tasks simple on iOS. Workflow includes a “Get Latest Screenshots” action that can replicate some of the features found in some of the apps mentioned above. For instance, the Tweet Text Shot workflow can produce a text shot using a recent screenshot. The results are not as polished as OneShot or Cite, but it works in a pinch. Combine is a workflow that Federico uses to join two or more screenshots side-by-side like LongScreen. I also use a workflow called MS Screenshots that helps me move screenshots for any MacStories article I am writing to a Dropbox folder for easy access on my iOS devices or my Mac because most screenshot management apps store images locally, making them inaccessible on other devices and platforms.
Workflow is available on the App Store for $2.99.
Mac
Pixave
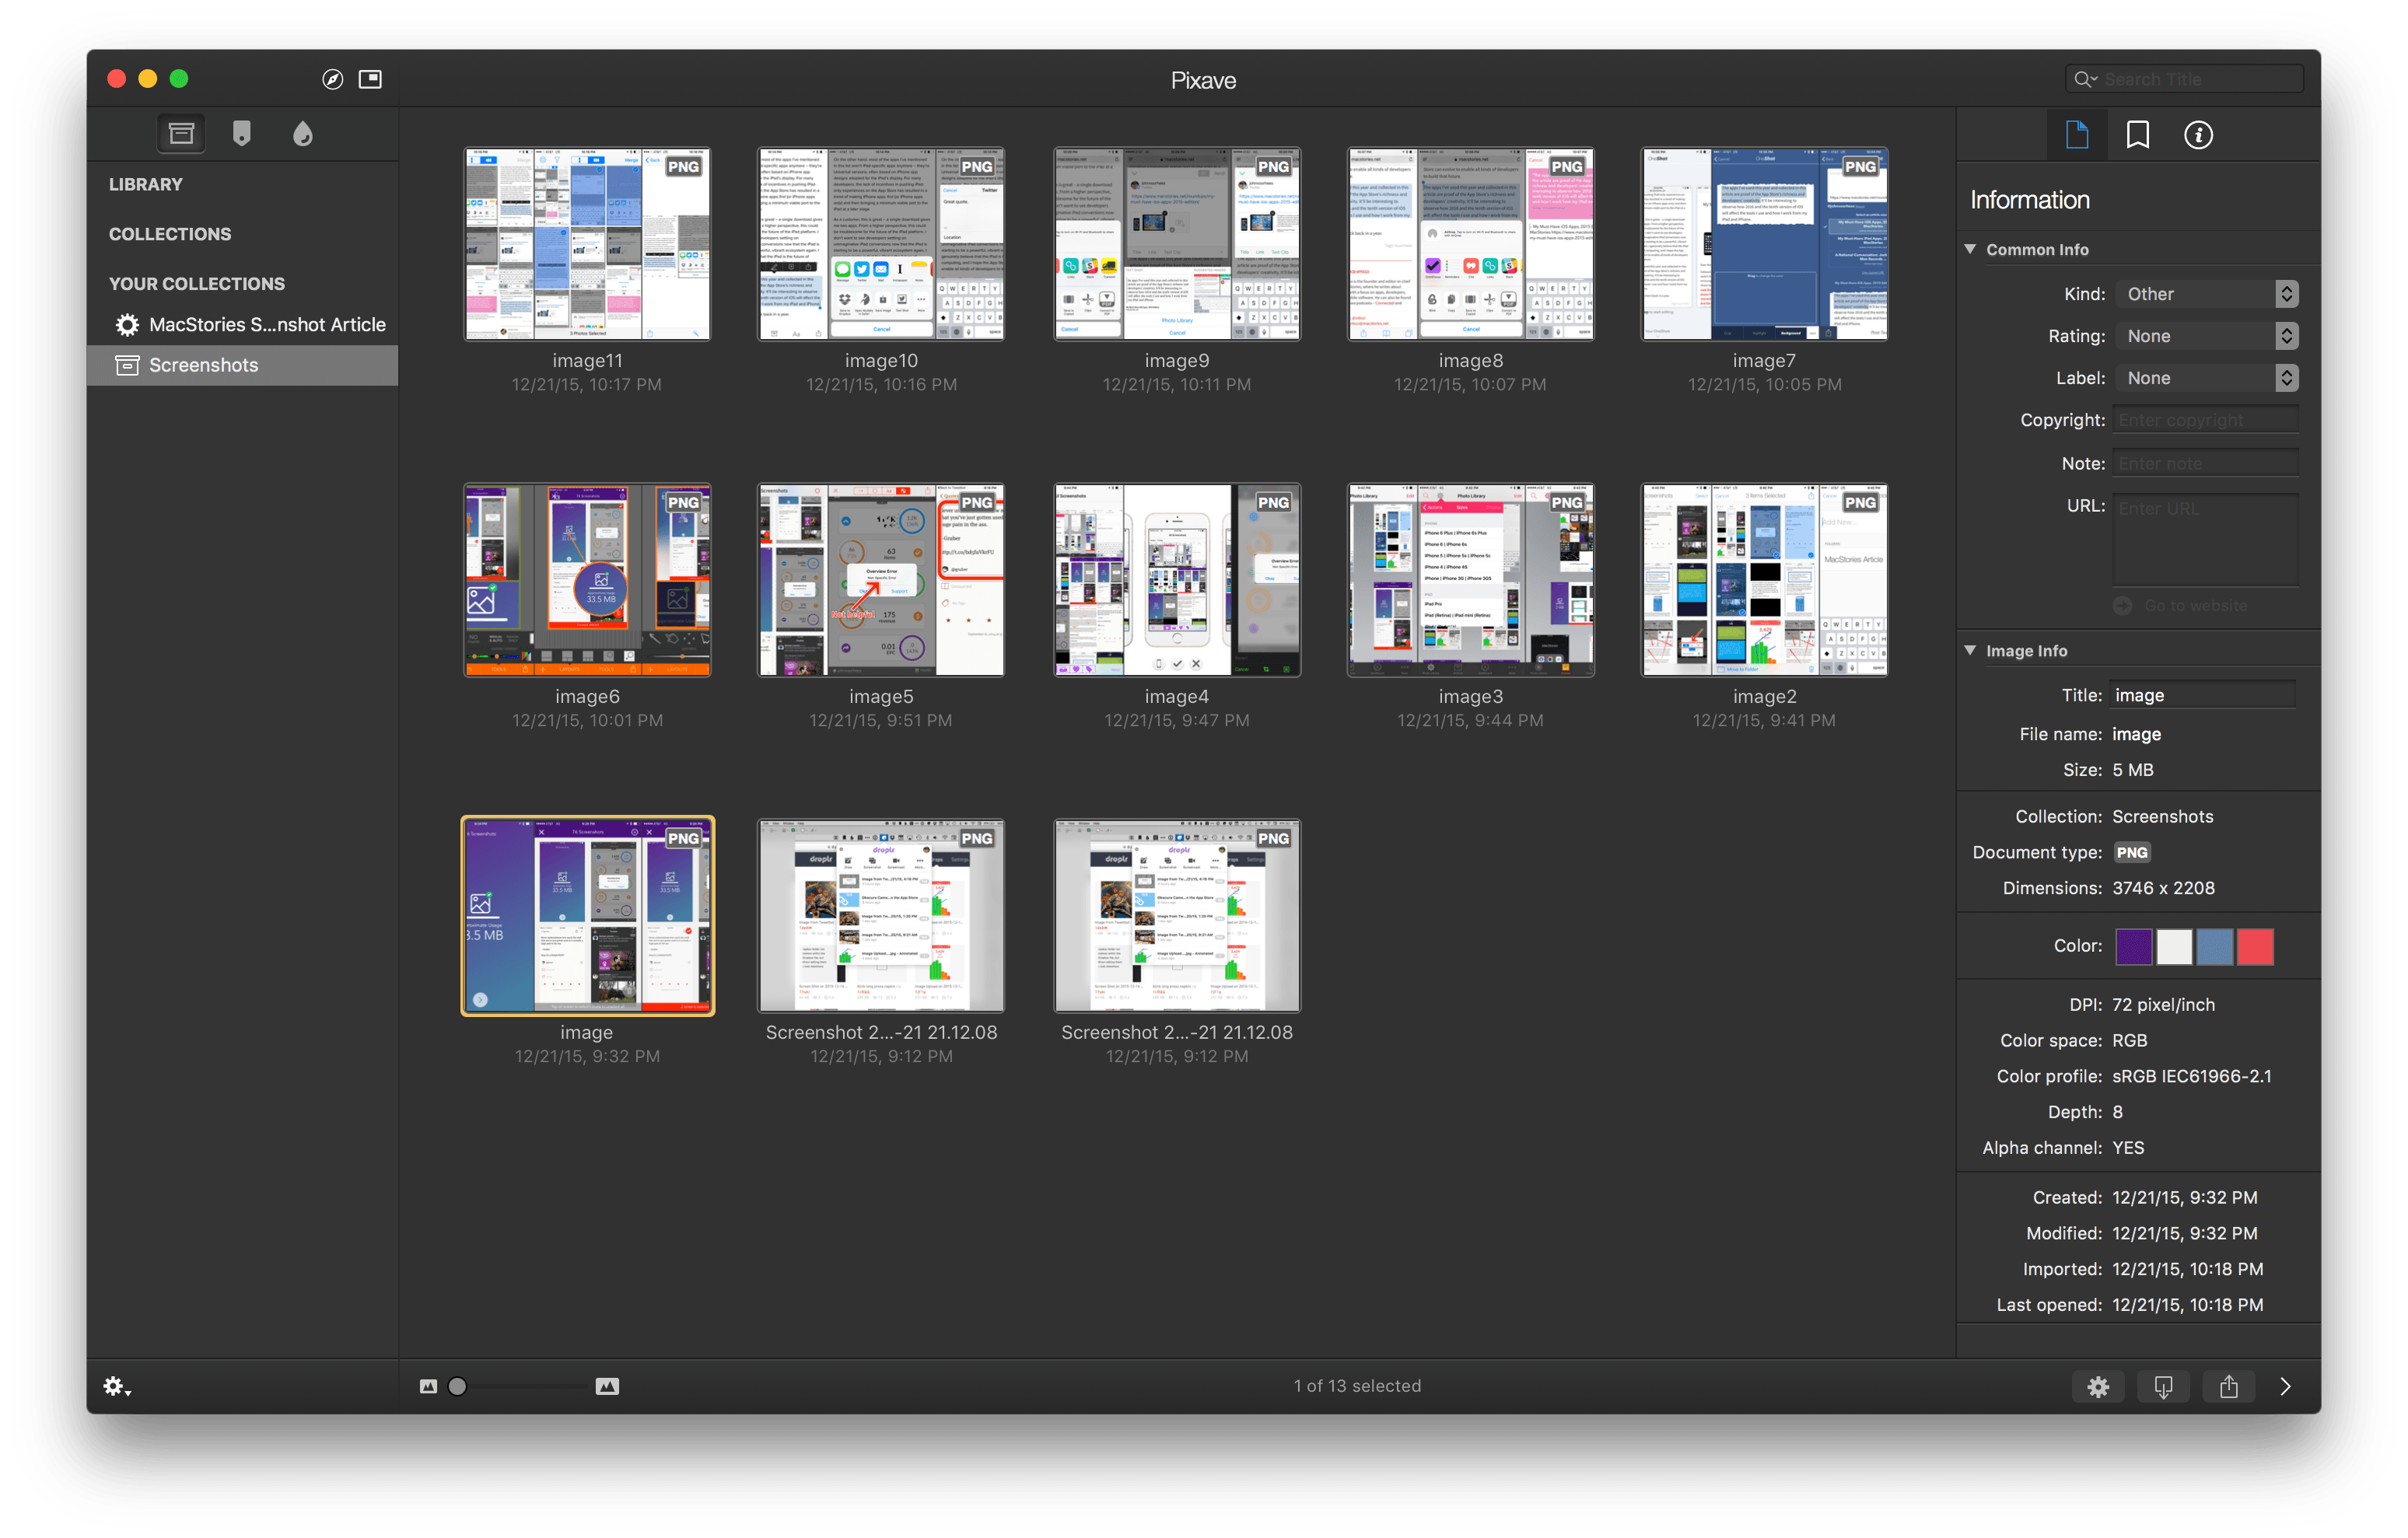
Pixave captures and manages screenshots on the Mac and includes nice set of markup tools that go beyond the tools found in apps like Droplr and Pinpoint including a magnifying loupe, the ability to sign documents, and several stroke styles for drawing on screenshots. Built around collections, Pixave is an excellent choice for designers and anyone who likes to collect visual ideas.
The power of Pixave lies in the metadata it tracks for each image and that you can add to images. Pixave lets you choose an image kind and apply a rating, label, and tags. You can sort by collection, tag or colors, which are automatically pulled from each screenshot, and by much of the other metadata associated with each image.
Pixave includes two great features for collecting images from the web. The first is the ability to screenshot an entire page regardless of whether it extends beyond the visible part of your browser window. Second, Pixave has a mini mode where it hovers above your other apps making it easy to drop images into a collection. You can also point it at specific folders for importing images. I point Pixave at the same Dropbox folder to which I upload screenshots using my MS Screenshots workflow from my iPhone. However, I would prefer if Pixave had an iOS app and implemented a sync solution so I could keep my screenshots synced among all my devices.
Pixave supports PEG, JPEG 2000, GIF, PNG, TIFF, ICNS, BMP, ICO, PSD, AI, EPS, SVG, TGA, and RAW image formats and is available on the Mac App Store for $9.99.
Napkin
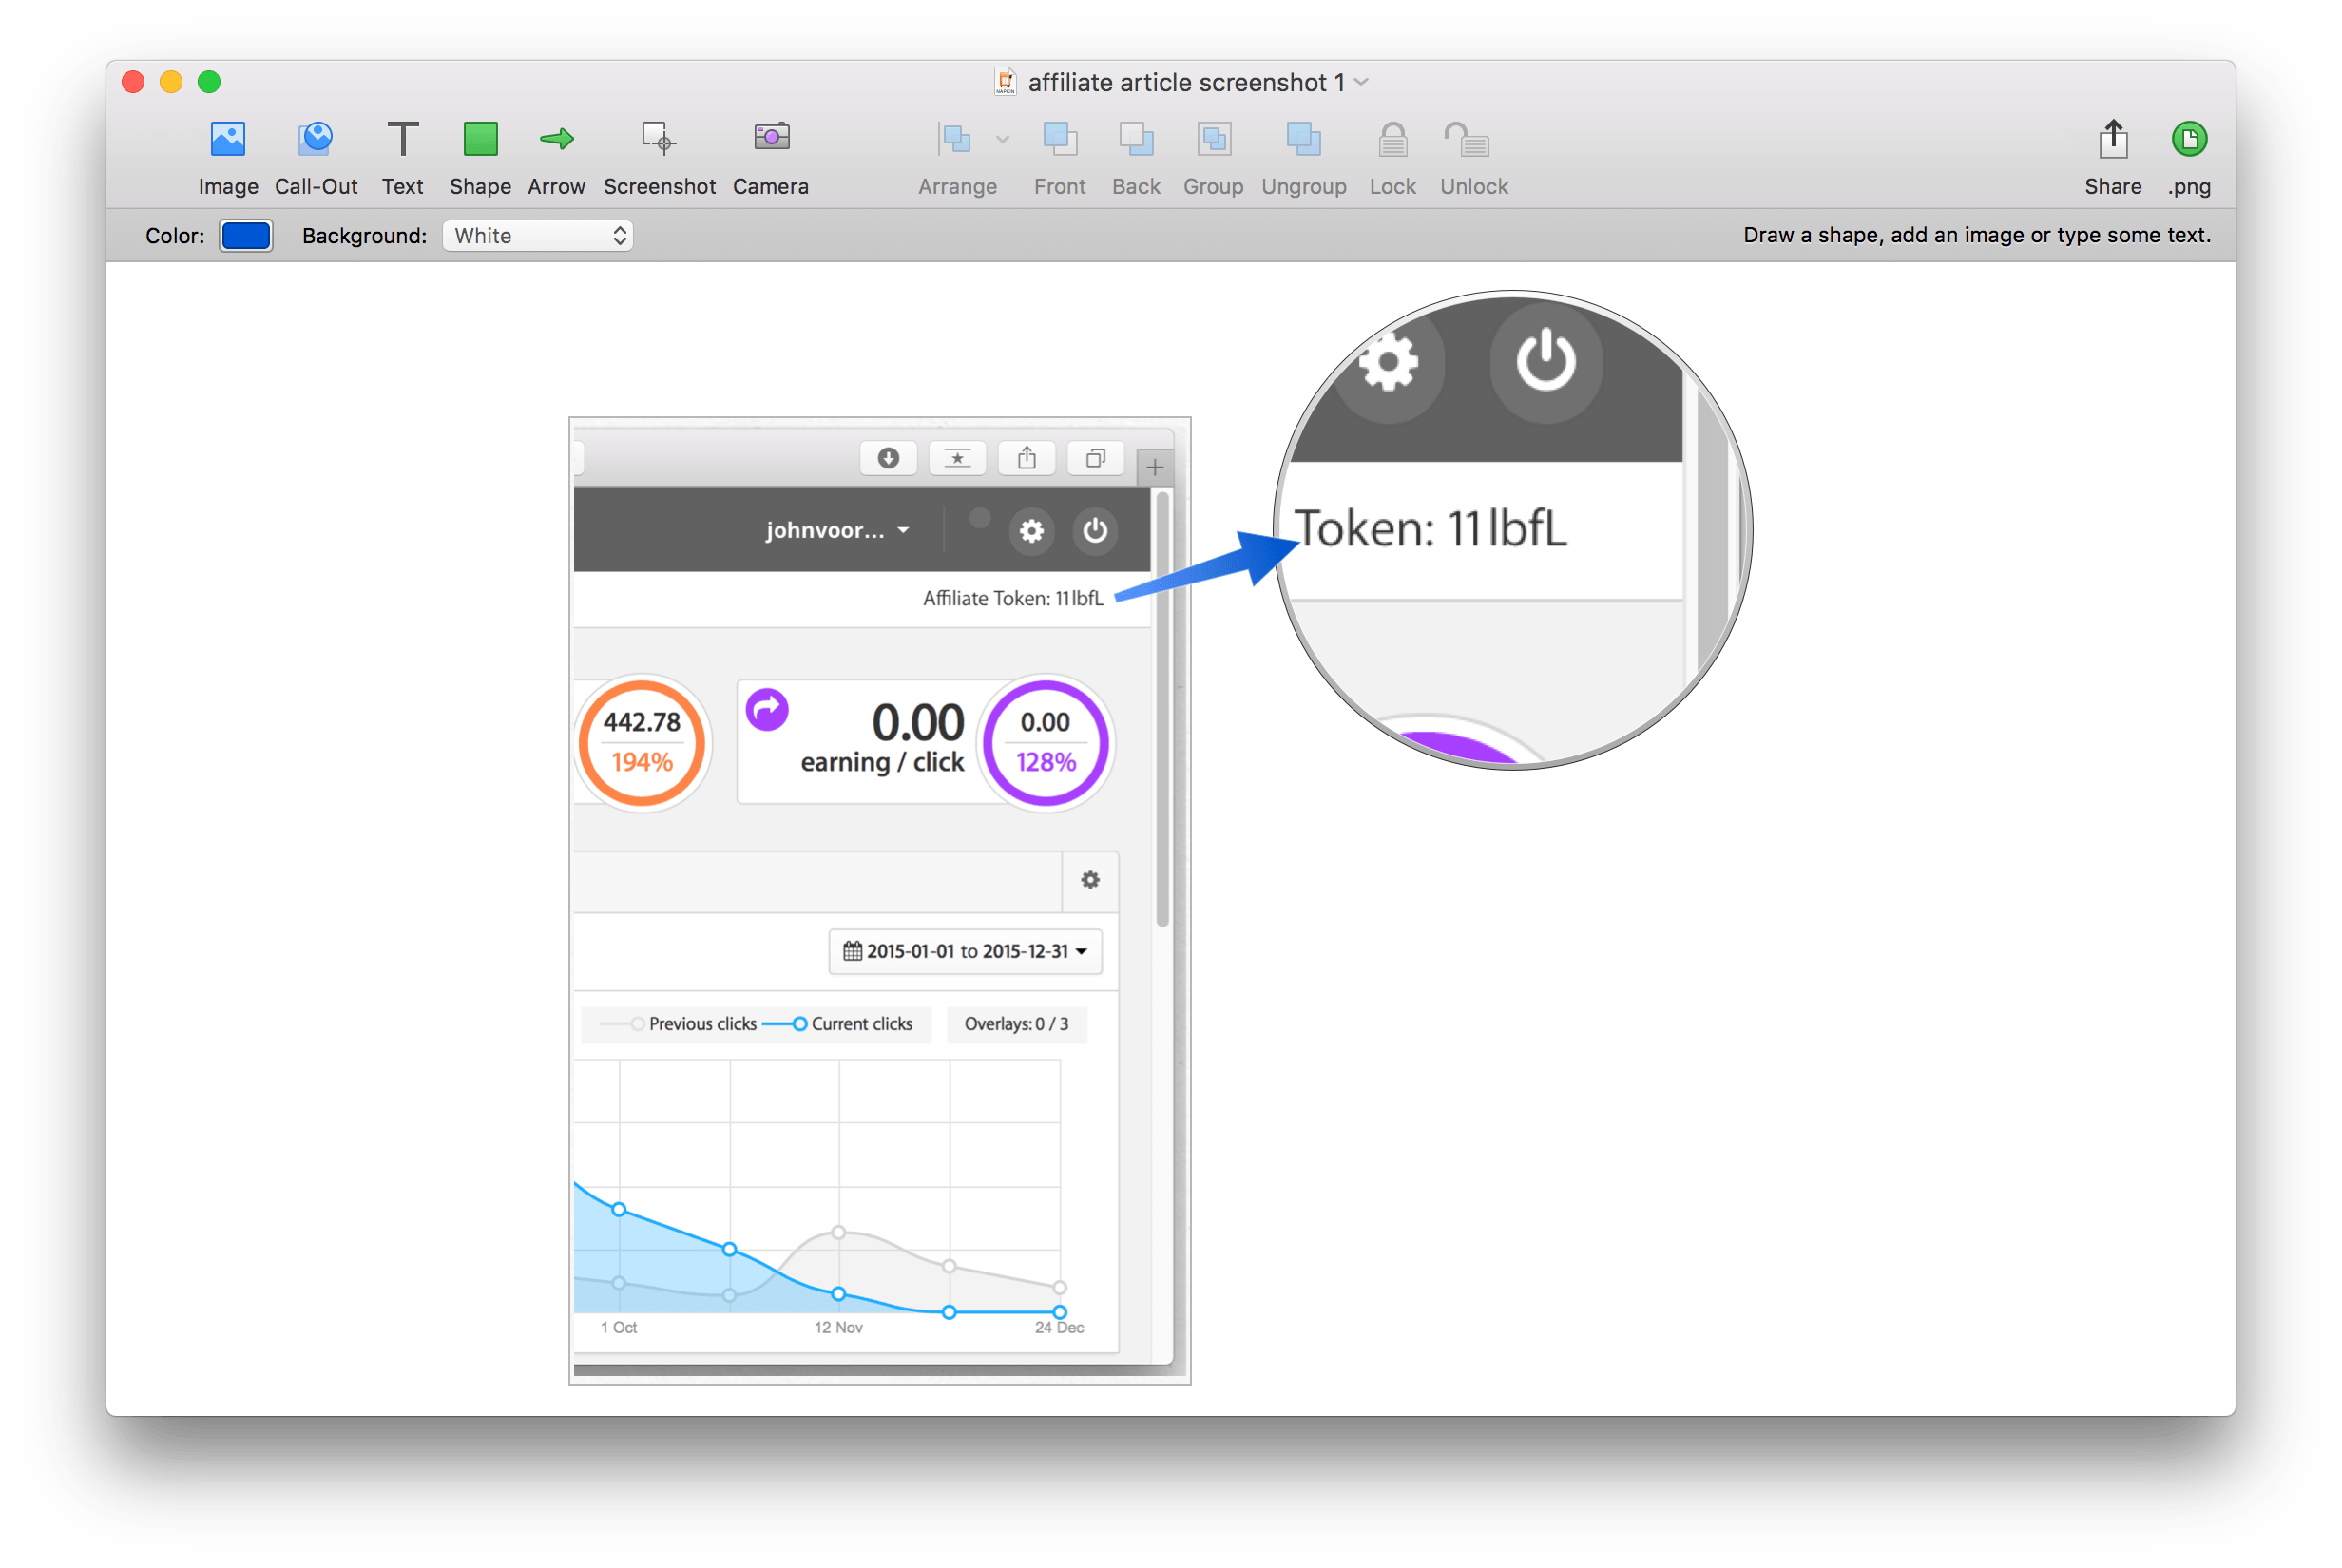
Napkin, from Aged & Distilled, is my favorite screenshot editor on the Mac. There is a ton of functionality and power hiding under Napkin’s approachable interface. You can use Napkin to create screenshots or drag them onto its canvas, which can be white, transparent, or have a napkin texture. It is easy to add arrows, shapes, text, and create call-outs that magnify a portion of the image you are editing. Those tools are accessible from the menu and the toolbar, but you can also just draw them freehand and they snap to a clean version of what you drew. For instance, draw a line with your mouse or trackpad and it becomes an arrow. Draw a circle and it becomes a call-out, unless you hold down the Command key, in which case it becomes a circle, and so on.
Napkin includes the standard Mac share sheet for sharing your creation. Alternatively, you can simply use the pip at the far right hand side of the toolbar to drag a PNG file into any app that can open PNGs. As a developer, I use Napkin for app support documentation and to tweet tips and tricks for my app. My greatest wish for Napkin is a version for the iPad Pro, which strikes me as a natural fit.
Napkin is available on the Mac App Store for $39.99.
Room for Innovation
There are some great iOS and Mac apps for managing and editing screenshots, but it’s interesting to me that there aren’t any integrated solutions on iOS that combine screenshot management and editing like Pixave does on the Mac. This strikes me as consequence of the fact that iOS screenshots are lumped in with photos, which initially created a singular focus on screenshot management. Whatever the reason, gaps remain in the iOS screenshot app category, waiting for an opportunistic developer to fill them.
It is undeniably hard to make a living as an app developer. The competition is fierce and it sometimes feels like every imaginable idea has been implemented. But as the screenshot app market suggests, there is still room for creative solutions that expand established categories. With the advent of powerful hardware like the iPad Pro, new opportunities have opened up for developers. I look forward to someone seizing upon this one.
- Dropbox, Pinpoint, Linky, Instapaper, LongScreen, and Workflow are all highlighted in Federico’s Must-Have iOS Apps, 2015 Edition ↩︎
- To save your screenshot to the Clipboard instead of saving to your desktop, add the Control key to any of the keyboard shortcuts. For instance, use Command (⌘)-Shift-Control-3 to paste a screenshot of your full Mac screen to the clipboard. ↩︎
- Rescanning worked fine for me on my iPhone 6s Plus, but crashed Screeny on two different iPad models. Screeny’s developers are aware of this bug and a fix is reportedly in the works. ↩︎
- I suspect this is a result of Screeny accessing only certain screenshots in the Photos app’s ‘Screenshots folder,’ which also appears to only collect screenshots since the launch of iOS 9. ↩︎
- 9:41 AM is the time that Steve Jobs unveiled the iPhone on January 9, 2007. ↩︎
- OneShot does not support iPad Pro screenshots. ↩︎


