Shortcuts
Perhaps I let my hopes and expectations get away from me. I’ve wanted Shortcuts on the Mac since it was called Workflow and long before it was acquired by Apple. Then, when Shortcuts for Mac was finally announced this year at WWDC, Apple’s message was even stronger than I’d expected. “Shortcuts is the future of Mac automation,” they said.
The WWDC presentations backed up the bold keynote statement. Shortcuts was embracing existing automation tools on the Mac like AppleScript and Automator, incorporating a command-line tool, and hooking into everything in macOS from the menu bar to the Dock. Shortcuts was rough on that first developer build of Monterey, but it was a brand new app, and it seemed to be a top priority. As a result, I expected the app to improve by leaps and bounds over the summer. The trouble is, it didn’t.
I still think Shortcuts will get there, and I believe Apple is committed to Shortcuts on the Mac, but the version of Shortcuts that has shipped with Monterey is still more a promise than a workable solution. On the one hand, that’s fine. Automator and AppleScript haven’t gone anywhere, and third-party tools like BetterTouchTool and Keyboard Maestro are still there to fill the gaps in Apple’s tools.
On the other hand, though, as someone who relies heavily on Shortcuts every day, I can’t help but be frustrated and disappointed by the state of Shortcuts on the Mac. I don’t want to over-dramatize the problems because many of my shortcuts do work on the Mac. However, the UI for interacting with Shortcuts is rough, and there are some gaping holes in the action library that make it hard to build what I want.
I expect things will improve with future updates to Monterey and beyond, but I’m concerned that Shortcuts may be squandering its chance to win over Mac users. That would be a shame because the app has so much potential. Let’s take a closer look, and I’ll explain what I mean.
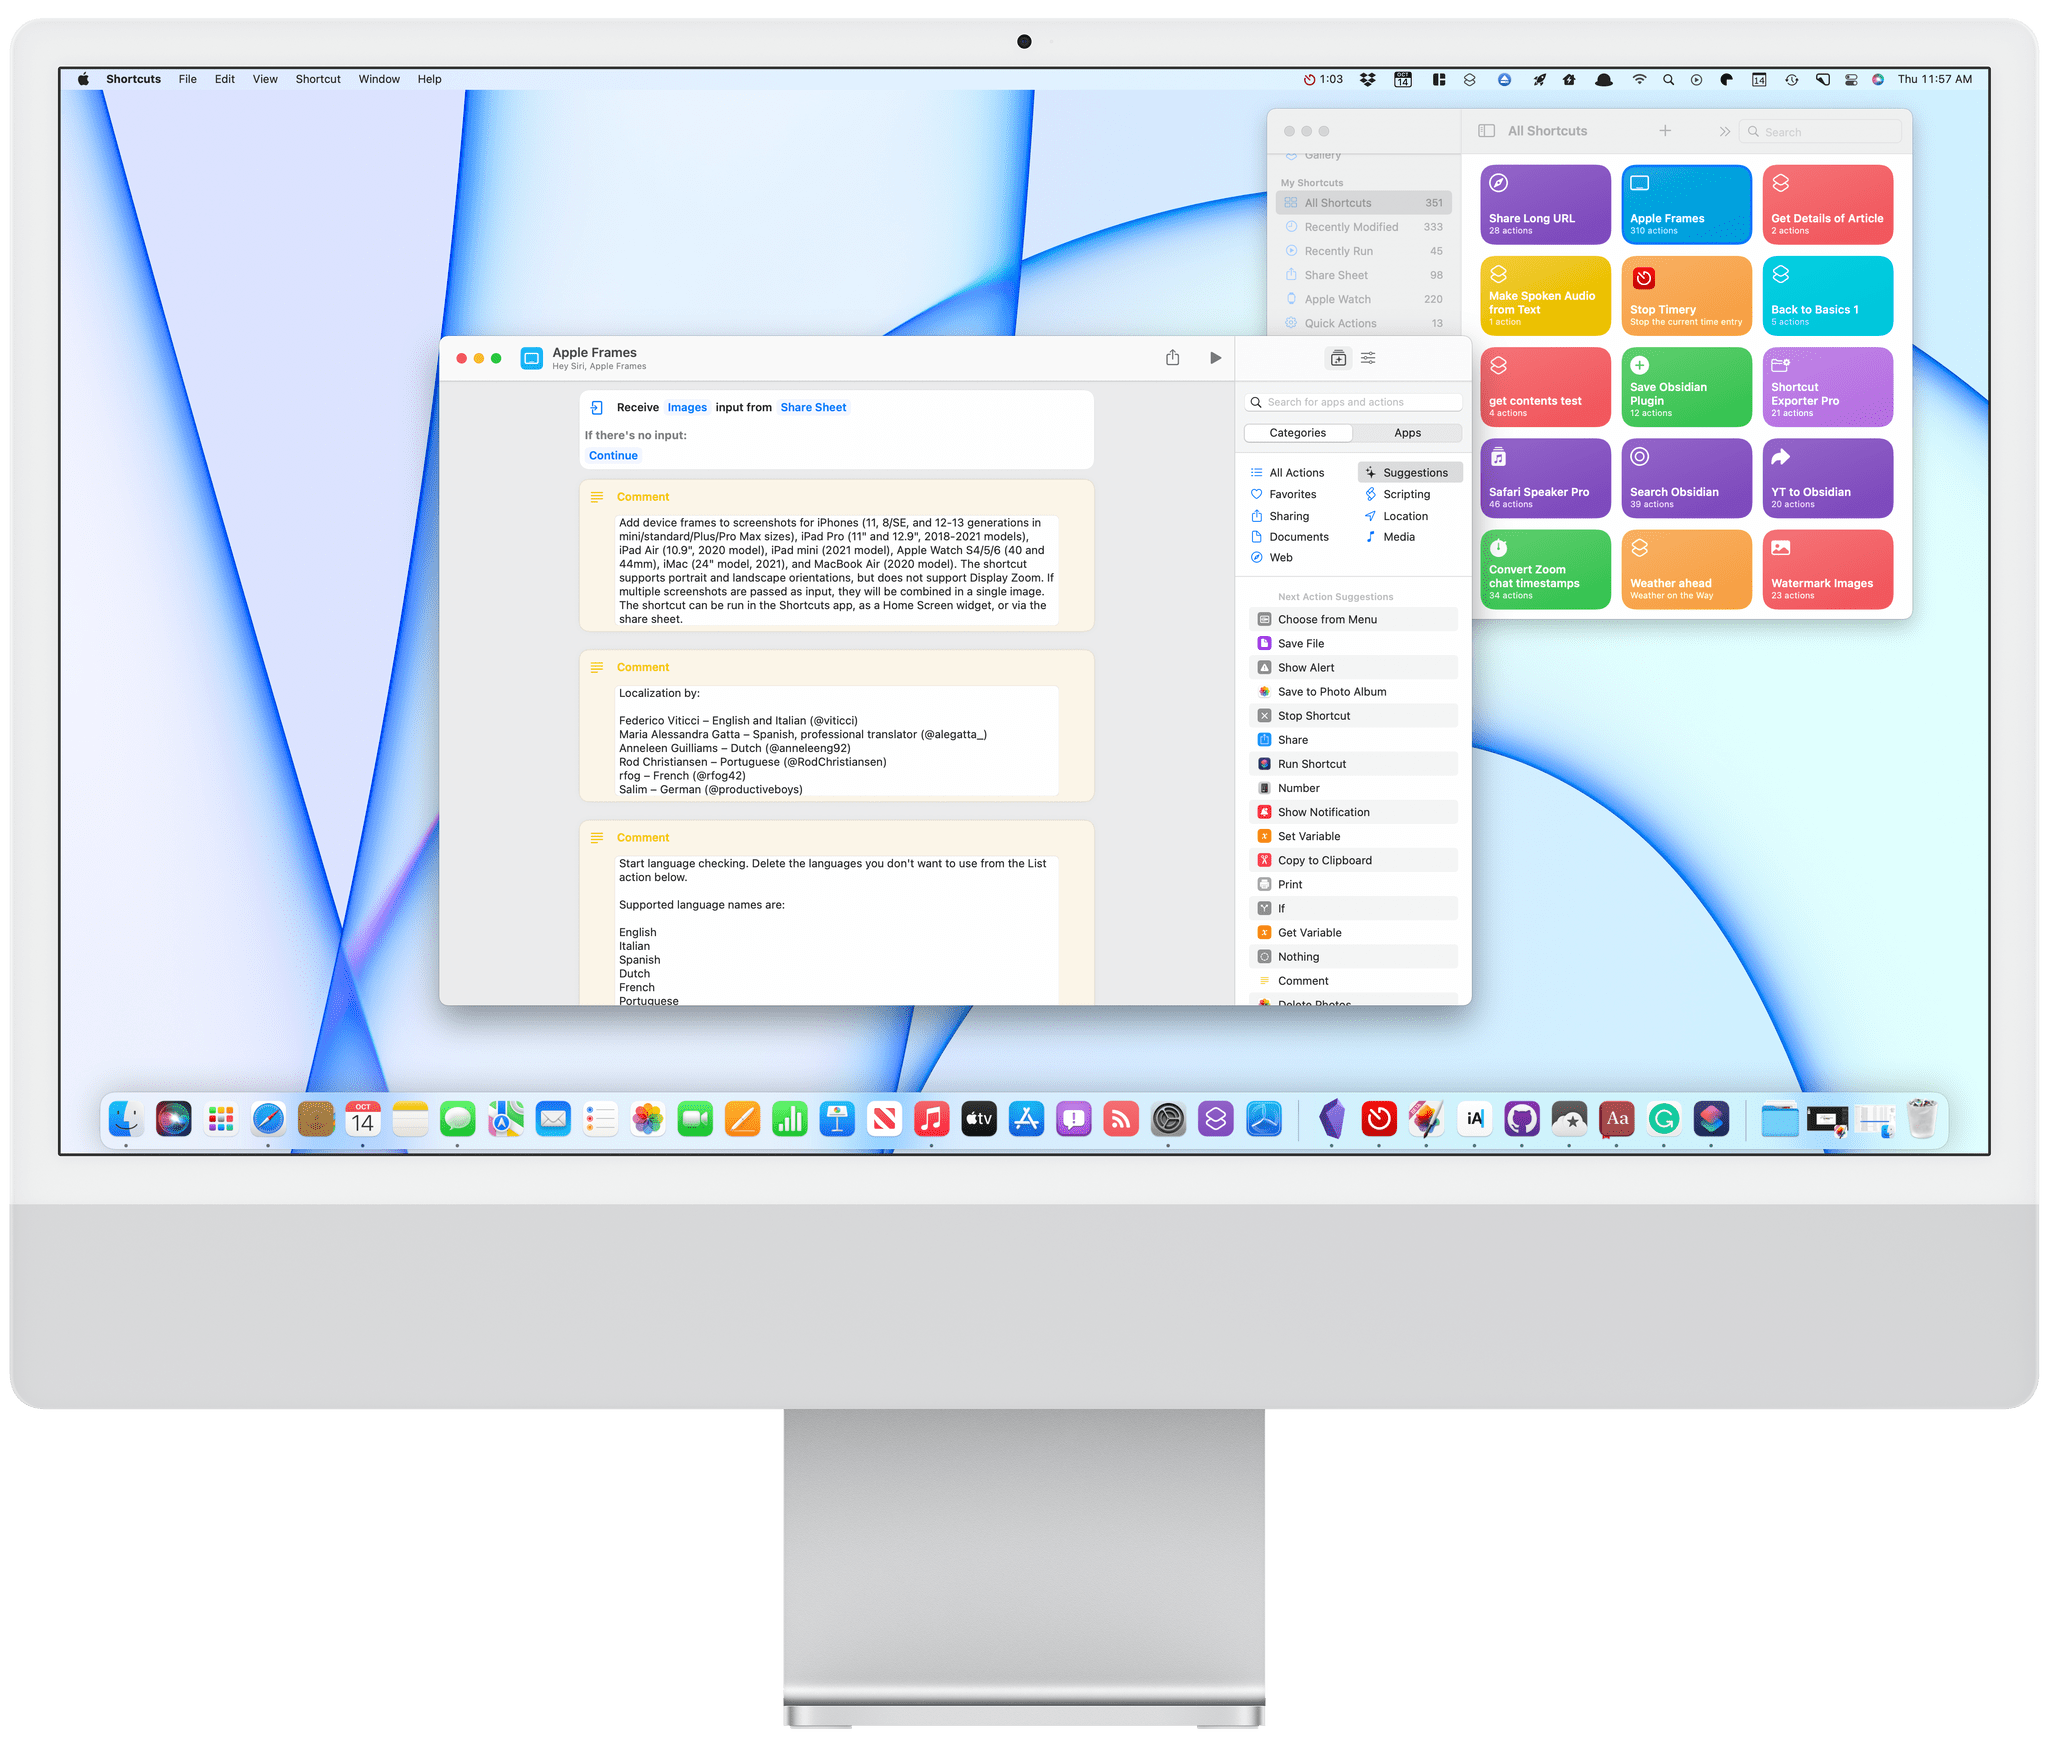
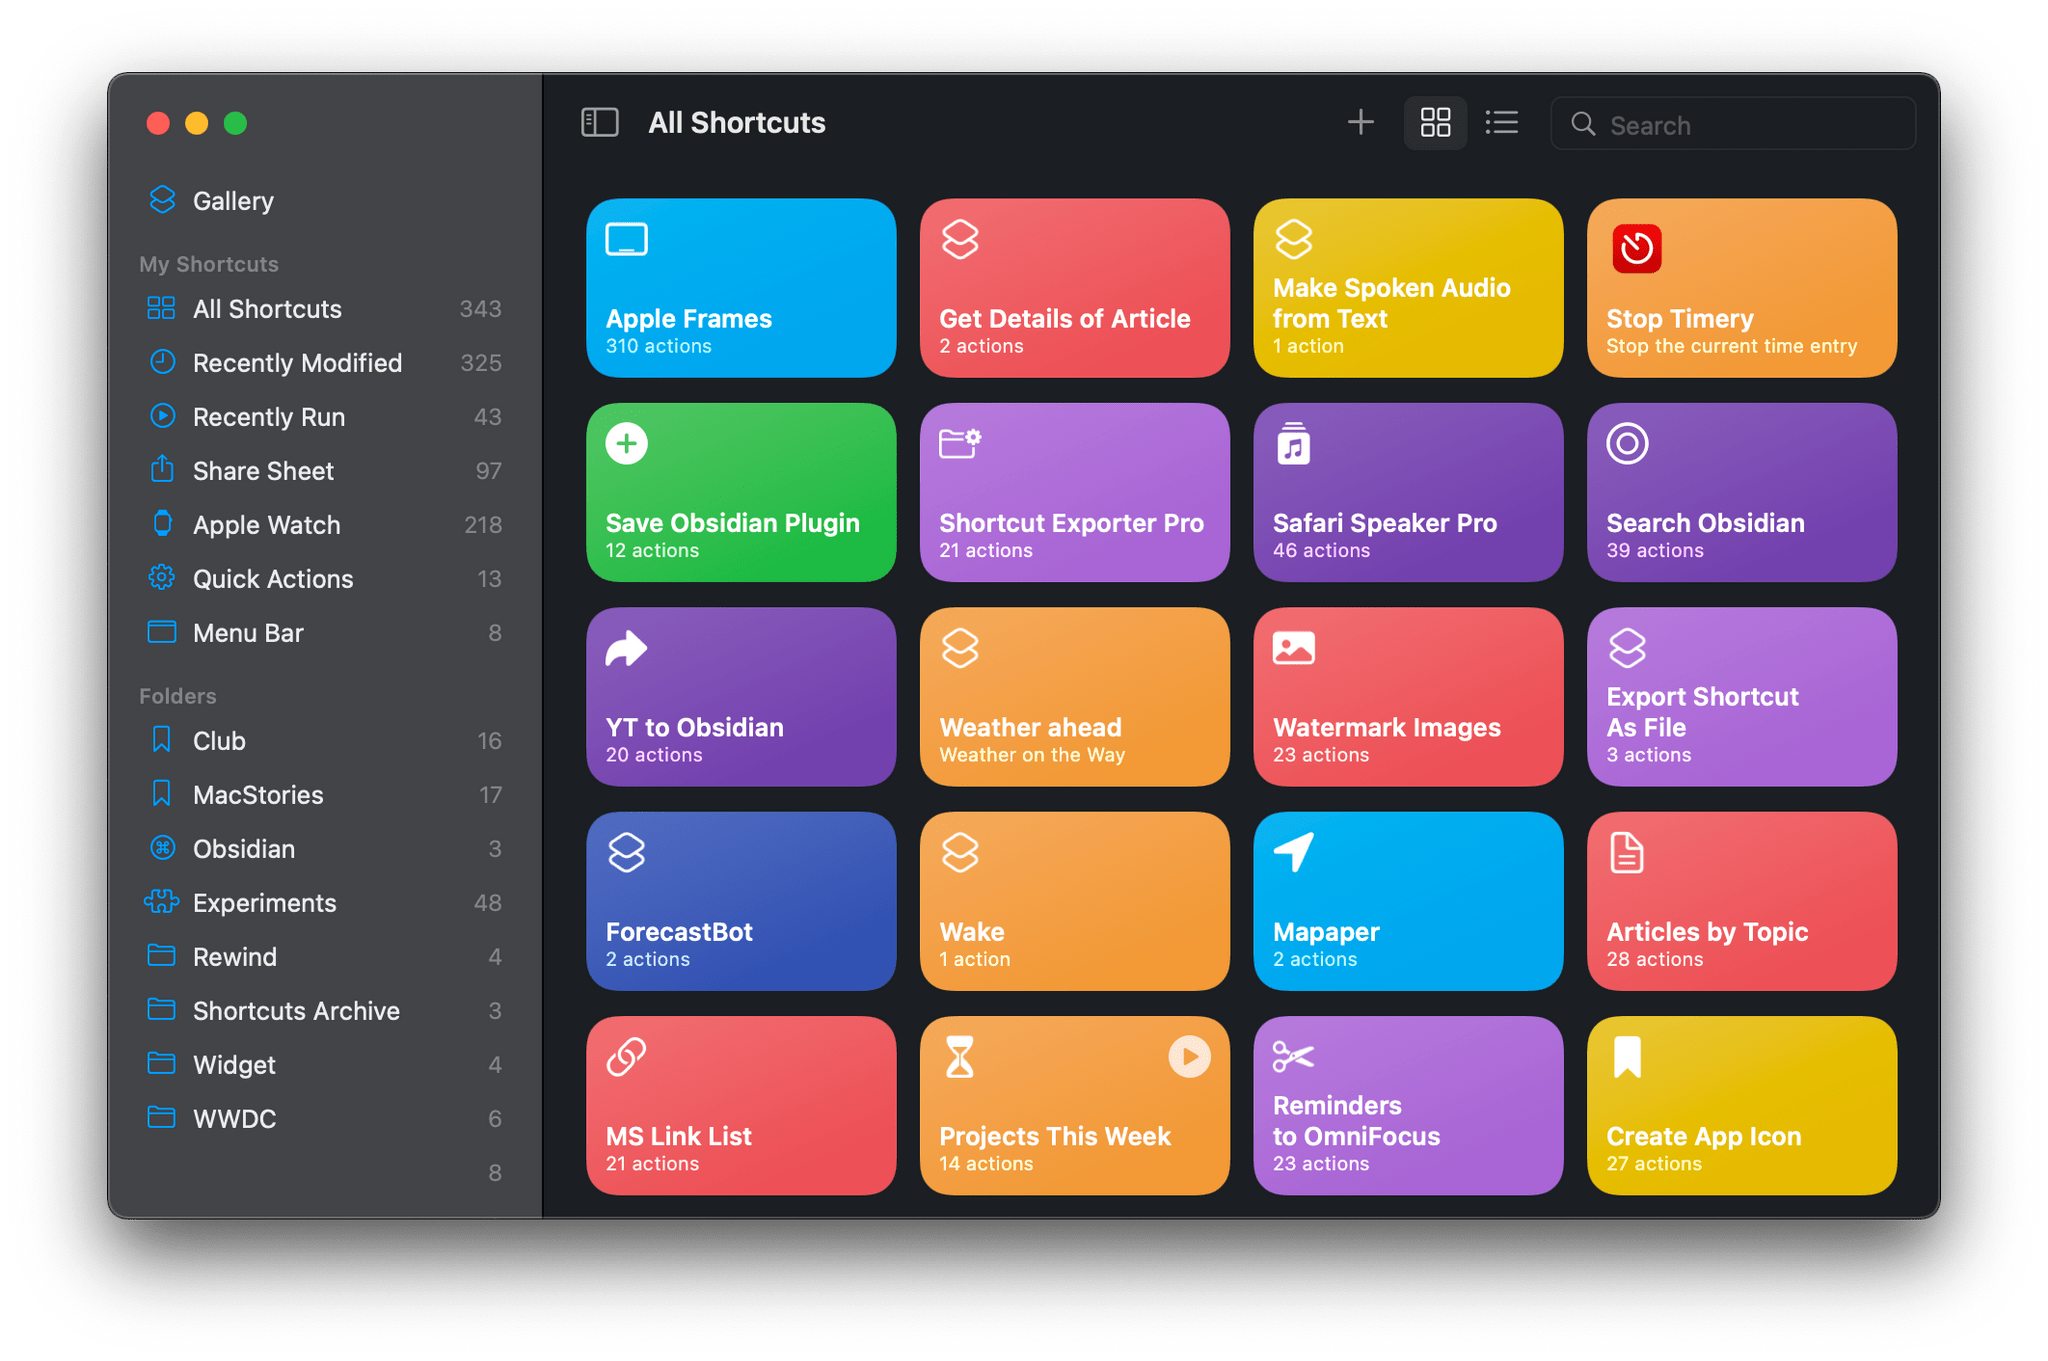
One of the greatest strengths of Shortcuts on the Mac is its familiar UI. If you’ve used the app on the iPhone or iPad, you’ll immediately be at home with the app’s colorful collection of shortcut tiles and sidebar. That’s a big advantage for the many users who come to the Mac already familiar with the iPhone or iPad.
Of course, there are differences, too. The first that you’ll probably run into is that on the Mac, Shortcuts’ brightly colored tiles aren’t buttons like they are on an iPhone or iPad. Instead of just clicking on the tiles to run a shortcut, there’s a play button in the top right-hand corner of each tile. Double-clicking a shortcut’s tile opens the editor. It didn’t take long for me to grow accustomed to the play button on shortcuts, but it is a somewhat unusual choice when apps like Home and Reminders include big tile-like buttons that can be operated with one click.
The sidebar on the left of Shortcuts’ window is the same as on the iPad, except there are no Personal Automations, and Home Automations can still only be created in the Home app. There are also additional categories in the ‘My Shortcuts’ section, including Recently Modified and Recently Run shortcuts, as well as categories for Quick Actions and Menu Bar shortcuts. Those last two are exclusive ways shortcuts can be run on the Mac, but I’d love to see Recently Modified and Recently Run added to iOS and iPadOS as a way to quickly access my most active shortcuts.
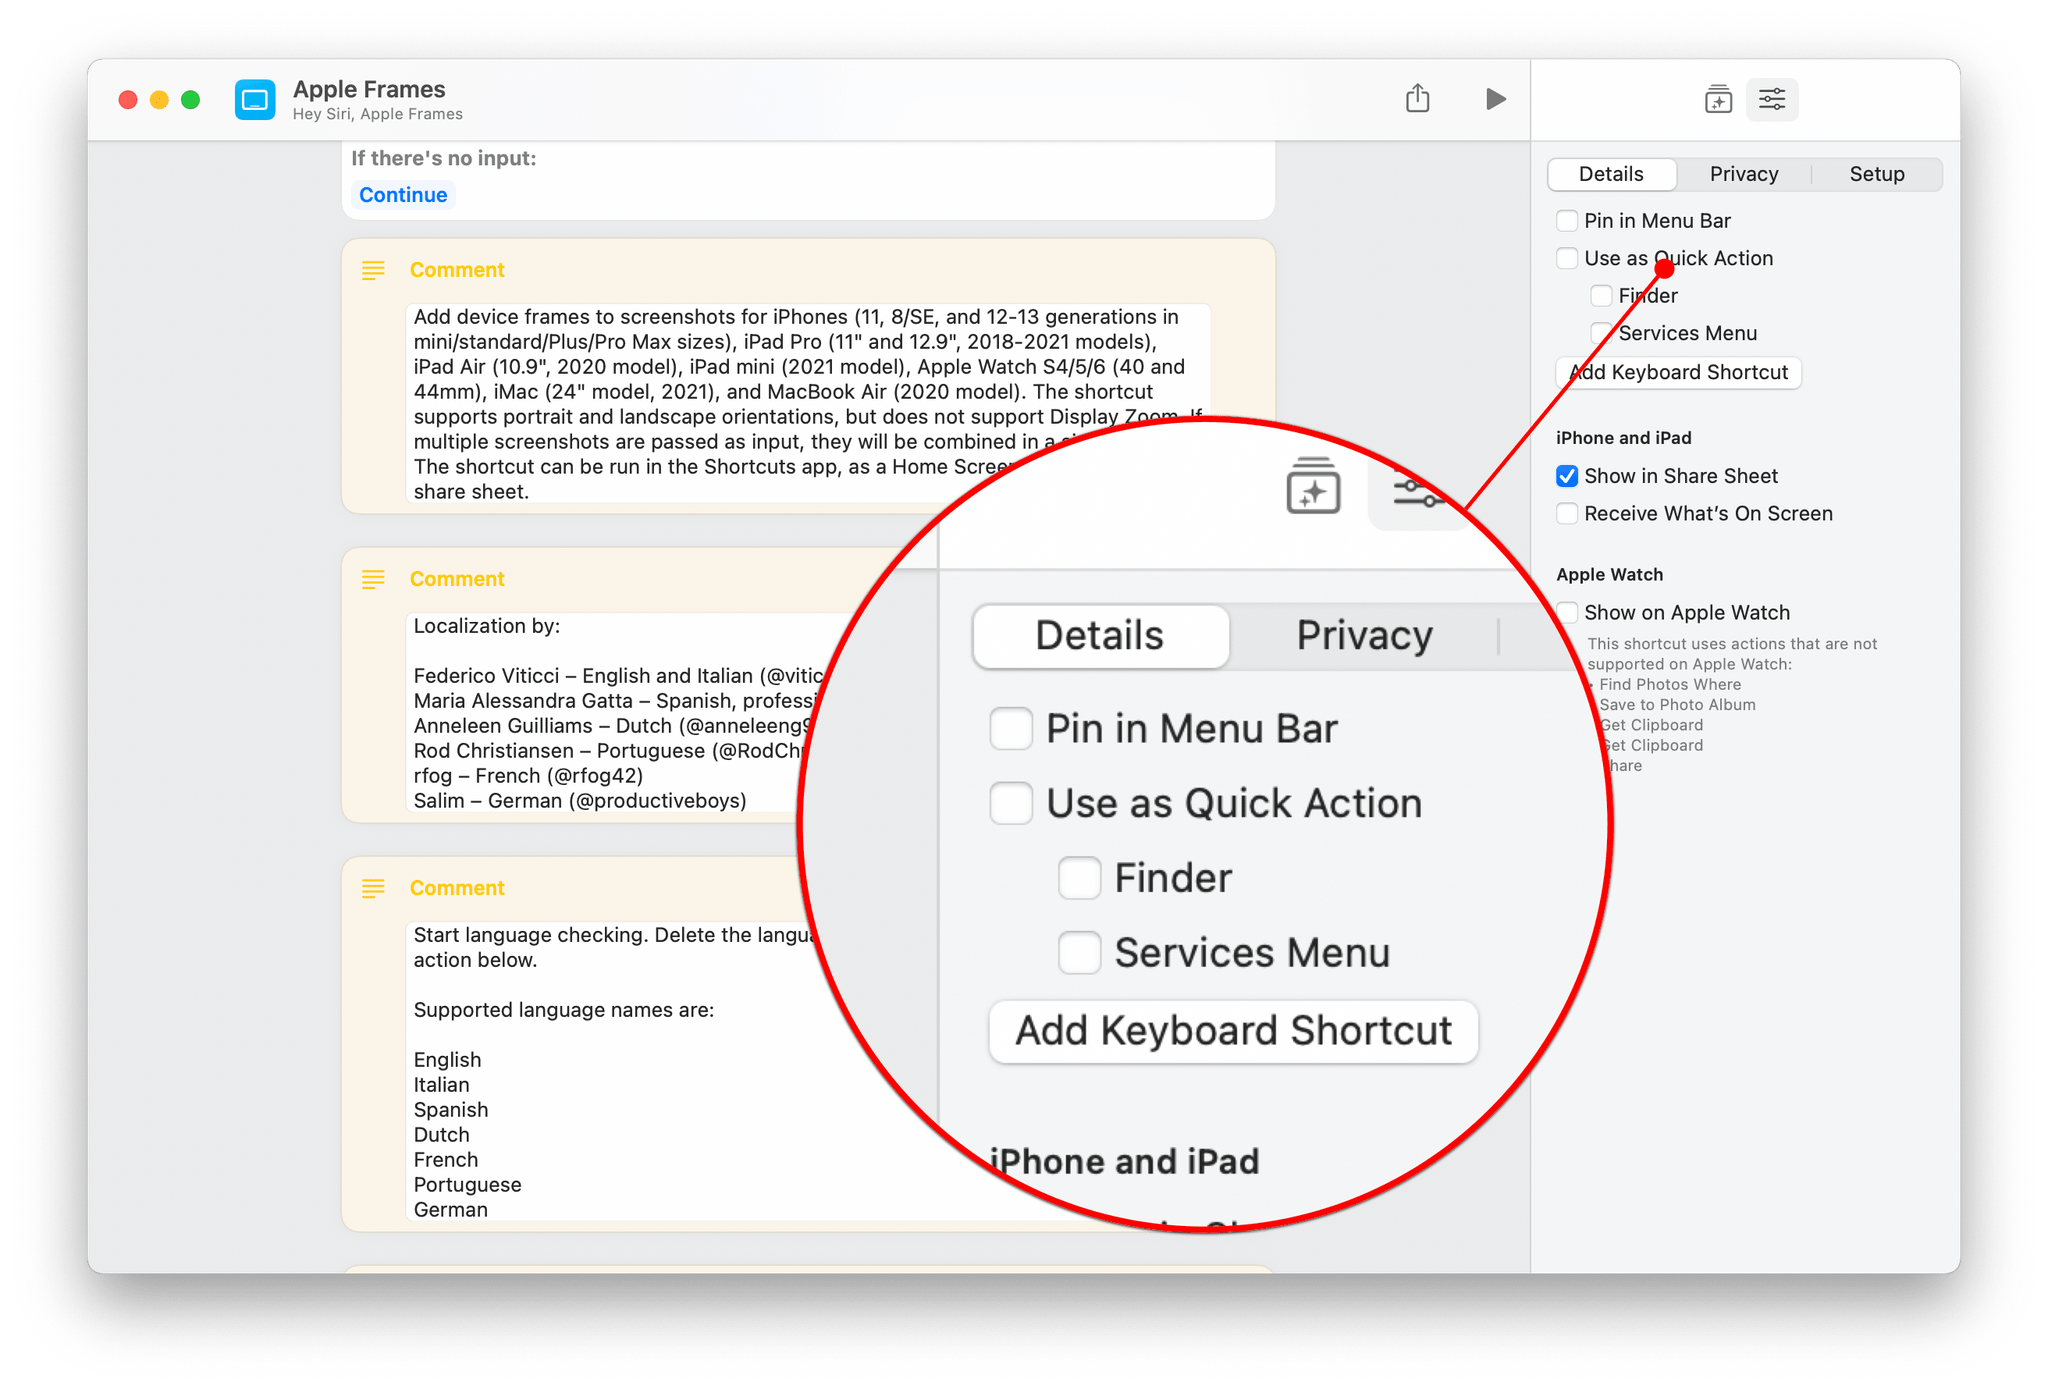
The details panel is where you’ll find the biggest differences between Shortcuts on Mac and the iPad and iPhone versions.
The toolbar along the top of the Shortcuts windows provides options to collapse the sidebar, create a new shortcut, view your shortcuts as a grid of tiles or a list, or search for a shortcut. The shortcut editor is nearly identical to the iPad version too. The panel on the right organizes the available actions by category and app, which can be changed to a settings view with the button in the toolbar. The first section of Settings, labeled Details, is one of the areas that the Mac version of Shortcuts differs from the iPad. This section is where you can choose to pin your shortcut to the Mac’s menu bar, set it up as a Quick Action that’s available in the Finder or as a Service, and assign a keyboard shortcut. You’ll also find iPhone, iPad, and Apple Watch settings, and there are new Privacy and Setup sections of Settings that parallel the changes made on the iPhone and iPad.
The process of building shortcuts is familiar too. Add actions from the Action Library by dragging them into the editor or double-clicking them, in which case they’re added to the bottom of the shortcut. What’s different, though, is that there are actions available in Shortcuts for the Mac that you won’t find on the iPhone and iPad. Those actions, along with others that also made their debut in iOS and iPadOS this year, were inherited from Automator. They aren’t new to Mac automation, but they reflect Apple’s commitment to Shortcuts as the future of automation on the Mac.
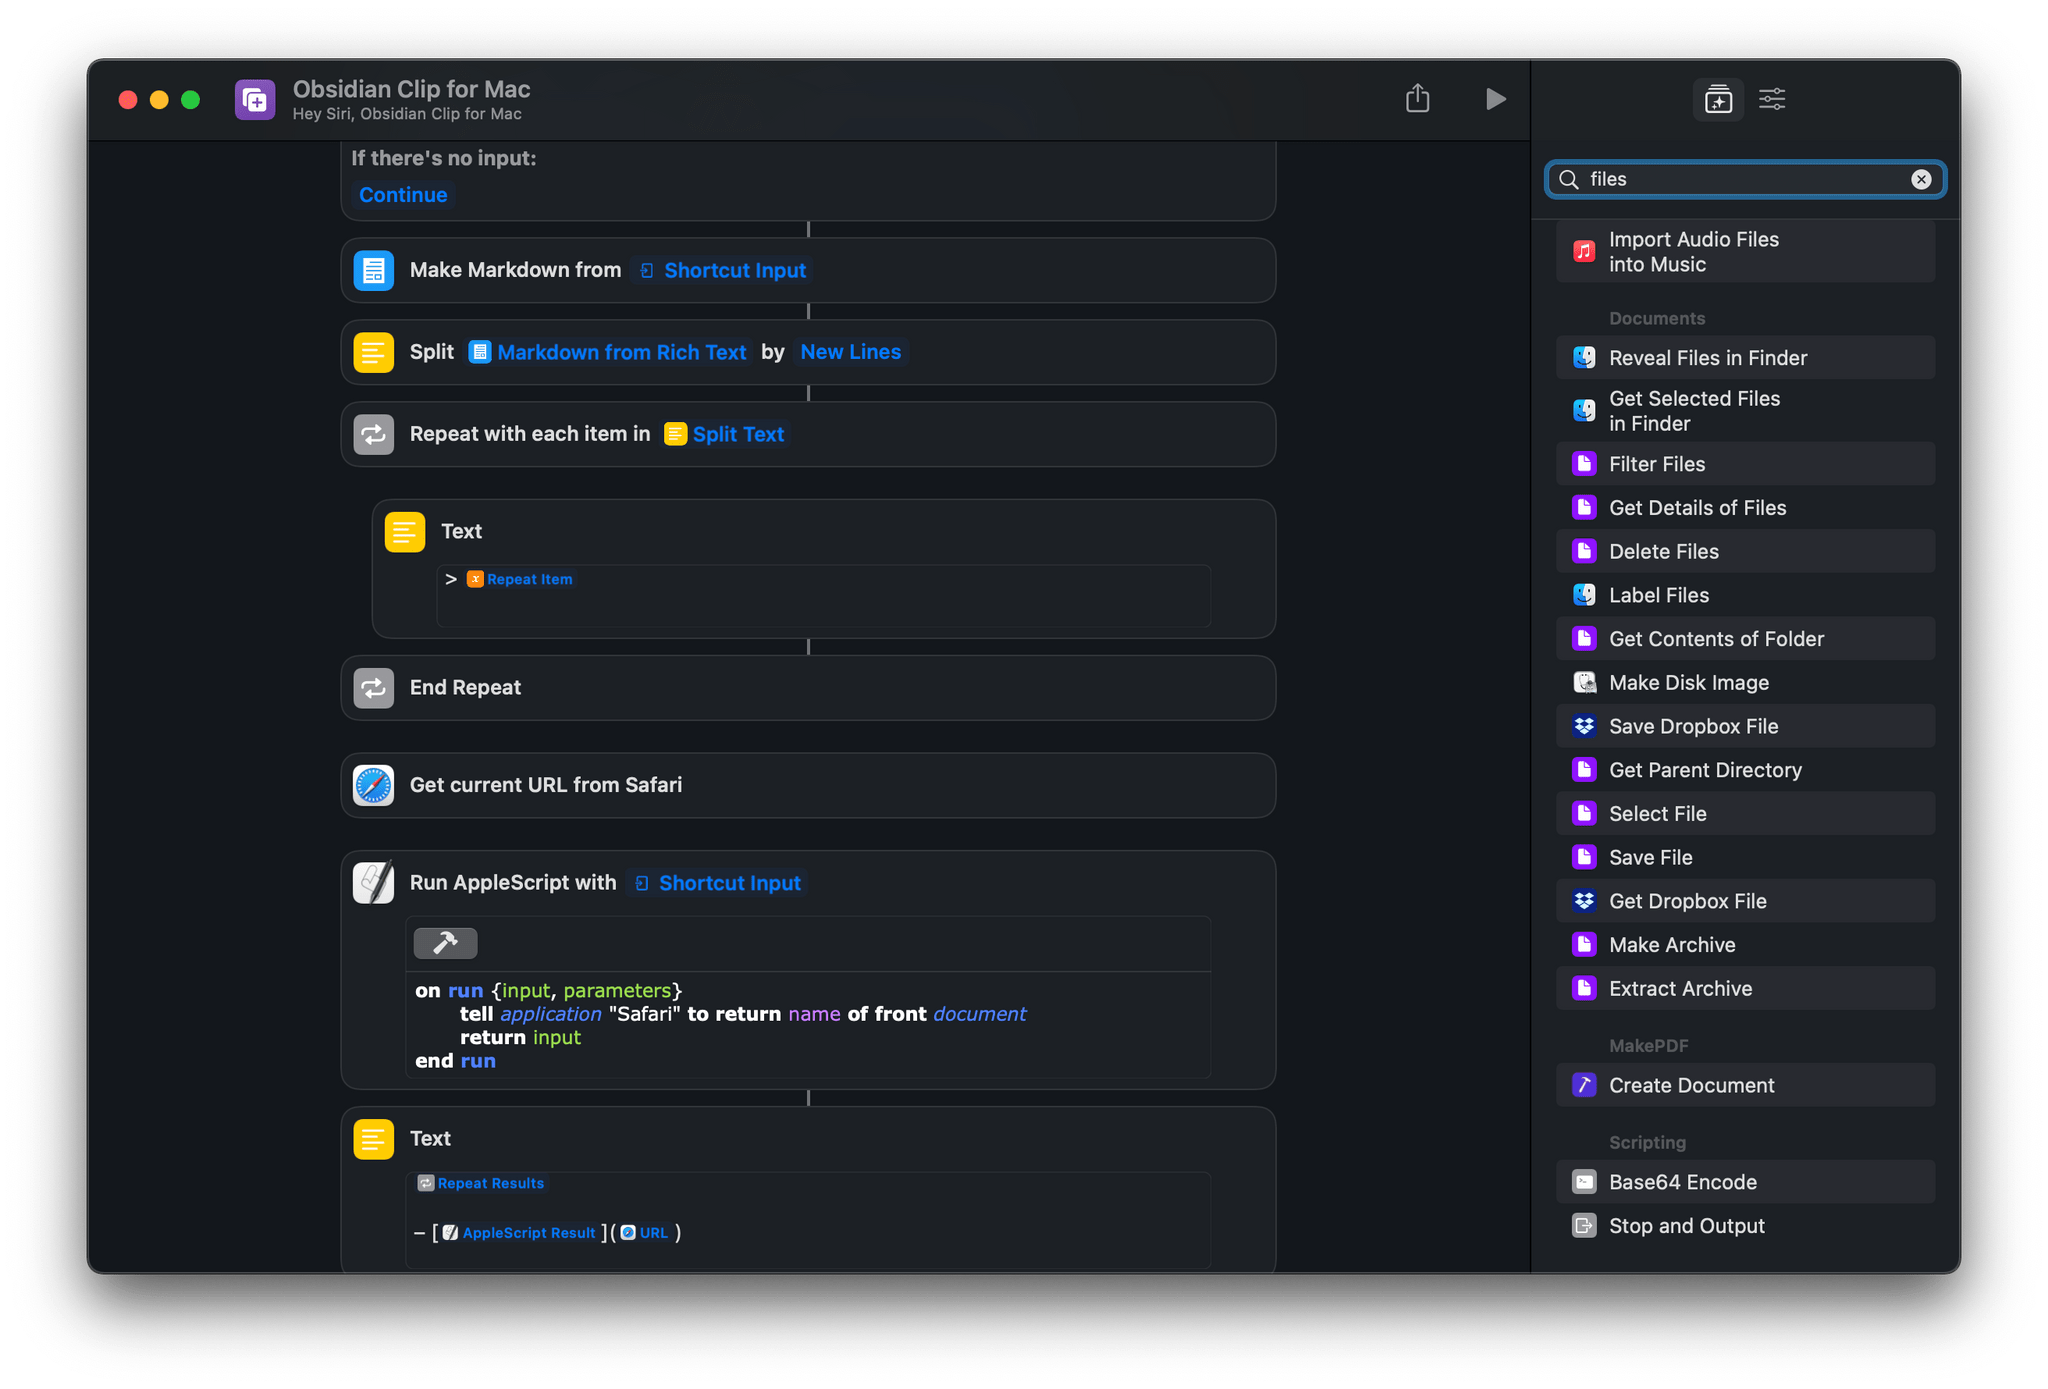
Unsurprisingly, you’ll find that a lot of the actions brought from Automator to Shortcuts are related to files.
The new Automator actions are among the most popular ones from that app and include:
- Add New Calendar
- Connect to Servers
- Create Photo Album
- Eject Disk
- Get Contents of Folder
- Get Current URL from Safari
- Get File from Folder
- Get Selected Files in Finder
- Get Text from PDF
- Hide App
- Import Audio Files into Music
- Label Files
- Make Disk Image
- Make Image from PDF Page
- Make Spoken Audio from Text
- Mount Disk Image
- Move File
- Open File
- Quit App
- Rename File
- Reveal Files in Finder
- Run AppleScript
- Run JavaScript for Mac Automation
- Run Shell Script
- Select File
- Split PDF into Pages
- Start Screen Saver
Further extending Shortcuts’ integration with Automator, most Automator workflows can be converted to shortcuts by dragging and dropping an Automator workflow file onto Shortcuts, which is an excellent user-friendly touch.
Shortcuts for Mac also has actions to find, move, and resize windows, which, combined with actions to hide and quit apps and open specific files, opens the door to creating task and project-specific desktop setups. There are plenty of dedicated apps that will do the same thing or more, but it’s handy to be able to do the same thing with a built-in tool if you’re particular about the location of your windows.

I’ve got a shortcut for creating a Markdown link list from RSS and adjusting my office lights in my Dock.
The number of ways to invoke shortcuts on the Mac is extensive. The list of options is impressive, but there’s one omission that makes it hard to adapt some iOS and iPadOS shortcuts for the Mac. You can run shortcuts from:
- The Shortcuts app
- The Dock
- The menu bar
- The Services menu
- Spotlight
- Siri
- The Touch Bar on compatible Mac laptops
- Widgets
- Global hotkeys
- The Finder
- AppleScript
- Shell scripts
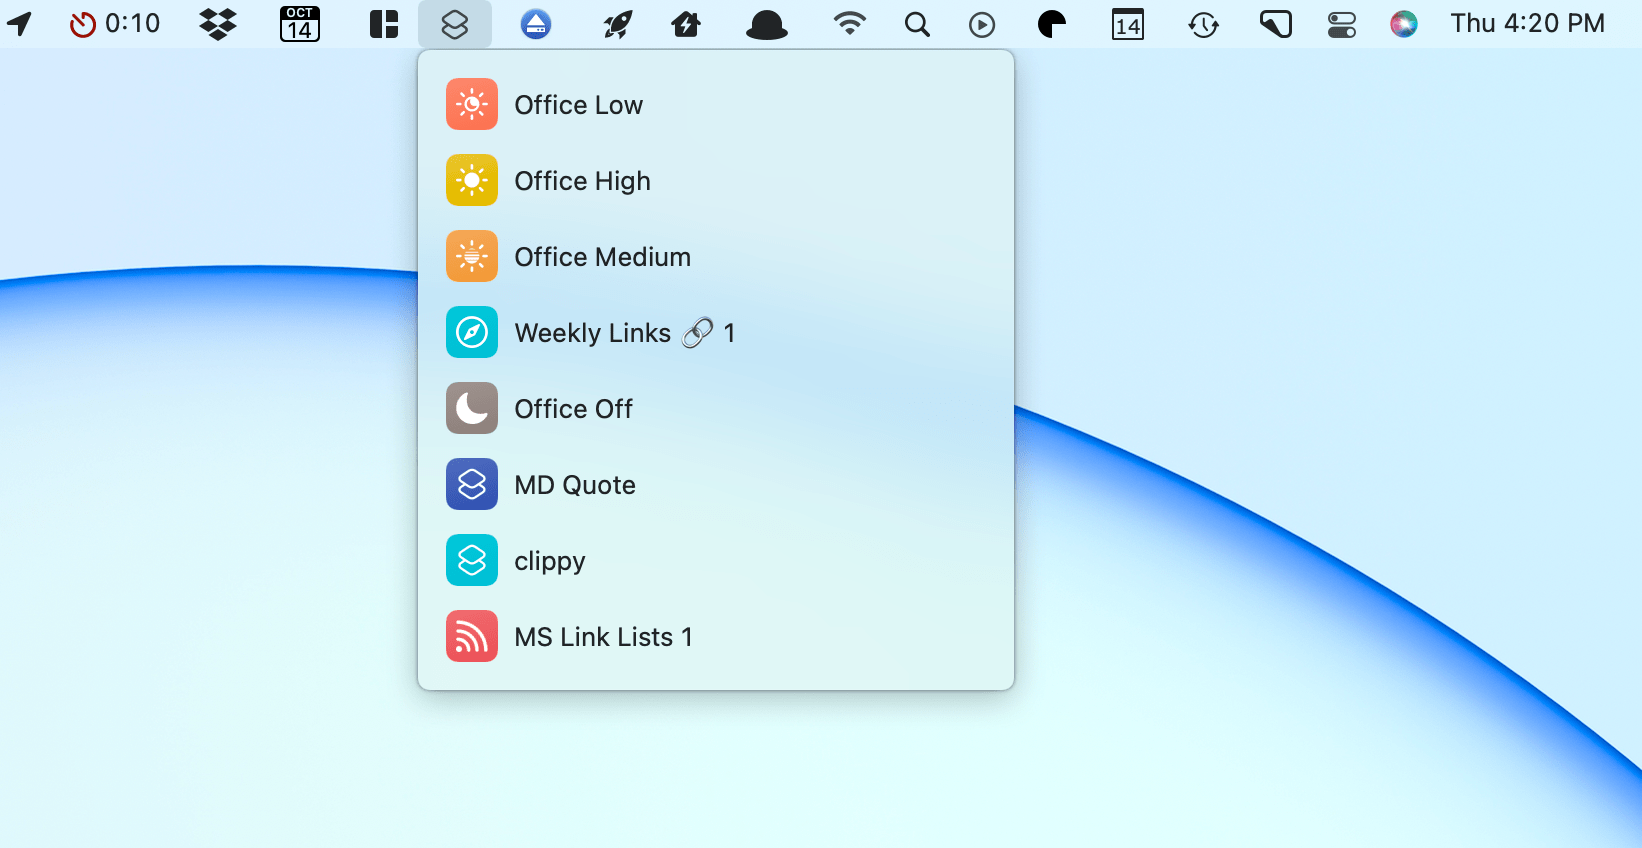
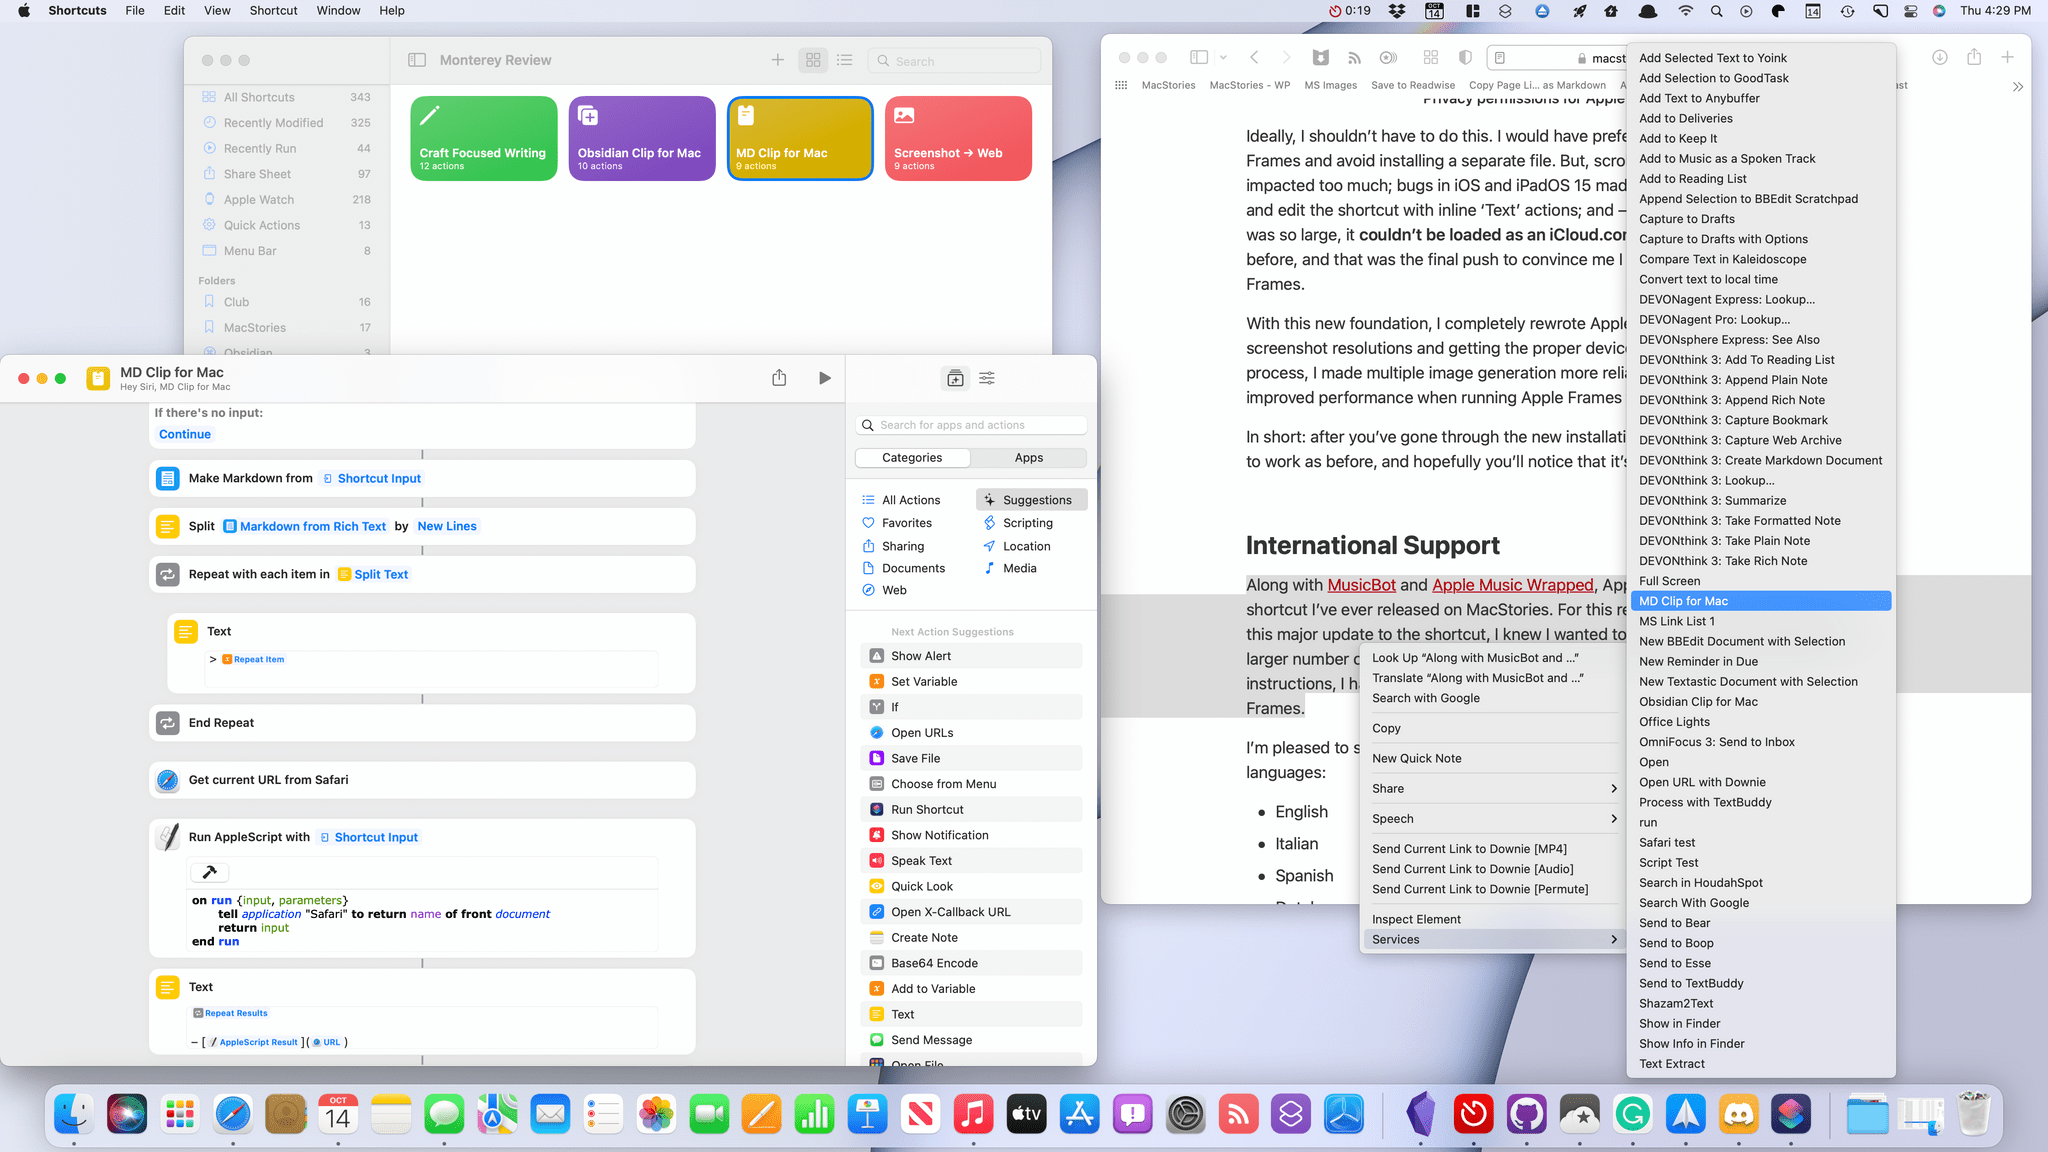
I’ve been experimenting with menu bar shortcuts, some of which also have keyboard shortcuts assigned to them, too.
Not only can you launch a shortcut with AppleScript or shell scripts, but shortcuts can also run AppleScript, shell scripts, and JavaScript for Mac Automation. I’m of two minds about the scripting support in Shortcuts. On balance, I’m glad it’s there because of the power and flexibility it provides users. However, one of my longstanding complaints about Automator is that every time I’ve used it in the past, I’ve quickly hit a wall where the solution was to use Automator to run a script that could do what Automator couldn’t. Too often, that made Automator feel like a script launcher instead of a powerful automation tool in its own right, which I hope doesn’t happen with Shortcuts for Mac.
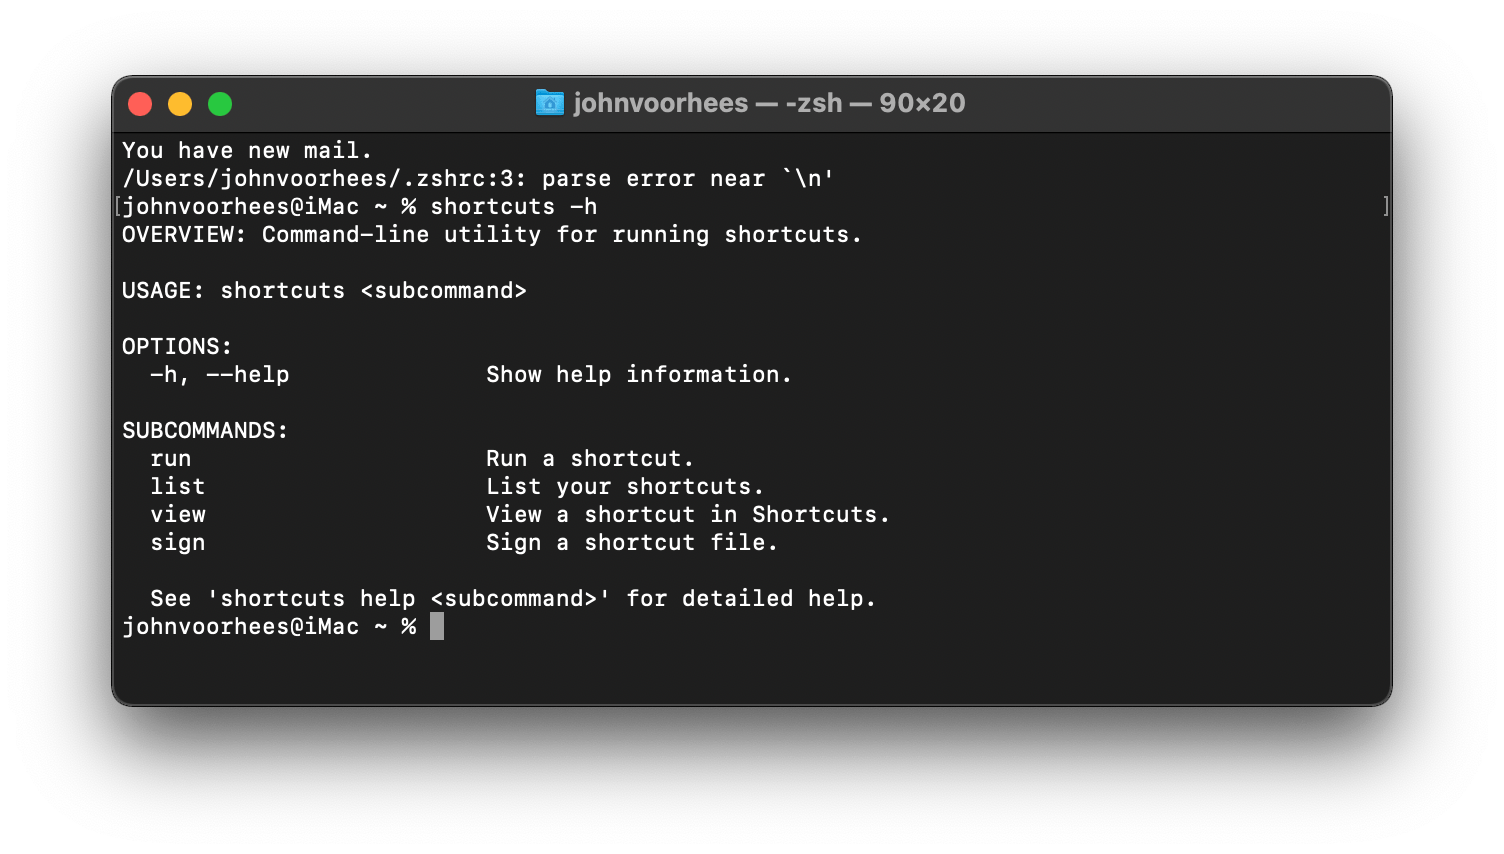
Shortcuts can also be run from the Terminal with the command shortcuts run 'name-of-shortcut'. There are commands to list, view, and sign shortcuts too. Signing is the most complex of the Terminal commands allowing users to specify the sharing mode, location of the shortcut file being signed, as well as an output destination.
The one inexplicable omission from the way shortcuts can be run is share sheet support. Share extensions on the Mac have never been supported well by Apple or taken off with third-party developers the same way they did on iOS and iPadOS. On those platforms, the share sheet launches some of my most important shortcuts. I work with webpages, links, and text all day, and being able to grab a URL or other data from a webpage or the App Store and process them in different ways is core to my work.
I’ve tried recreating the same shortcuts with the Services menu, but the problem runs deeper than the inability to hook things up to a share button. On the iPhone and iPad, it’s simple to grab the title, URL, and selected text of any webpage using the Get Details of Safari Web Page action. In other shortcuts, I use Get Article Using Safari Reader. Both actions are central to working with web-based data and are available in the Mac app, but neither works. What’s curious is that both actions are available in the app, and Web Pages and Articles are listed as content types available as shortcut input.
Undeterred, I set out to find a way around the trouble I was having, and while I was at it, I created a few other shortcuts for my Mac to give readers a sense of what’s possible. There are plenty of shortcuts you can create that will work on any of Apple’s platforms, but here are four that are Mac-only.
MD Clip for Mac
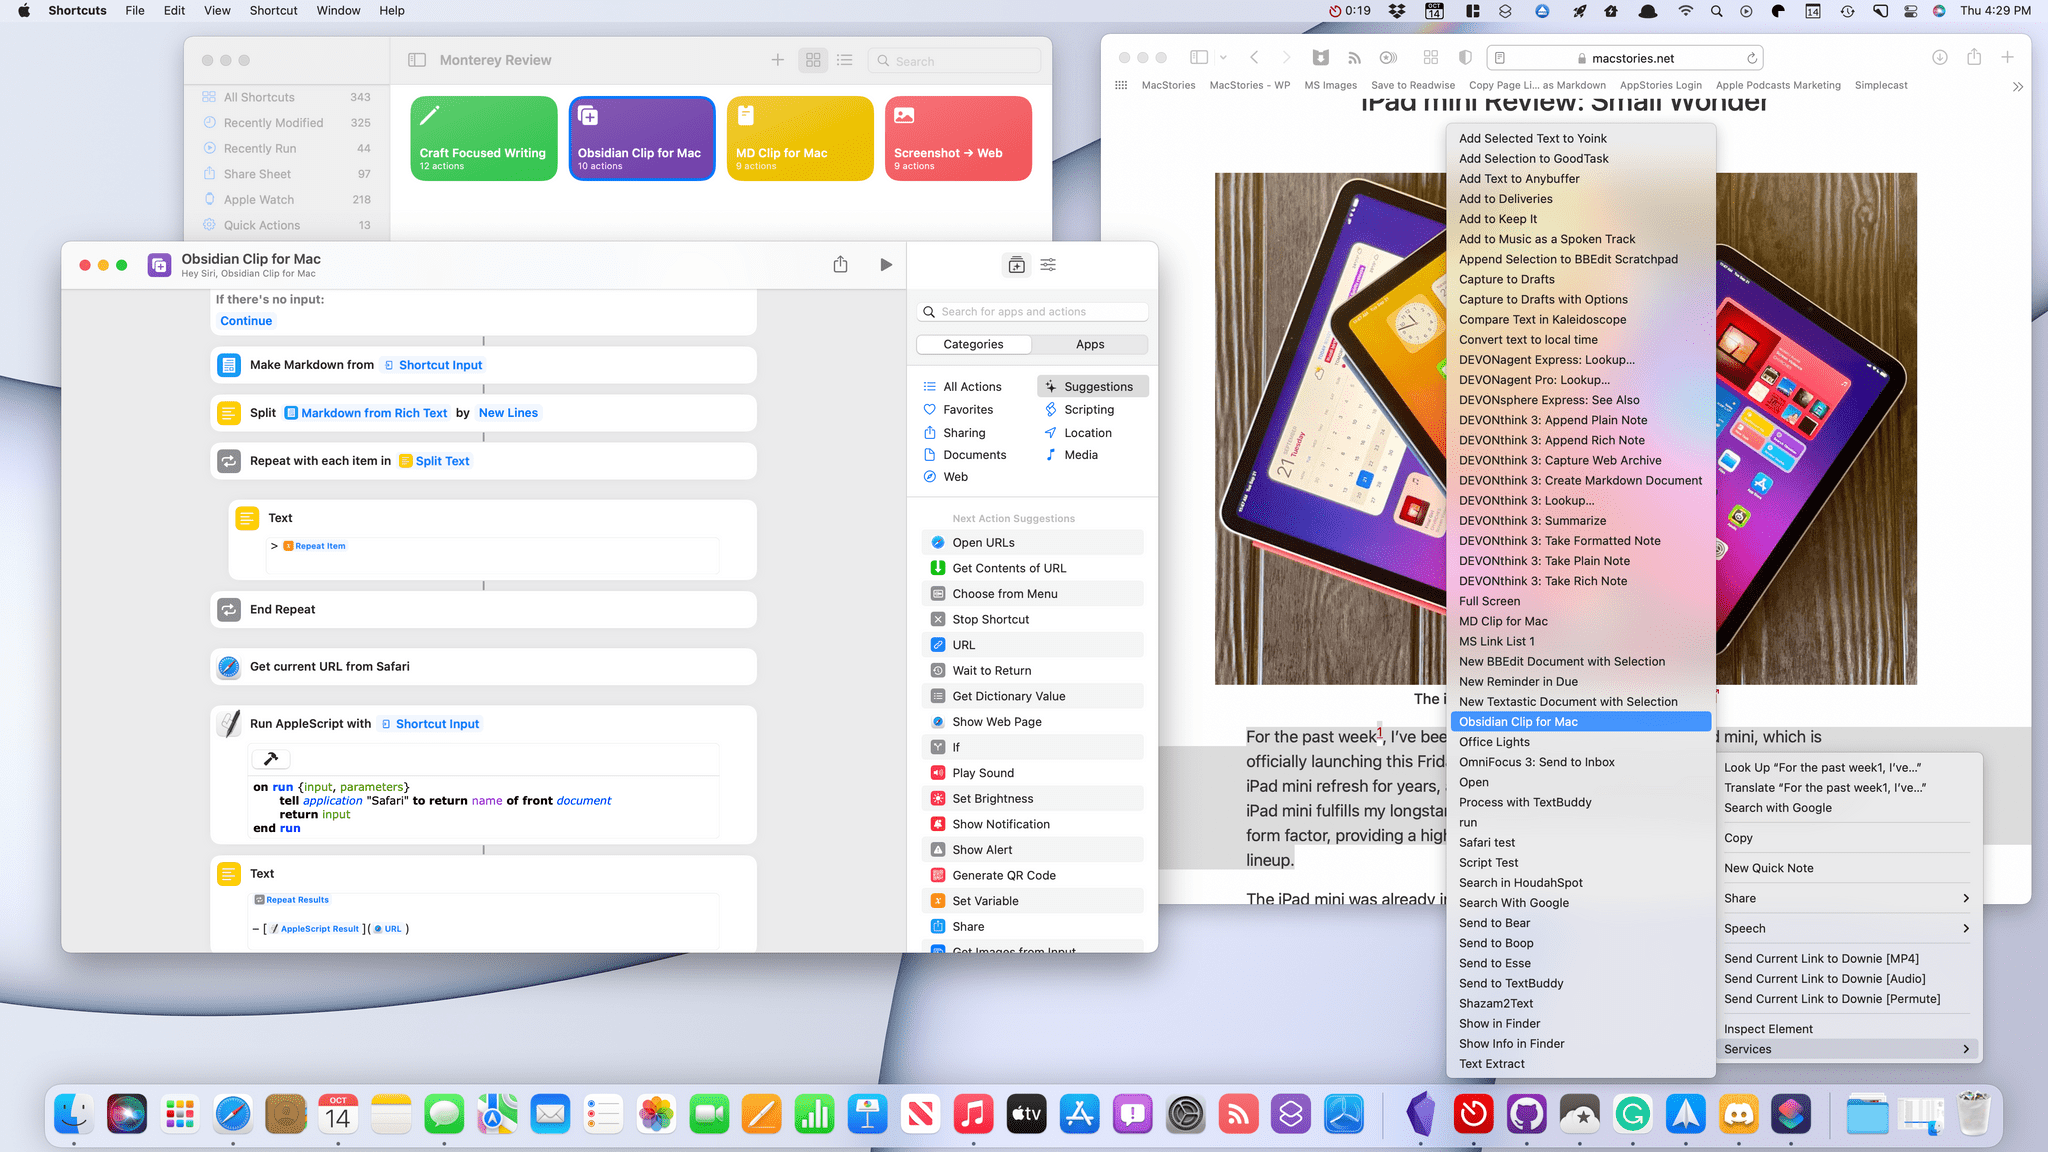
The first shortcut I built is a workaround to deal with the lack of webpage support I mentioned above. As I do research, I like to grab text from articles as blockquotes and save them in various apps for use later.
On the iPhone and iPad, I do this with the handy Get Details from Web Page action. With that action not working, I took a different approach. There are two Mac-specific keys to MD Clip for Mac. The first is that the shortcut is enabled as a Services menu item. That way, I can highlight text on a webpage, right-click, pick the shortcut, and the selected text will be passed into the shortcut. If you prefer, you can also set a keyboard shortcut to run MD Clip for Mac.
The shortcut takes the selected text, converts it to Markdown format, applies blockquote formatting, and adds a linked reference to the title of the story at the bottom of the quote. Without the Get Details from Web Page action available, I had to find another way to get an article’s title and URL. Fortunately, the solution was fairly straightforward. First, the shortcut uses Get Current URL from Safari, a Mac-only action, and then I use a bit of AppleScript to pull the title from the active tab. The remainder of the shortcuts assembles all of the pieces and copies them to the clipboard, ready for pasting in a note-taking app, text editor, or elsewhere.
While the solution to the lack of Get Details from Web Page wasn’t especially difficult to figure out, basic interactions with Safari like this shouldn’t differ by platform. I could incorporate the Mac-specific steps of this shortcut into one that assembles the same sort of blockquote on iOS and iPadOS, checking for the device type and following different paths depending on which kind of device I’m using, but that shouldn’t be necessary.
You can download MD Clip for Mac here or from the MacStories Shortcuts Archive.
MD Clip for Mac
MD Clip for Mac formats selected text in Safari as a blockquote and adds a link to the source material and then copies the results to the clipboard. To use the shortcut, select text in Safari and then select MD Clip for Mac from the app’s Services menu.
Obsidian Clip for Mac
I made an Obsidian-centric version of MD Clip for Mac because that’s the app I currently use most often for the kind of web clipping. Obsidian doesn’t offer Shortcuts actions, but it has a URL scheme, and there’s a community plugin called Advanced Obsidian URI that can do some amazing things with your documents. I used the plugin to construct a URL that takes the results of the same sort of blockquote generated by MD Clip for Mac and prepends it to a scratchpad note that I use as an inbox for links.
You can download Obsidian Clip for Mac here or on the MacStories Shortcuts Archive.
Obsidian Clip for Mac
Obisidian Clip for Mac is a variant of MD Clip for Mac. The shortcut formats selected text in Safari as a blockquote and adds a link to the source material and then prepends the results to an Obsidian file called @scratchpad using the Advanced URI Obsidian community plugin. To use the shortcut, make sure you’ve installed the Advanced URI plugin and have specified the vault and file you want to use in the URL action below. In Safari, select text and then select Obsidian Clip for Mac from the app’s Services menu.
Craft Focused Writing
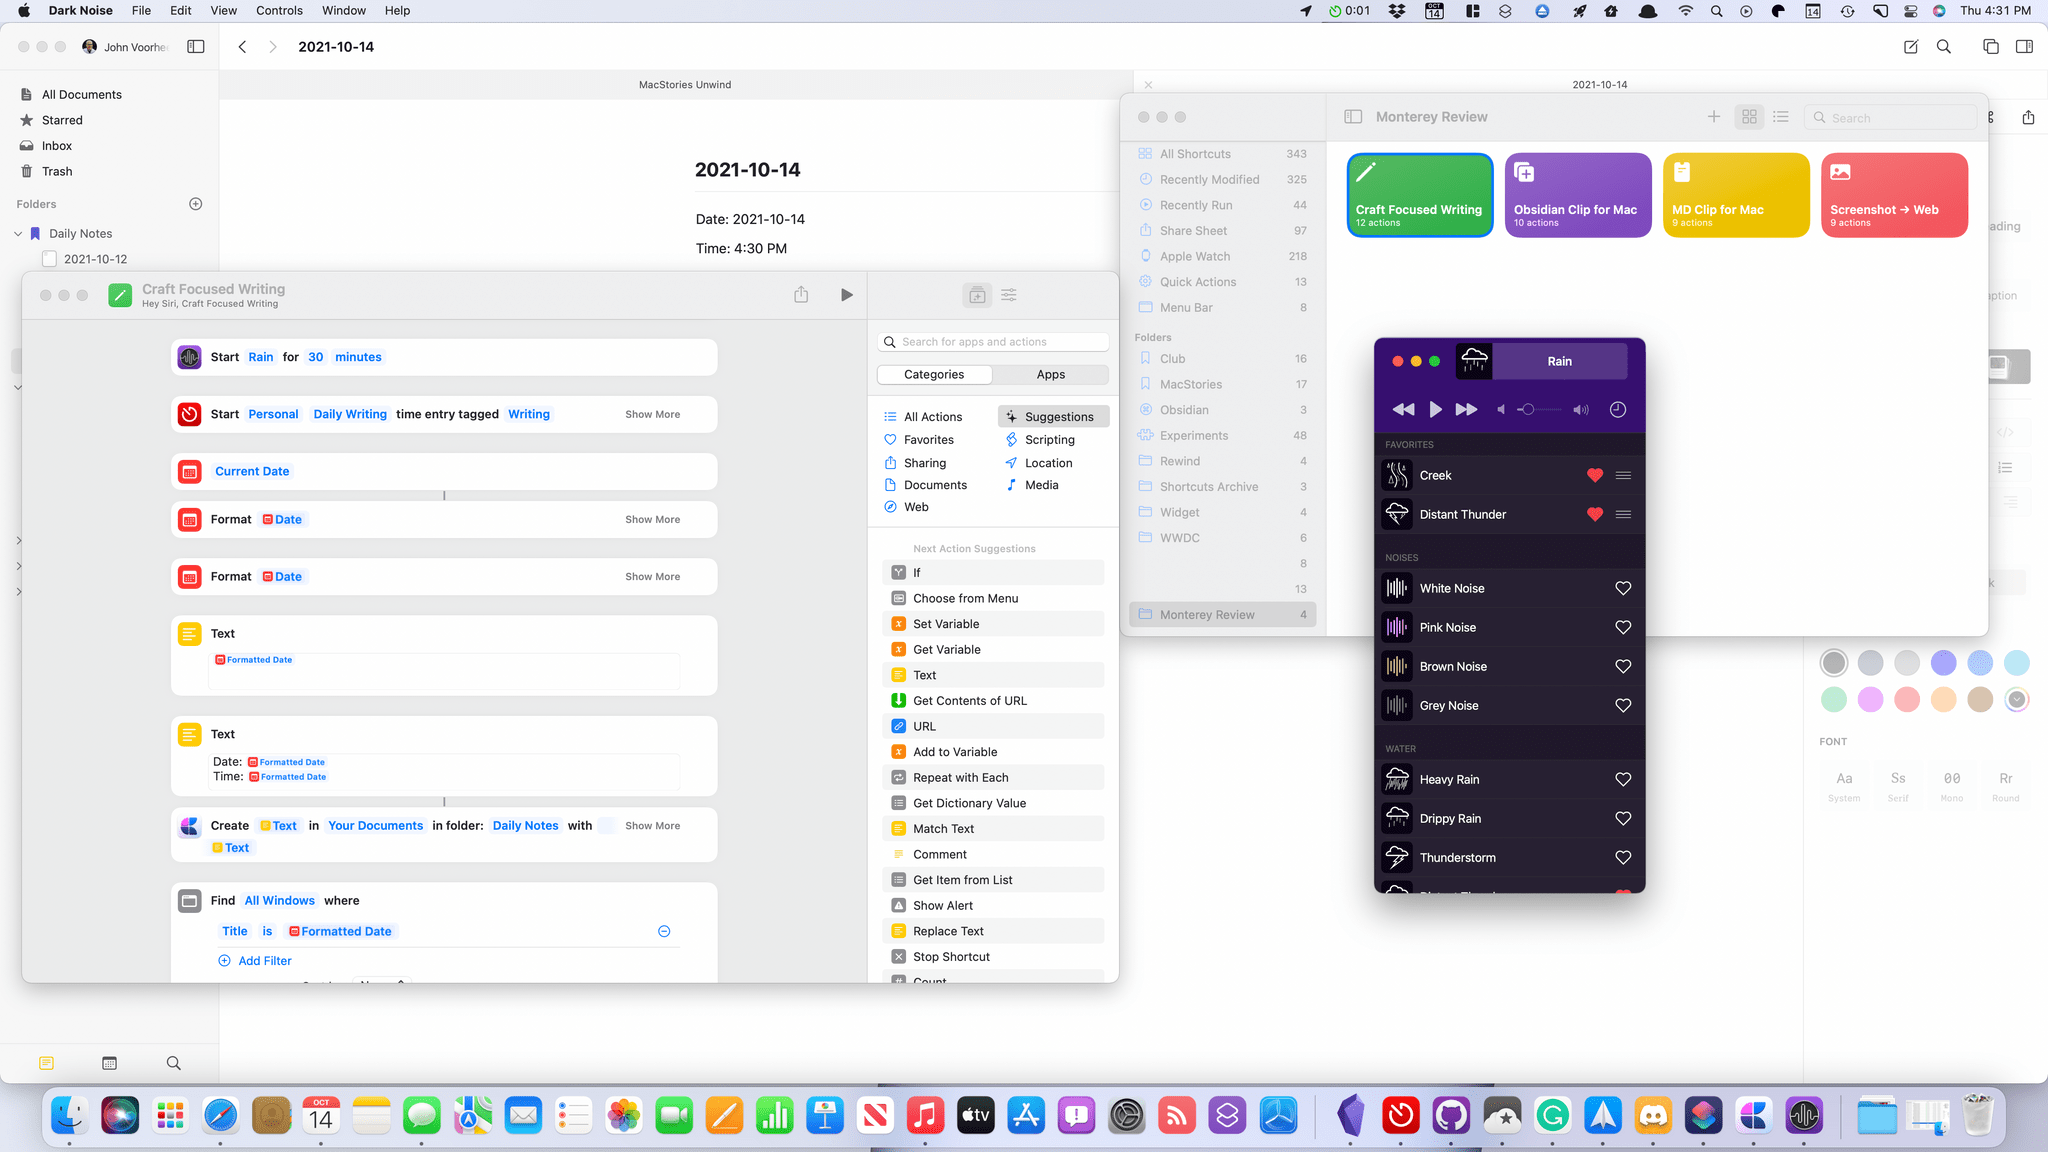
As I mentioned above, the ability to open apps and move windows around makes Shortcuts for Mac a good way to set up work environments with a single click. To show what I mean, I created Craft Focused Writing. The shortcut:
- Opens Craft
- Starts Dark Noise playing the sound of rain for a 30-minute writing session
- Starts a Timery timer with the time tracking details pre-filled
- Creates a Craft note using today’s date as the file name
- Inserts the date and time at the top of the note
- Resizes the Craft window to fill the screen
- Hides any other open apps
Whether you want a one-click way to get started with writing in Craft like this shortcut facilitates, or want to do something similar with a different set of apps, the ability to resize and position windows, along with the ability to quit or hide apps, makes the process easy.
You can download Craft Focused Writing here or on the MacStories Shortcuts Archive.
Craft Focused Writing
Craft Focused Writing is a shortcut that can be used to create a new dated note in Craft, start a ‘writing’ timer in Timery, play 30 minutes of rain sounds in Dark Noise, resize the Craft window to full screen and then hide all other apps.
Screenshots -> Web
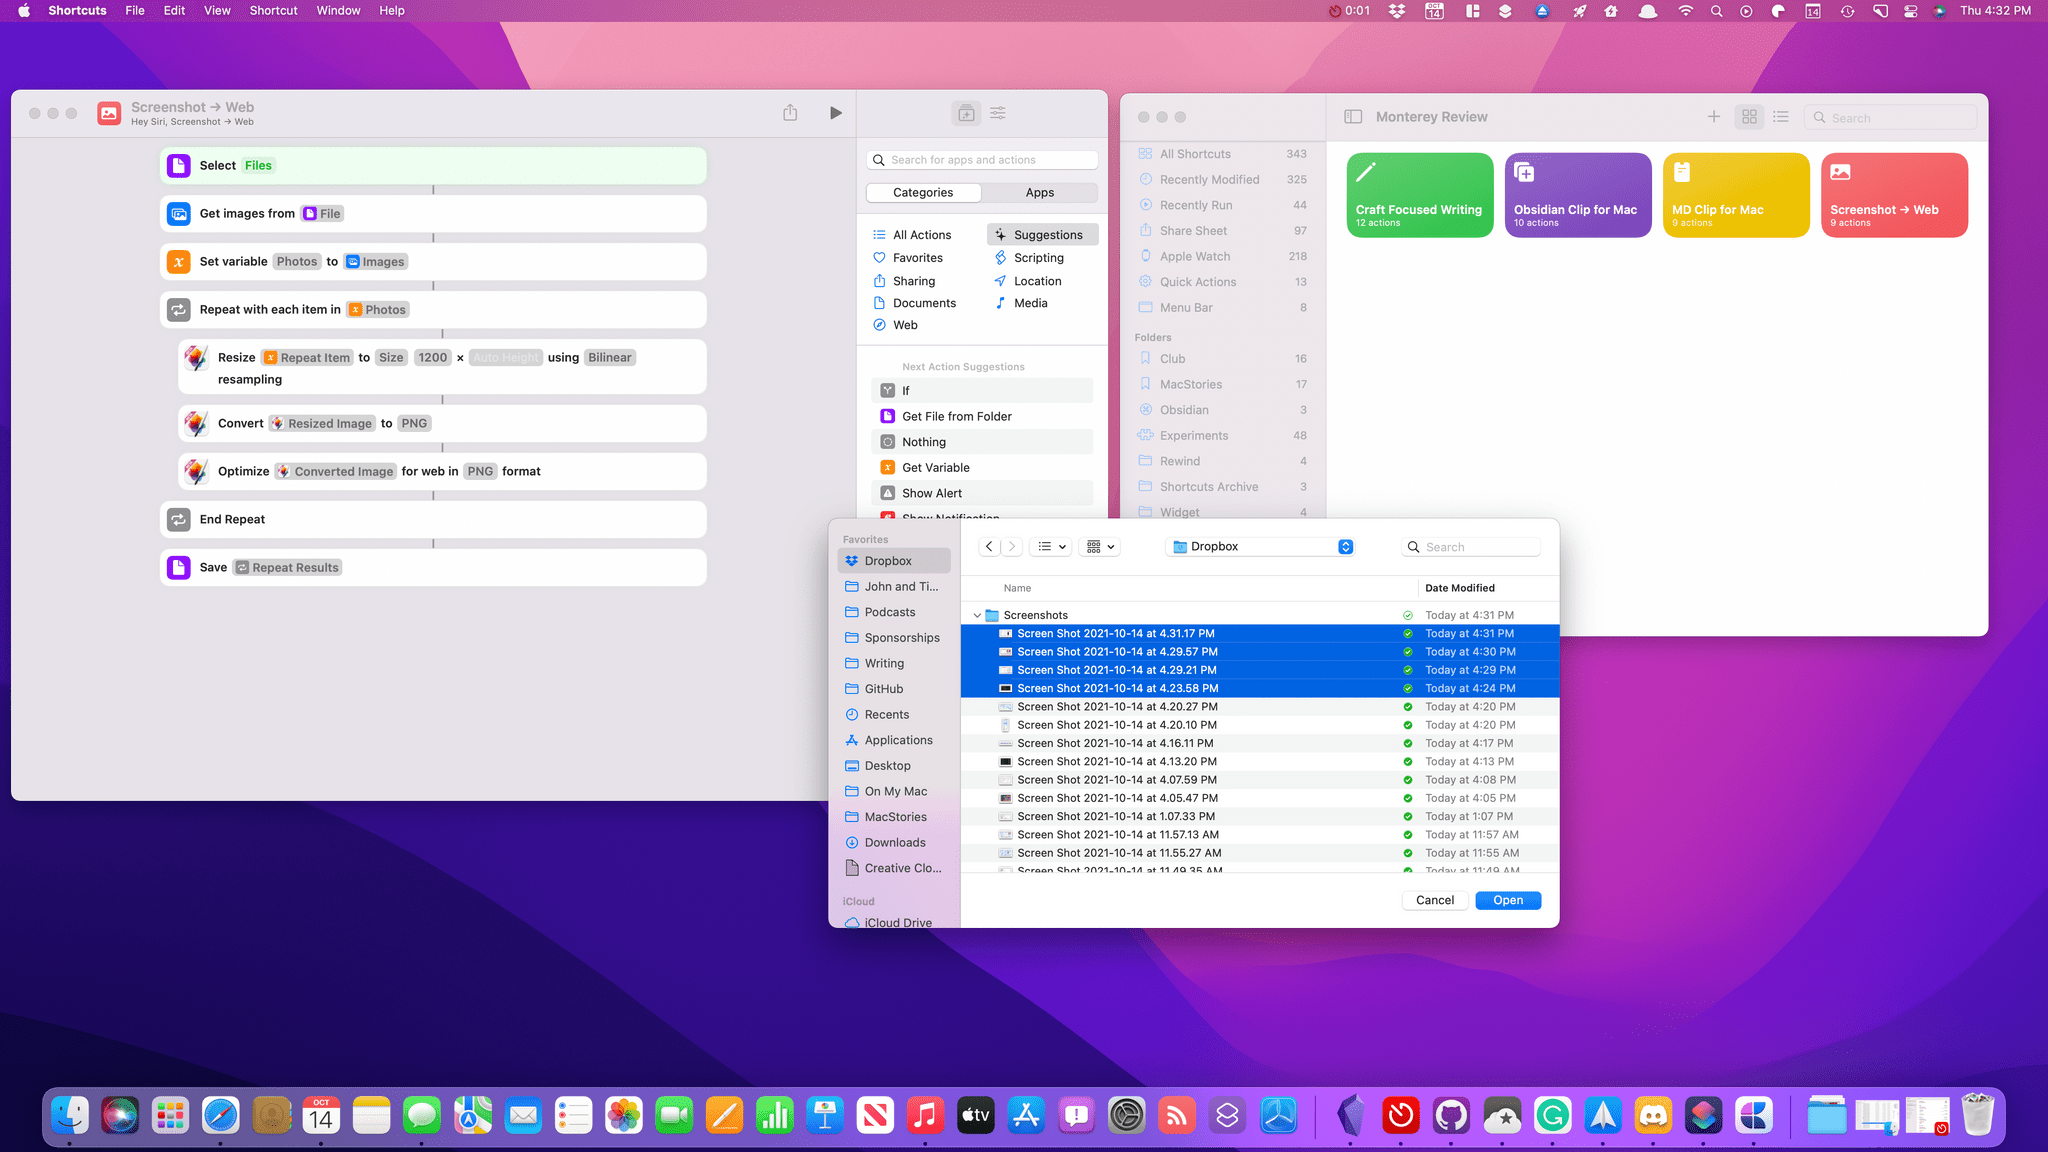
I also wanted to show off a new set of shortcuts actions from a Mac-only app: Pixelmator Pro. More often than not, I use Pixelmator Pro to do things like resizing and optimizing screenshots before uploading them to the MacStories CDN. It’s the sort of repetitive task that’s perfect for Shortcuts.
Screenshot -> Web asks you to pick a series of images and then resizes them to a standard width. The final step optimizes the images for the web and converts them to PNG files. The entire process is fast and efficient, saving me from the chore of clicking around as I do the same thing over and over in the app’s UI.
The version of Pixelmator Pro that includes Shortcuts actions is currently in beta and should be out alongside Monterey, allowing readers to give this shortcut a try too. In addition to the two actions I used for this shortcut, there is a long list of other actions covering an impressive scope of the app’s image editing functionality.
You can download Screenshots -> Web here or on the MacStories Shortcuts Archive.
Screenshot → Web
Screenshot -> Web allows you to select multiple image files that the shortcut resizes to a standard width, converts to PNG, and then optimizes for the web. The image actions are part of Pixelmator Pro and will be available soon after the release of macOS Monterey.
In the wake of WWDC, I was full of excitement and optimism for a future in which Shortcuts is the glue that holds automation together across all of Apple’s platforms. My hope was that Shortcuts would unite existing Apple and third-party automation tools with actions donated by a wide cross-section of the app ecosystem, ushering in an era of cross-platform automation that leveraged the advantages of each in a way that opened up new opportunities for innovation.
Shortcuts for Mac doesn’t deliver on that promise, but it’s still too early to declare it a failure. My greatest concern isn’t that Shortcuts for Mac won’t eventually become the app I’ve hoped for, but that it will frustrate many users who simply never give it a second look. That could stunt the app’s growth no matter how good future updates are, which would be unfortunate. I’d also hate to see Shortcuts’ troubles discourage developers from incorporating it into their apps, but I’ve already heard from some who have shelved plans for Shortcuts support, and the initial buzz from Mac developers has faded noticeably.
That said, there is still reason for cautious optimism. The Automator actions added to Shortcuts provide a solid foundation of Mac-centric actions on which to build and have led to new Shortcuts actions on iOS and iPadOS that are direct descendants of Automator actions. Also, many shortcuts built for iOS and iPadOS, including complex shortcuts like Federico’s Apple Frames 2.0 shortcut and MusicBot, already run on the Mac, though not always as reliably. I also remain encouraged by Shortcuts’ integration into everything from the menu bar and the Services menu to the Finder and Dock.
So, start simple and don’t give up tools you already rely on in favor of Shortcuts just yet. Instead, explore and experiment to familiarize yourself with the new actions available on the Mac. I had hoped Shortcuts would be further along by this point. Still, by setting realistic expectations and goals about what you’ll be able to accomplish, you’ll be less frustrated and better positioned as Shortcuts improves.


