For the past couple of years, the tech industry has grappled with the consequences of people carrying a tiny computer with them all day long. When it comes to Apple, iOS devices have long had a Do Not Disturb setting and notifications can be adjusted, but over time, it became apparent that the existing tools were not enough.
Screen Time is Apple’s solution to the information gap about how we use our iOS devices. The new feature, which is found in the Settings app in iOS 12, provides a wide array of metrics that give an unforgiving and eye-opening look into exactly how you use your devices each day.
Screen Time is also the means for acting on that information. Users can impose restrictions on when and how they use their devices.
The same tools are available to parents through Apple’s Family Sharing feature. Although Screen Time for kids is complex in some respects and lacking in others, it’s an excellent first step. The feature may require a time investment to master, but it succeeds on two levels. First, by working the same way it does for individuals, which Federico will cover in his iOS 12 review, managing the feature for a child will be familiar to anyone who uses Screen Time themselves. Second, although I’d like to see Apple implement some age-appropriate default settings in places, on balance, I’m satisfied that the complexity of Screen Time is a fair trade-off for the customization that it enables.
Family Sharing and Screen Time Set Up
Screen Time for kids is part of Family Sharing, a feature that has been available since iOS 8. In addition to Screen Time, the feature allows up to six family members to share media purchases with some limitations, an Apple Music subscription, and iCloud Storage. Family members can also share photo albums, Reminders lists, calendars, and use Find My iPhone to find their devices.
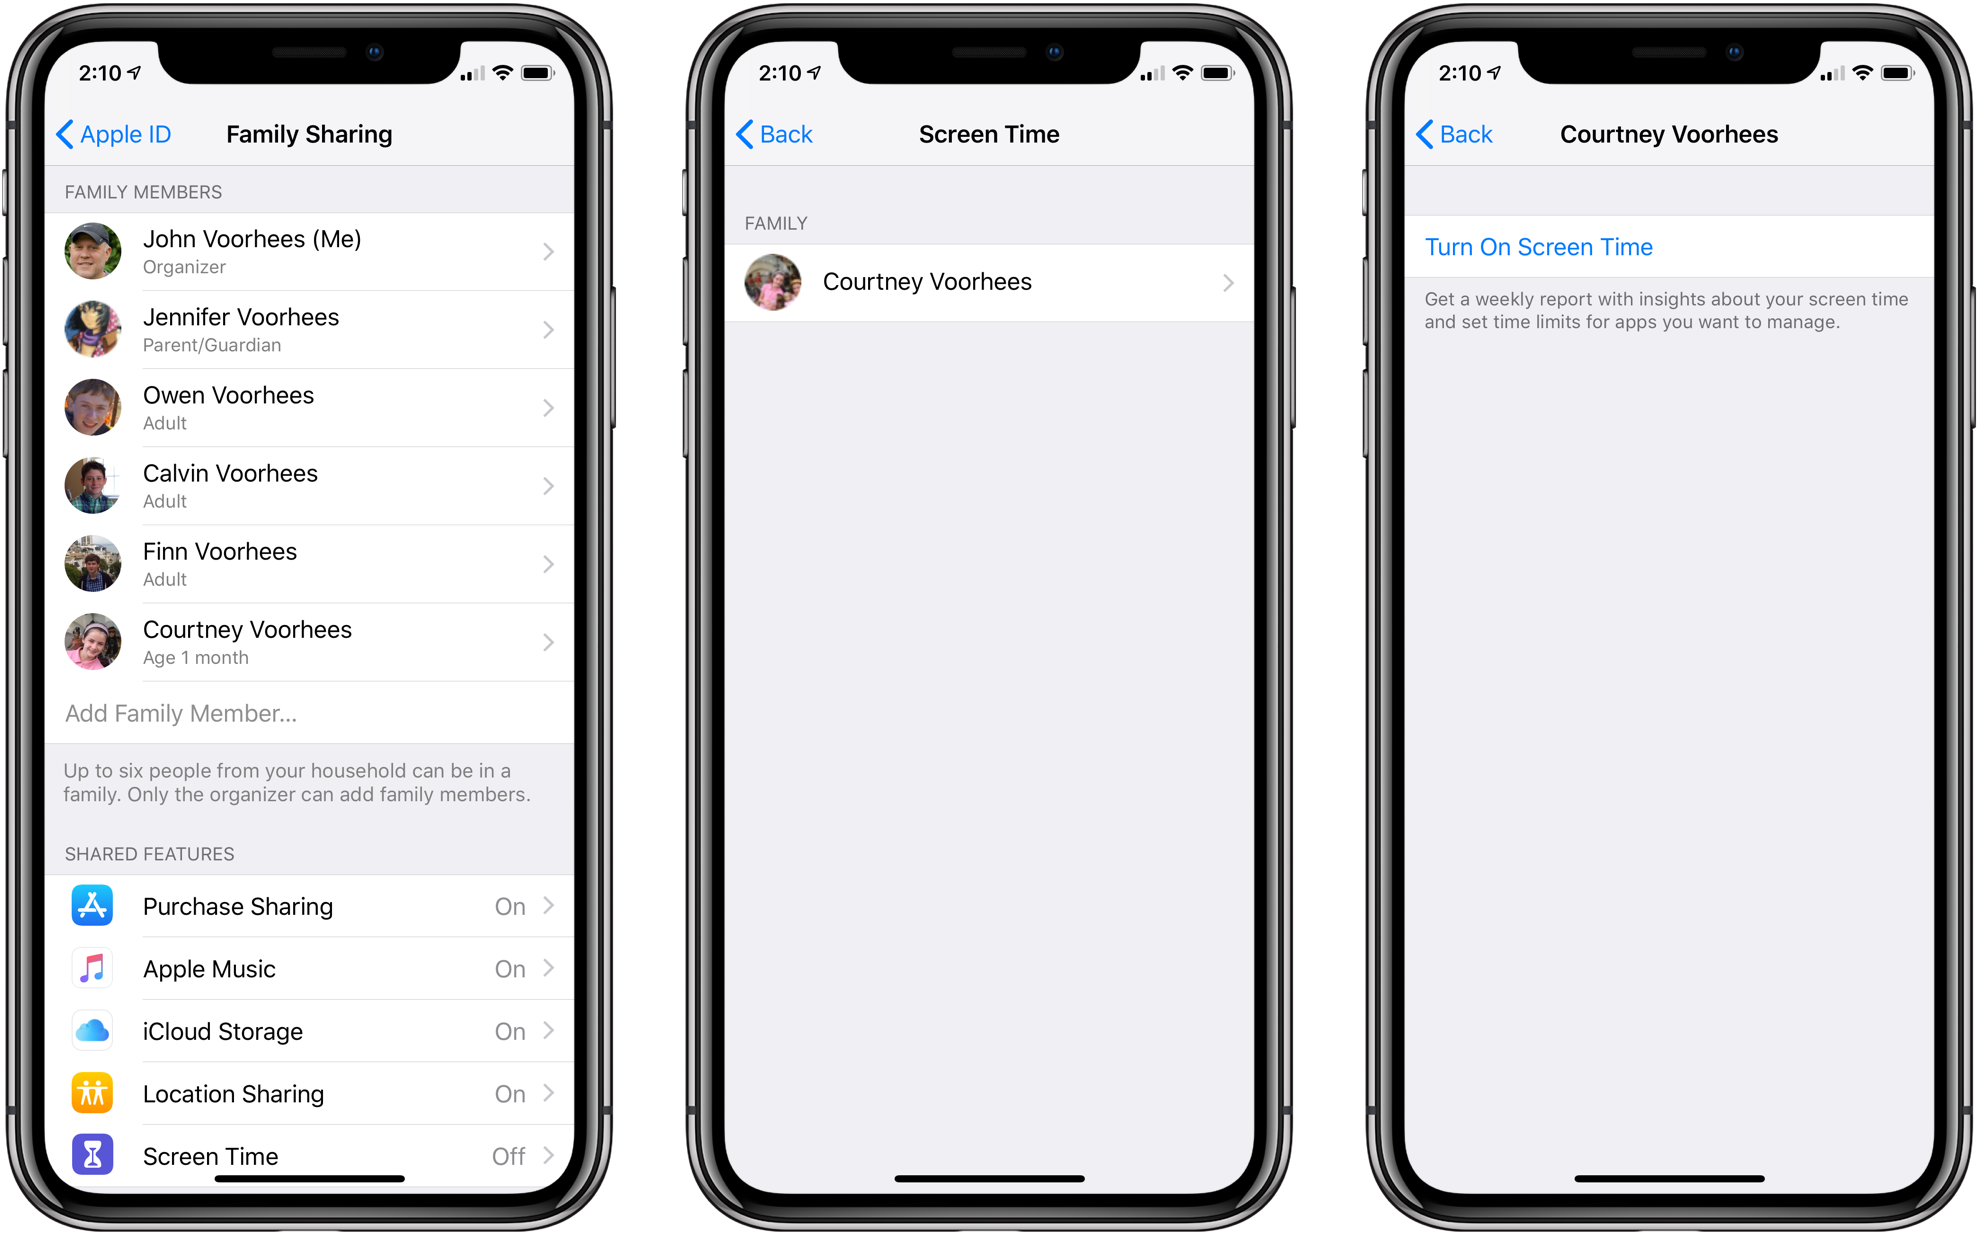
Screen Time for individuals can only be enabled in the Screen Time section of the Settings app. For kids though, if you already have Family Sharing enabled, you can go to the Family Sharing settings or the Screen Time section of Settings. Regardless of where you start, the setup process is the same. If you don’t already have Family Sharing enabled, start by tapping on your name at the top of the first Settings app screen, then on ‘Family Sharing.’ You can also enable Family Sharing from a Mac’s System Preferences or on iCloud.com.
Every Family Sharing group has an organizer who acts as the administrator of the group. Others in the family can be designated as parents/guardians or children. The organizer, parents, and guardians can all manage Screen Time for a child.
With Family Sharing enabled, tap ‘Screen Time’ in the list beneath the names of your family members from the Family Sharing settings screen. You’ll be taken to a screen with each child in your family listed under the heading ‘Screen Time.’ Pick a kid to set up with Screen Time and then ‘Turn On Screen Time.’ Alternatively, if you already have Family Sharing enabled, you can go to the Screen Time section of Settings where you’ll see each of your kids listed near the bottom of the screen.
This process strikes me as involving more tapping than necessary. Why not just include an on/off toggle next to each child’s name? Families are limited to only six members, so it’s not as though vertical screen space is at a premium for most devices. It also makes the setup process needlessly tedious before parents even get to the many layers of settings available after Screen Time is enabled. Fortunately, the initial steps are something that shouldn’t have to be repeated in most circumstances.
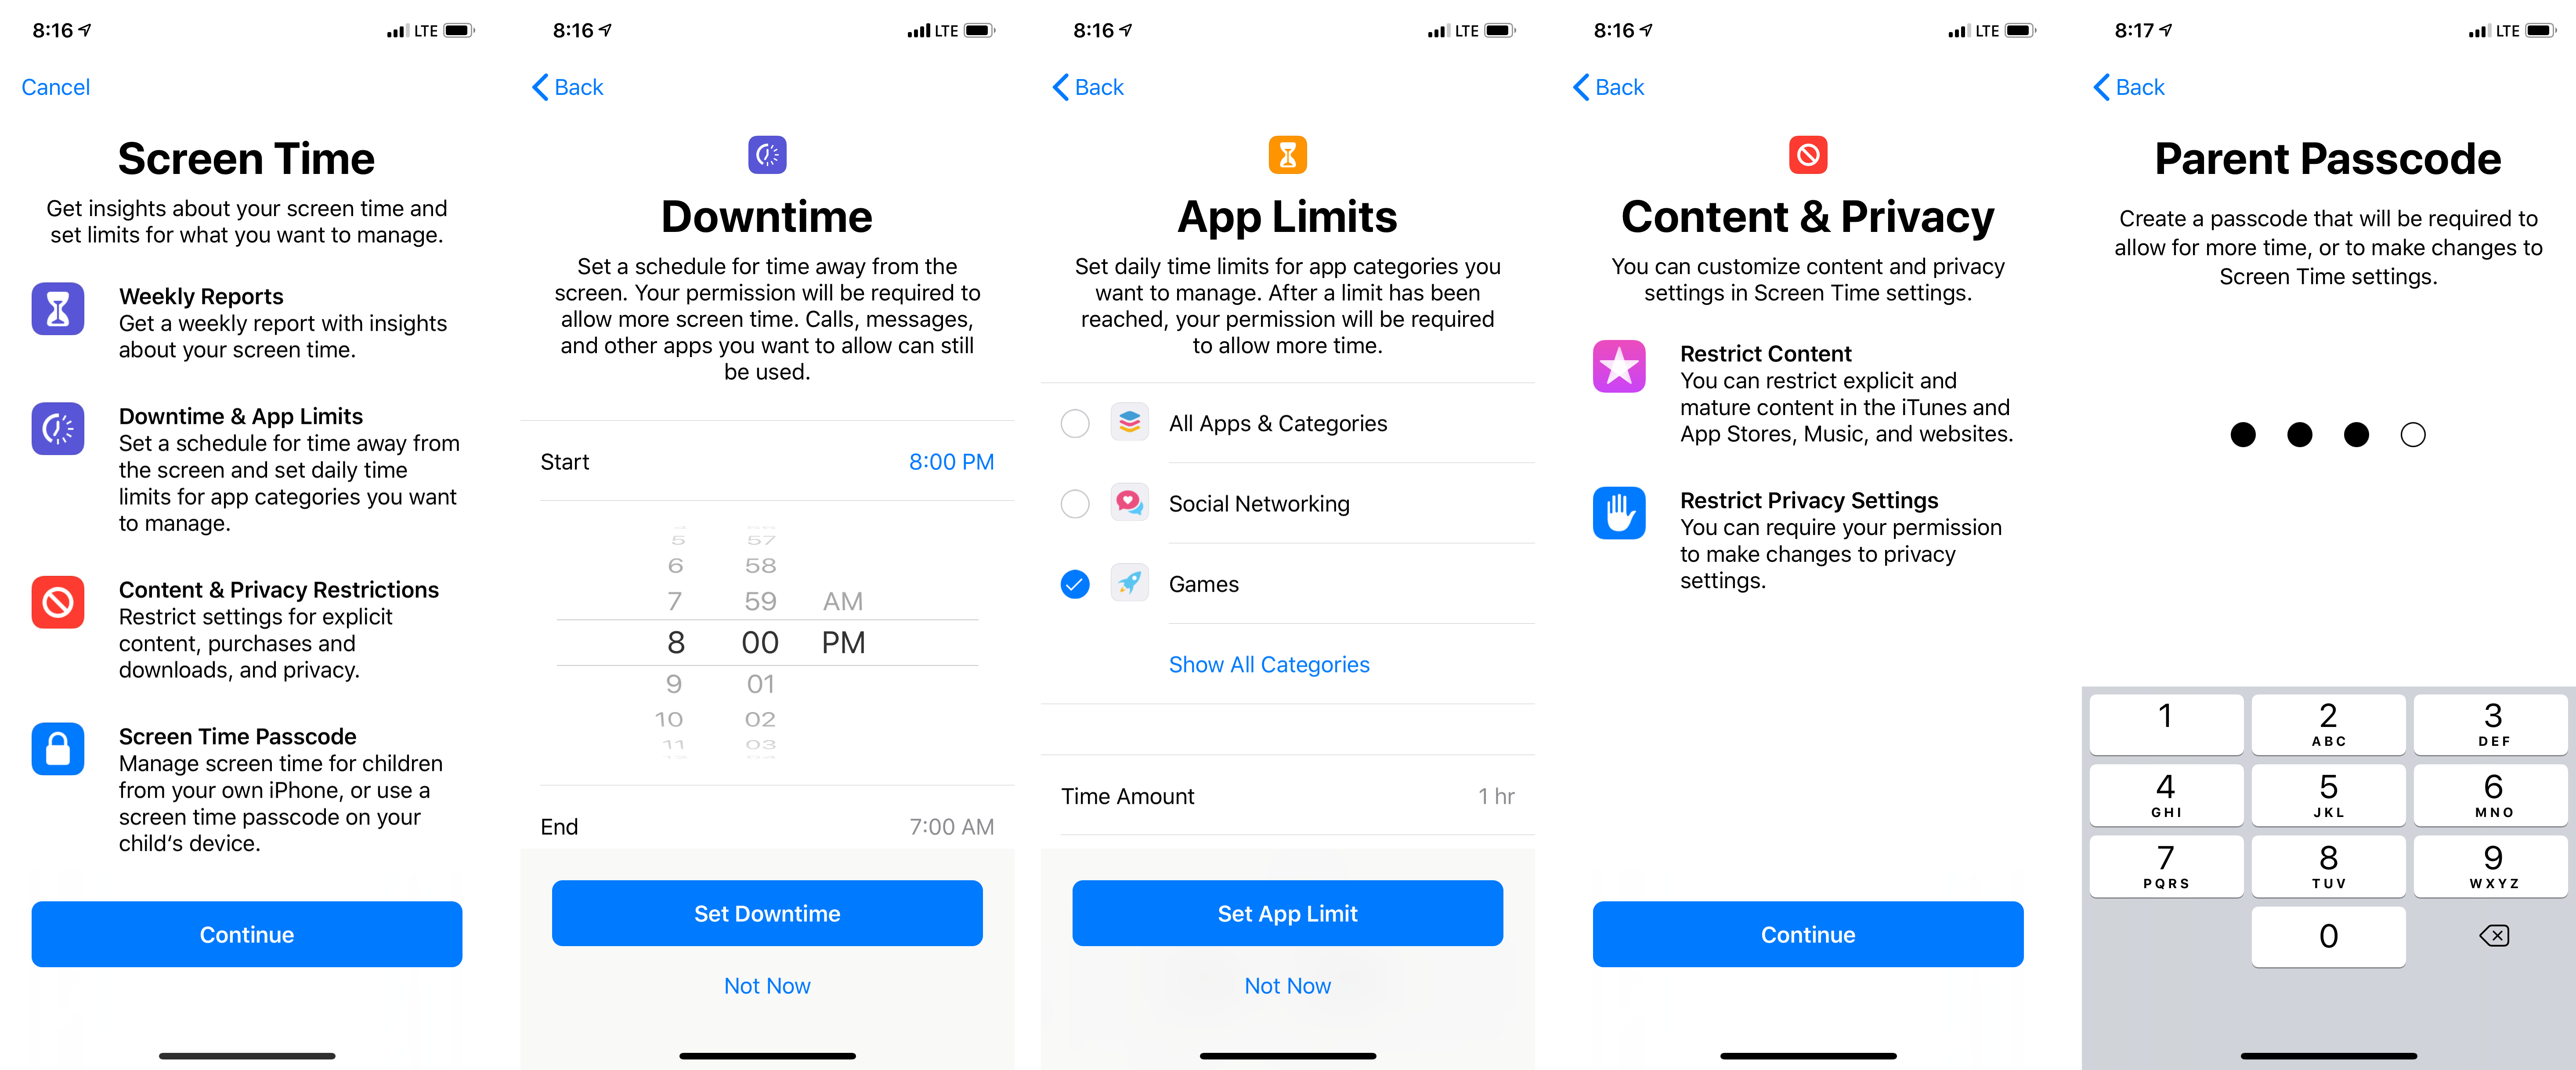
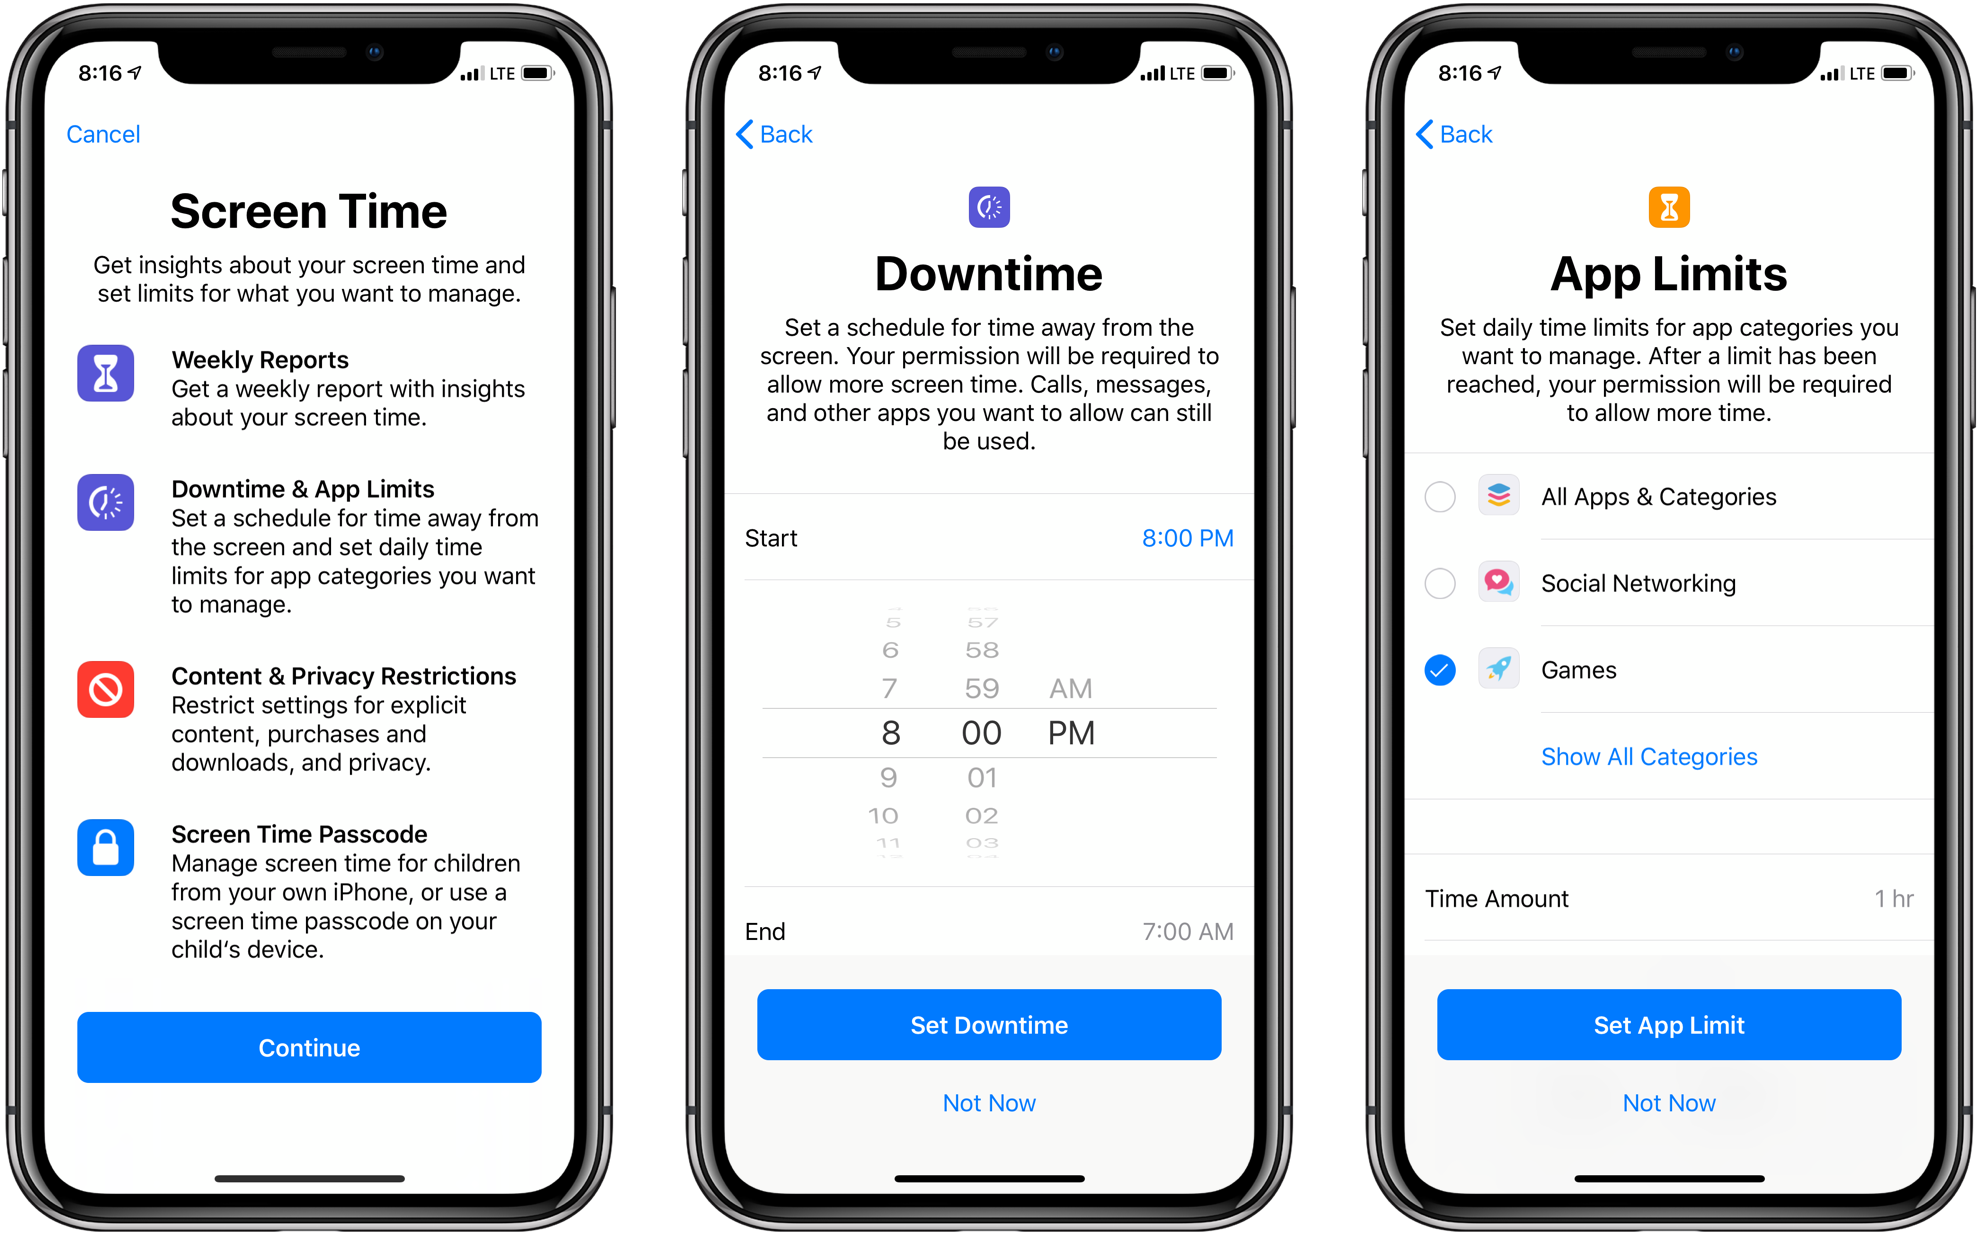
During the intial setup process Screen Time explains its primary featues and gets parents started with Downtime and App Limits.
The next series of steps walks you through screens that summarize Screen Time’s features and let you pick some initial limits for your child’s iOS use. There are options to set up a Downtime period and App Limits, which I explain further below. Another screen informs you that content and privacy settings can be adjusted by parents from the Settings app. Finally, you need to set up a four-digit Parent Passcode, which is required any time you change your child’s Screen Time settings or grant permission to extend time limits.
Overall, the setup process went smoothly when I tried it. My greatest concern about adoption is that I’ve always felt Family Sharing is too hard to discover. Family Sharing isn’t even listed as one of the things tucked behind your picture at the top of the main Settings app screen. At least there are two avenues into Screen Time, which will help anyone who set up a family group years ago but has forgotten where to find those settings. Still, I’d like to see Family Sharing at least mentioned as one of the items behind your name at the top of the Settings app.
Screen Time
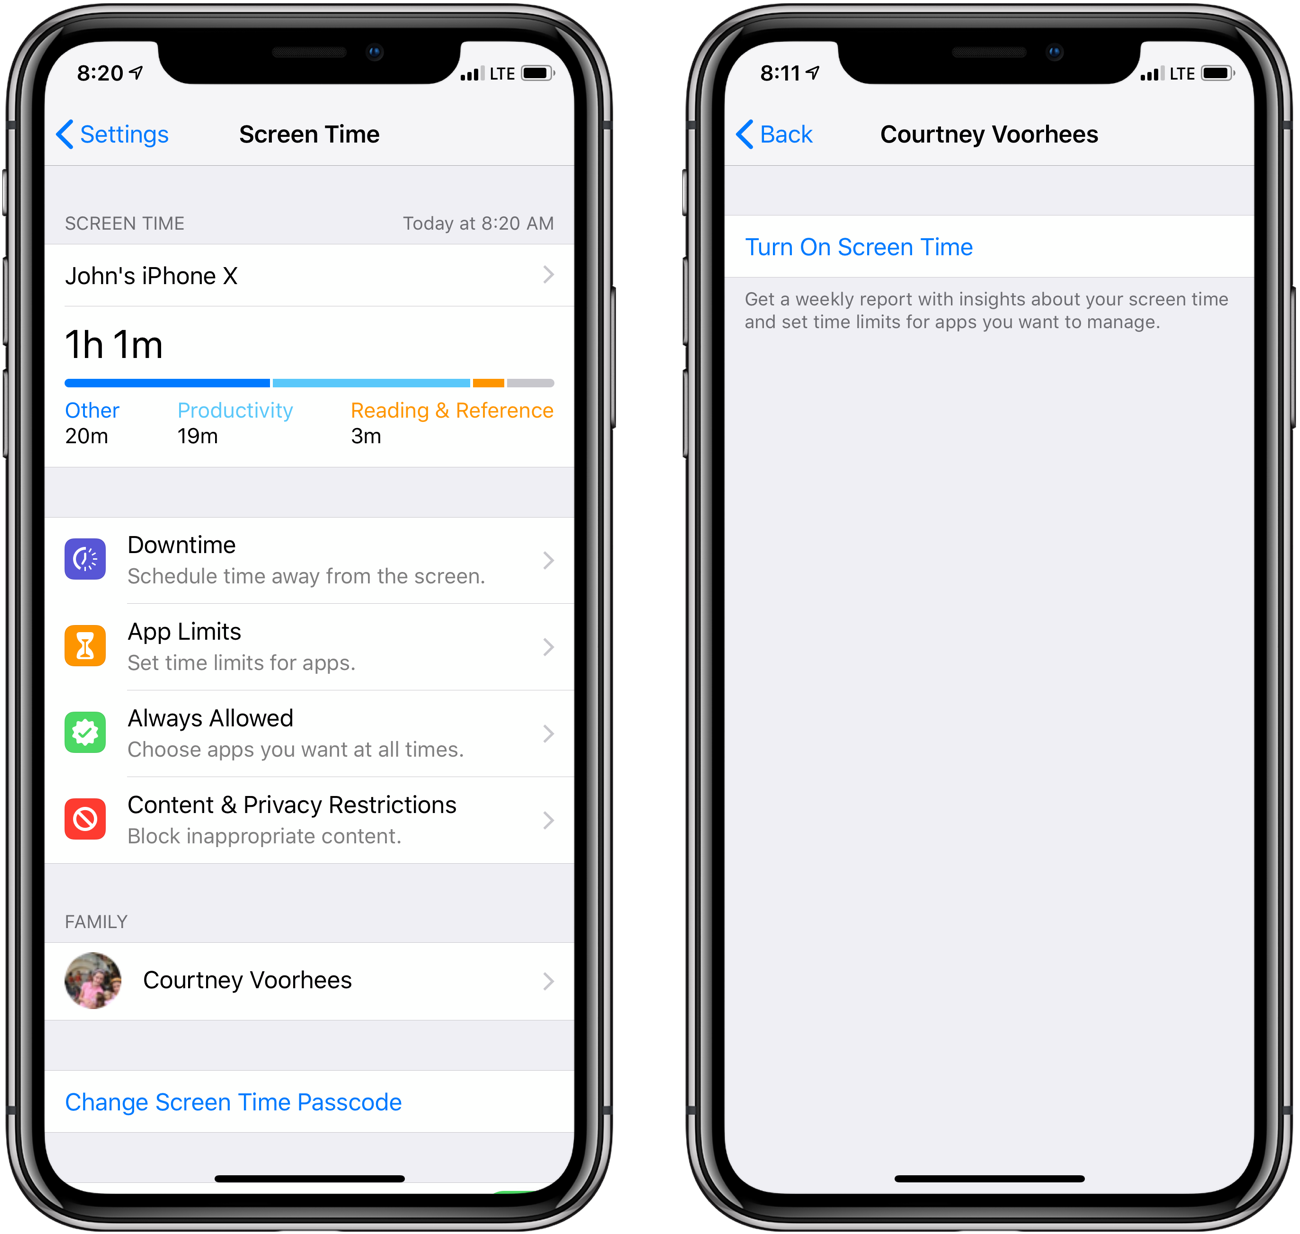
With your family in place and Screen Time turned on, you have two options for managing your kids’ Screen Time settings. The most direct route is through the Screen Time section of Settings. Each of your children will appear beneath the statistics collected about your device usage. Tap on your child’s name and the Screen Time view that opens is almost identical to what you’d find on your child’s device, with a couple of differences that I’ll explain below. The other route into your kids’ Screen Time data is through Family Sharing by tapping on the Screen Time button near the bottom of the screen. I appreciate having a second way into Screen Time, but I prefer using the dedicated Screen Time section of Settings from which I can view my own statistics too.
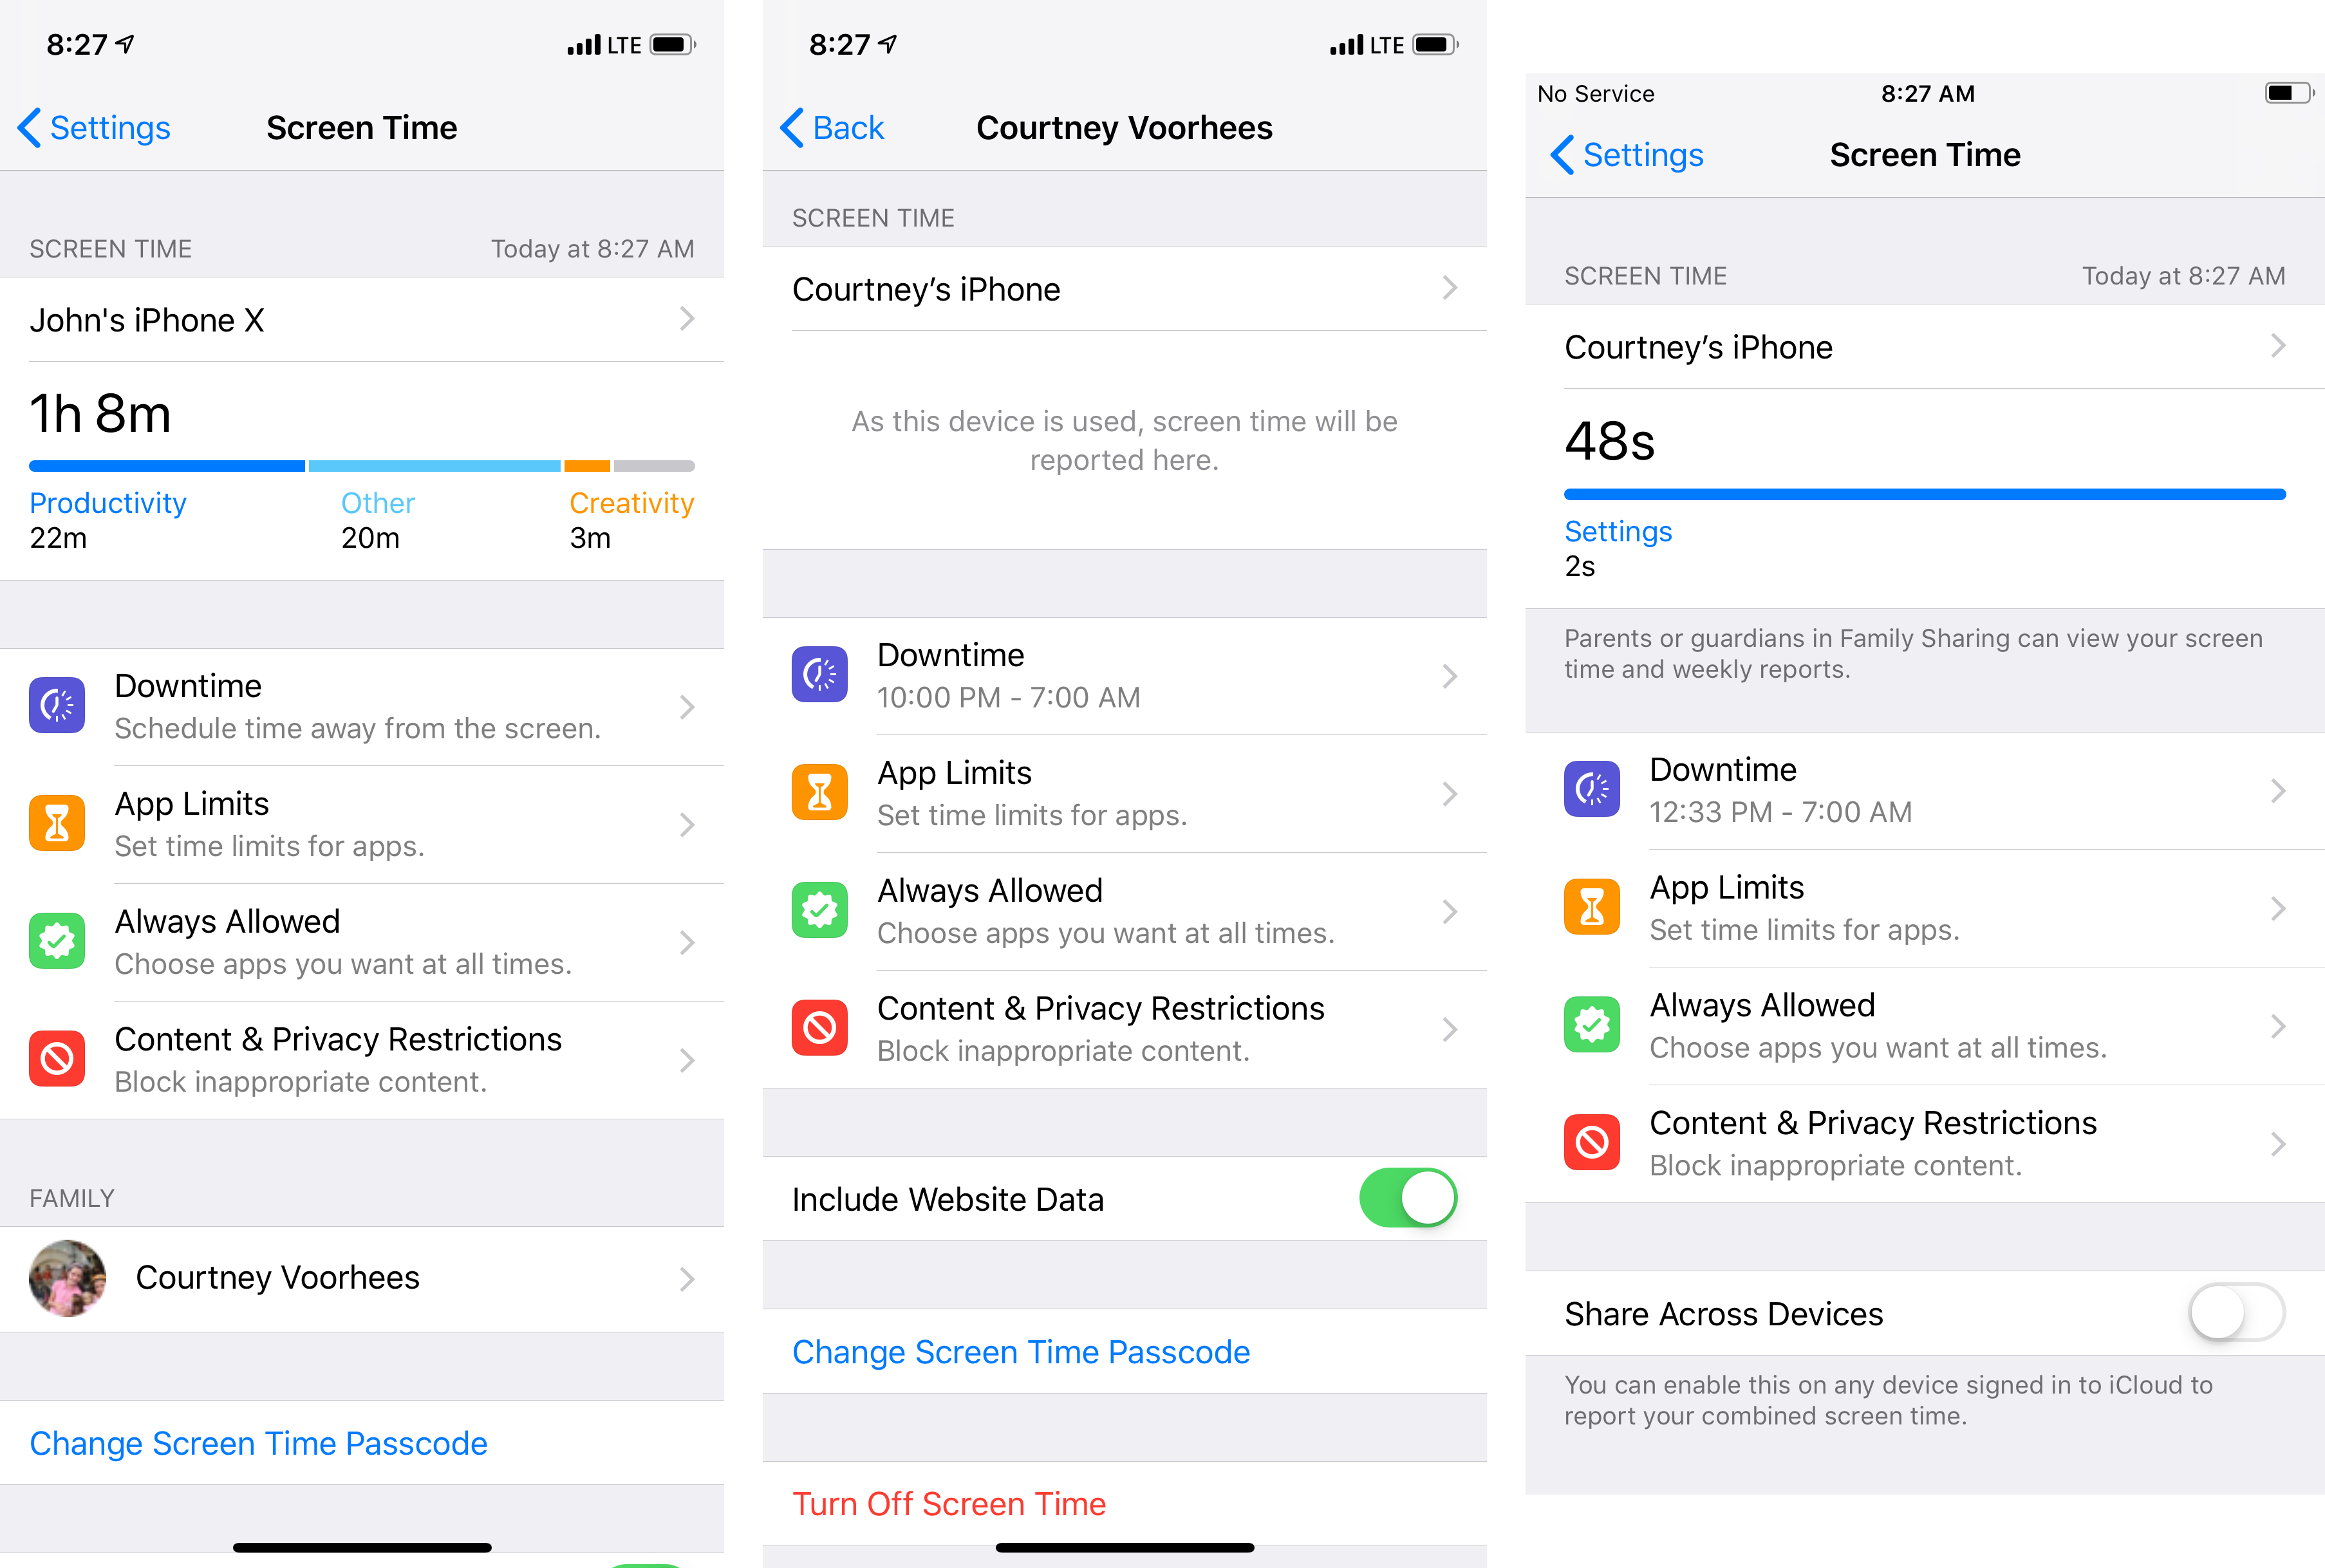
The main Screen Time view (left), a parent’s view of their child’s device use (center), and what your child sees (right).
The main difference between what you’ll see when you view your child’s Screen Time data and what they see is at the bottom of their main Screen Time view. Parents have a button to change their Screen Time passcode and a switch to include website data for their child. The Screen Time passcode is necessary to make changes to any of the Screen Time settings whether you’re using your iOS device or your child’s. Including website data in the Screen Time statistics allows iOS to collect data about services like Twitter, YouTube, and Netflix whether your child uses them from a native iOS app or website. It’s also worth noting that Screen Time alerts kids that their parents and guardians can monitor their iOS use.
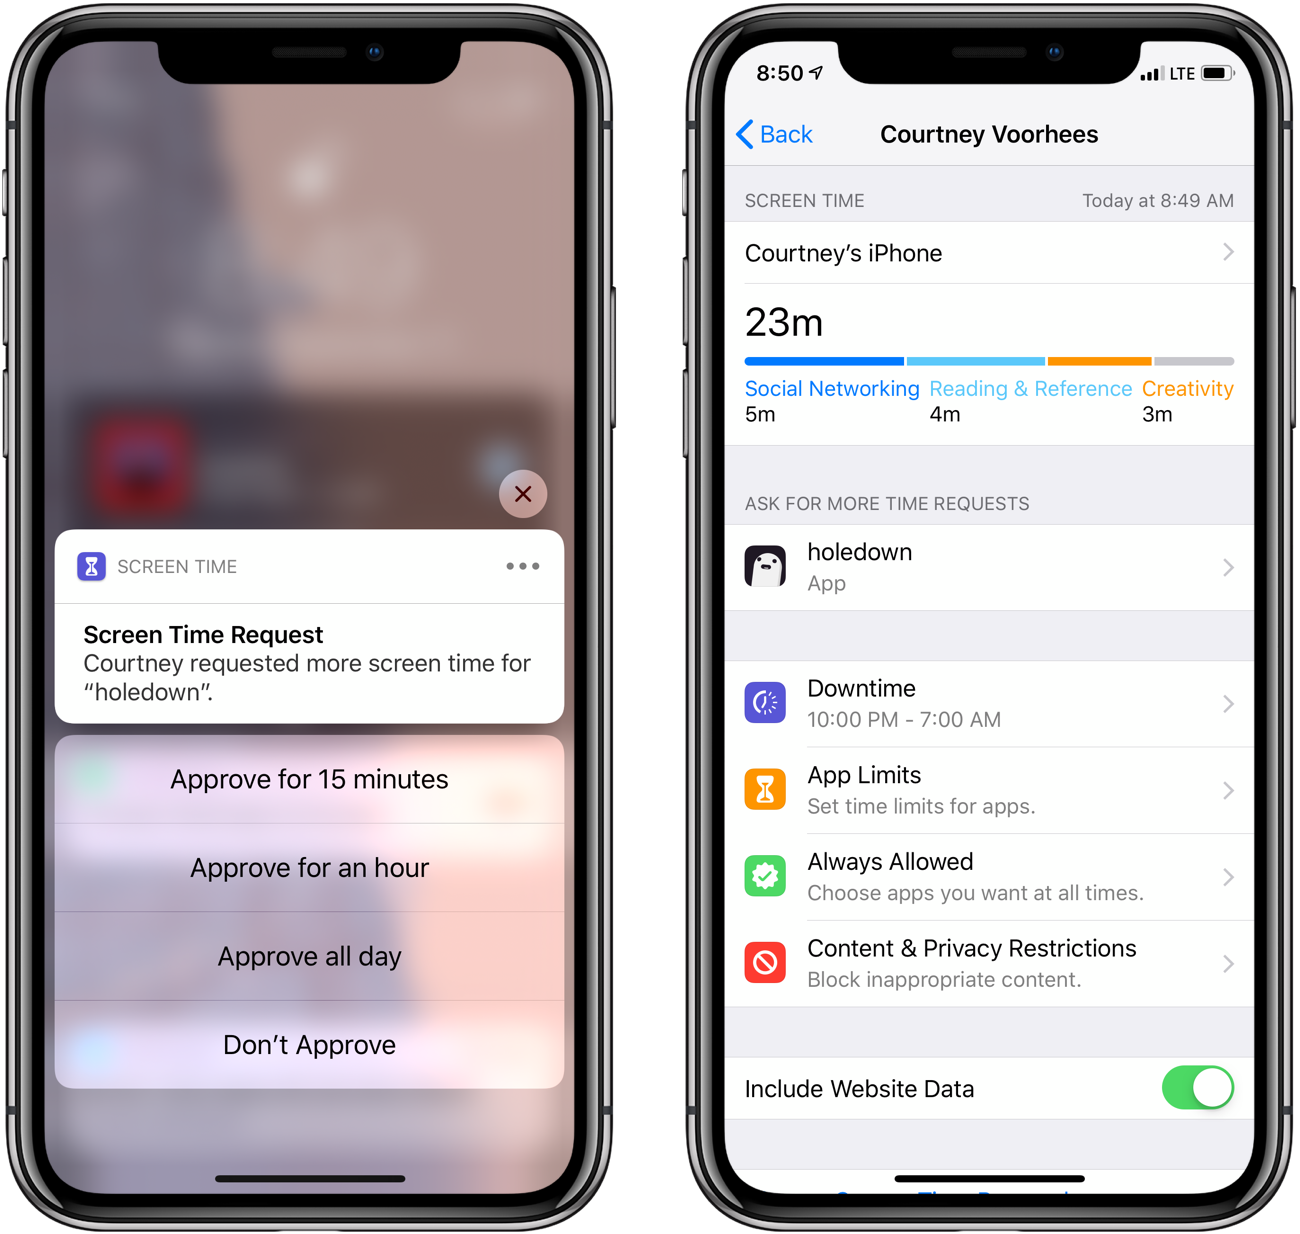
Another difference between a parent’s and child’s Screen Time view is found just below the summary of your child’s Screen Time statistics for the day. There, you’ll see a list of the requests for additional time to use apps that your child has made, but that you haven’t responded to.
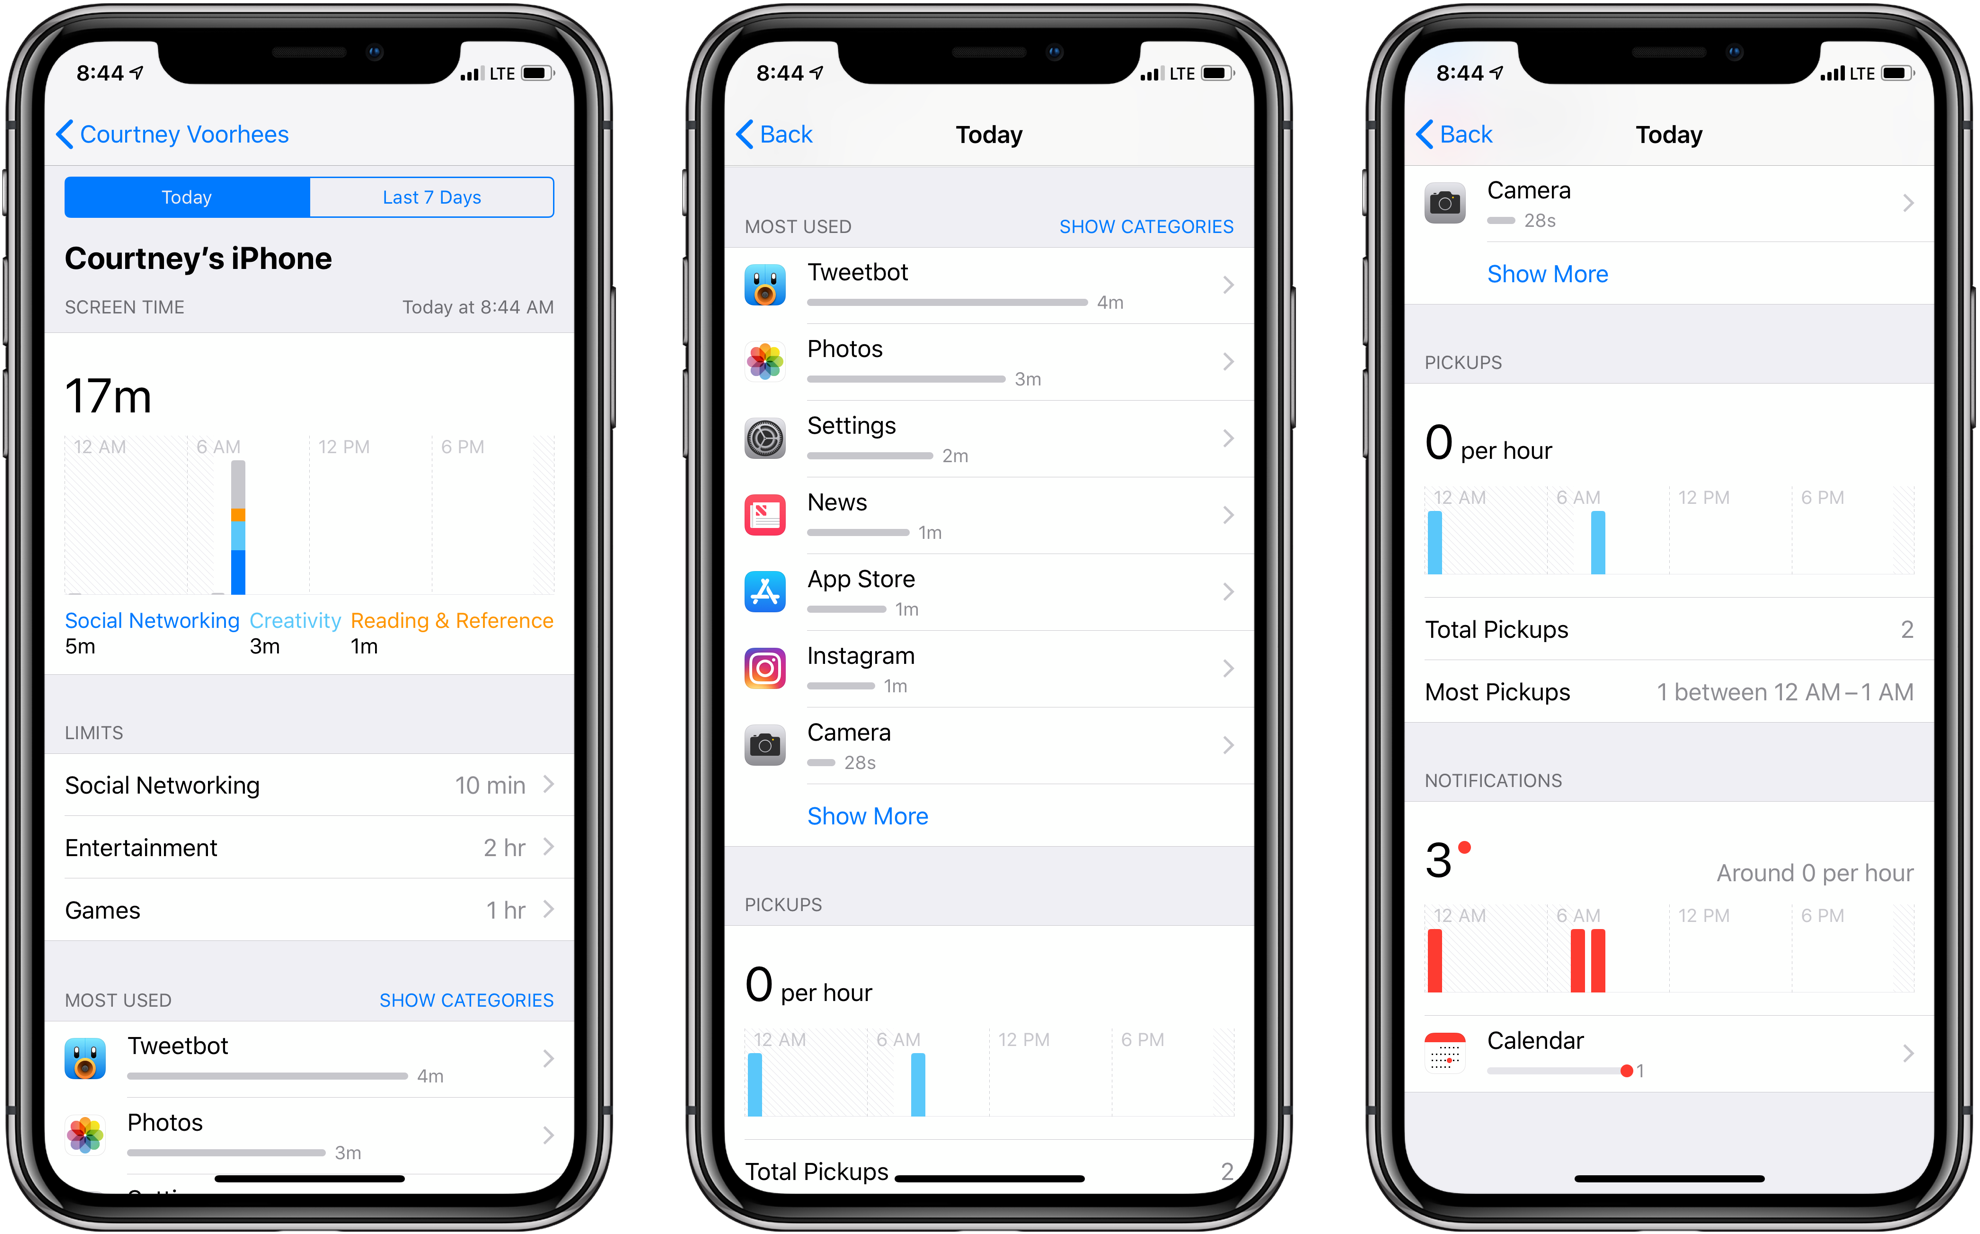
The remainder of the Screen Time report for a child is the same as their parents’. Tapping on the name of their iOS device will take you from the summary of the current day’s usage to a detailed view tallying up screen time, listing the limits that are in place, and showing your child’s most used apps, number of pickups, and notifications. Just as for individuals, Screen Time data for kids is a valuable resource for deciding what limits to impose on a child’s device. You may know right away that you don’t want your child to use their iPhone after 10 PM, but the value of Screen Time’s in-depth reporting is in the ability to use it to create refined limits that fit your goals as a parent.
Downtime and App Limits
Screen Time provides parents with multiple layers of granularity for imposing limits on kids’ iOS device use, from a blanket limit on nearly all apps during Downtime to categories of apps like Social Networking and individual apps. At each level, there’s also an option to block app access once a limit is reached, which gives parents even more options. The multi-layered approach to limits and plethora of options allow parents to tailor Screen Time limits to their individual children, but it can be bewildering at first too.
Downtime
Downtime is perhaps the most straightforward Screen Time limit that can be set, but also the most blunt instrument. Downtime lets you set a period during which your child can’t access most of the apps on their iOS device. A handful of system apps such as Phone, Wallet, Safari, Settings, and Clock all remain available, as do any apps that are whitelisted in the Always Allowed section of Screen Time.
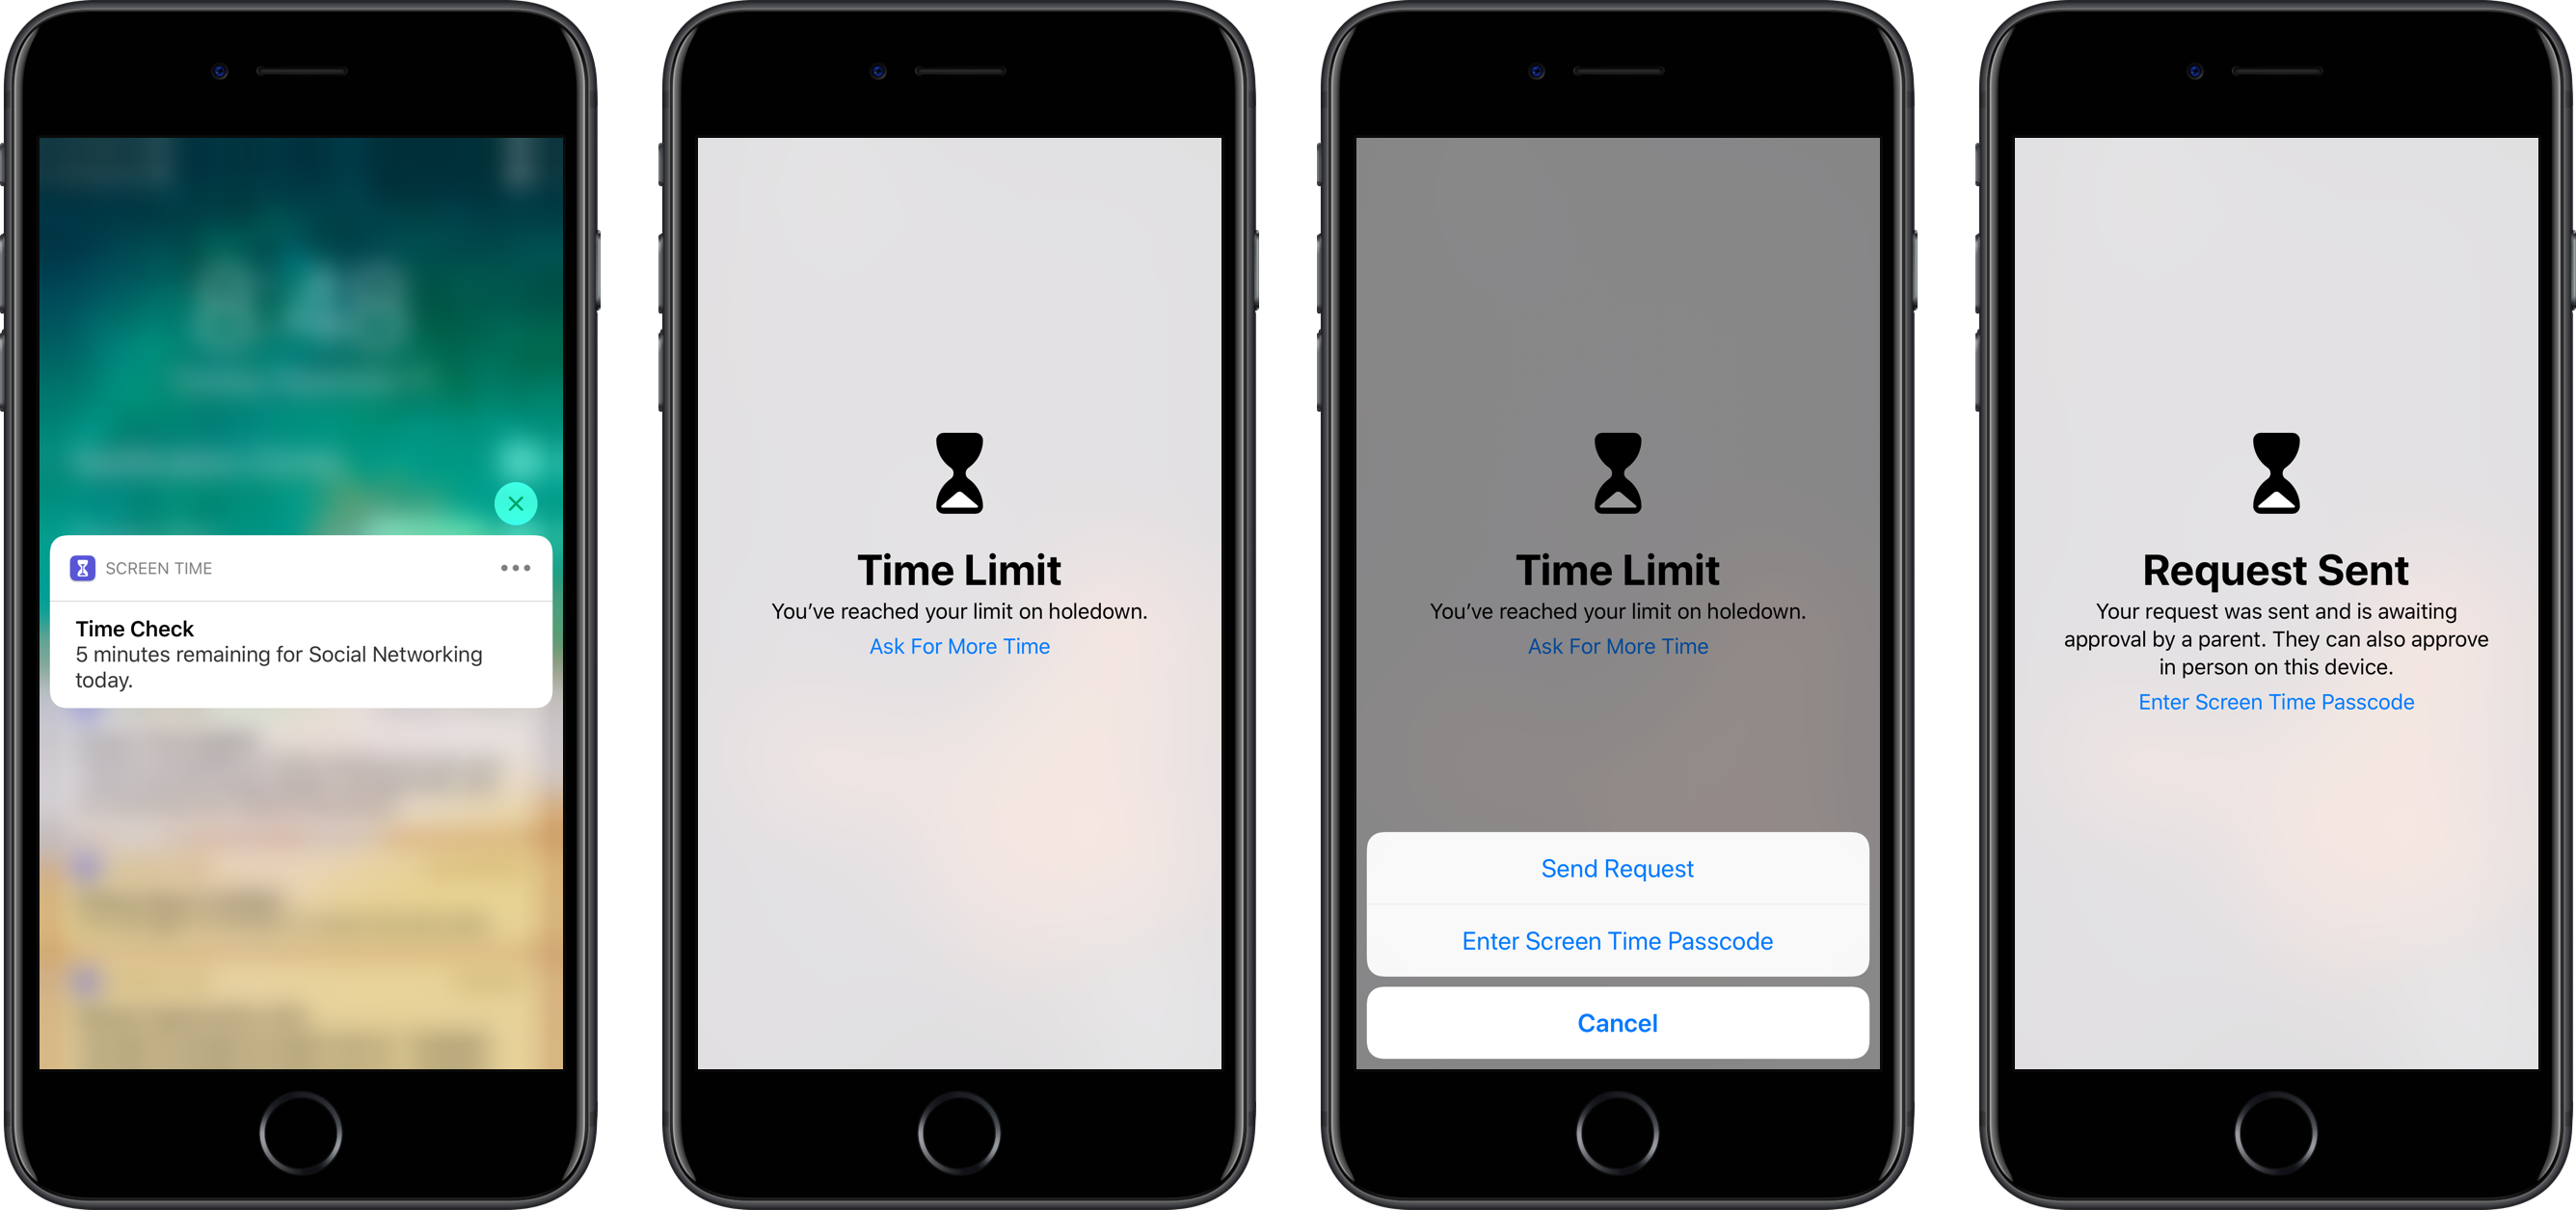
Five minutes before the beginning of a Downtime period, your child will receive a notification that their device use will be limited until the end of the period. Time extension requests are made on a per-app basis, but how a limit is extended depends on how it’s set up in the first place.
At the bottom of the Downtime setup screen is a toggle that says ‘Block at Downtime.’ Turning that toggle on means that when a Downtime limit is reached, your child has to send a request to extend the time allowed. The request sends a notification to you as the parent, and you can grant an extension of 15 minutes, one hour, or all day, or deny the request from the notification by expanding it or going to Screen Time in Settings and entering your Screen Time passcode. Short of turning off Downtime entirely, there is no way to extend the Downtime deadline generally.
Alternatively, the same time extension options can be exercised by entering the Screen Time Passcode directly into the child’s iOS device.1 Of course, parents will probably want to do this themselves and not entrust the passcode with their kids because the whole point of the passcode is to prevent kids from subverting the limits imposed.
If the ‘Block at Downtime’ toggle isn’t enabled, your child can extend the Downtime period by 15 minutes, or they can ‘Ignore Limit for Today,’ neither of which sends a notification to you as the parent or requires the entry of your Screen Time passcode.
I have the same issue with Downtime that I do with Do Not Disturb. It’s a useful feature, but it ignores the fact that kids’ schedules, like adults’, change from day-to-day. I like that I can set Downtime to lock down my son’s phone when he should be asleep, but I’d also like to set a second Downtime period immediately after school on weekdays when he should be doing his homework. Unfortunately, that’s not possible with this first version of Screen Time.
App Limits
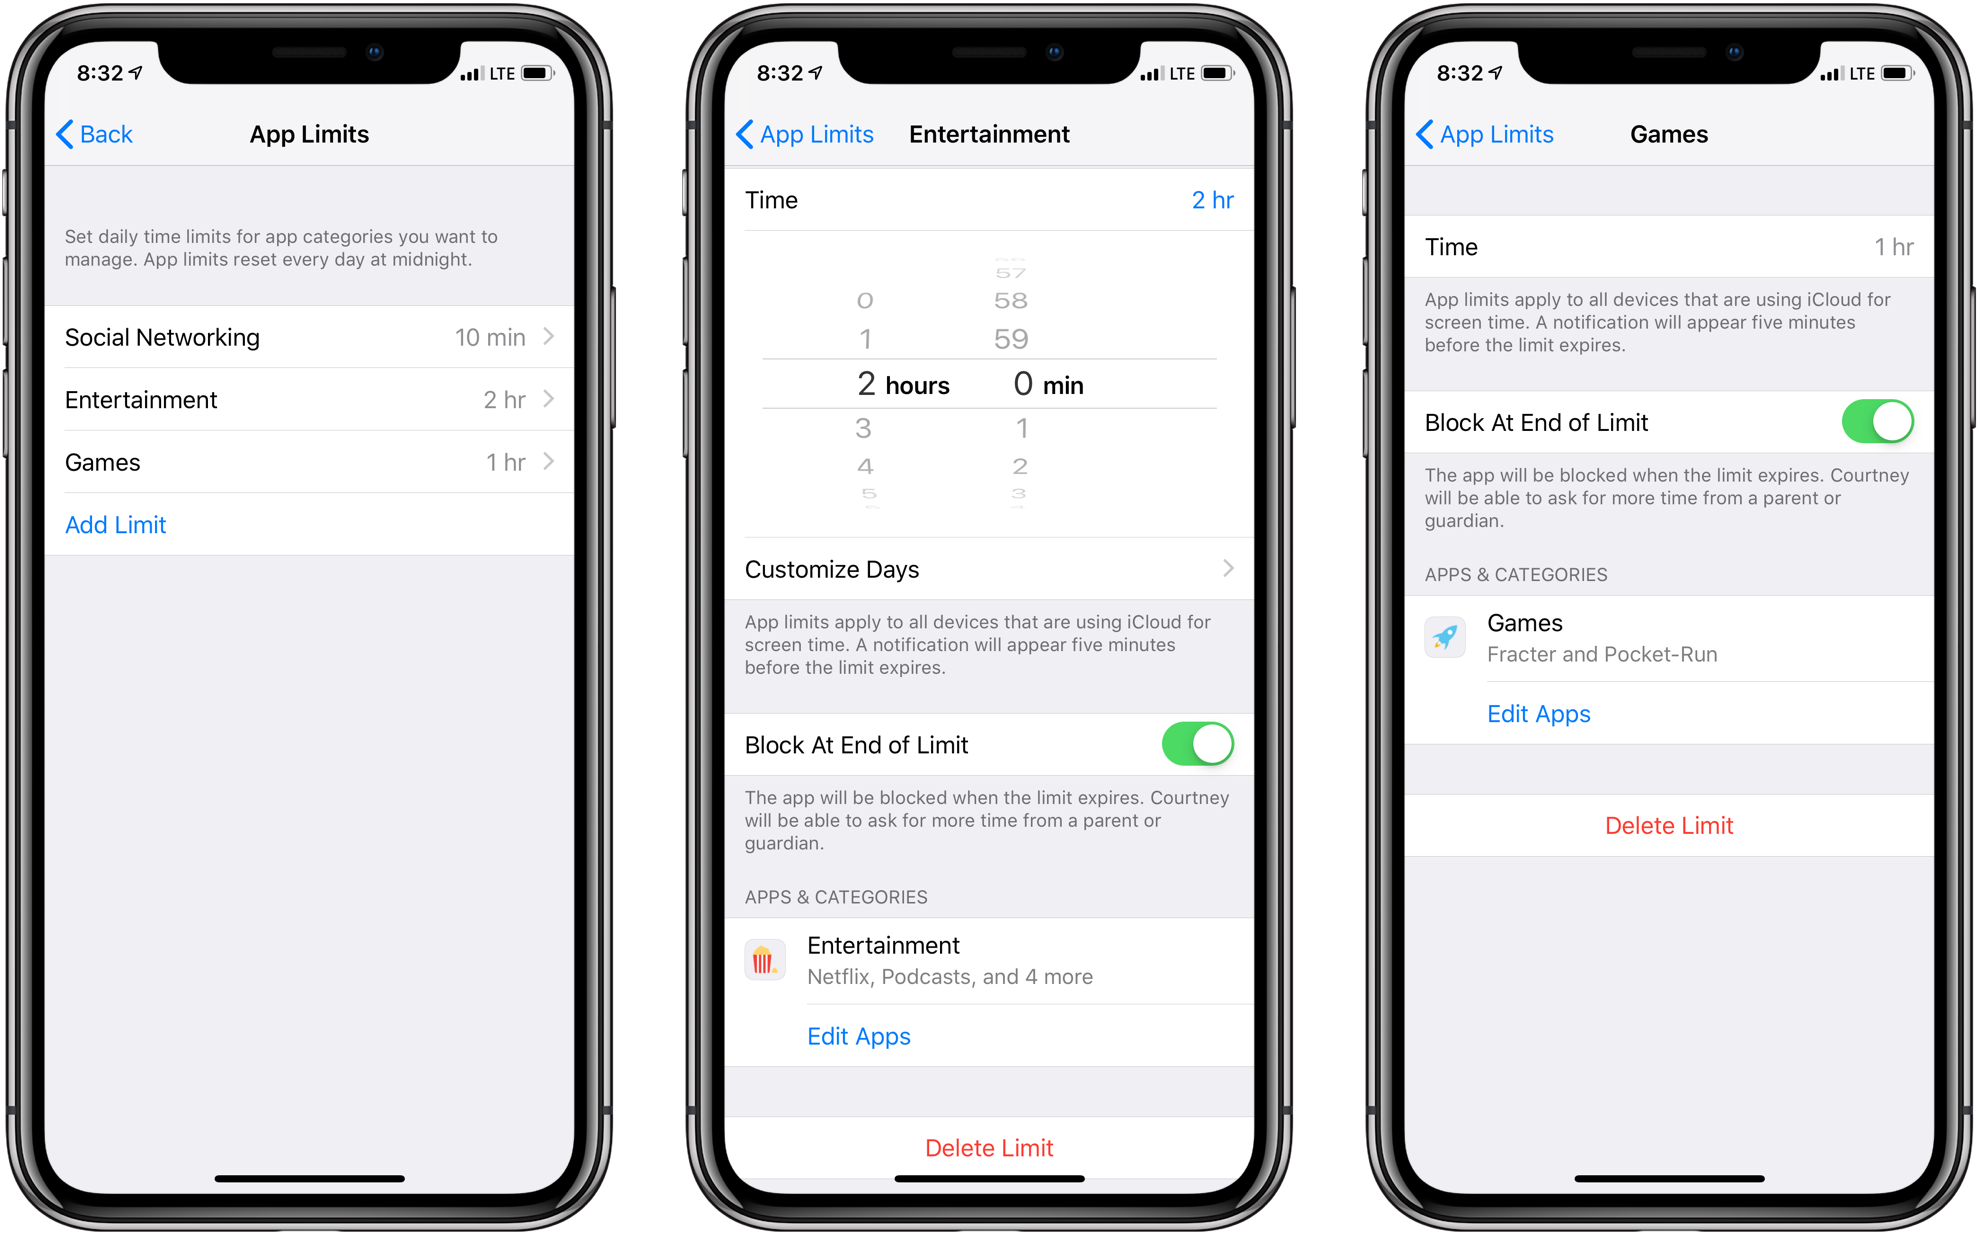
App Limits work the same as if you set them up for yourself, but unfortunately the process isn’t very intuitive. The App Limits section of Screen Time doesn’t actually impose per-app limits. Instead, when you tap the ‘Add Limit’ button, Screen Time offers to create restrictions for all apps and categories of apps or sub-categories of apps. Categories are based on how apps are organized on the App Store.
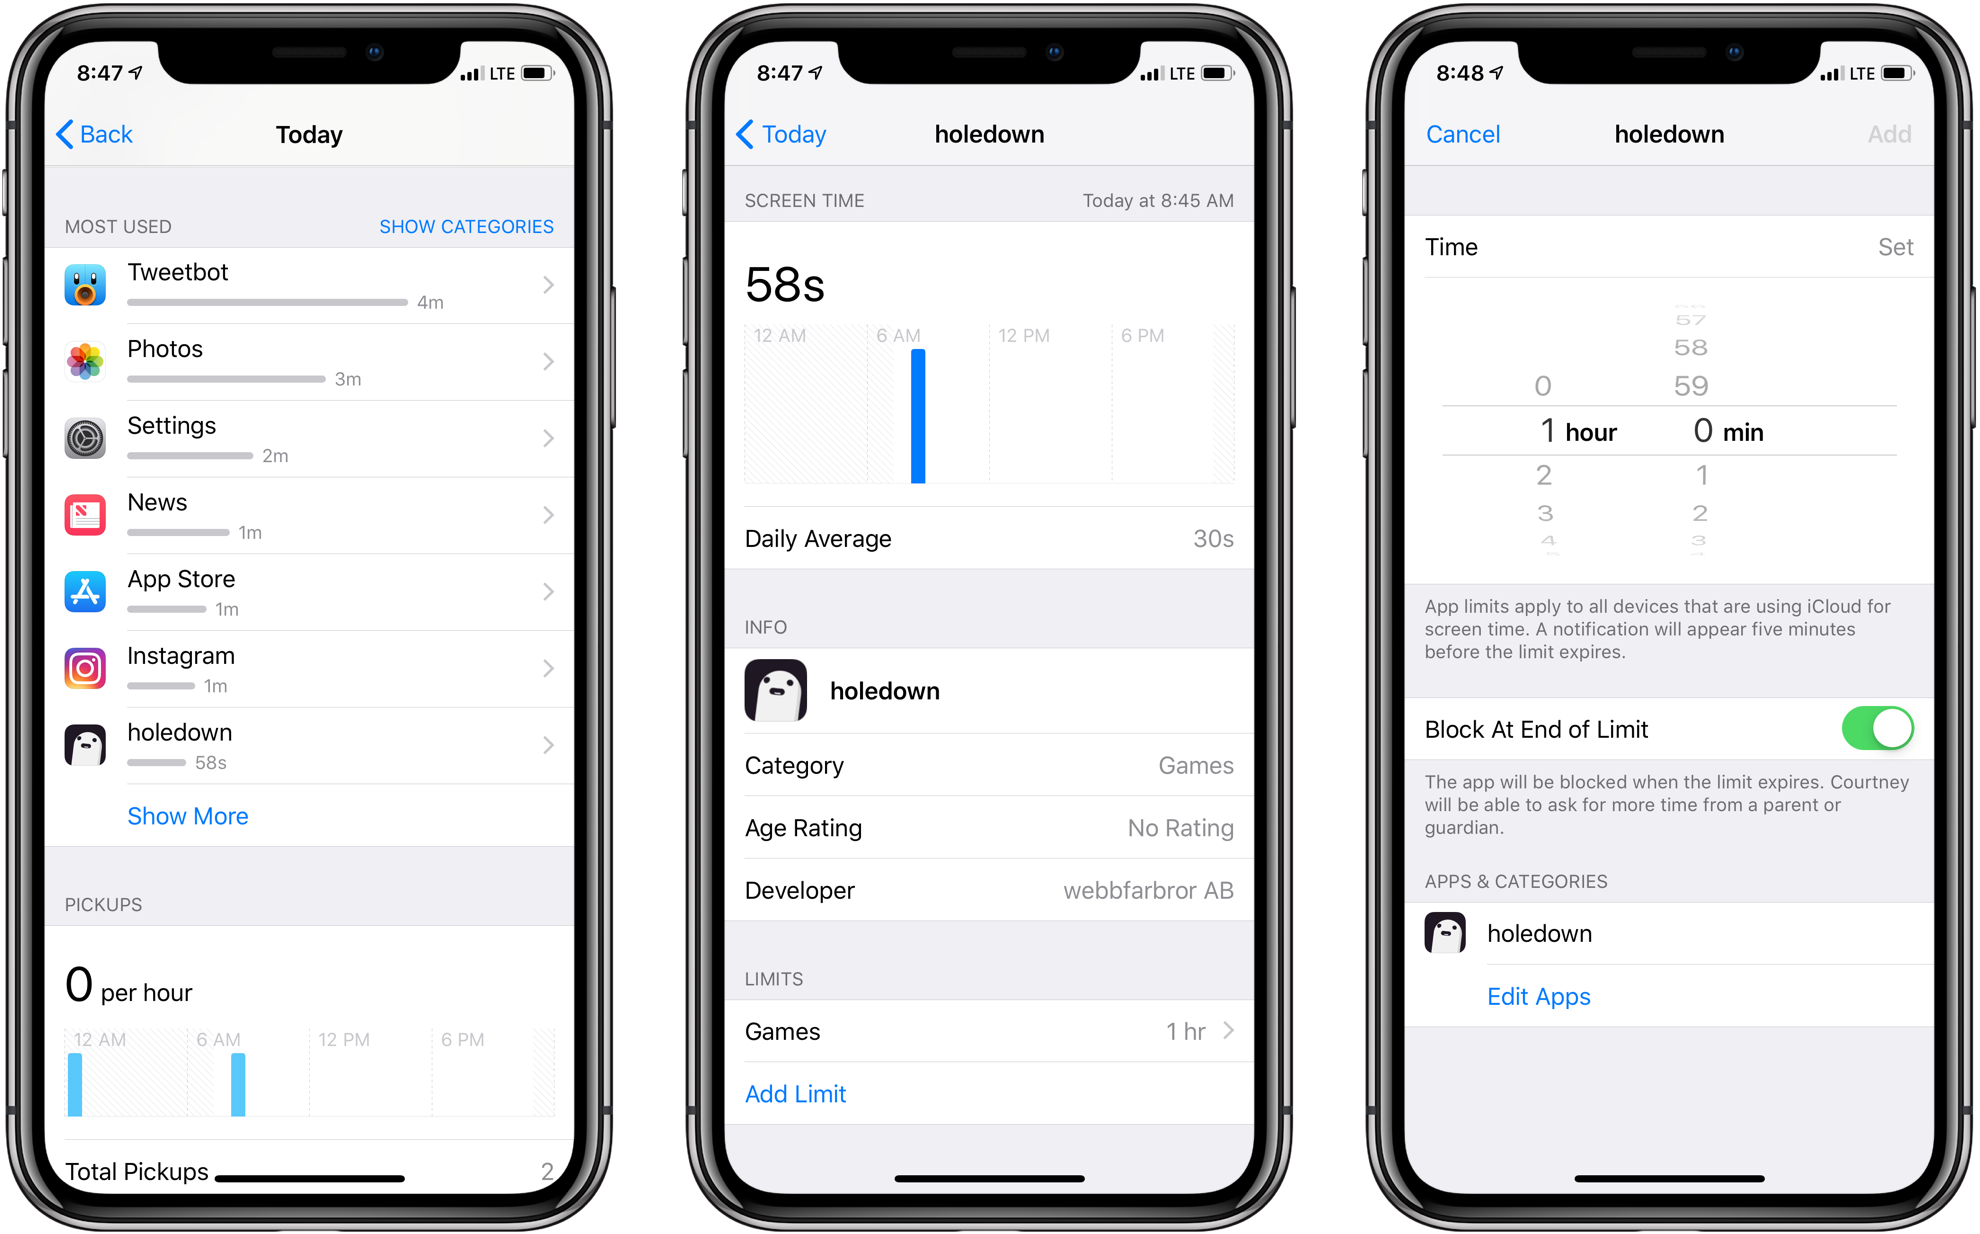
To set up a limit for a particular app, you need to start with Screen Time’s device usage statistics instead. There, you will see a list of your child’s most-used apps. Tapping on an app name provides more information about the app and its use by your child. At the bottom of the detail view is an ‘Add Limit’ button that will allow you to set a limit for that individual app. App limit setup includes a ‘Block at End of Limit’ toggle that works the same as the ‘Block at Downtime’ toggle described above. It’s worth carefully considering whether you turn on the ‘Block at End of Limit’ toggle for every app if you have a lot of individual app limits, because you could be in for a flood of notifications from your child requesting extensions.
Individual app limits are unfortunately somewhat buried. I’d prefer that they too were part of the App Limit section of Screen Time and not hidden inside device usage statistics. That said, armed with information about my kids’ app usage, I expect individual app limits to be valuable for apps that aren’t neatly categorized or for which I have a reason to set a one-off limit.
Always Allowed
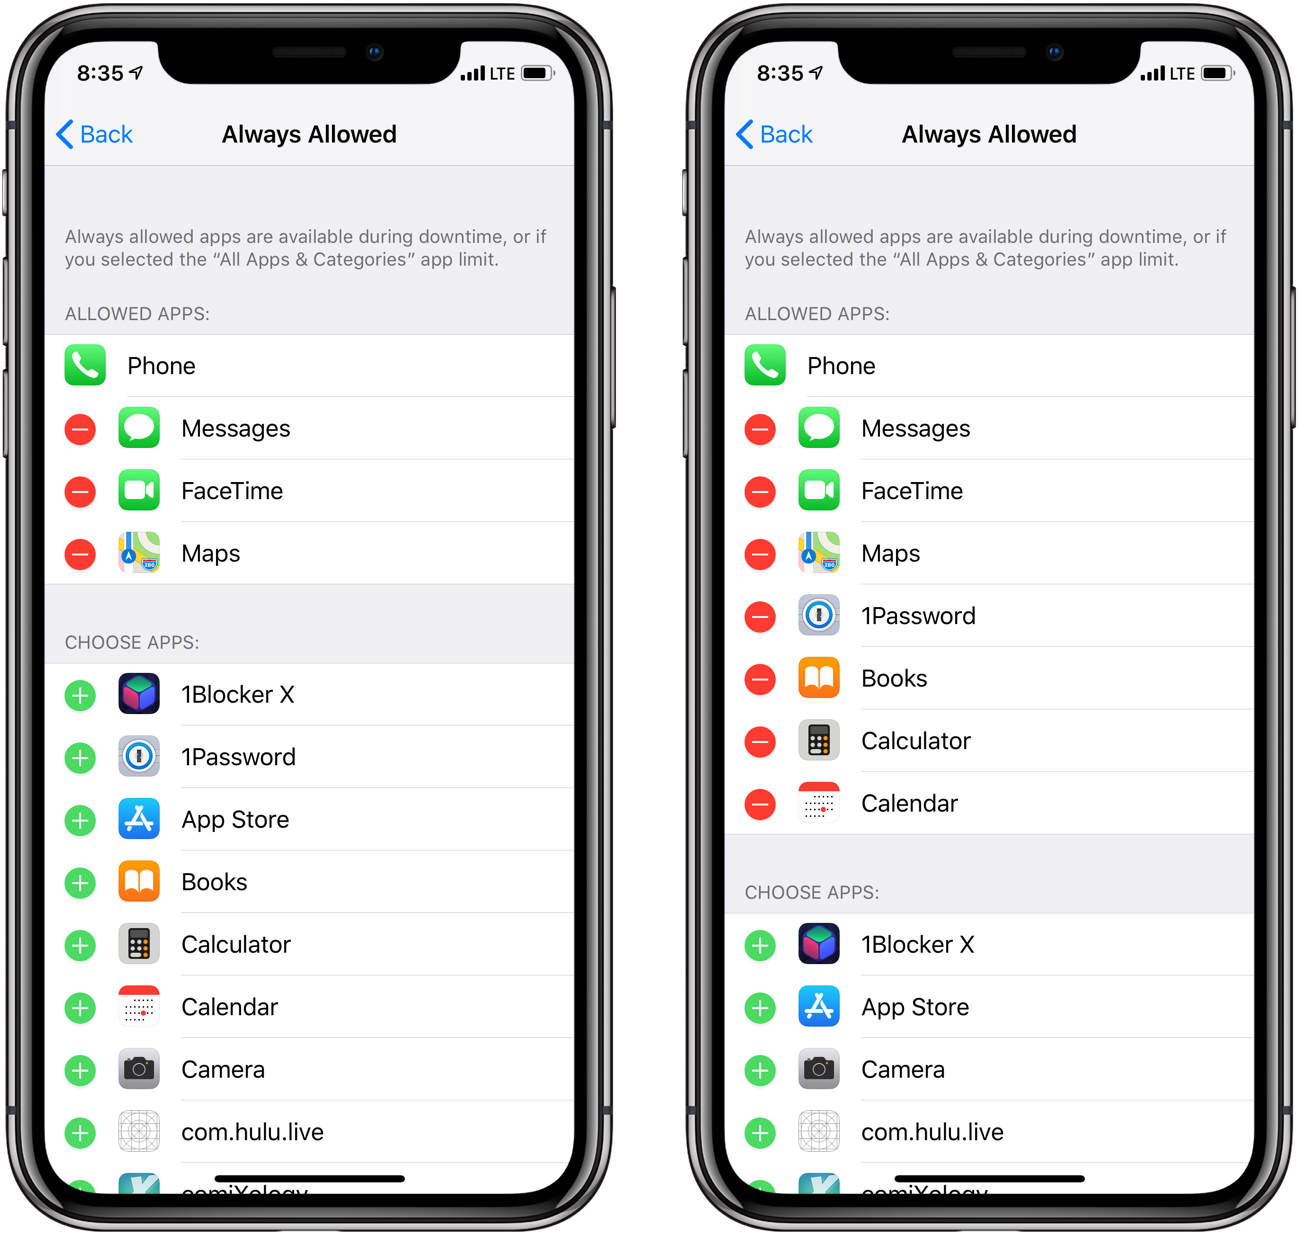
Parents can also designate apps as always available notwithstanding any other restrictions. The Always Allowed section of Screen Time works as you’d expect. The Phone app is always available, and Messages, FaceTime and Maps are whitelisted by default, but beyond that, the list is up to parents. If an app that would otherwise be blocked by Downtime or App Limits is marked as Always Allowed, the app will remain available notwithstanding those limitations.
Content and Privacy Restrictions
Content and Privacy Restrictions are turned off by default. That means that even after you set up Screen Time for your kids, they have unrestricted access to music tagged as explicit, movies rated R and NC-17, TV shows rated TV-MA, and more.
To set up Content and Privacy Restrictions, tap that entry from the main Screen Time view and turn the associated toggle to ‘On.’ As with all Screen Time settings, this can be done on your iOS device or your child’s device.
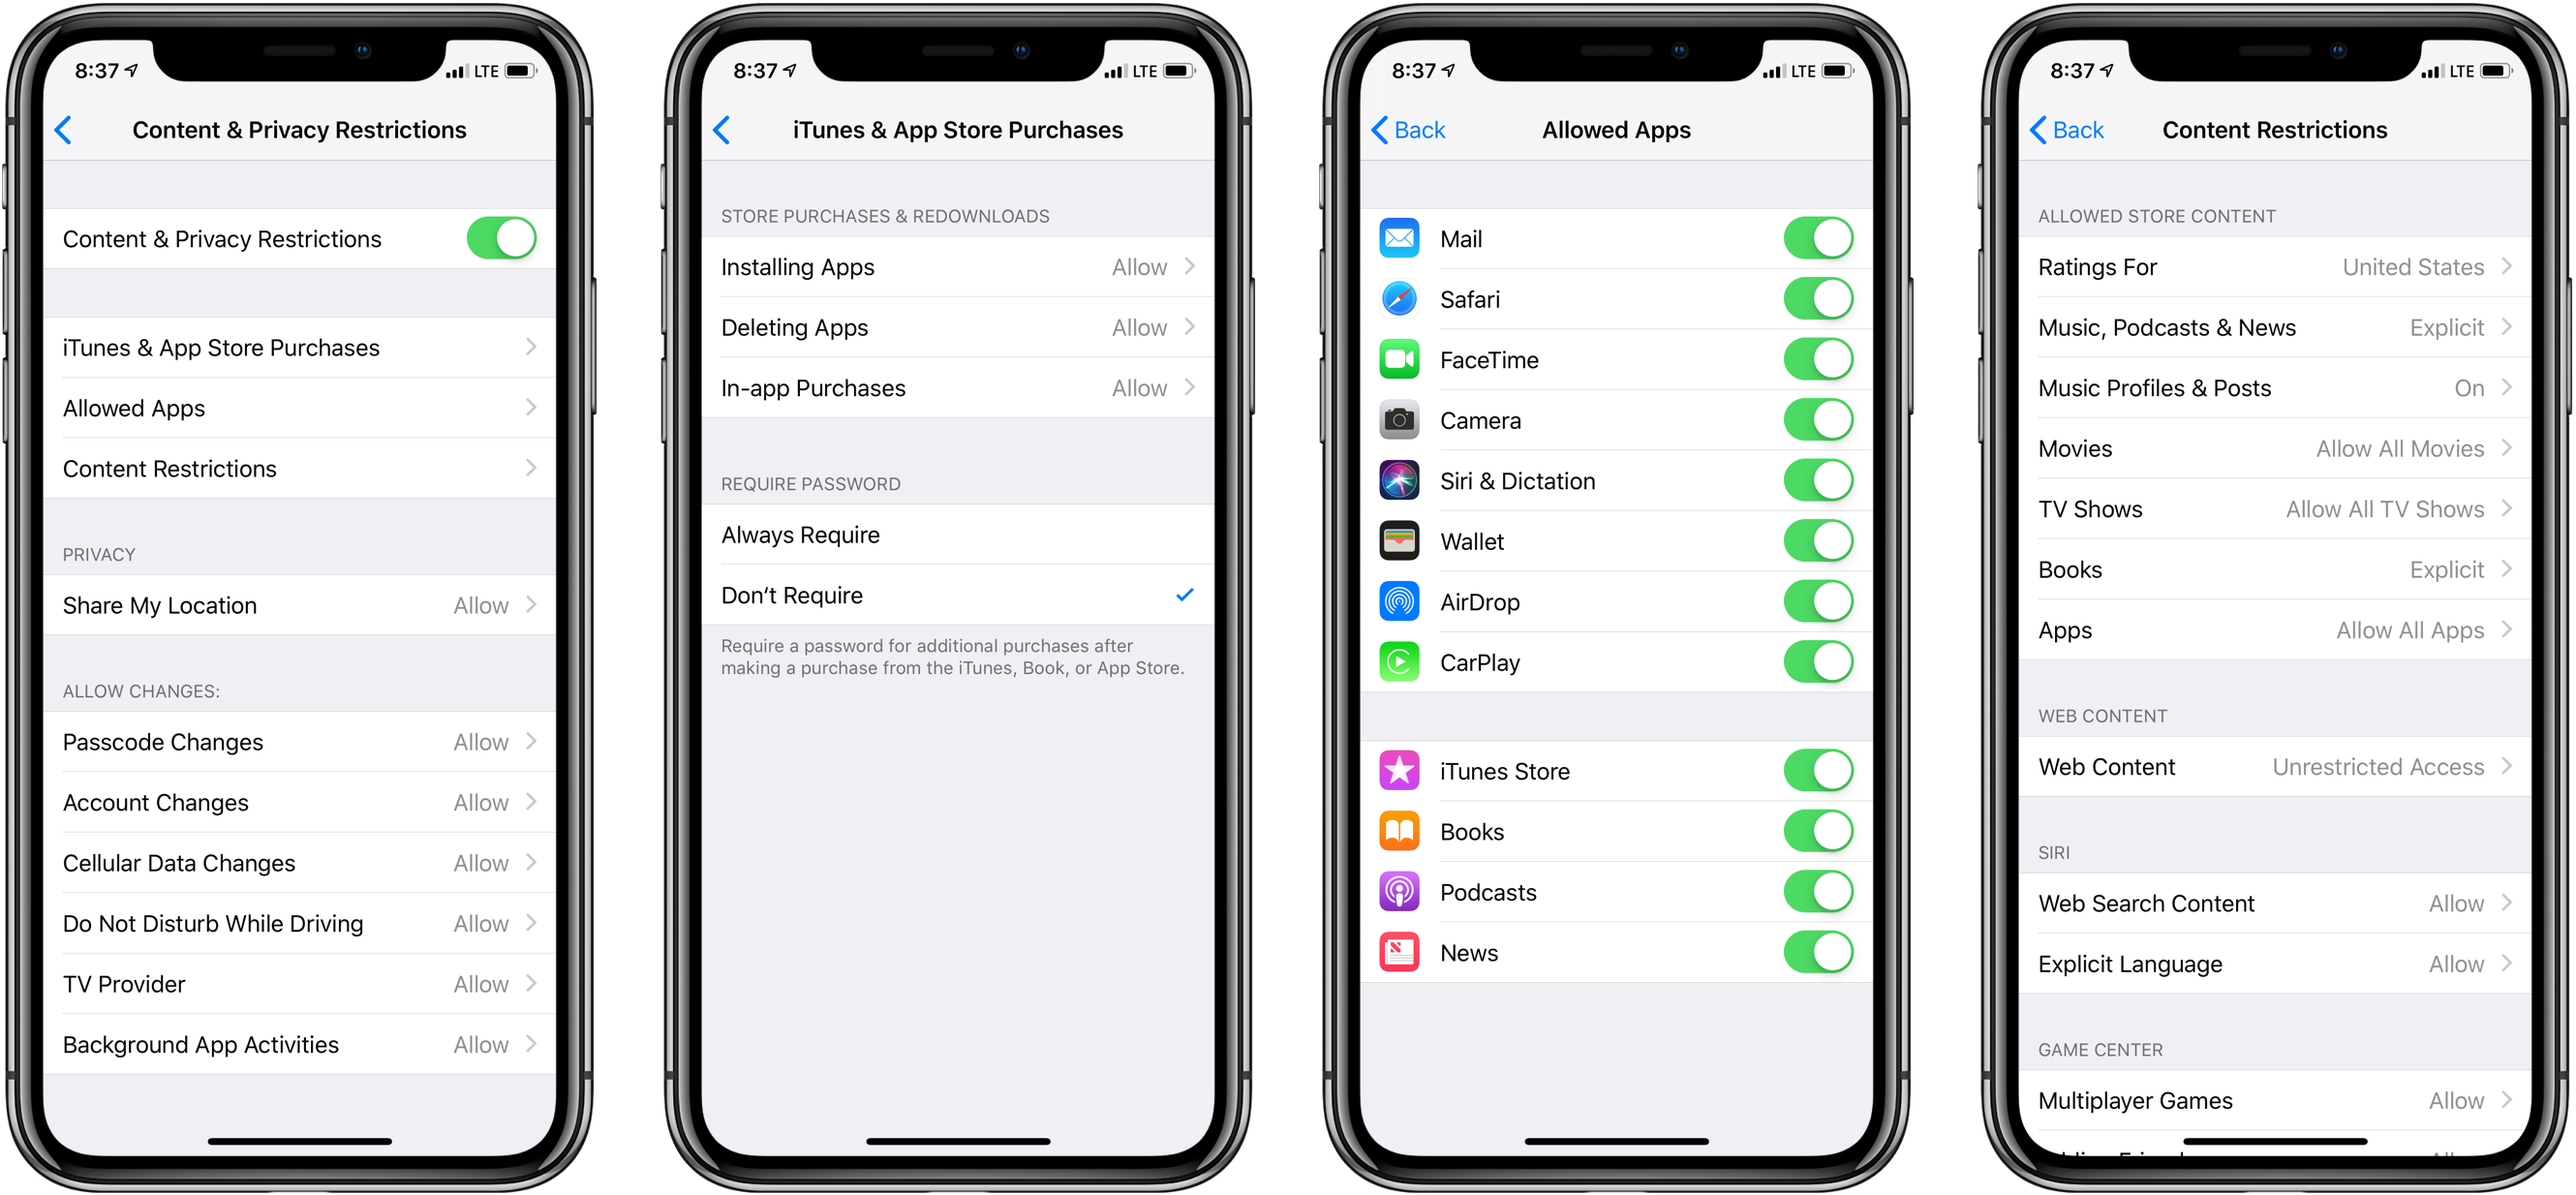
There are a lot of settings to comb through in Content and Privacy Restrictions. You can toggle app installation and deletion and In-app Purchases on or off, plus require a password for every store purchase. A long list of Apple’s pre-installed apps can be turned on or off too.
Content restrictions allow parents to set a maximum rating for each type of media available on an iOS device based on the ratings system available in a parent-specified country. Web browsing can be restricted to limit access to adult content or whitelisted sites only. Siri can also be prevented from returning web search results and from using explicit language.
Apple devotes a separate section to Game Center, where you can prevent kids from using multiplayer games, adding friends to Game Center, and creating screen recordings.
The remainder of the Content and Privacy Restrictions section is devoted to privacy. You can turn off location sharing, remove a child’s ability to modify settings for their device’s passcode, cellular data, Do Not Disturb while driving, TV provider, and background app activity.
There’s a lot to dig into here, much of which was already available under Settings → General → Restrictions. On the one hand, the myriad of settings give parents the tools needed to set up restrictions that are highly personalized to their kids. On the other hand, it’s a shame that Apple doesn’t set some age-appropriate defaults. Family Sharing has the age of each child in a family, which would be a reasonable basis for establishing defaults. The restrictions don’t have to be turned on by default, but once enabled, I’d like to see Apple include age-appropriate settings to give parents a head start.
One major limitation of Screen Time is a big picture limit of iOS 12 itself: the OS has no concept of shared devices. If two kids share an iPad at home, there’s no way for iOS 12 to tell the two apart, which makes setting meaningful limits for each kid impossible. Apple has been criticized for its lack of multi-user login support for iOS devices in the past, and limits on the effectiveness of features like Screen Time only serve to highlight that multi-user support is long overdue on iOS. For the time being, Apple continues to view the iOS device world as one where every user has their own device, which means certain features, like Screen Time, will continue to break down in circumstances where that is not the case. It’s something to keep in mind if your household includes a shared iOS device.
Also, Apple’s layered, multi-option approach to Screen Time limits can lead to confusion if you dig deep into its settings too quickly without first considering the way your child uses their iOS device. This may turn off some users, but I think it will be a long-term benefit for those willing to invest some effort into Screen Time. My suggestion is that parents set some top-level limits like Downtime periods and time limits on app categories first. Then watch your child’s Screen Time statistics. If there are areas that seem to be an issue, set limits, but also consider which apps are needed for things like schoolwork. It’s only through studying usage patterns that you can meaningfully drill down into the detail of each app and set limits that make sense.
I’m glad that Apple has chosen to add the level of Screen Time customization for kids that it has with iOS 12. I am concerned, however, that there’s so much here that it will be overwhelming to some people, and they will throw up their hands and give up. Screen Time is an area that could stand to be better designed with progressive disclosure in mind. Start parents out with broad tools and let them get into the detail as they feel it’s necessary. Smart defaults or collections of settings based on easy-to-understand, age-based criteria that can turn on several settings with the flick of a single switch would be a welcome addition too.
Nonetheless, Screen Time is a significant step in the right direction – it attacks the issue of excessive mobile device use on multiple fronts and puts powerful tools in the hands of parents. Screen Time helps parents learn about how their kids use devices and enables them to restrict excessive use. There’s a certain irony to the fact that it took adults recognizing their own screen time problems before these kinds of tools were put in place to help children too, but regardless of how we got here, I’m glad to see Apple empowering parents to set healthy limits and look forward to seeing the company refine the tools in the future.
- If changing a setting on one iOS device side by side with the other, it’s remarkable how fast the corresponding setting changes on the other phone. In my tests, the changes were reflected in roughly one second. ↩︎


