Editor’s Note
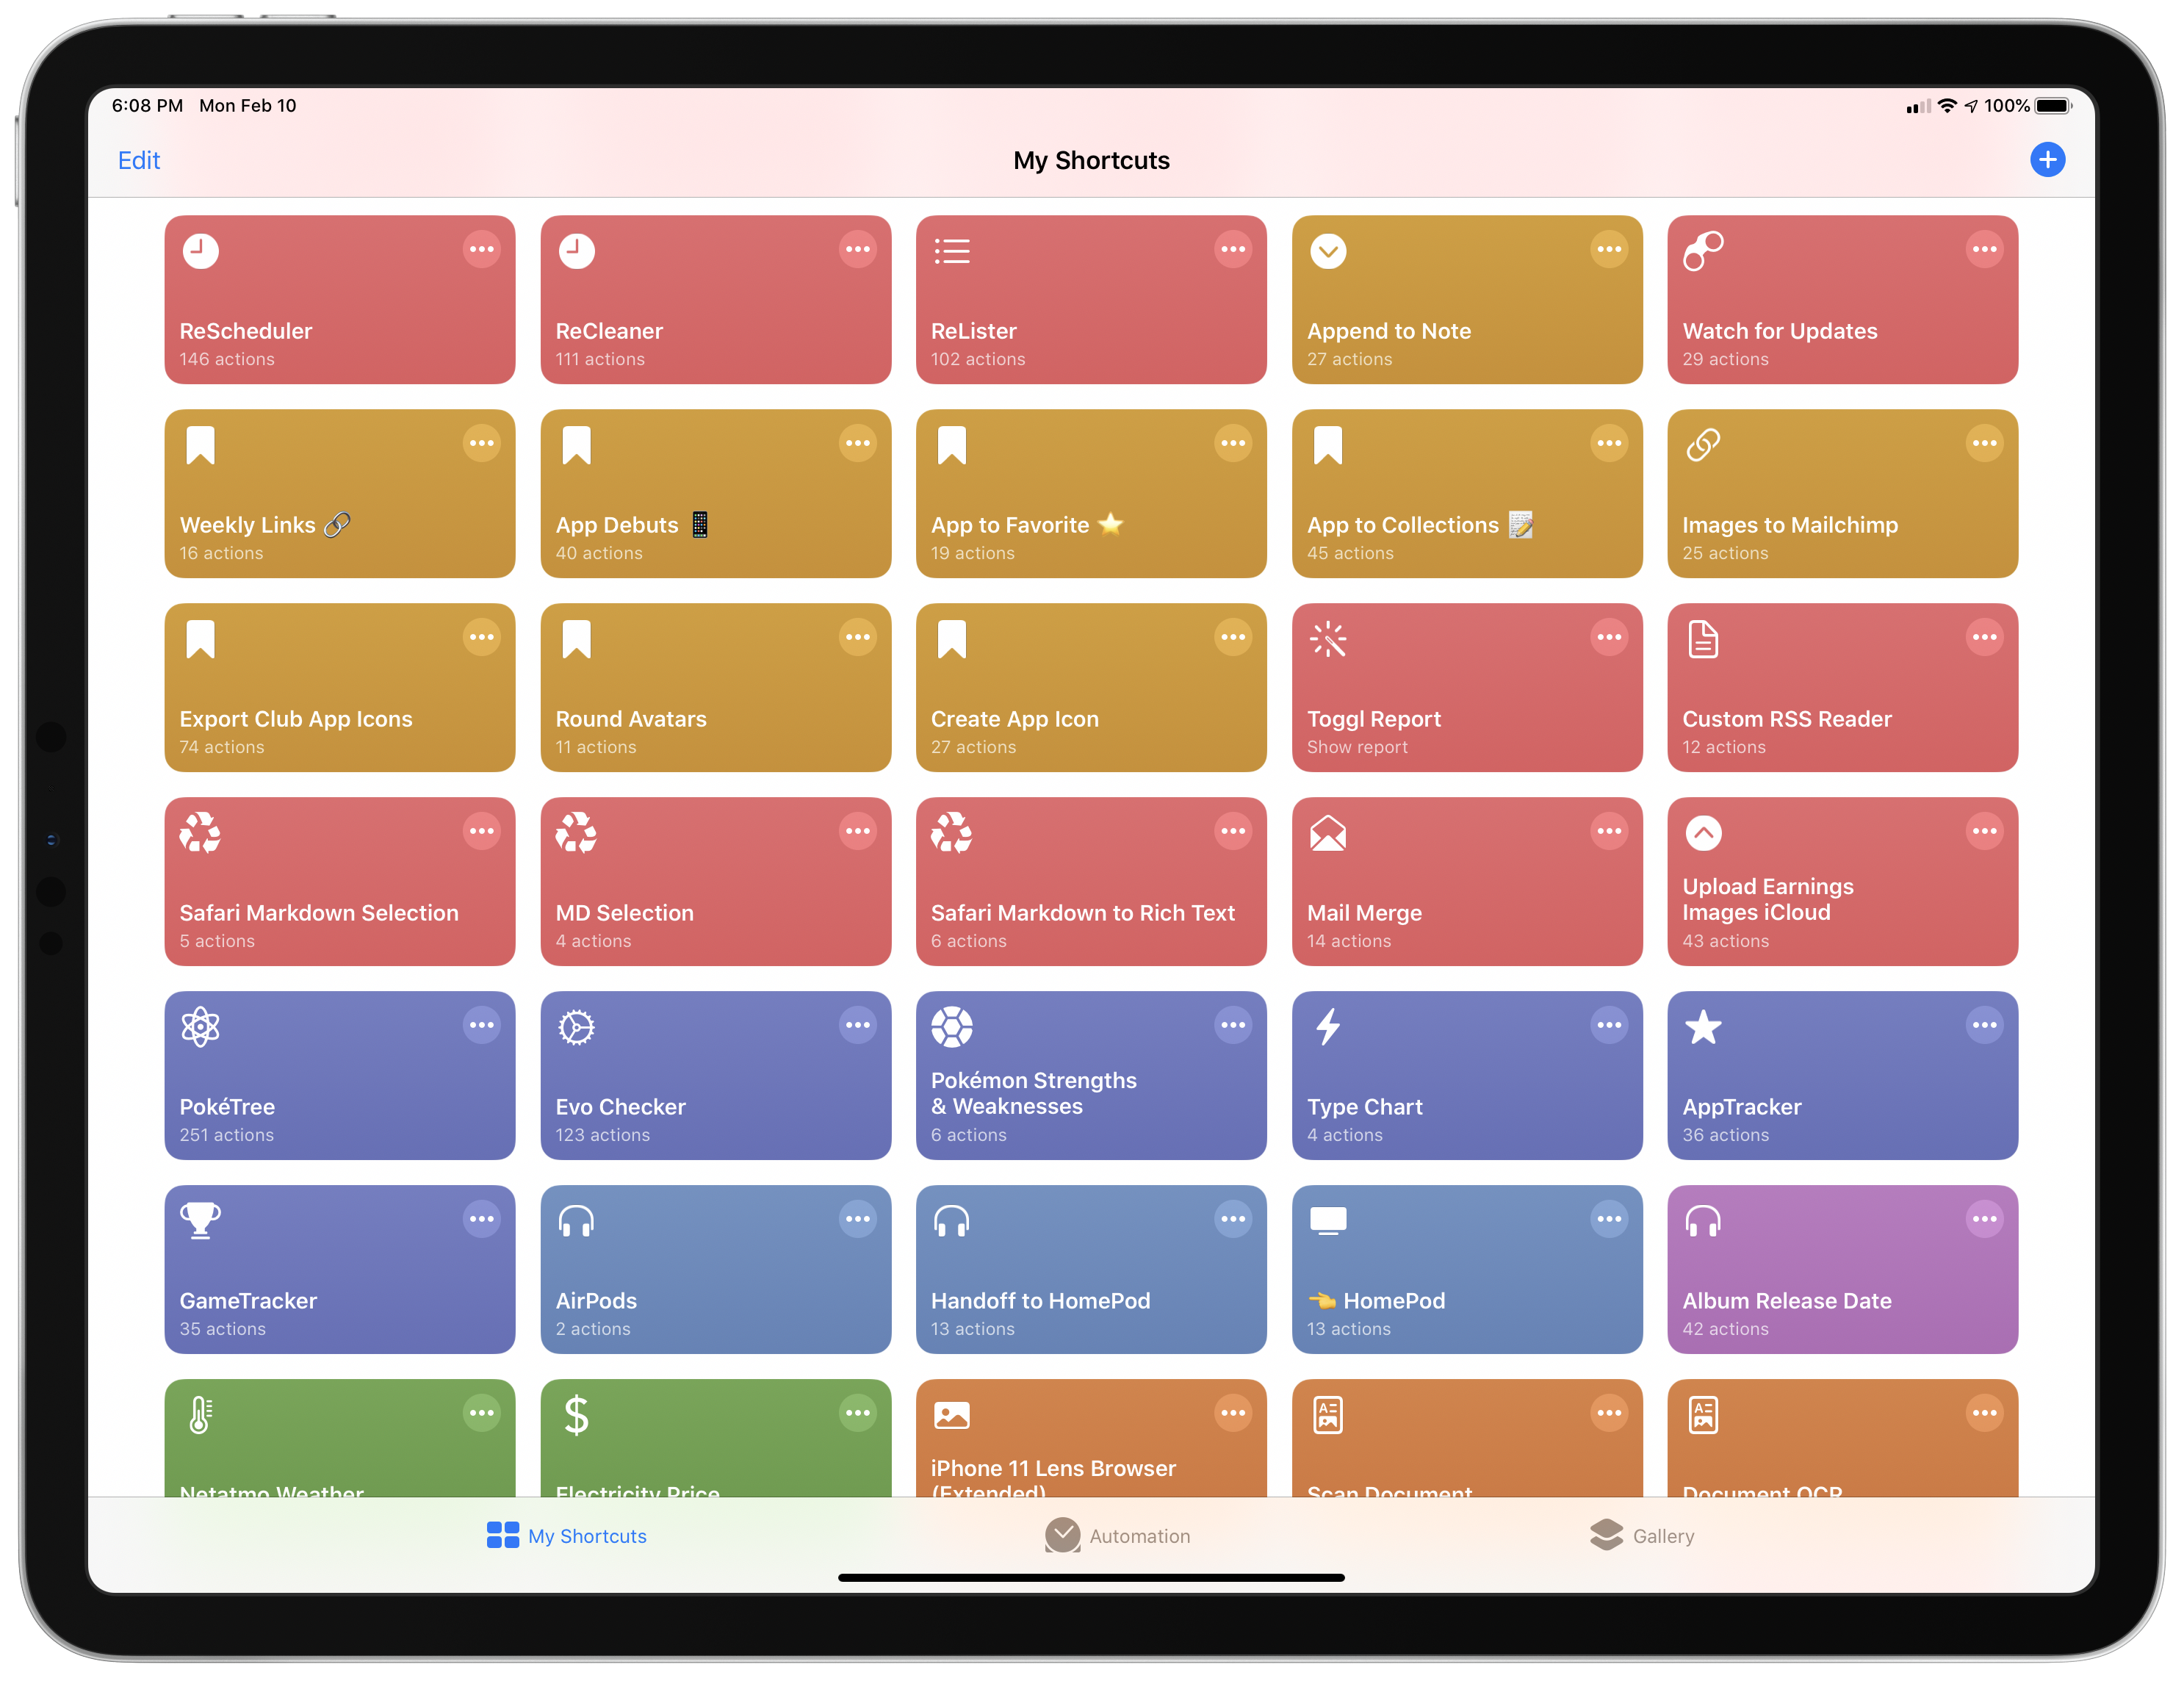
Over the past several years, Federico has built hundreds of shortcuts that are sprinkled throughout the stories he’s written. Last spring we debuted the MacStories Shortcuts Archive, a one-stop destination that collects all of those shortcuts organized by topic, so readers can find them easily.
There’s no better way to learn how to build your own shortcuts than by downloading someone else’s, which is what makes the Archive such a valuable resource to readers and one of MacStories’ most popular features. Still, it can be hard to pick up best practices and patterns or other tips and tricks from experimentation and tinkering.
That’s why today we are introducing a new series on MacStories called Shortcuts Rewind to add context to the shortcuts in the Archive. Periodically throughout the year, we will pick a few shortcuts from the Archive that we think would benefit from a further explanation, whether that’s to help new Shortcuts users learn the basics, to illustrate a particular technique that can be used across multiple shortcuts, or to automate a task that you might not have thought was possible.
Tying Shortcuts Rewind together is a new graphical approach to explaining shortcuts. As you’ll see, we’ve created a system that dispenses with distracting UI elements and breaks shortcuts into logical sets of actions. The approach allows us to simultaneously provide step-by-step instructions alongside commentary that we hope will help readers achieve a deeper understanding of Shortcuts and assist them in building their own automations.
Let’s get started.
For this first installment of Rewind, I wanted to start with a trio of relatively simple shortcuts that illustrate the power of Shortcuts’ ability to streamline the transformation of one type of content into another. All three shortcuts can be found in the Text section of the Shortcuts Archive, but there are also links to them below. The foundation of this process is the Content Graph, a core part of Shortcuts dating back to its origins as Workflow. The idea is a simple but powerful one that eliminates complexity for the user, handling much of the data compatibility and conversion chores behind the scenes with little or no effort on the part of the user.
At the heart of the three shortcuts discussed below are transformations between plain text, rich text, and URLs. Thanks to the Content Graph, Shortcuts has the flexibility to create powerful text and link handling functionality.
Clean Up Rich Text
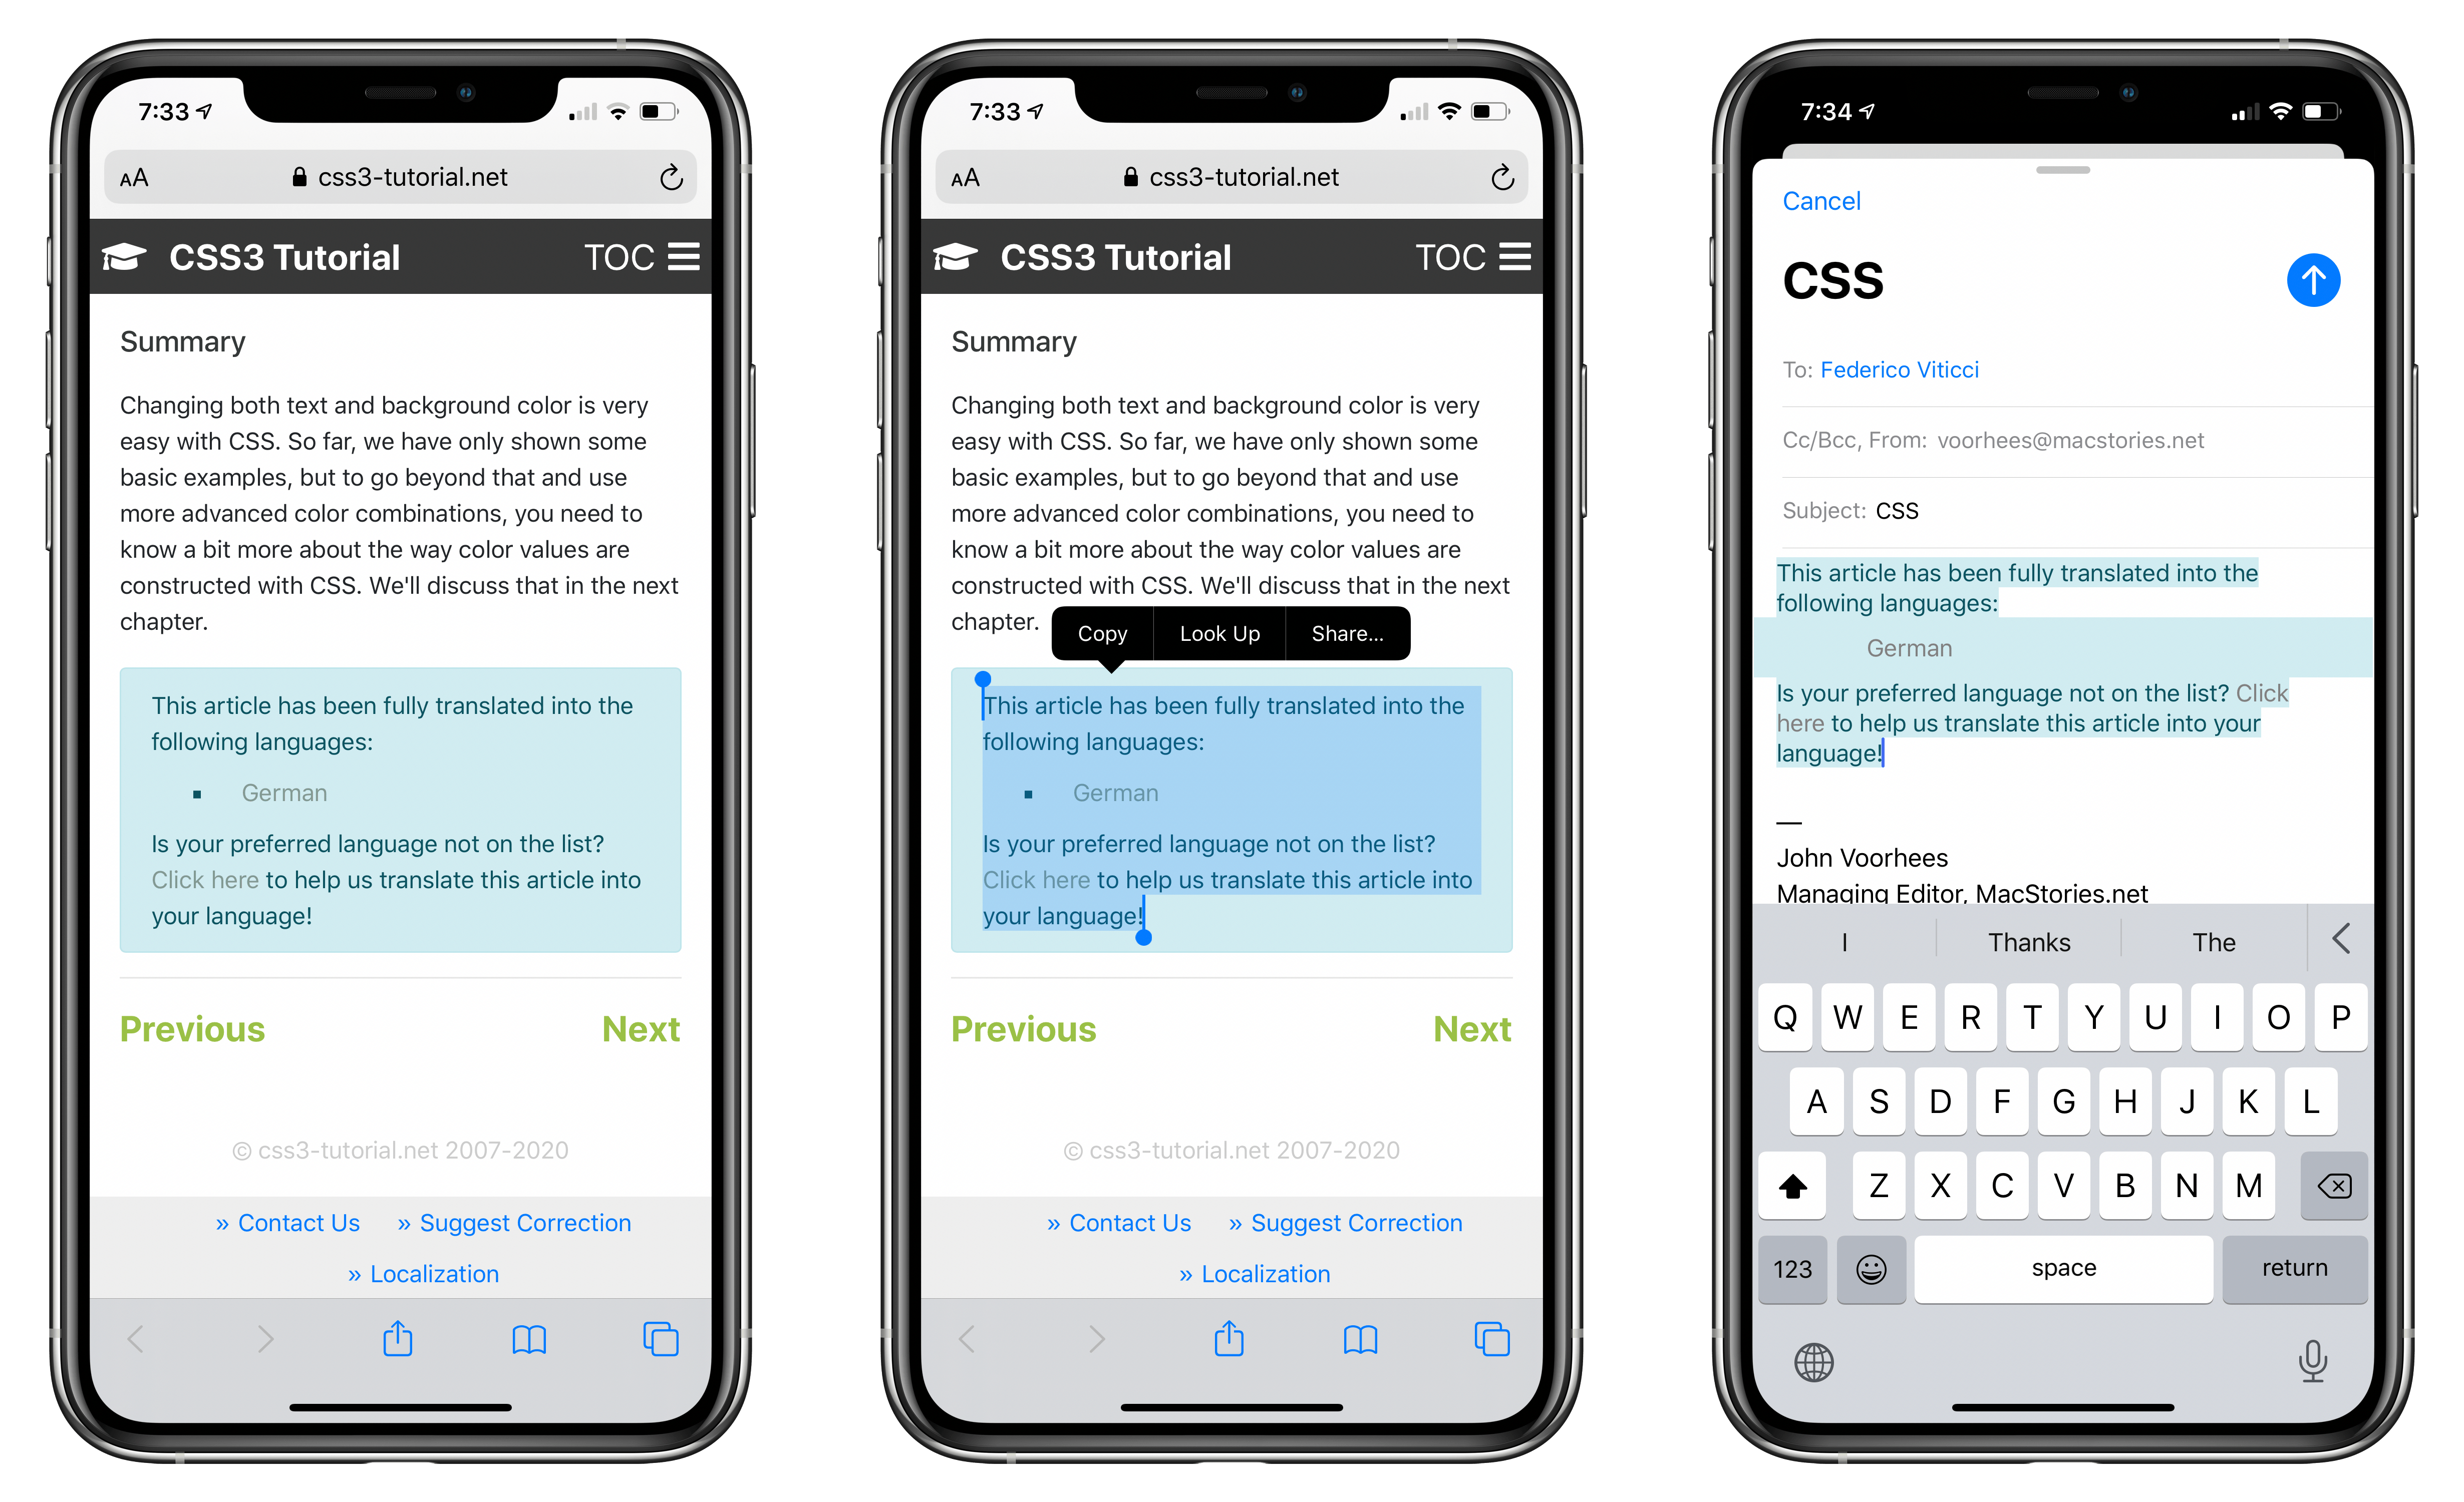
Clean Up Rich Text will strip out unwanted formatting, like the blue background of this text, but preserves links and other basic formatting.
You’ve probably been there. You copy text from a webpage and paste it into an email message, and the rich text copied includes lots of unwanted baggage like the source’s font, text color, and background color. That makes the pasted text look out of place at best, and often unreadable.
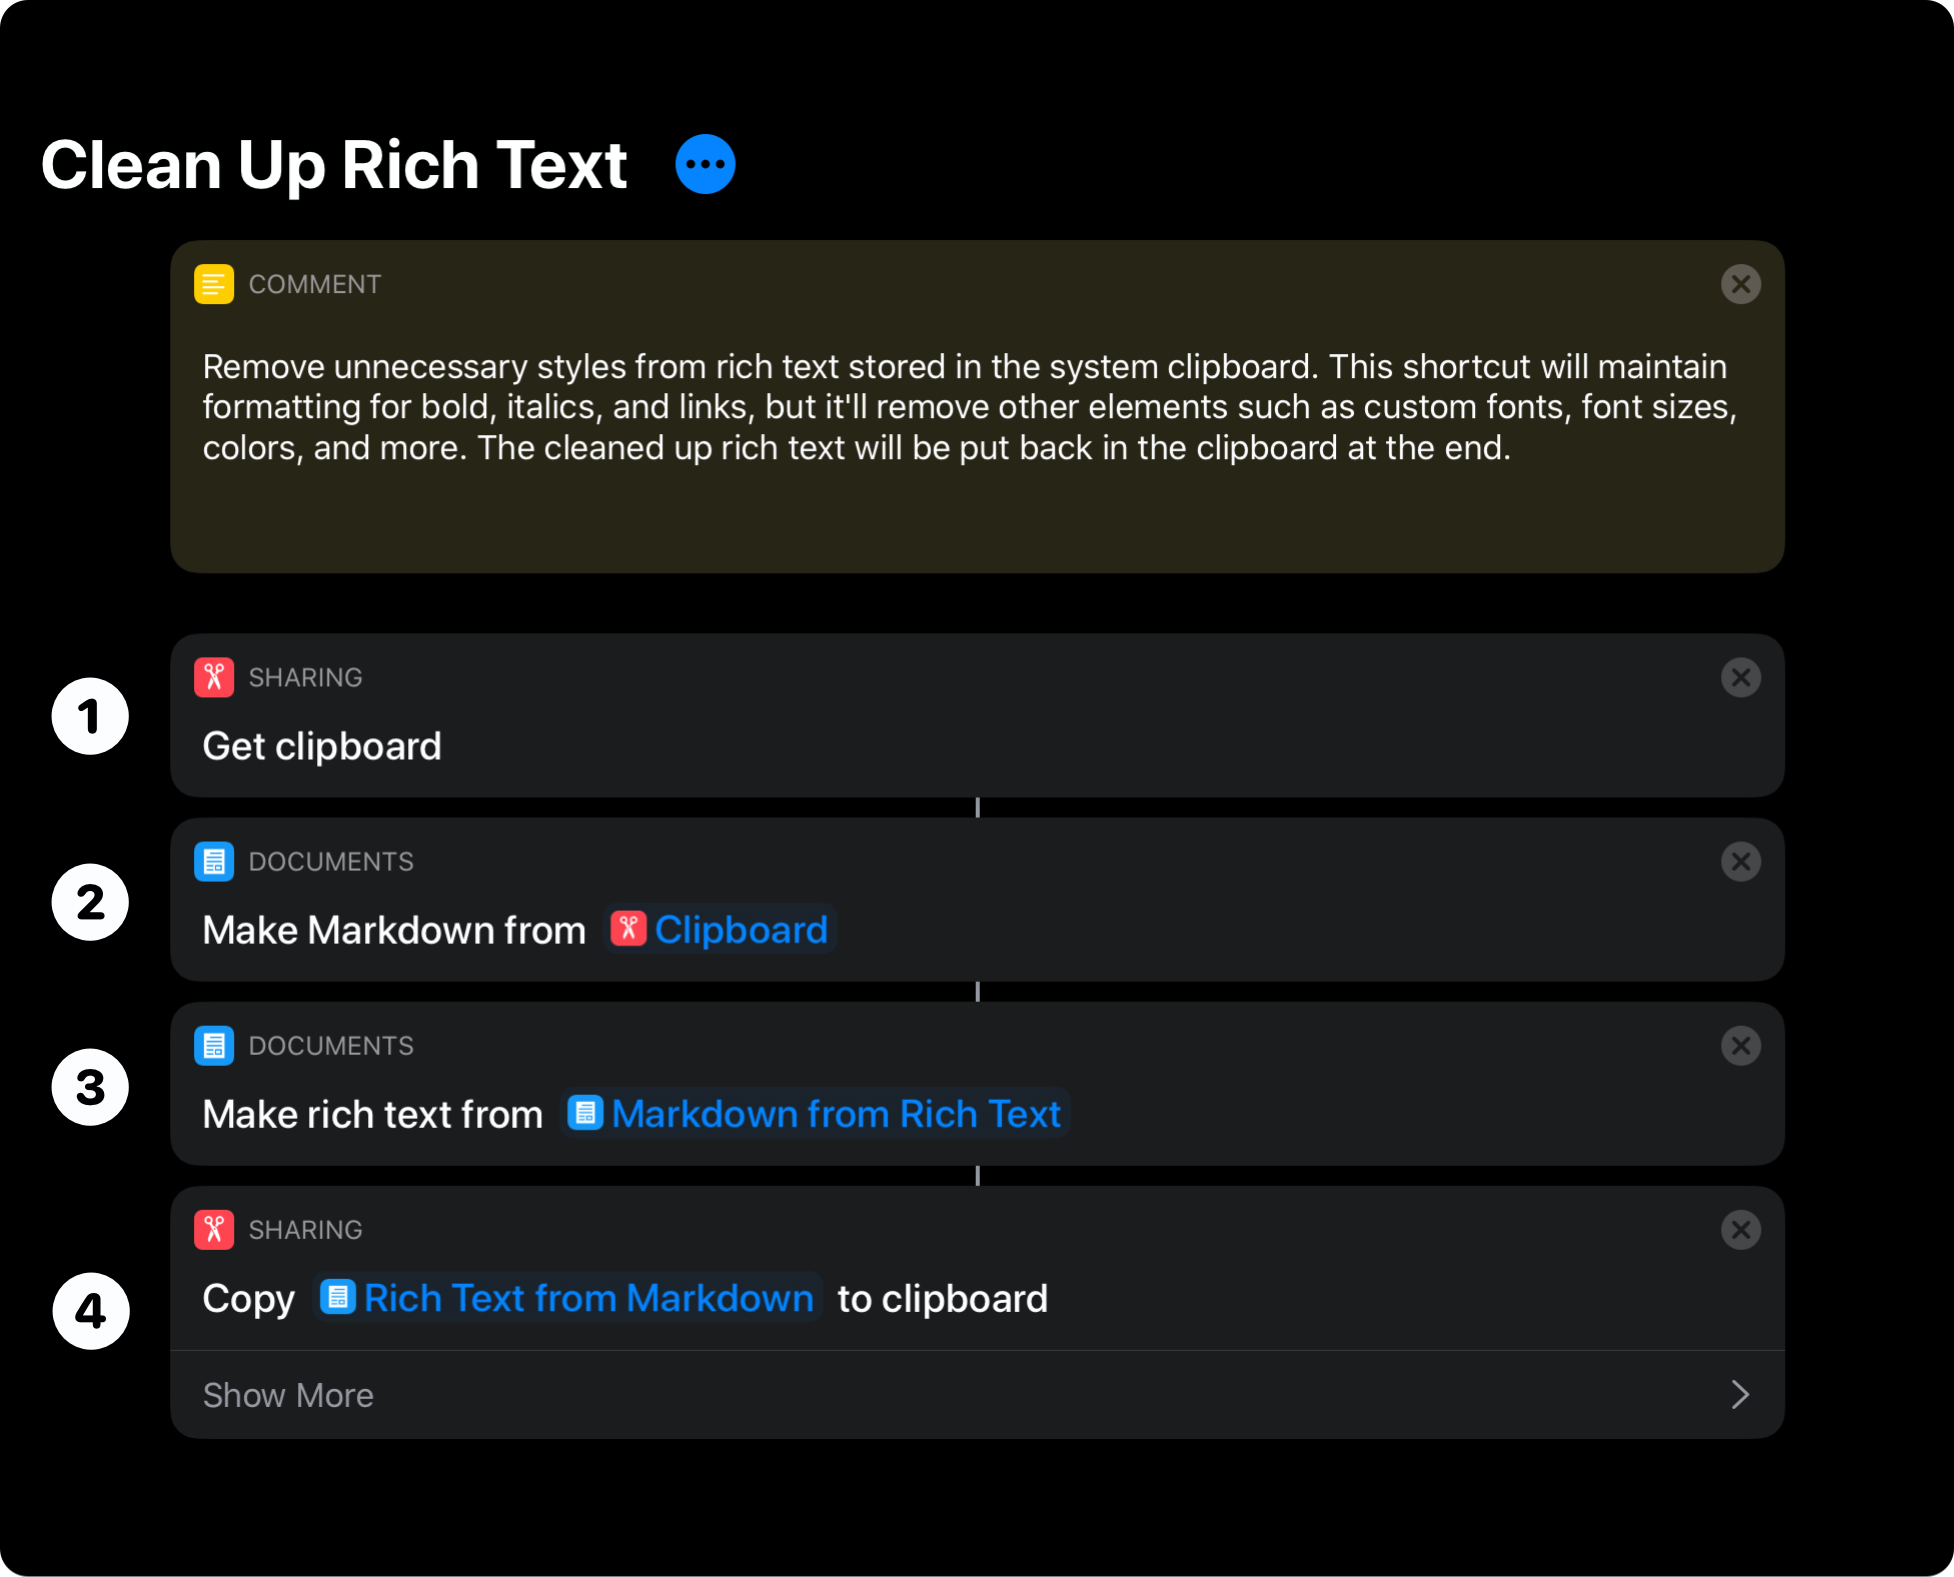
This first shortcut cleans up unsightly rich text while preserving basic formatting like bold, italics, and links. To use Clean Up Rich Text, simply run the shortcut after you’ve copied rich text but before you paste it into another app. In four simple steps that run almost instantly, the shortcut will process the text on your clipboard, replacing the clipboard’s contents with the cleaned-up version, so you can paste it elsewhere.
➊ Get Clipboard
When you’re building a new shortcut, it pays to think about the context in which you’ll use it because that often dictates the first step, the types of input it handles, and other aspects of the design of the shortcut. Clean Up Rich Text is built to eliminate unwanted formatting when you’re pasting rich text into another app, which is why Step 1 is to grab the contents of the iOS clipboard using the ‘Get Clipboard’ action.
➋ Make Markdown from Clipboard
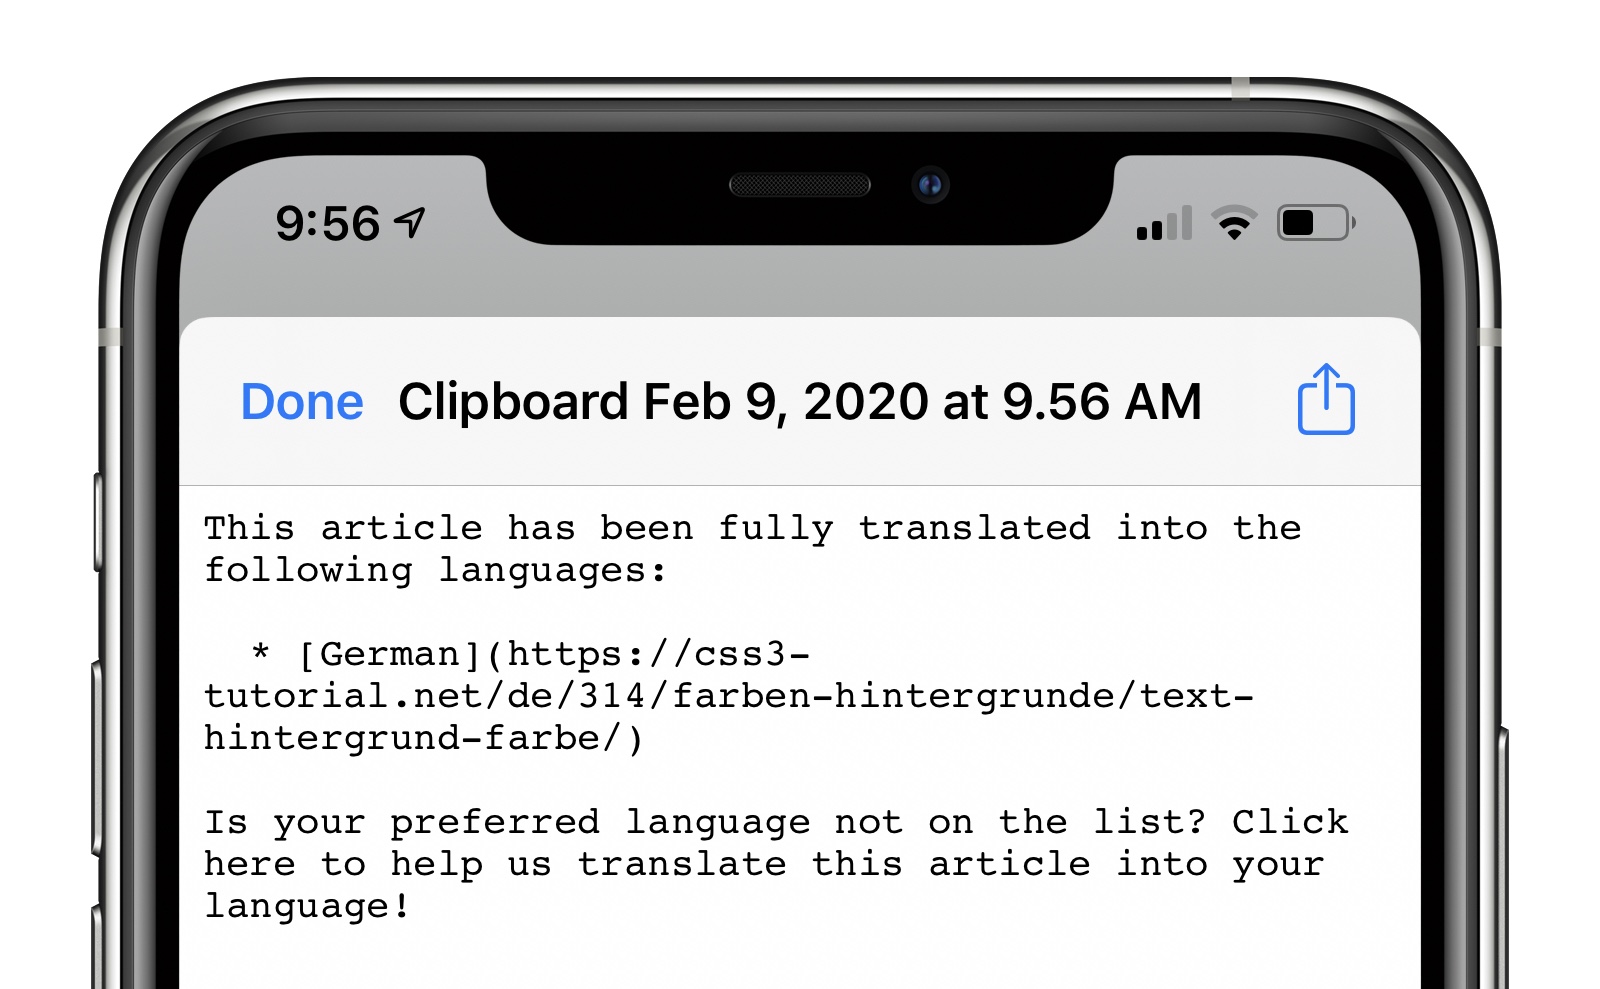
Step 2 of the shortcut converts the rich text pulled from the clipboard to plain text using Markdown, the plain text markup syntax created by John Gruber, using Shortcuts’ built-in ‘Make Markdown from Rich Text’ action. The trick of this shortcut lies in its use of Markdown, which supports basic formatting like bold, italics, and links, but not rich text formatting like text or background colors. As a result, converting the rich text on your clipboard to Markdown leaves other formatting behind.
However, we’re not quite finished yet. If we pasted the results of Make Markdown from Rich Text into an email message, we’d end up with something like this:
Instead, we want the more readable rich text version of the Markdown generated by Step 3, which requires one more conversion action.
➌ Make Rich Text from Markdown
Step 3 takes the Markdown you created in the last step and converts it back to rich text using the ‘Make Rich Text from Markdown’ action. Again, Shortcuts is smart enough to know that you most likely want to convert the Markdown from Step 2, so it fills in the parameter for you automatically. Because Step 2 stripped unwanted formatting, the rich text generated by this action will include just the basic formatting supported by Markdown.
➍ Copy to Clipboard
Clean Up Rich Text ends much like it began, but instead of grabbing the contents of the clipboard, Step 4 places the results of the shortcut back on the clipboard using the ‘Copy to Clipboard’ action. With the cleaned up rich text on your clipboard, you can now paste it into an email message or any other app that accepts rich text.
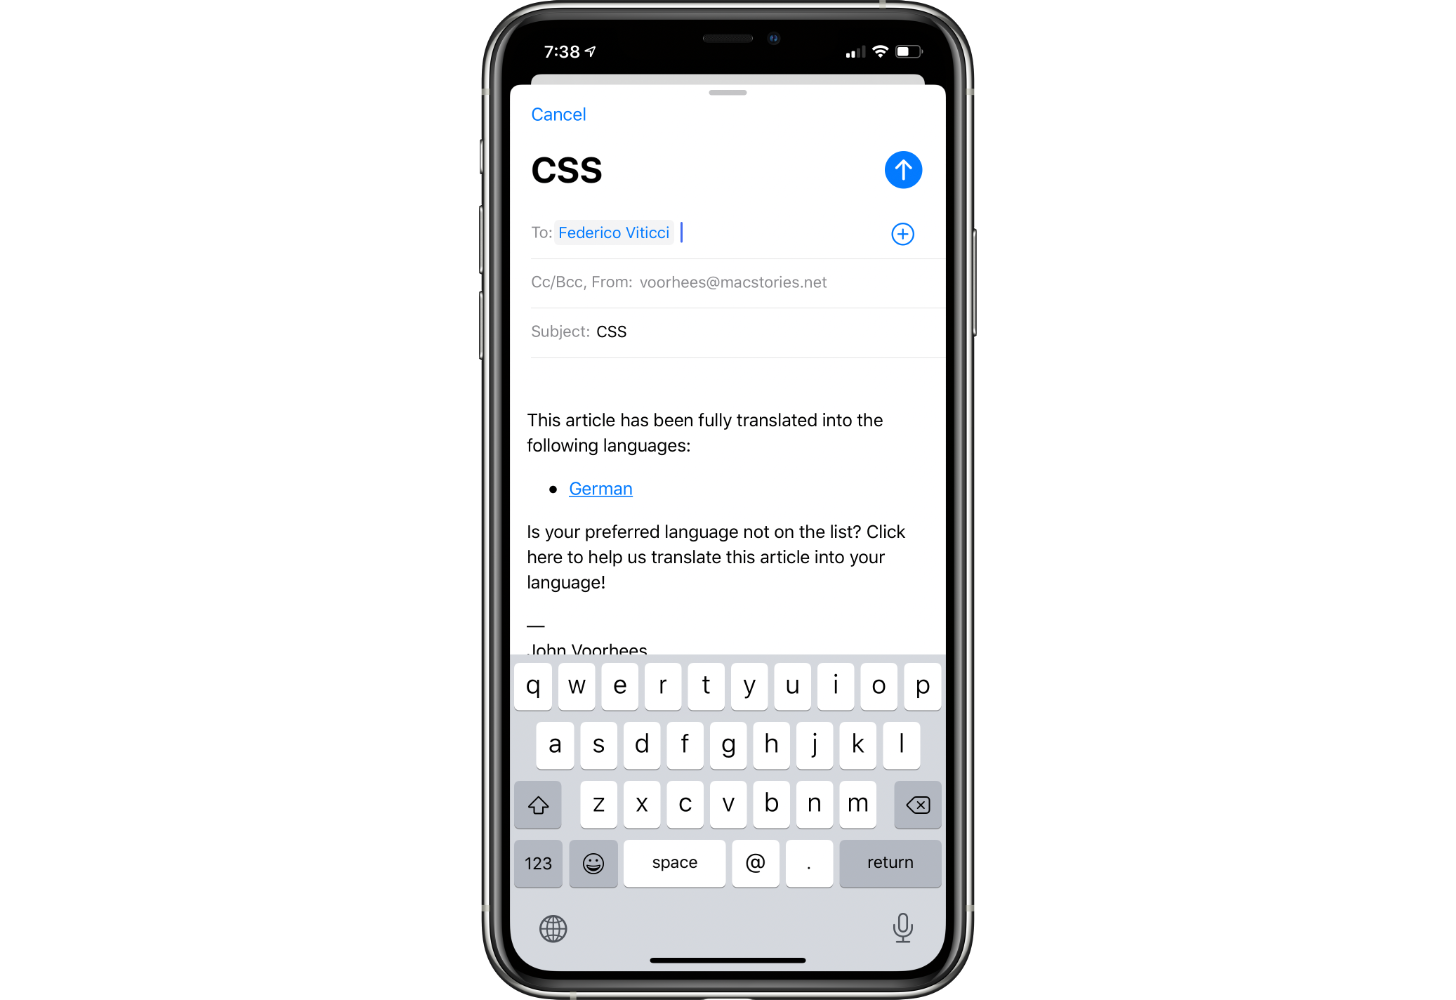
The result of Clean Up Rich Text is a much nicer, more readable version of the text copied from a webpage that preserves the link and bulleted list, but eliminates the blue background from the source text. The shortcut also shows how it pays to understand the attributes of the data formats handled by Shortcuts because it’s the difference between rich text and Markdown that allows Clean Up Rich Text to strip away the blue background in this example.
You can download Clean Up Rich Text below or find it in the MacStories Shortcuts Archive.

Clean Up Rich Text
Remove unnecessary styles from rich text stored in the system clipboard. This shortcut will maintain formatting for bold, italics, and links, but it’ll remove other elements such as custom fonts, font sizes, colors, and more. The cleaned-up rich text will be put back in the clipboard at the end.
Shortcut Rich Link
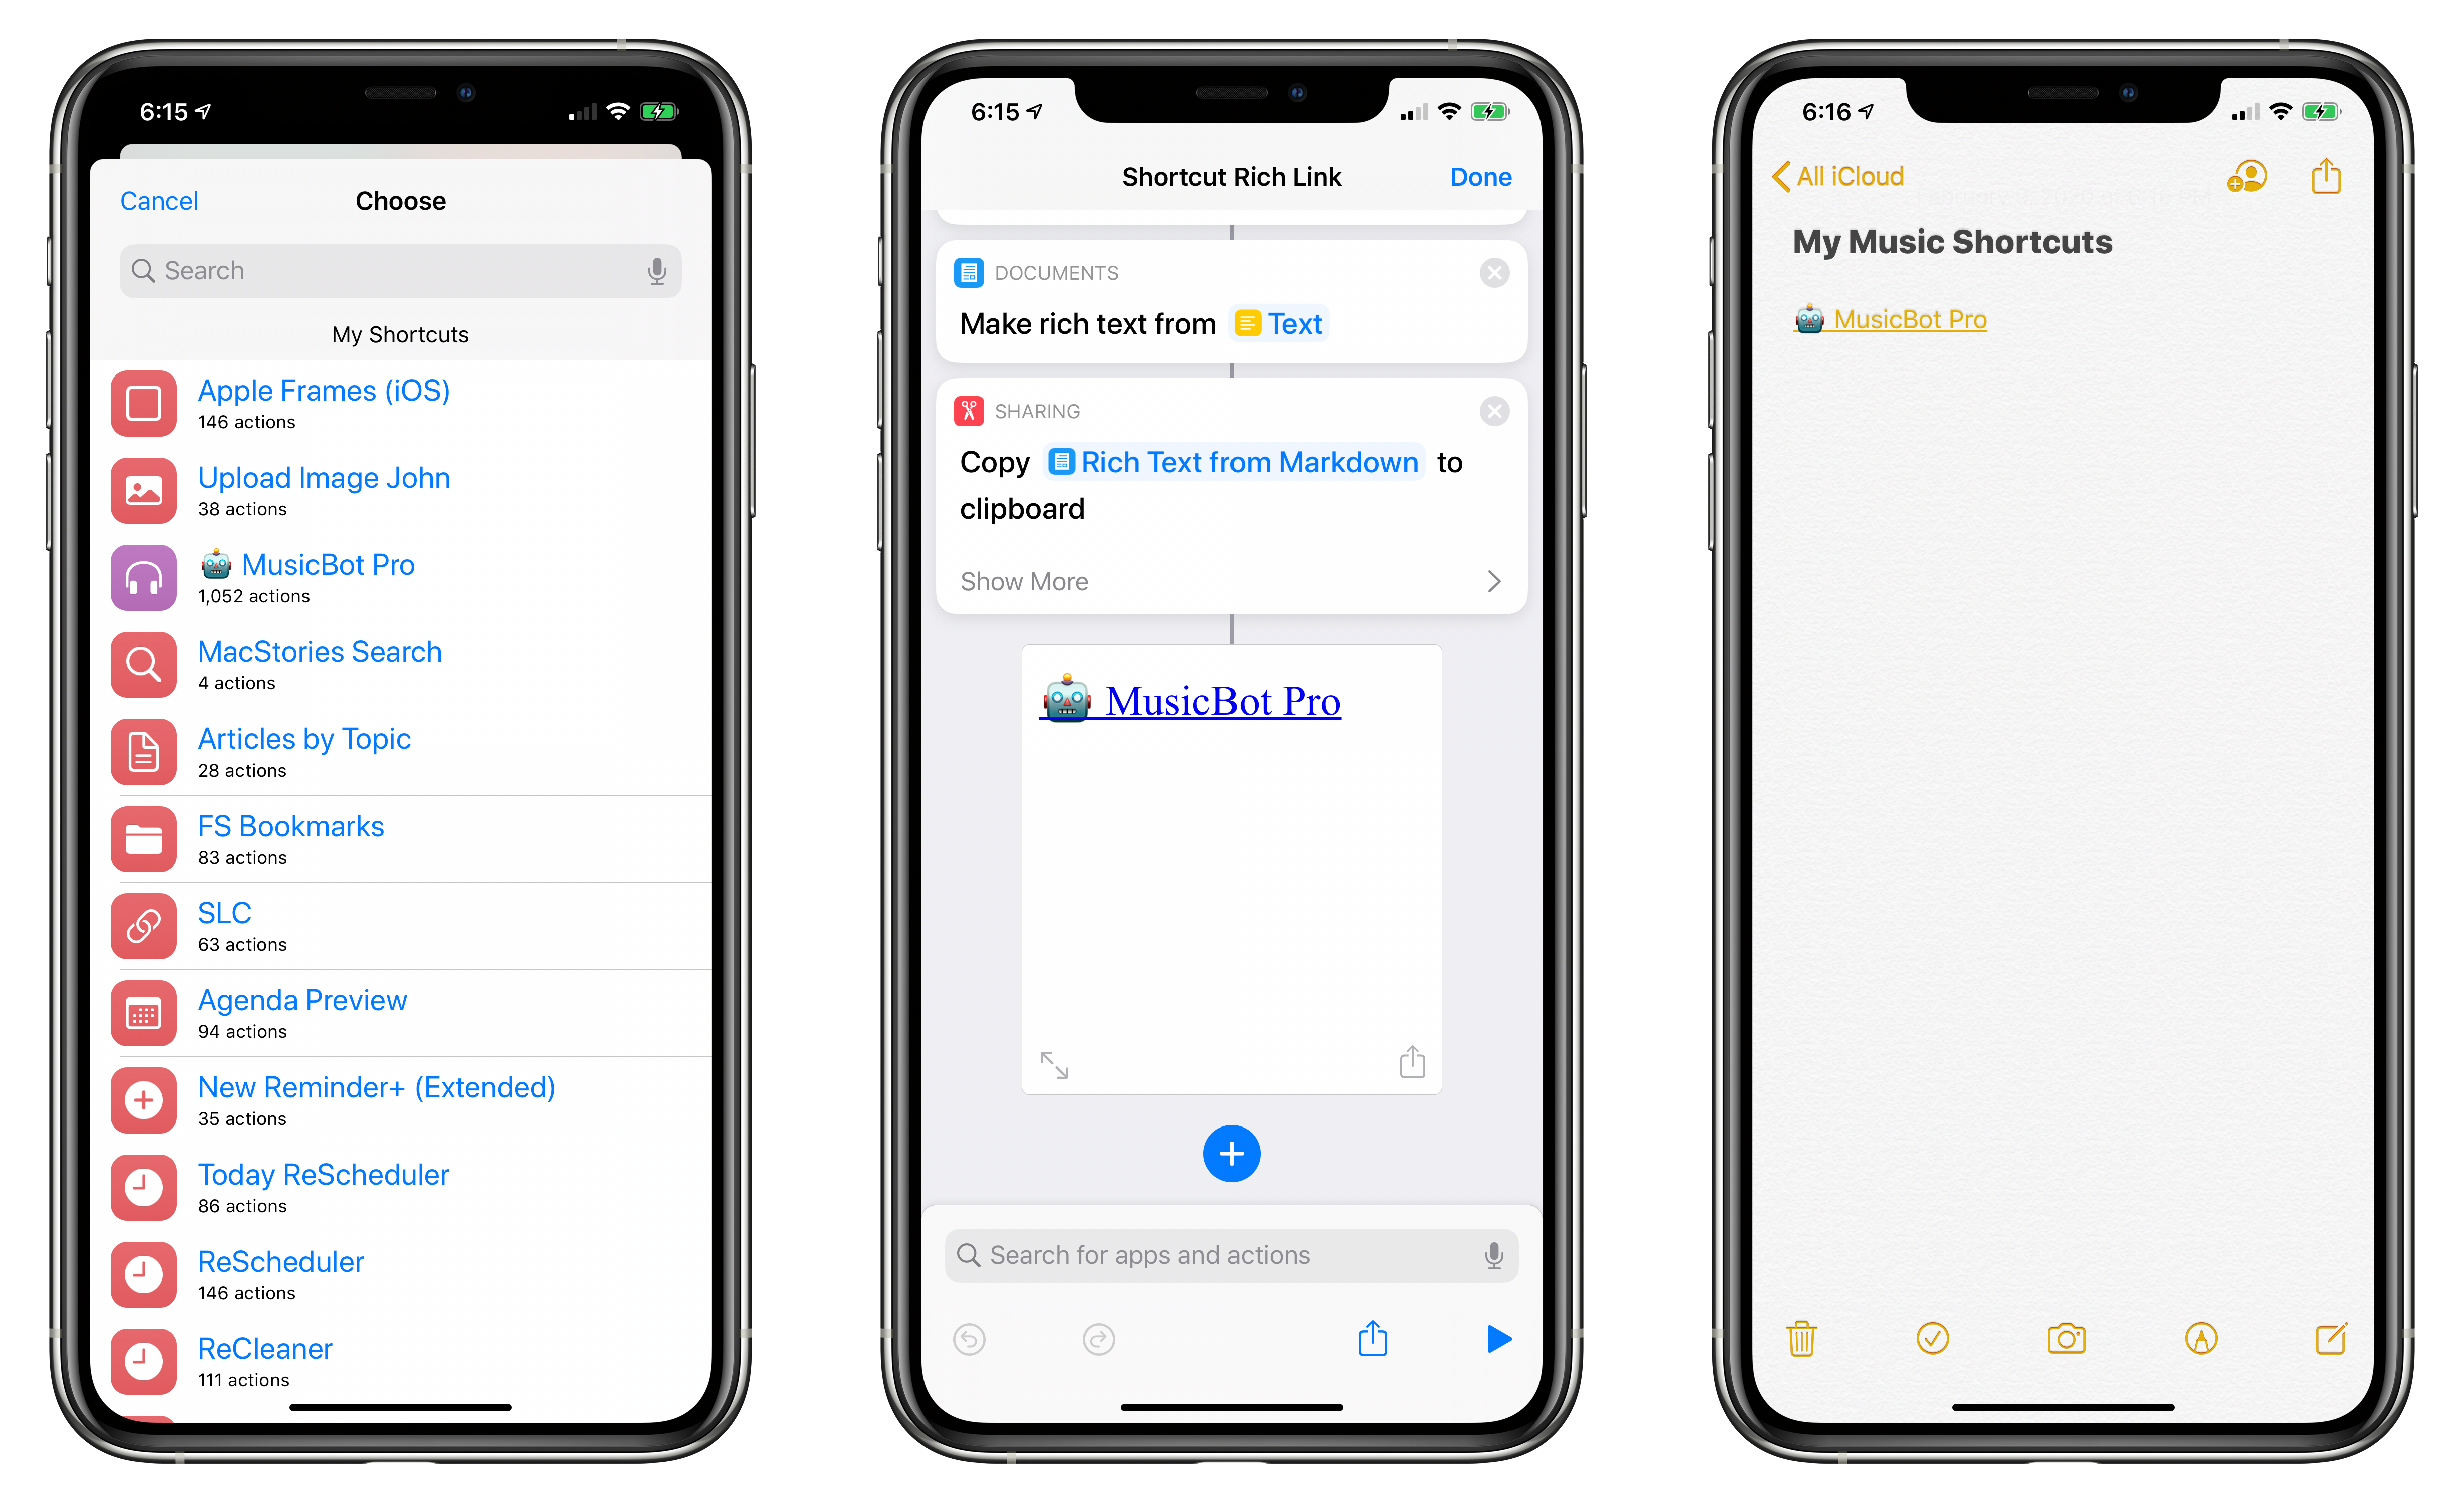
Shortcut Rich Link combines Markdown and rich text in a way that is similar to Clean Up Rich Text for an entirely different purpose. This shortcut generates a rich link to one of your existing shortcuts and places it on the clipboard, so you can paste it into another app. Perhaps you have a note related to a project in Apple’s Notes app or a recurring task in Reminders where you want fast access to one of your shortcuts. With Shortcut Rich Link, you can put a link to the shortcut you need where you need it, so you don’t have to hunt around for it in the Shortcuts app.
This shortcut is a little longer than the last, so I’ve broken it into two parts.
Shortcut Rich Link, Part 1
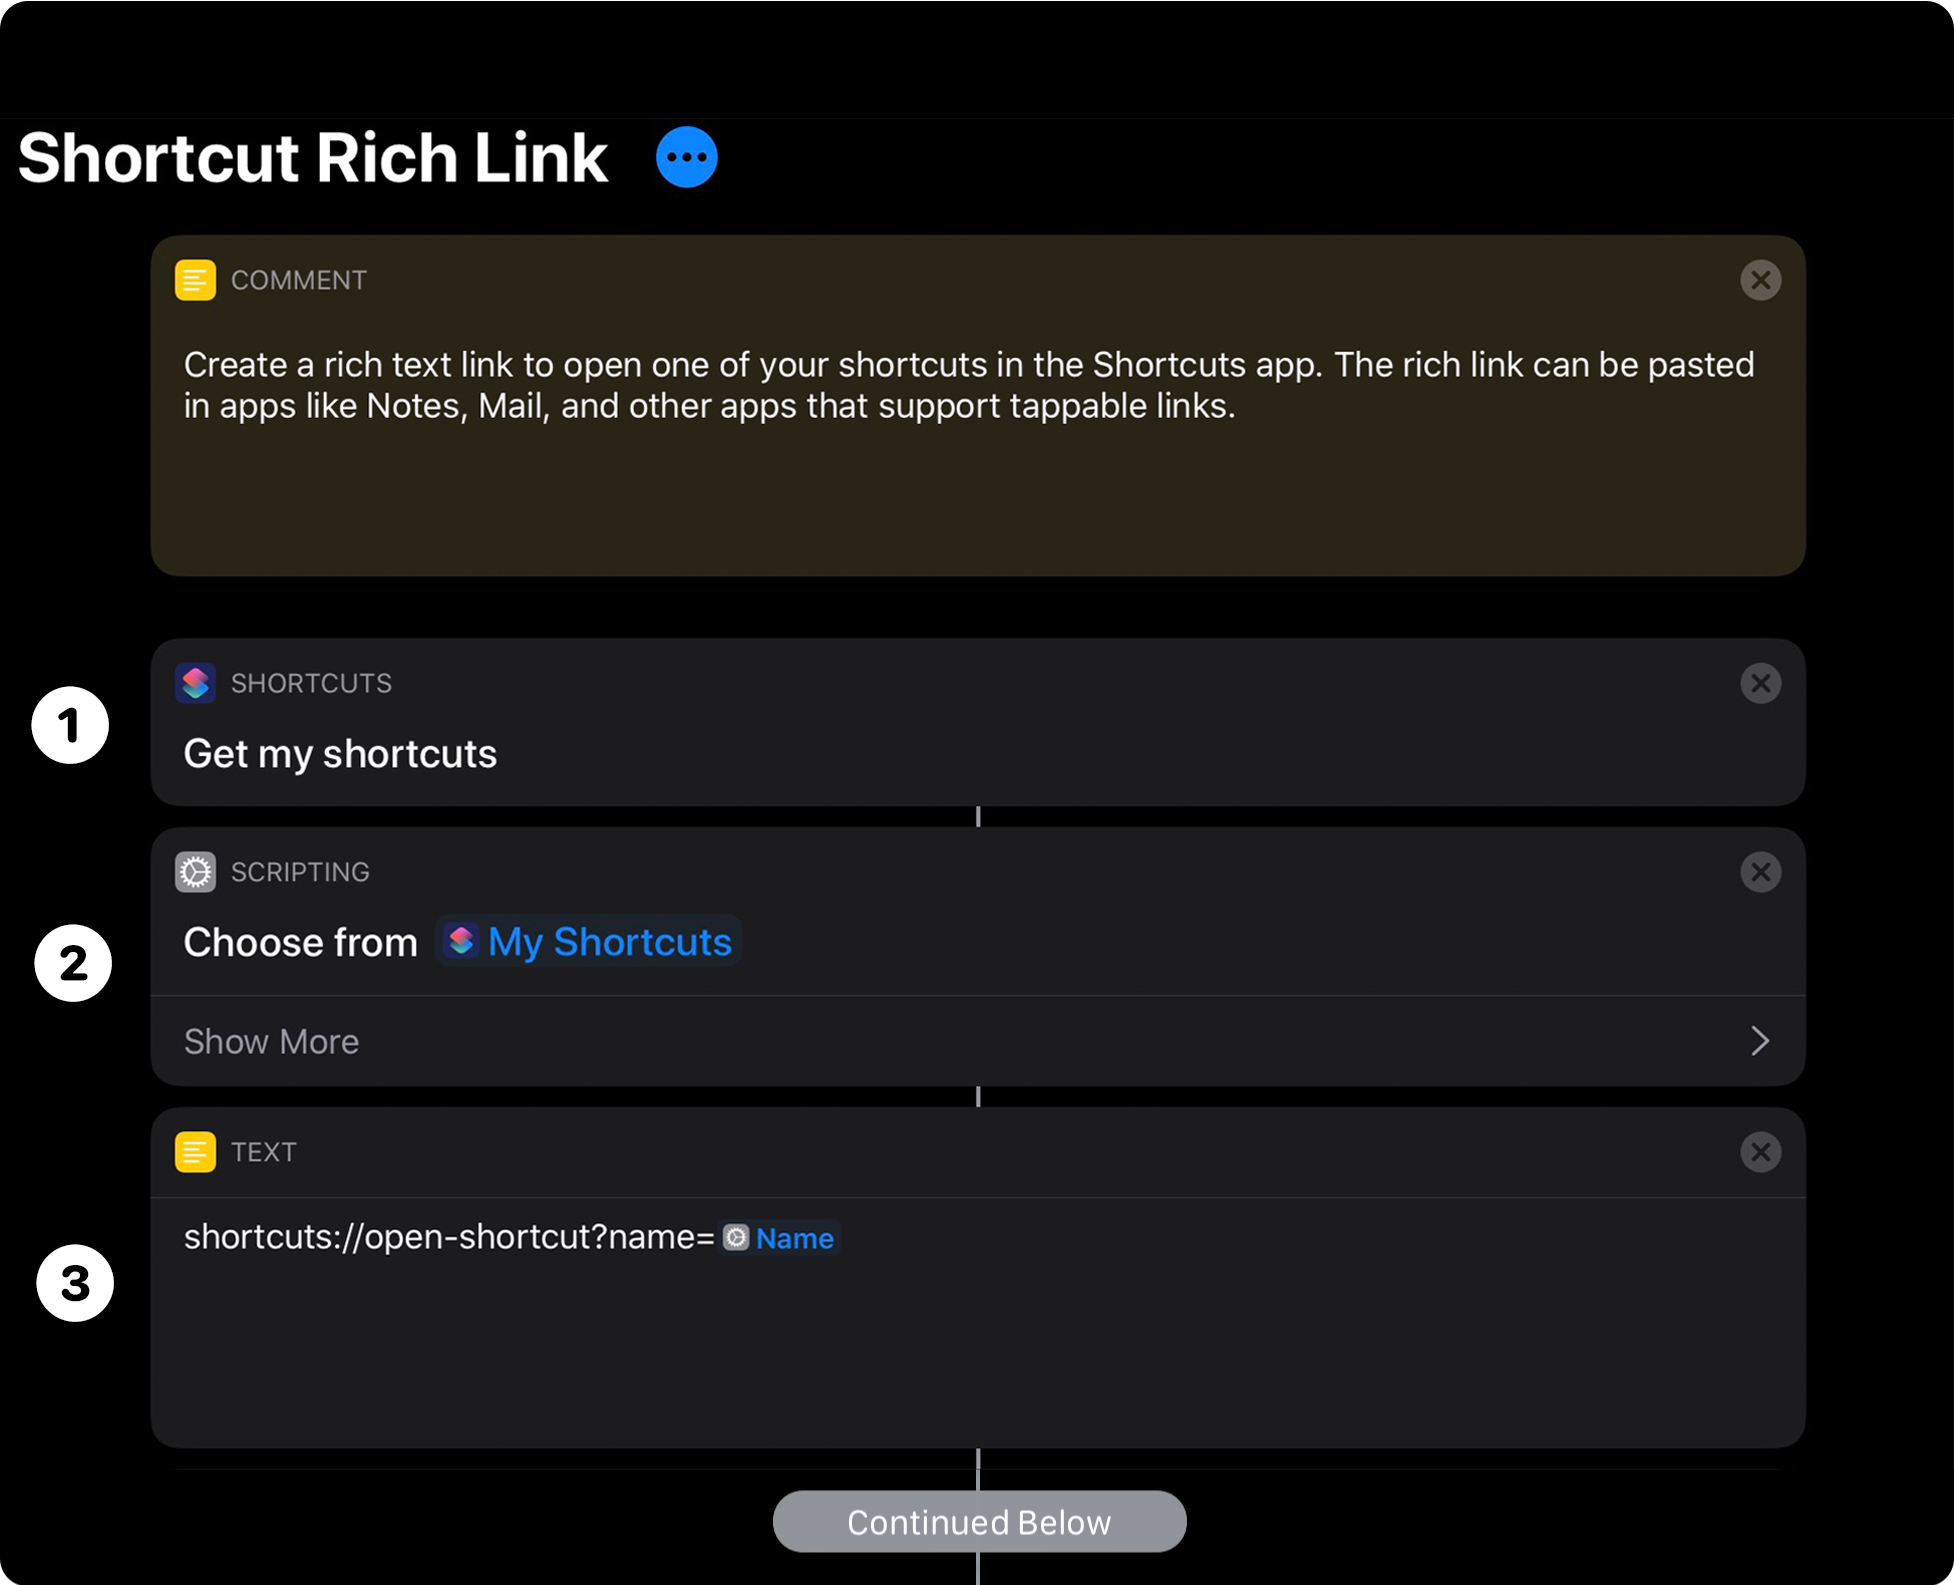
Shortcuts uses a URL scheme to open individual shortcuts that consists of a base URL which opens Shortcuts and a parameter based on the name of the shortcut you want to open. Therefore, to create a rich link to a shortcut, you need to pick a shortcut, get its name, build a URL, and then apply the Markdown and rich text techniques from the last shortcut to create a rich link.
➊ Get My Shortcuts
The first thing you need is a list of your shortcuts. Step 1 uses the very meta action ‘Get My Shortcuts’ to retrieve a list of your shortcuts. This is a very simple but handy action that doesn’t take any parameters.
➋ Choose from List
Step 2 uses one of Shortcuts’ scripting actions called ‘Choose from List.’ Scripting is an entire section of the Shortcuts action library containing dozens of useful actions that don’t belong to a particular app or another action category. The Scripting section of the action library is divided into subsections, including a List section, which contains three actions for handling Lists and the items in them.
Choose from List displays a list of the shortcuts generated by Step 1. You’ll notice that at the bottom of the action is a ‘Show More’ button. Tap that to reveal optional action settings. For this shortcut, a ‘My Shortcuts’ prompt has been added, which gives the list a title by that name. The ‘Select Multiple’ toggle is off because we’re only creating a link to one shortcut.
➌ Text
Step 3 of Shortcut Rich Link uses a ‘Text’ action to create the URL for your shortcut. Shortcuts uses a URL scheme that starts shortcuts://open-shortcut?name= and is hard coded in this shortcut because it won’t ever change.
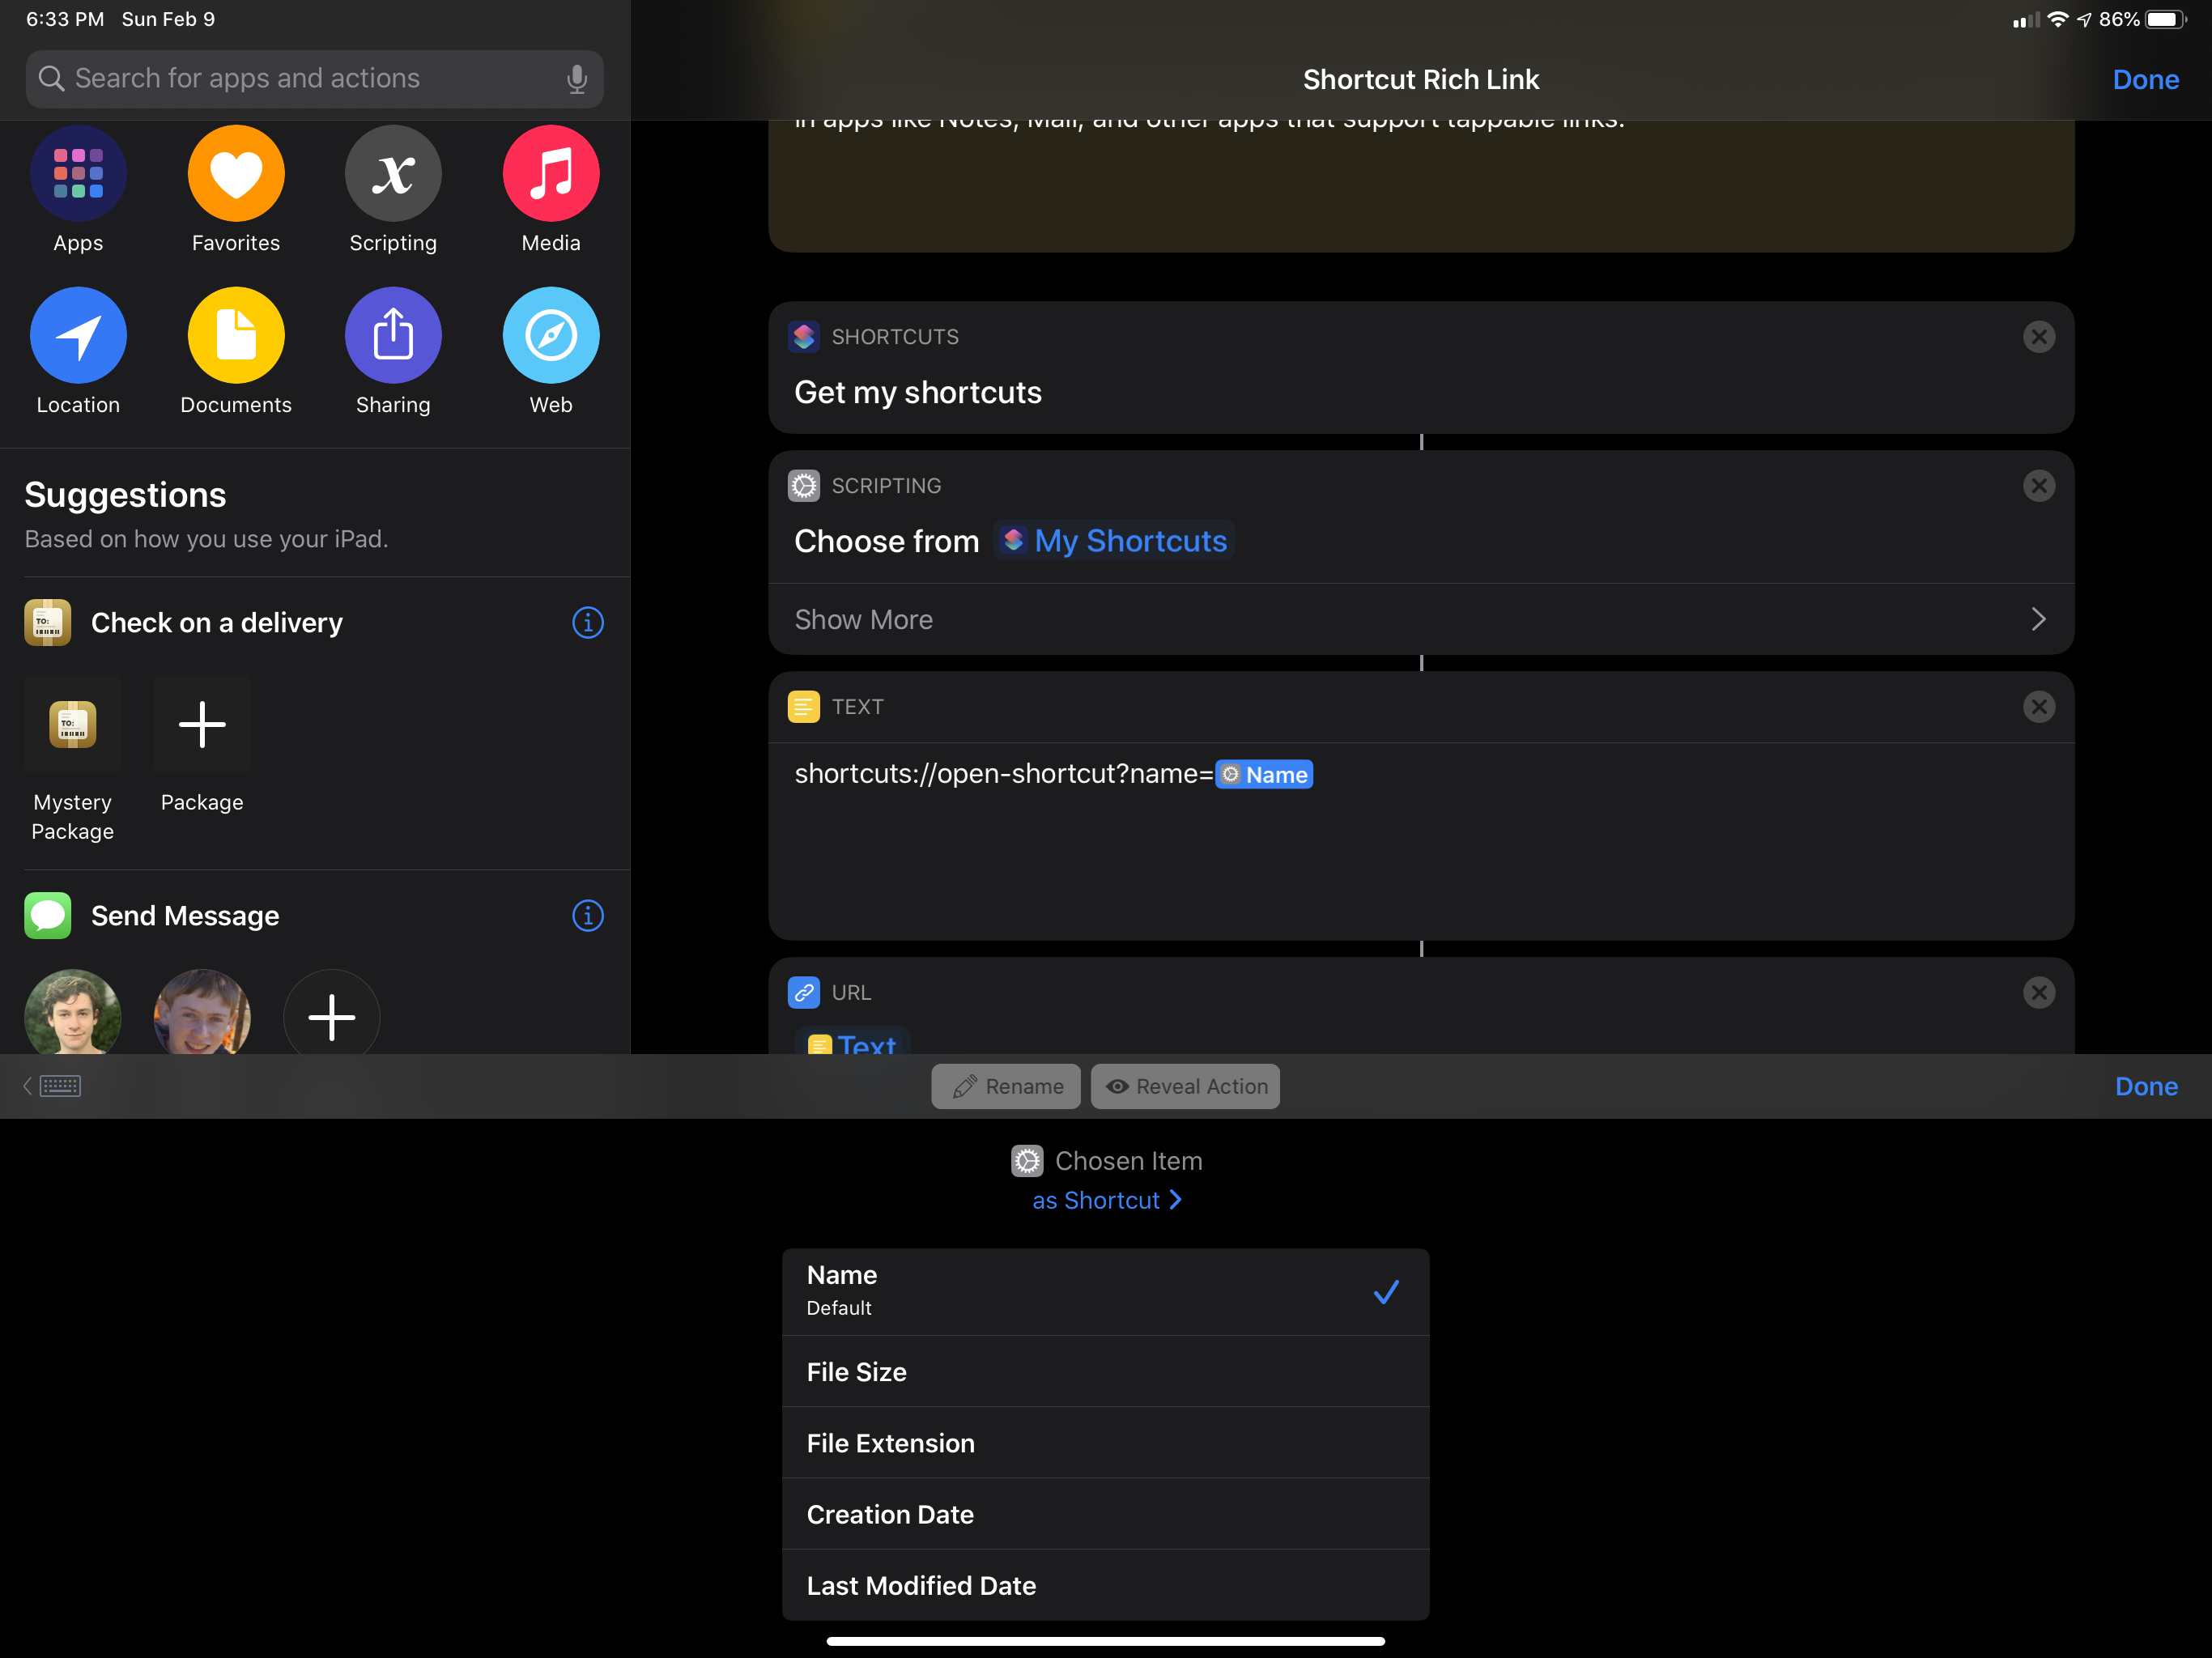
If you’re building this shortcut from scratch, you’ll see a list of Magic Variables immediately beneath the editor, one of which is ‘Chosen Item.’ When you tap it, a tokenized version with a gear icon appears at the end of your Text action. Below the editor is a list of data available to you. The default is ‘Name,’ which is exactly what we need to complete the URL, so no changes are needed. Just tap it, and ‘Chosen Item’ changes to ‘Name’ in the URL you built.
Shortcut Rich Link, Part 2
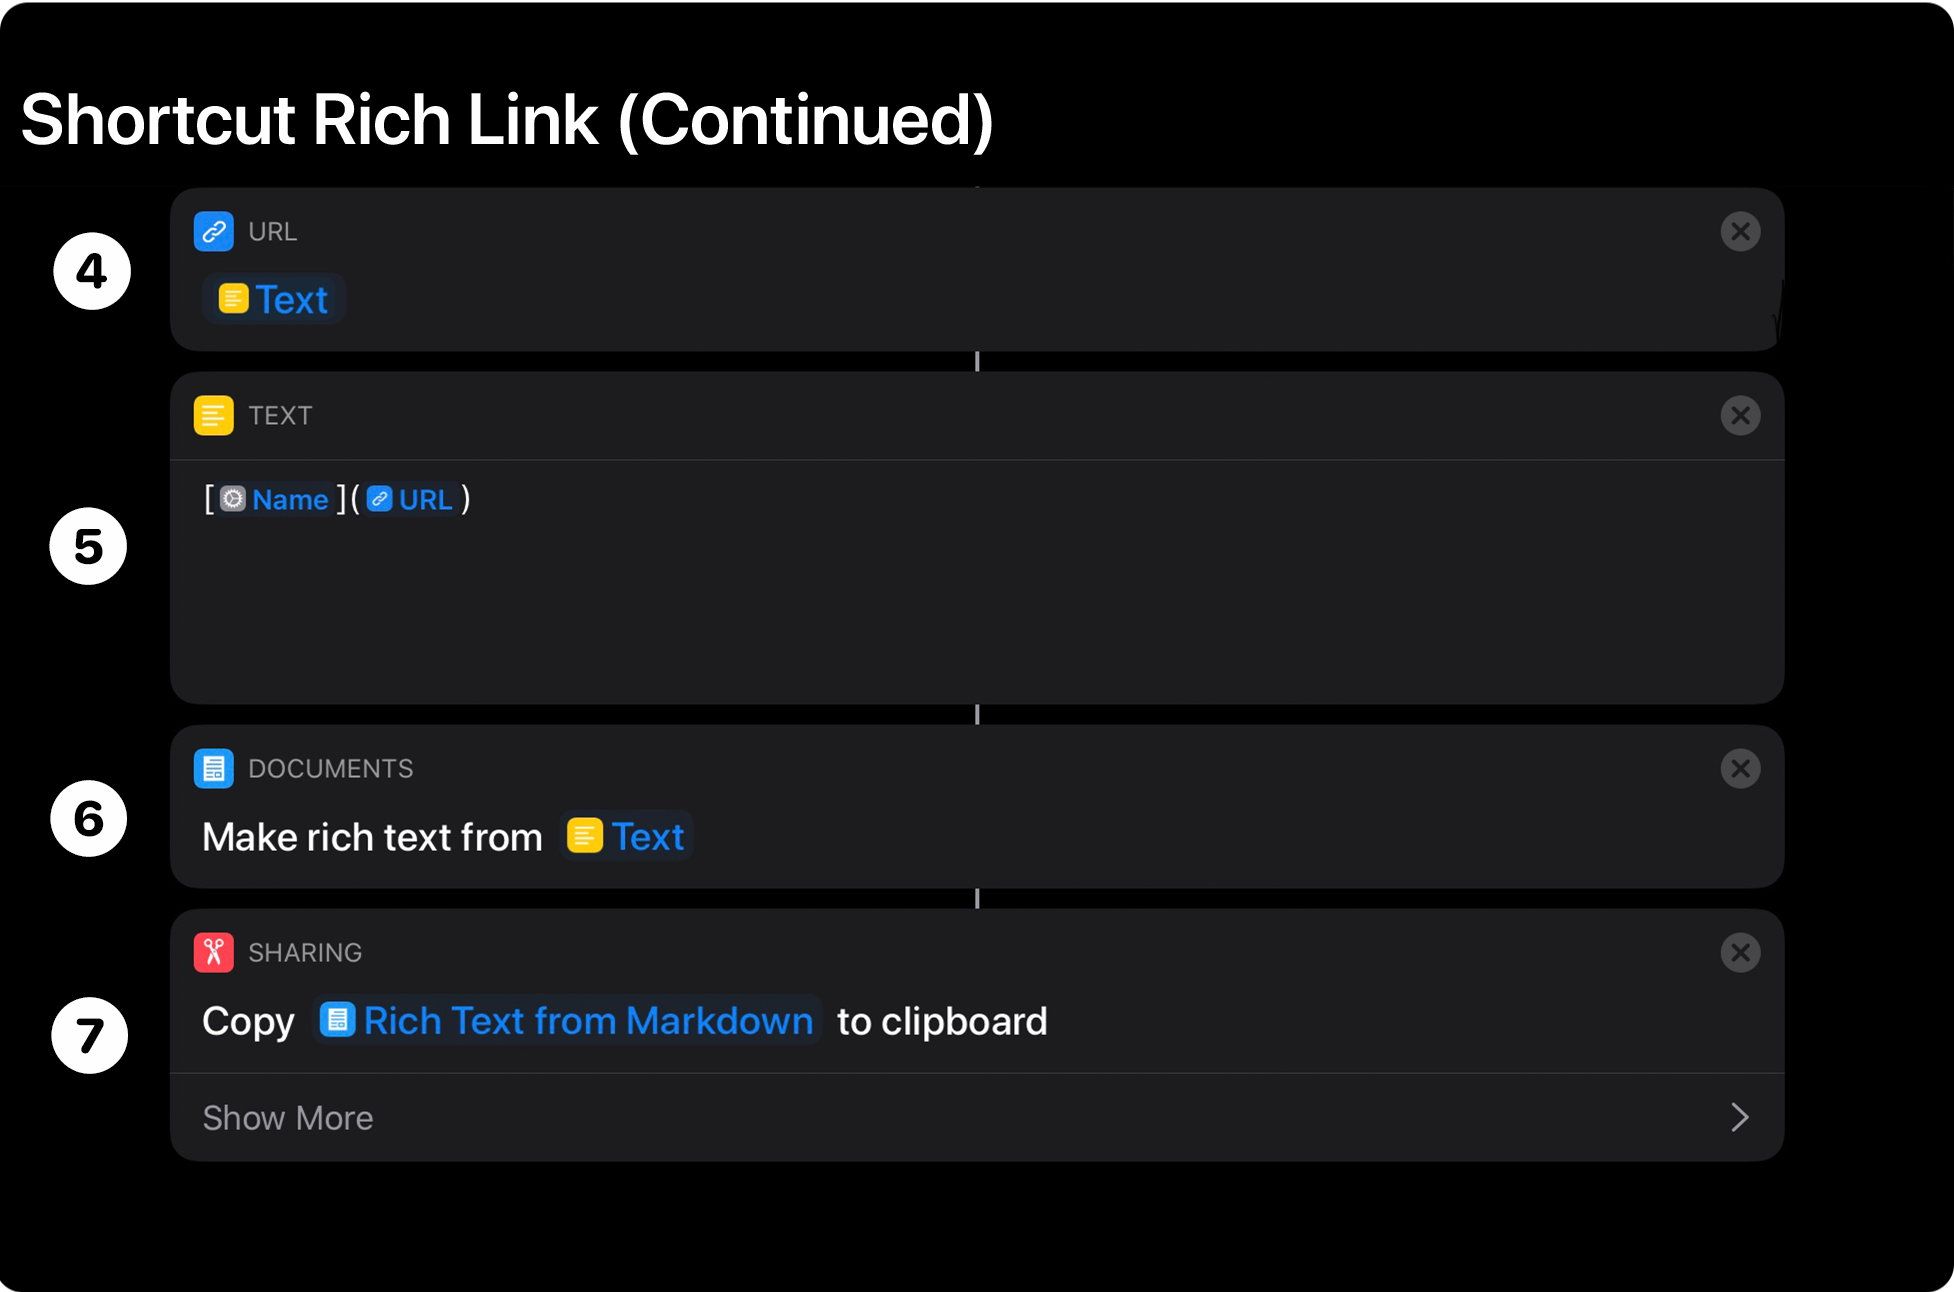
The remainder of Shortcut Rich Link transforms the text generated above into a URL, builds a Markdown version of the link to your shortcut, and then converts it to a rich link.
➍ URL
Step 3 used a Text action to piece together the parts of the URL that will link to the shortcut you picked. However, it’s not a URL yet; it’s just text. To create a URL that links to the shortcut, a ‘URL’ action is needed.
When you add the URL action to the editor in Step 4, you’ll notice that it’s not connected to the text action above it yet, and there’s an empty parameter for a URL. Long-press on the parameter, tap Select Magic Variable, and then pick the ‘Text’ variable that appears just below the Text action. That connects the URL action to the Text action above it, and ‘Text’ now appears in the URL action to show that the text output from the previous action will be used to create the URL.
❺ - ➐ Markdown → Rich Text → Clipboard
Steps 5, 6, and 7 of the shortcut will look familiar because they’re similar to the ones used in Clean Up Rich Text, but instead of converting a rich link to Markdown and back again to strip unwanted formatting, Step 5 builds a Markdown-formatted link using a Text action and two Magic Variables: the name of the shortcut picked in Step 2 and the URL generated by Step 4. That Markdown link is then converted to rich text using a Rich Text from Markdown action in Step 6, which is copied to the clipboard using a Copy to Clipboard action in Step 7.
What I love about Shortcut Rich Link is that the same link creation technique used in Clean Rich Link to strip formatting is used to build a tappable link. The shortcut is a terrific example of how remixing the same actions can result in very different shortcuts.
You can download Shortcut Rich Link below or find it in the MacStories Shortcuts Archive.

Shortcut Rich Link
Create a rich text link to open one of your shortcuts in the Shortcuts app. The rich link can be pasted in apps like Notes, Mail, and other apps that support tappable links.
Create Hyperlink
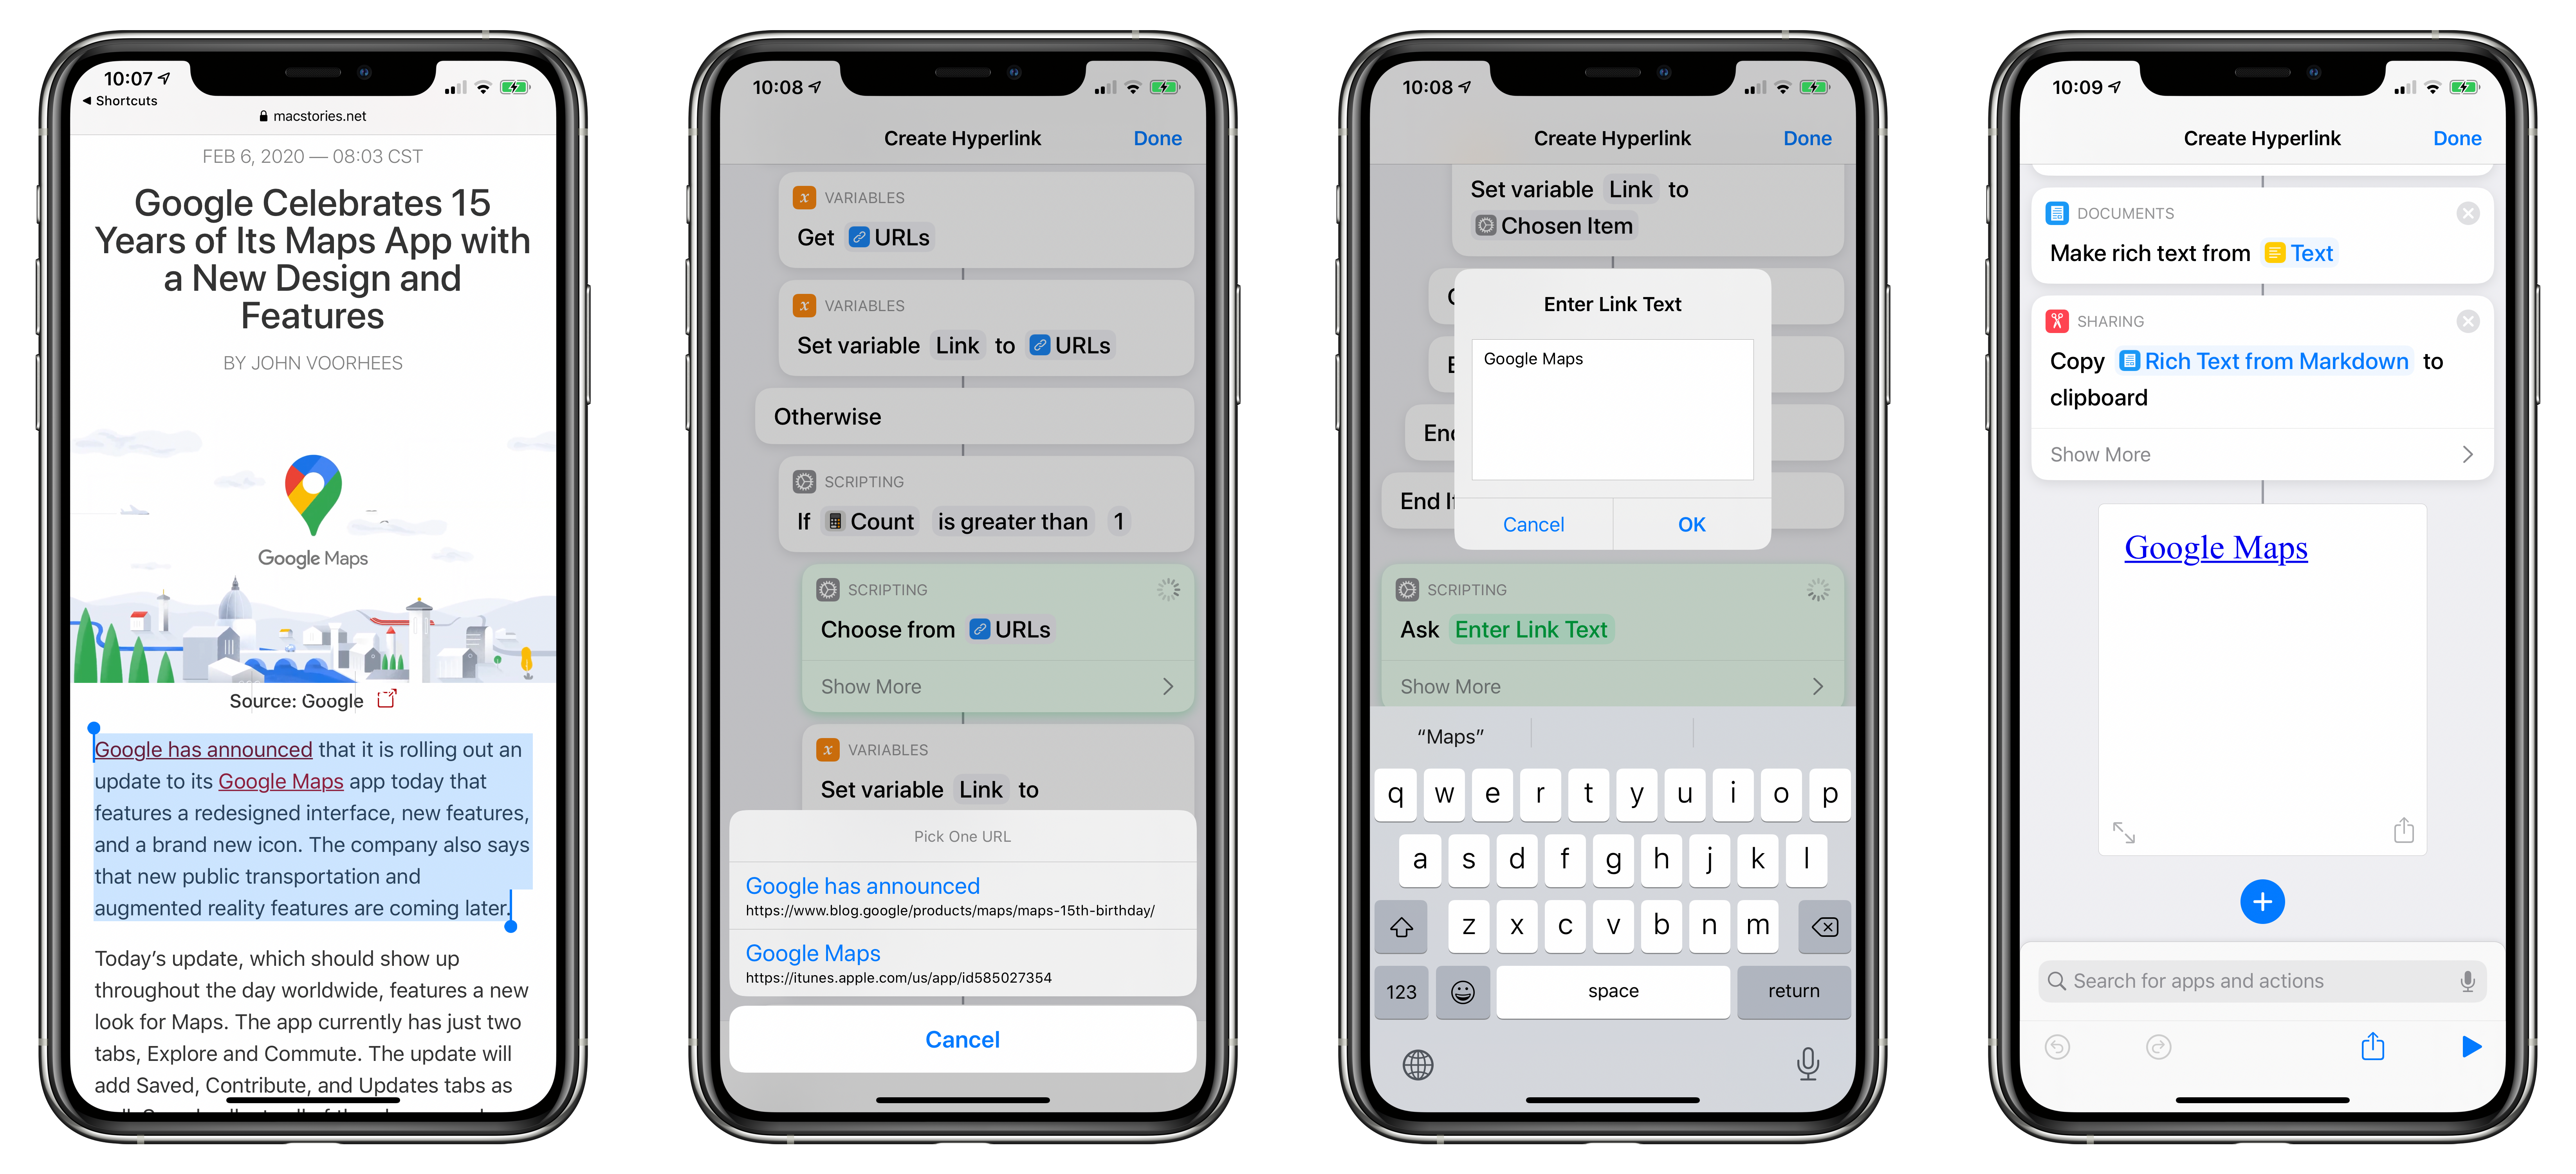
The final shortcut I want to cover is Create Hyperlink, which takes the link creation technique from the shortcuts above and combines it with flow logic to reach different results depending on what is fed to the shortcut.
Create Hyperlink, Part 1
Create Hyperlink can pull URLs from your clipboard and use them to create hyperlinks regardless of what else is on the clipboard. That means whether you have a list of raw URLs or a paragraph of text copied from a webpage that includes linked text, Create Hyperlink can use the URLs on your clipboard to create a link.
This shortcut is a little more involved than the previous two because it includes flow logic to deal with three scenarios where: there is no URL on the clipboard, in which case the shortcut alerts you to that fact, there is one URL on the clipboard, in which case there is no reason to make you pick from a list, and there are multiple URLs on the clipboard, in which case the shortcut asks you to pick one.
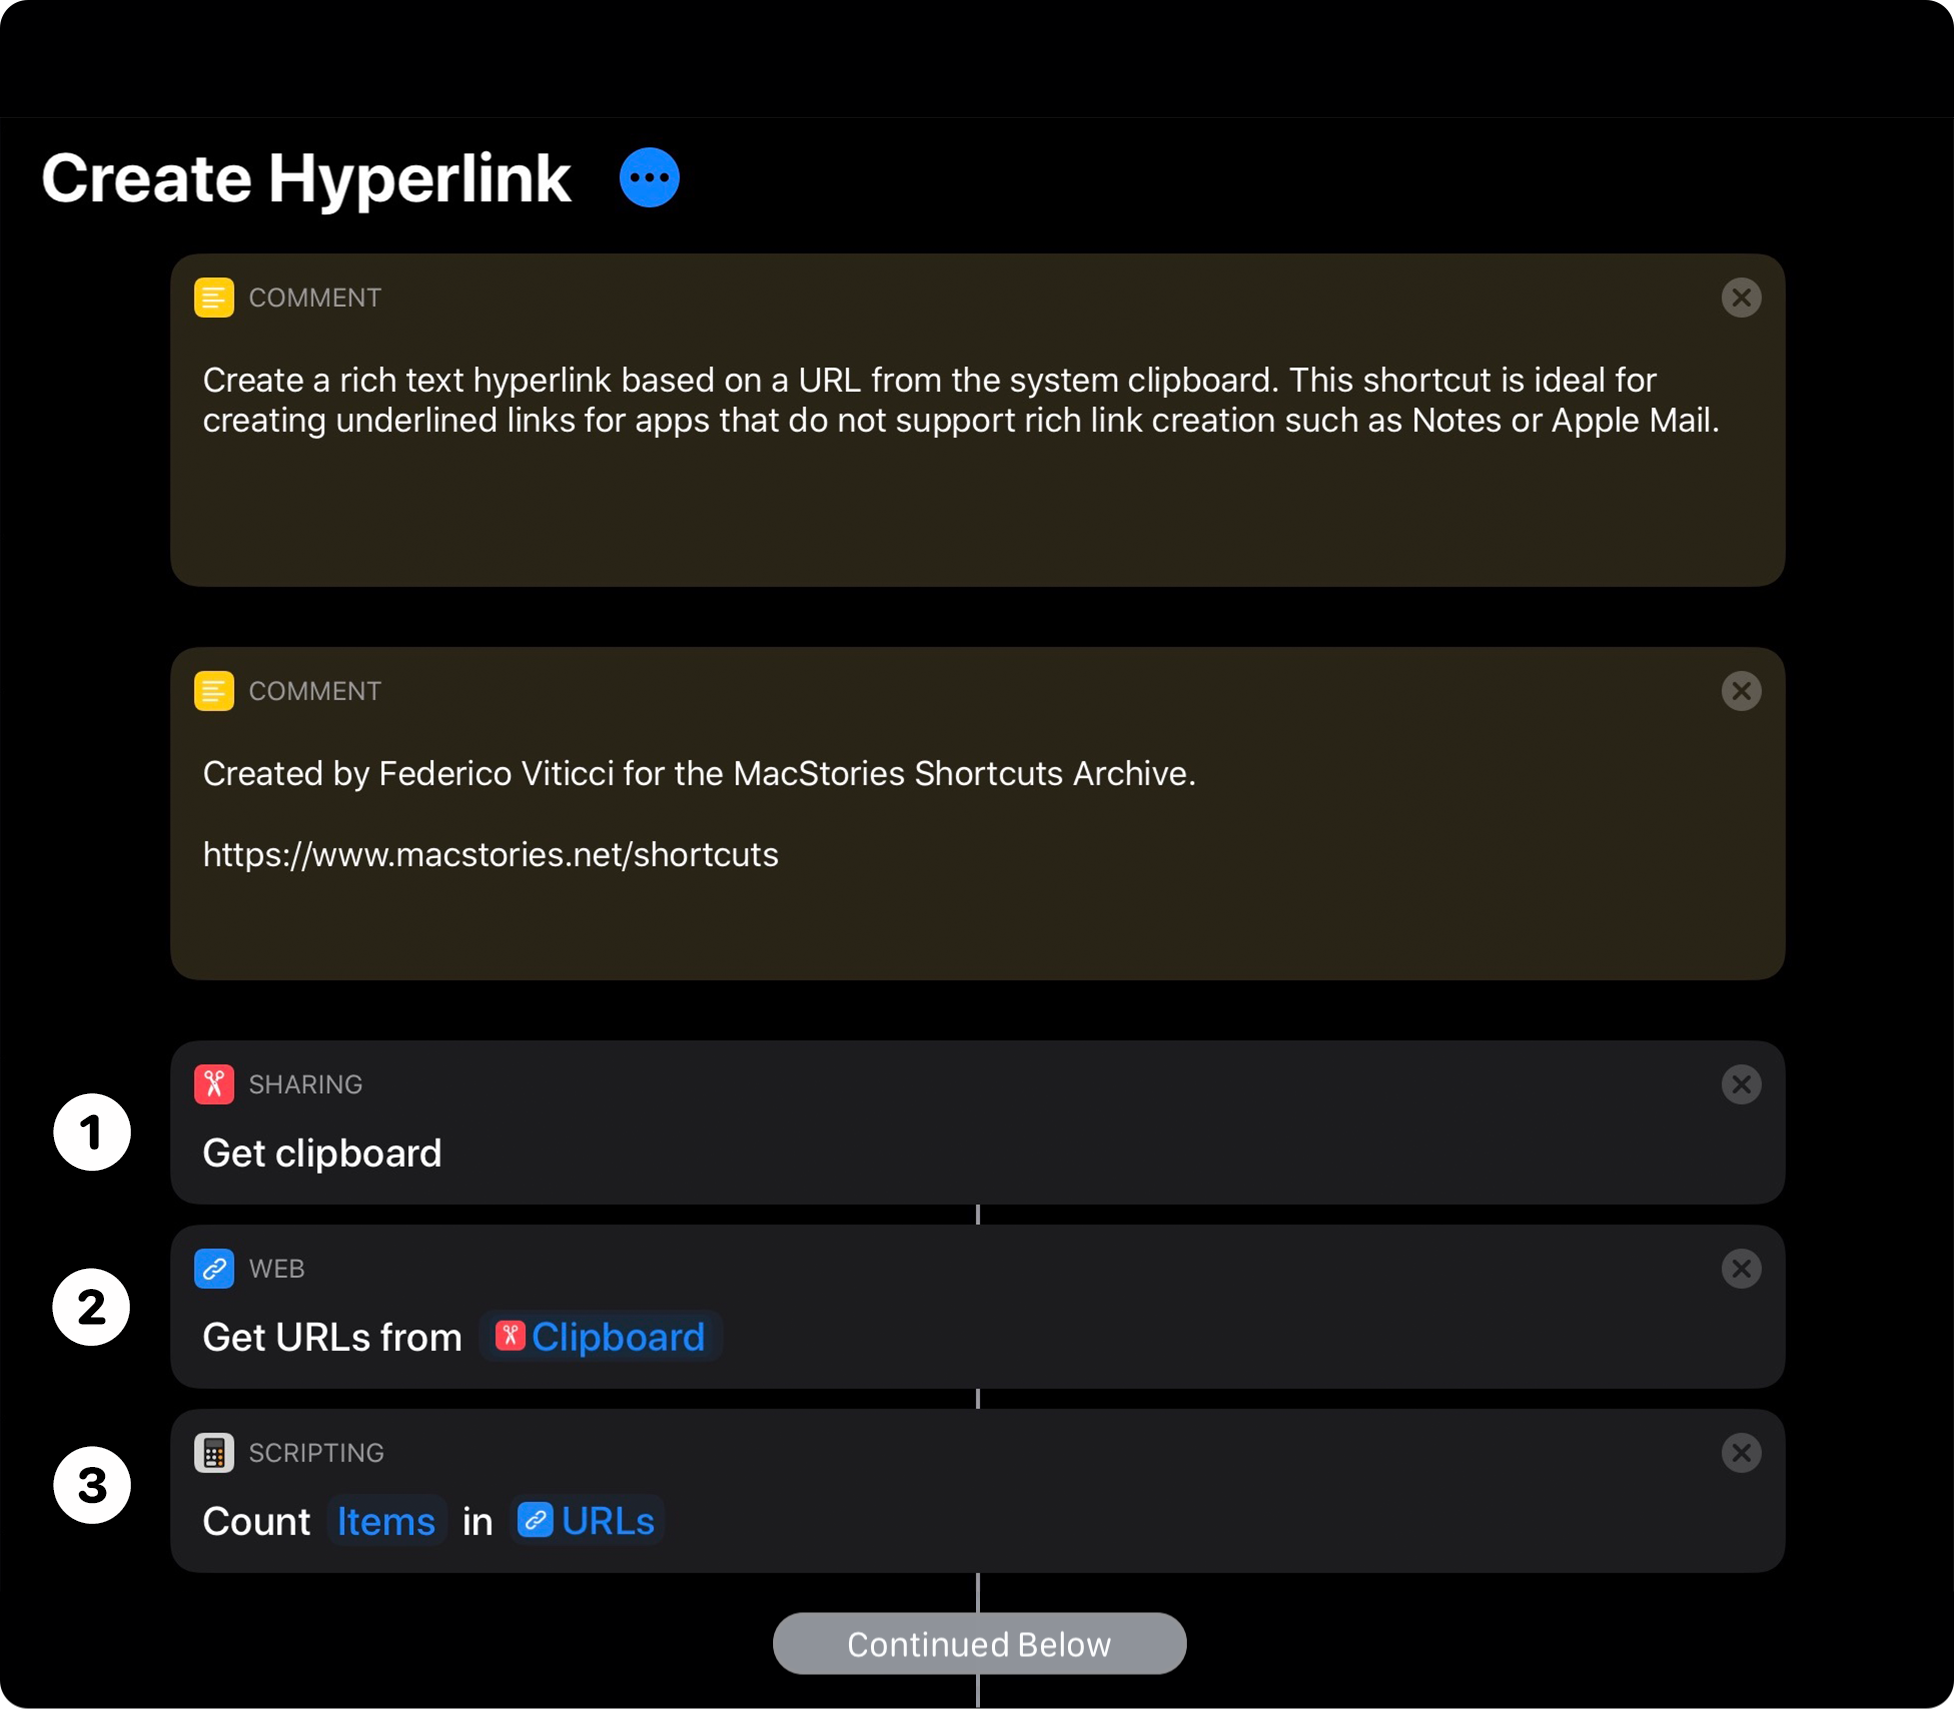
➊ - ➋ Get Clipboard and Get URLs from Input
The first two steps of Create Hyperlink are straightforward. The Get Clipboard action in Step 1 takes the contents of your clipboard and sends it to the ‘Get URLs from Input’ action in Step 2, which defaults to using the contents of the clipboard from Step 1.
➌ Count
Step 2 passes the URLs extracted from the clipboard to a utility action called ‘Count’ in Step 3, which does as you’d expect. By default, when you add it after Step 2, the action will count the ‘Items’ in ‘URLs,’ which is what we want. If for some reason, you wanted to count something other than the items from Step 2, you can long press on Items or URLs to pick something else.
Create Hyperlink, Part 2
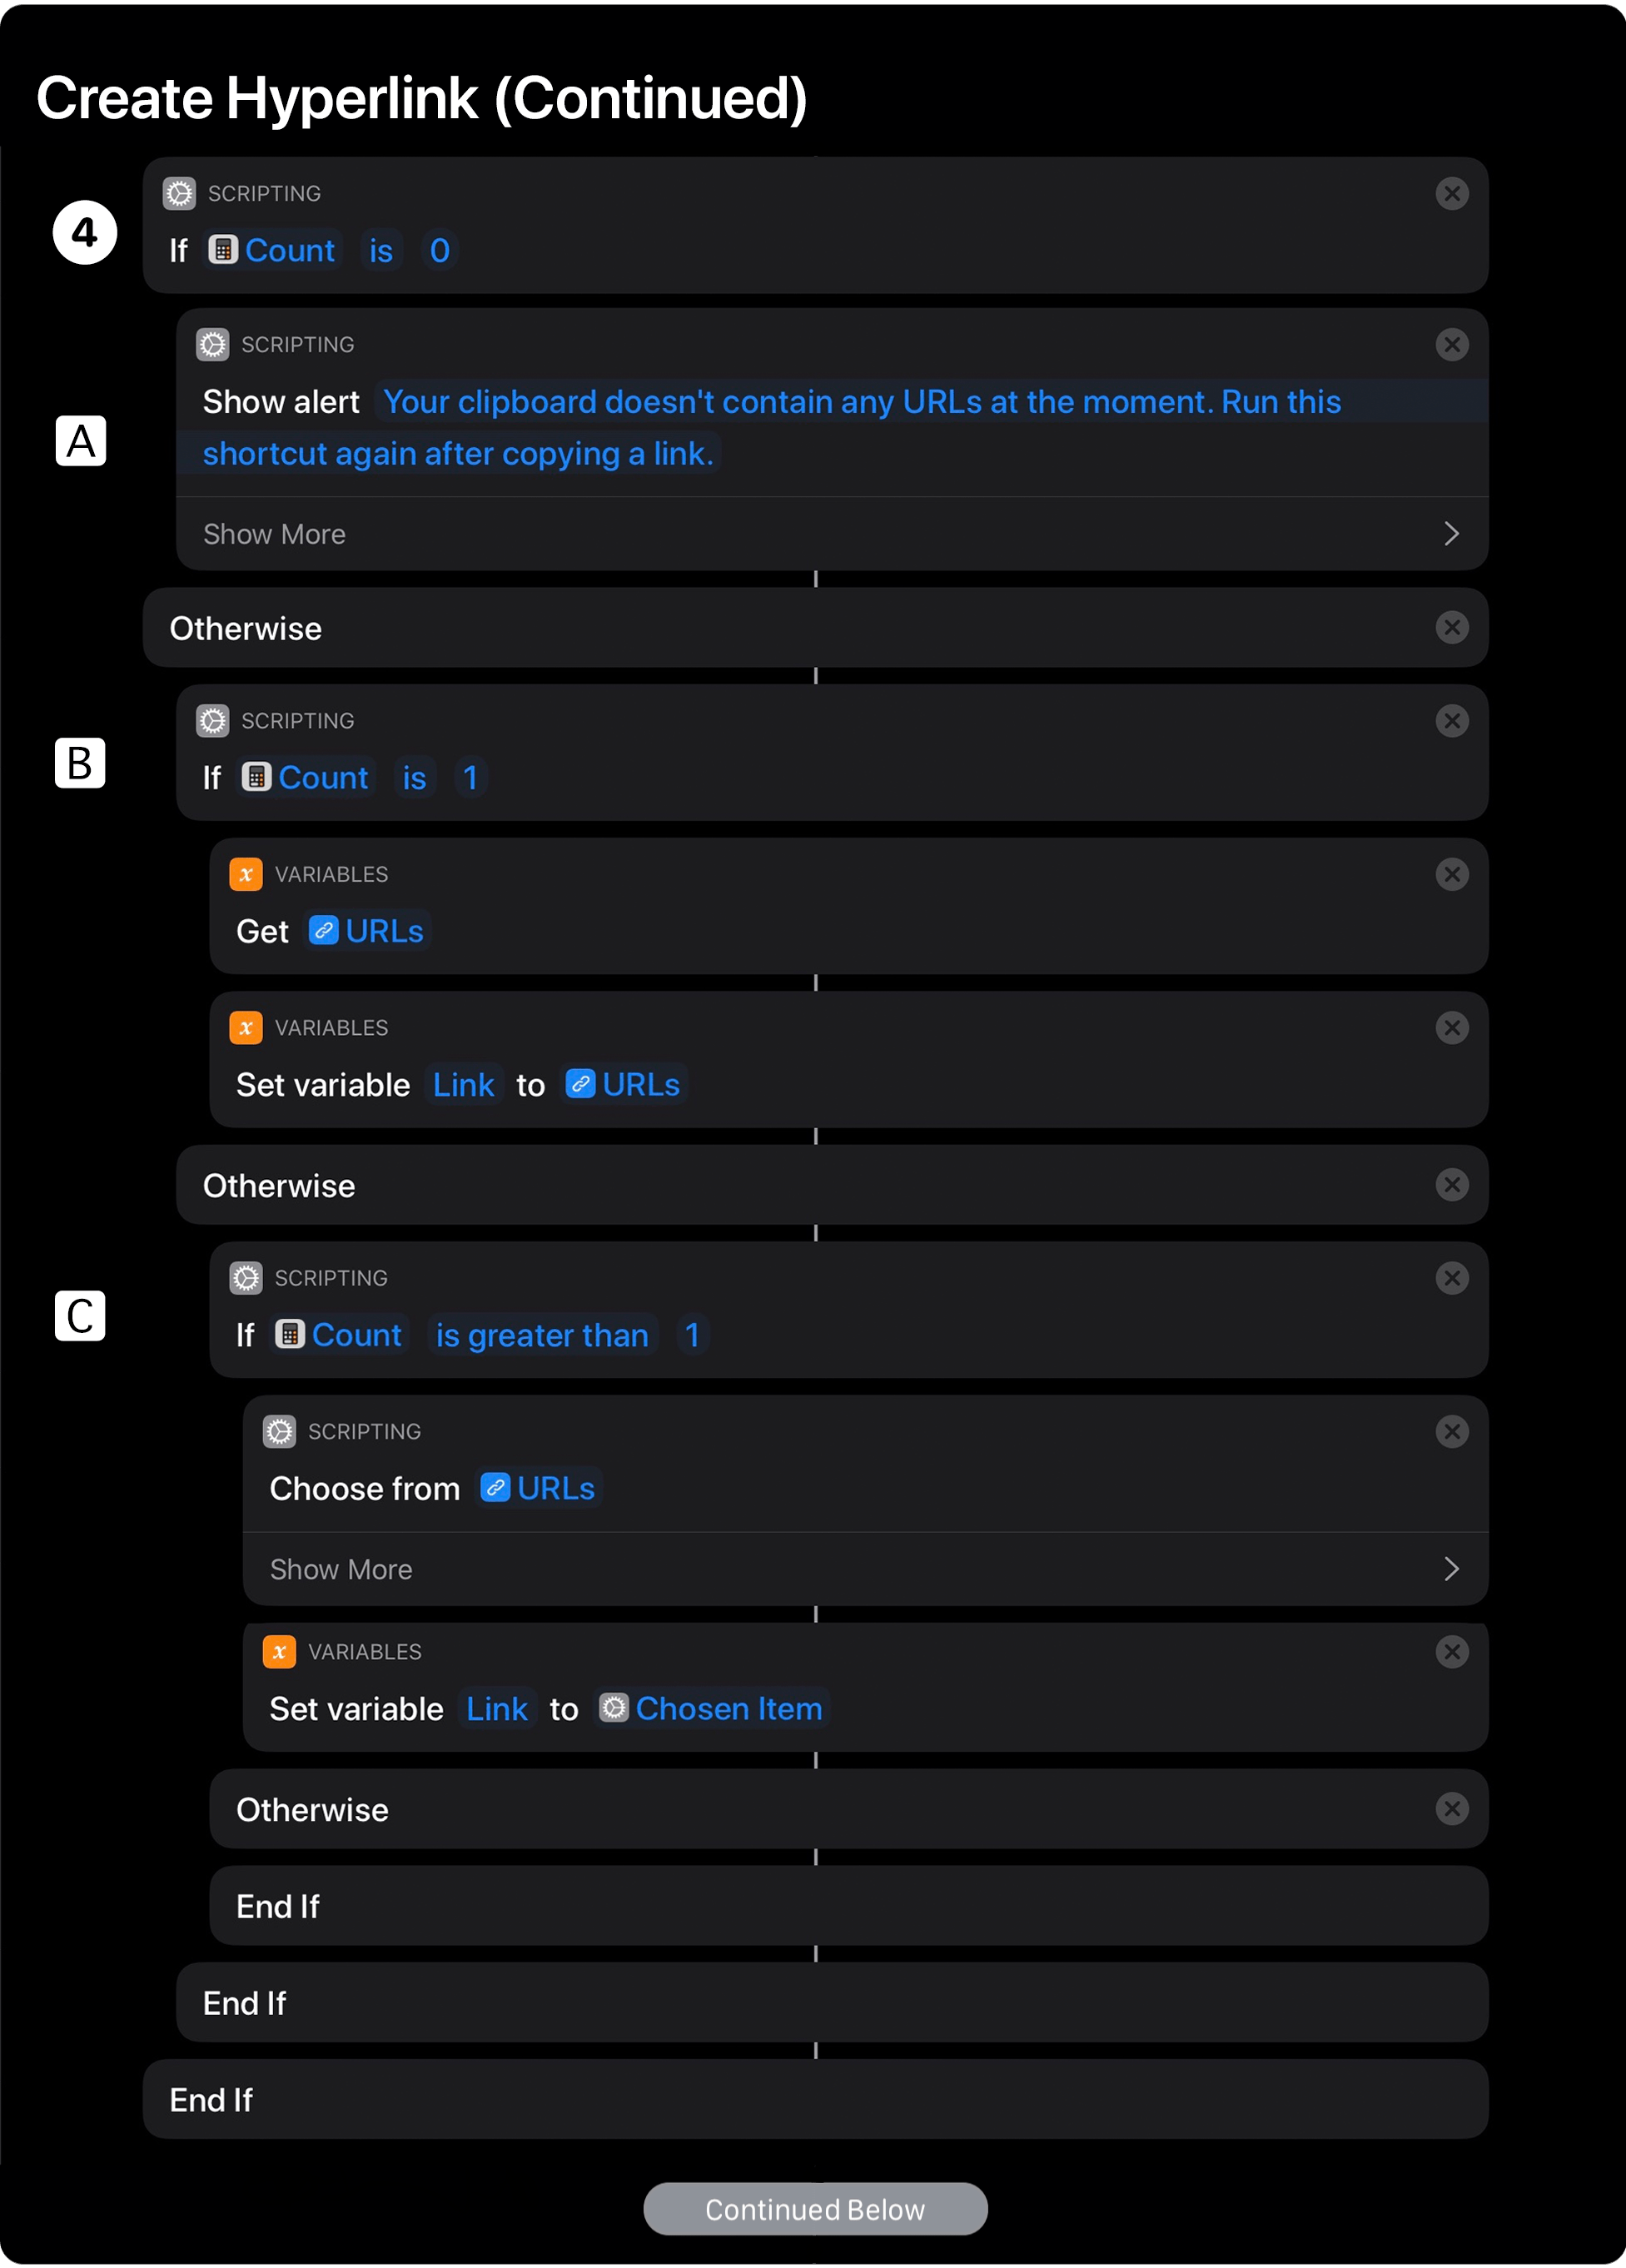
Part 2 of Create Hyperlink is where the branching logic comes into play. There are three possible scenarios that need to be addressed:
- There are no URLs on the clipboard
- There is one URL on the clipboard
- There are multiple URLs on the clipboard
To handle those three options, Create Hyperlink uses nested ‘If’ actions. An If action is comprised of three parts: the If action, an ‘Otherwise’ action, and an ‘End If’ action. A single If action is all you need if you have just two options to deal with, but as I’ll explain below, you need to nest two additional If actions inside the first If action to handle all three of the scenarios described above.
➍🅰 If actions and Show Alert
Step 4A covers the case where the clipboard contains no URLs. As soon as you add your first If action, Shortcuts assumes you want to base it on the number of Items from Step 3, which is correct. All you need to do is tap the Condition parameter in the If action and pick from the nine different methods of comparing values. For this first If action, the first option, ‘is,’ works because we want to measure if the number of URLs counted is 0. After picking the ‘is’ parameter, a new parameter for a number appears. Tap it then type 0.
If there are no URLs on the clipboard, we want to display an alert to that effect, so add a ‘Show Alert’ action to the shortcut. The Show Alert action will appear after your If action block, so drag it between the If action and the Otherwise action. Then, you can change the text of the alert to something like the language used in the version found in the MacStories Shortcuts Archive: “Your clipboard doesn’t contain any URLs at the moment. Run this shortcut again after copying a link.”
➍🅱 Set Variable
Step 4B is where we add the first nested If action. Add an If action to the shortcut like you did above and drag it between the Otherwise and End If actions of your first If action.
This second If action likewise assumes you want to control what happens based on the count of the items from Step 3, which is correct. Tap the ‘Condition’ parameter, choose ‘is’ from the list, and then set the Number to 1.
Create Hyperlink was created before an update to Shortcuts that can be used to simplify the shortcut a little. Shortcuts uses variables, including Magic Variables, to store data temporarily that can be used by other actions in the shortcut. Previously, you had to ‘get’ a variable every time you wanted to set it to another value. Now, you can skip the ‘Get’ actions you see in Steps 4B and C, and go directly to the ‘Set Variable’ action. The Create Hyperlink shortcut in the MacStories Shortcuts Archive still works with the Get actions, but if you’re creating it from scratch, proceed to the Set Variable action, which defines a new variable called ‘Link’ and assigns it the URL Magic Variable output from Step 2.
➍🅲 Choose from List and Set Variable
Step 4C requires another If action to be dragged after Step 4B’s Otherwise action. This time, however, set the condition so it reads ‘If Count is greater than 1.’ If there is more than one URL on the clipboard we need to pick one, so add a Choose from List action, like the one we used in the Shortcut Rich Link above. When you drag the action into place after the If action, Shortcuts will assume you want to pick from the Count variable, but we want the URLs instead so long press on Count, tap Select Magic Variable, and pick URLs, which appears just after Step 2.
Finally, add a Set Variable action and set it to the Link variable. Shortcuts will automatically suggest setting Link to Chosen Item, which is what we want, so no change needs to be made there. If you’ve set the nested If actions up correctly, they will end in an Otherwise action followed by three End If actions.
Create Hyperlink, Part 3
The final part of Create Hyperlink takes the URL from Part 2 and uses it to generate a hyperlink.
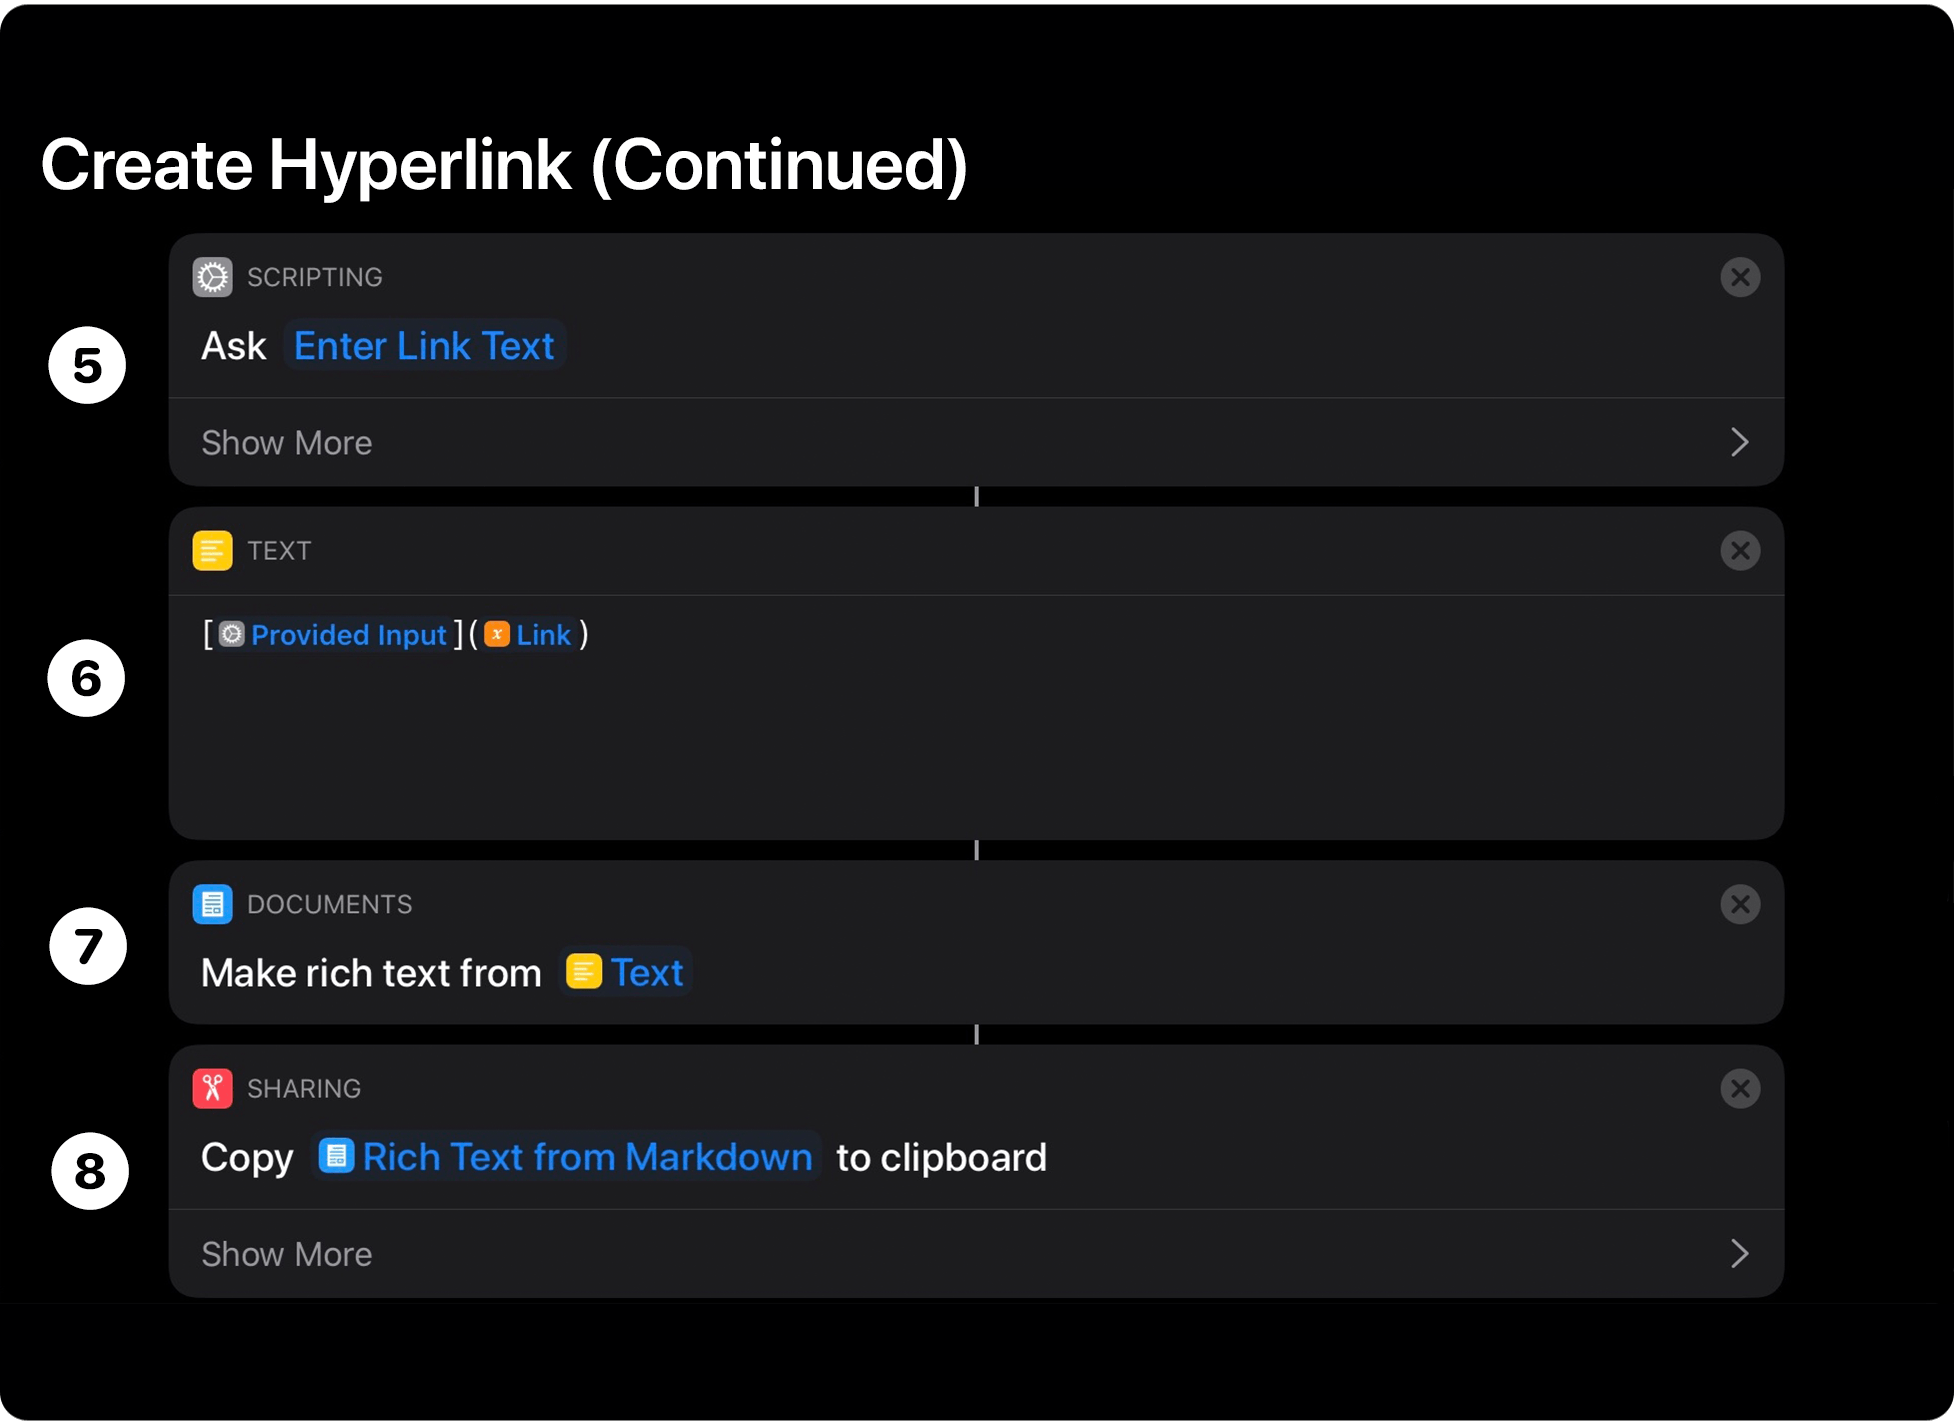
➎ Ask for Input
Step 5 uses an ‘Ask for Input’ action, which will be the text to which the URL is linked. The shortcut uses an ‘Enter Link Text’ prompt to let the user know what input is being requested.
➏ - ➑ Markdown → Rich Text → Clipboard
The final three steps should be familiar by now. Step 6 builds a Markdown link that combines the text input in Step 5 and the URL from Part 2 above. Next, Step 7 converts the Markdown link to a rich text link, and finally, Step 8 copies the link to the clipboard for pasting in another app.
You can download Create Hyperlink below or find it in the MacStories Shortcuts Archive.

Create Hyperlink
Create a rich text hyperlink based on a URL from the system clipboard. This shortcut is ideal for creating underlined links for apps that do not support rich link creation such as Notes or Apple Mail.
My favorite part of these three shortcuts is the flexibility they demonstrate despite being relatively simple. There are times and places for more complex shortcuts, but often it’s the simplest shortcuts that come in handy the most. That means even if you’re a beginner, you can build shortcuts that will save you time and effort right away, while simultaneously learning techniques you can build on to create more complex shortcuts later.
Stay tuned for future installments of Shortcuts Rewind. Although this inaugural story is aimed at beginners, our plan is to build on it and publish a variety of stories that will appeal to Shortcuts users of all experience levels.


