This Week's Sponsor:

Incogni

Put an End to Spam, Scams, and Robocalls on Your iPhone


Posts tagged with "keyboard maestro"

Convert Twitter.com URLs to Tweetbot Links

I communicate with my team through iMessage. We’ve tried many “communication services” over the years, yet, since last Fall, we’ve always come back to Apple’s solution. It’s not perfect for us, its reliability is far from 100%, but it works.

As we keep using iMessage every day, there’s one category of “media” we’re constantly sharing: Twitter URLs. We find some cool piece of information or news on Twitter, we share it with the team. Linking back to tweets has, in a way, become our favorite type of commentary for fun, news-hunting, and everything in between.

Twitter.com URLs, though, aren’t the best way to jump back to a tweet, especially when you’re on a mobile device. When you’re on a Mac, clicking on a Twitter link will open a new browser tab, which doesn’t really bother us as we’re used to opening background tabs on our computers. But on the iPhone and iPad, it can become annoying: there’s a limit of 8 Safari tabs on the iPhone, you get yanked out of Messages, and, most of the time, mobile.twitter.com URLs just don’t work. In our team chat, we’ve speculated the “Not Found” errors we’ve seen may be related to how Tweetbot generates Twitter URLs when you hit “Copy Link to Tweet”: instead of using status in the URL slug, it uses statuses, which seems to be the reason behind erroneous redirecting on mobile devices.

We’ve come to the conclusion that we want to be able to easily copy twitter.com URLs and turn them into links based on Tweetbot’s URL scheme. Using a simple tweetbot:// URL, you can use Twitter’s status ID – the same you receive when you copy a link – to open a single tweet directly in Tweetbot. And the best part is, the same URL scheme works consistently across Tweetbot for iOS and Tweetbot for Mac. As everyone on the MacStories team is already using Tweetbot, the solution seemed obvious – plus: no more browser tabs.

The problem was finding a way to convert twitter.com URLs easily, without having to remember complex combinations of keystrokes and commands. Furthermore, as I promised my team I’d come up with a way, I had to figure out a solution to do text conversion directly on iOS.

As a result, I’ve come up with an AppleScript, a Keyboard Maestro macro, and a simple Python script to transform Twitter URLs into their Tweetbot counterparts. Read more


Send Selected OmniFocus Task to Plain Text File

I save a lot of stuff into OmniFocus: bits of text, URLs, emails. I used to save favorite tweets into it, too. The app’s Quick Entry panel is so easy to invoke and so well-integrated with core parts of OS X  that, most of the time, I find myself clipping information that shouldn’t be into OmniFocus at all. However, I also find the process of manually going through that information beneficial to my workflow: it allows me to mentally and practically separate actionable items (tasks) from things to read and things to write (Instapaper material and my future articles, essentially).

I have created a simple AppleScript to send the selected OmniFocus task to a text file. The script is meant for how I use OmniFocus; hopefully you’ll find it useful as well. Feel free to modify it.

Typically, when I decide to go through my OmniFocus inbox, I find a lot of tasks that are actually ideas of things I want to do or write. Ideas don’t go into OmniFocus. Until those ideas become actionable items, I send them to a text file so I can elaborate on them and see if they can evolve. Like I said, most of the time those ideas are for new articles.

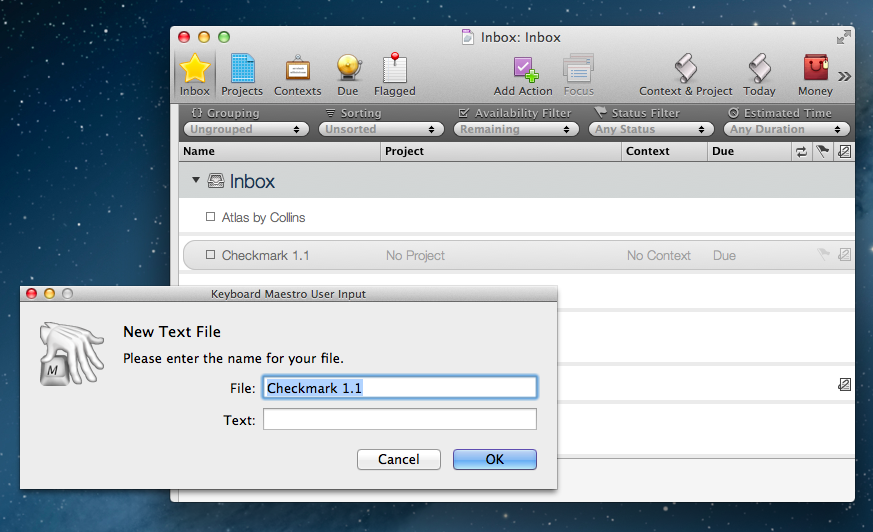
I store all my notes in a single Apps/ directory on my Dropbox. Based off the same AppleScript, I have created a Keyboard Maestro macro to create a new text file for each processed task; this is for ideas I know will turn out to be single, standalone articles. For ideas I’m not so sure about, I prefer to append them as text to an Ideas.txt file I keep in Dropbox as an “everything bucket” for inspiration. Read more


Send Flagged Mail Messages To OmniFocus Automatically

Send Flagged Mail Messages To OmniFocus Automatically

Sven Fechner pointed today to an AppleScript published in late 2011 by Hunter Hillegas to send flagged Mail.app messages to OmniFocus’ inbox on the Mac.

In iOS 5, Apple added the ability to flag a message, just as you’ve been able to do on the desktop forever. I created an AppleScript that looks for flagged messages. When it finds them, it adds them to OmniFocus and links them back to Mail.app, just like the Services action does. It then also unflags the message, resetting the state back to normal. This script runs every five minutes.

In iOS 6’s Mail.app, it’s now even easier to mark a message as flagged. I have tried the script, and it works as advertised. I would modify it to include only the latest message of a thread in the task note, but I see the appeal of having an entire conversation saved in OmniFocus for reference.

Obviously, the script is best enjoyed if executed on a Mac that’s running all the time. In this way, you can set a message as flagged on iOS, wait a few seconds, and find it in OmniFocus right away.

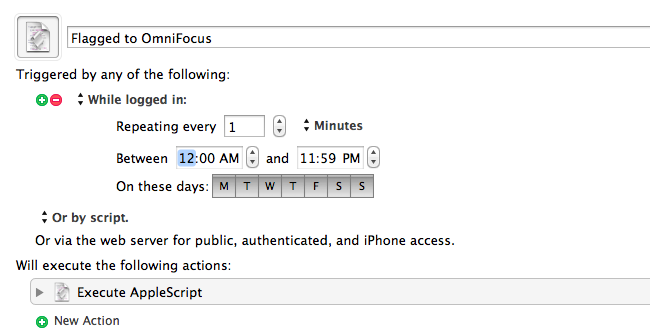
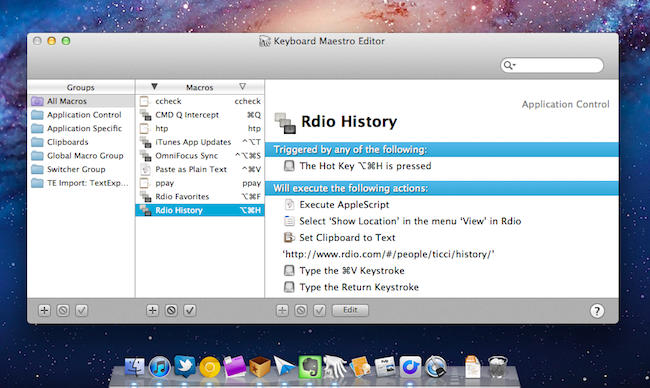
Personally, I run my own OmniFocus sync (every minute) so that I always have up-to-date sync that I can control. To implement this script in my workflow, I just had to create a new Keyboard Maestro macro (pictured above) that runs the AppleScript every minute if I’m logged in. In the way the script is designed, flagged messages are processed, then set back to “unflagged” so they won’t be added again in the future (unless you flag them manually).

You can find the AppleScript here.

Permalink

A Better Way To Combine iPhone Screenshots with Keyboard Maestro

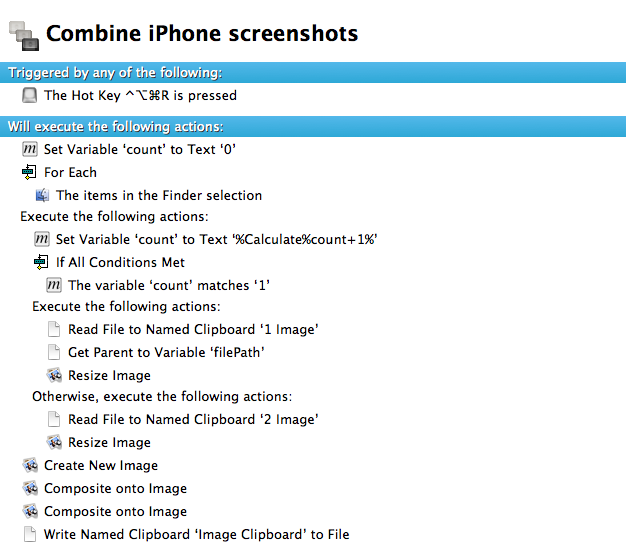
In May, in my coverage of Keyboard Maestro 5.3 I shared a macro to combine two iPhone screenshots in a single image through a keystroke:

For iPhone apps, I like to take two screenshots, place them side by side, and generate a single image. Until today, I had to manually drag the image out of Photo Stream (or use Scotty), resize them with Preview, create a new image in Acorn, drop the images in there, adjust their position, and save. I came to the point where the process took less than a minute, but still it required a manual and boring effort on my side. Enter Keyboard Maestro 5.3: I rename the images I need to use “1″ and “2″, respectively (“1″ goes on the left side); I tell Keyboard Maestro to run an Automator workflow to scale them; Keyboard Maestro creates a blank image in its clipboard, composites files 1 and 2 onto the image at a specific pixel position, and creates a new .png file on my desktop.

With the release of the iPhone 5, I updated the macro to include a version that would use the bigger resolution of the new device; however, the macro was still requiring two files named “1.png” and “2.png” to be available and selected in the Finder. While the process of manually renaming a file was allowing me to “control” the placement of the screenshots on the final image (1.png would end up on the left), I still received several requests to figure out a way to grab any image – not just those named “1” and “2”–  from the Finder.

Gabe Weatherhead of Macdrifter came up with a way to allow for such workflow, and he allowed me to share the macro here on MacStories. Read more


Keyboard Maestro 5.3

Keyboard Maestro 5.3

I love Keyboard Maestro. It is one of my most used OS X utilities – I use it every day, I rely on it to automate processes and tasks that would take repetitive and tedious clicks and selections otherwise, and my work is ultimately faster and more efficient because of it. I have covered Keyboard Maestro in the past on MacStories, and after using the app for over a year now, it still feels like I’m just getting started with it. Keyboard Maestro offers an infinite amount of possibilities, because it is capable of automating almost every aspect of OS X.

With today’s 5.3 update, Keyboard Maestro gets even more powerful, and adds support for one specific area that is going to dramatically speed-up my workflow once again: image manipulation. From the press release:

Version 5.3 adds a bunch of new Image manipulation actions, allowing you to create new images, flip, rotate, resize, and crop images, composite images, styled text and shapes onto images, display images, get the size of images, and even find the image on the screen. You can also capture the screen or a window to an image, or highlight a location on the screen.

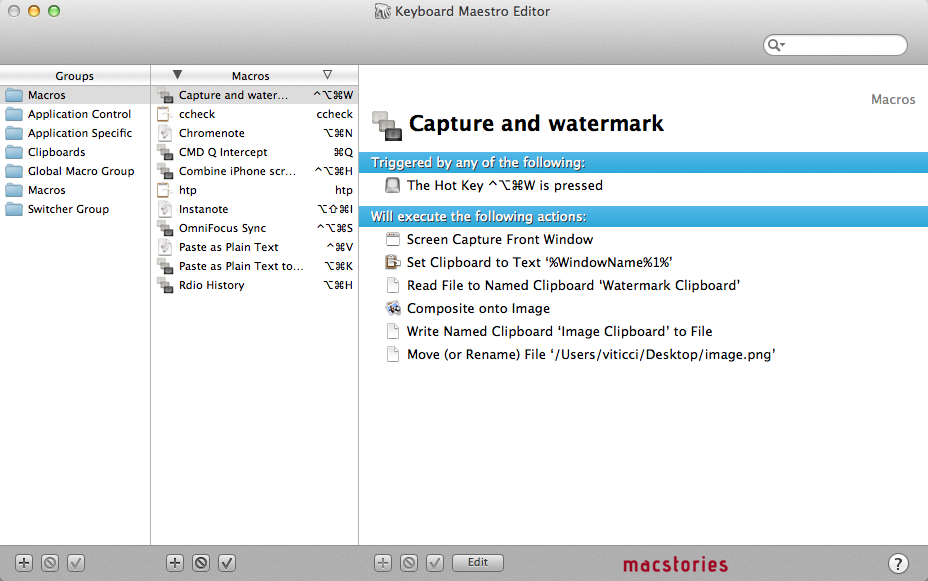
Let alone the other improvements of version 5.3 (here’s the full changelog), let me quickly focus on the image capabilities of the app, as I have set up two new macros that are going to substantially enhance my screenshot-taking duties for the site. Firstly, the image above: taken with Keyboard Maestro, set it to a specific clipboard, modified with the addition of a pre-defined watermark, saved as .png and renamed with (previously copied to clipboard) front window’s file name. Execution time: 1 second.

Then, iPhone screenshots. For iPhone apps, I like to take two screenshots, place them side by side, and generate a single image. Until today, I had to manually drag the image out of Photo Stream (or use Scotty), resize them with Preview, create a new image in Acorn, drop the images in there, adjust their position, and save. I came to the point where the process took less than a minute, but still it required a manual and boring effort on my side. Enter Keyboard Maestro 5.3: I rename the images I need to use “1” and “2”, respectively (“1” goes on the left side); I tell Keyboard Maestro to run an Automator workflow to scale them; Keyboard Maestro creates a blank image in its clipboard, composites files 1 and 2 onto the image at a specific pixel position, and creates a new .png file on my desktop. Like this one. I don’t need to manually switch between apps anymore as everything’s automated, and takes 2 seconds, literally.

Keyboard Maestro has a lot to offer, but that’s up to you. Check out the app’s tour, full documentation, then buy it from Stairways Software for $36.

Update 9/30/2012: Here’s an updated version of the “Combine iPhone screenshots” macro for the new iPhone 5 resolution. (thanks, @PiratXMac)

Update 10/7/2012: A better version of the macro is now available here.

Permalink

A Hack to Get Back “Save As”

A Hack to Get Back “Save As”

And to add insult to injury, as a keyboard junkie it’s not just the removing of “Save As” that saddens me. It is also the removal of a very handy keyboard shortcut that I used many times a day: Command+Shift+S. And so, by harnessing the power of Keyboard Maestro, I set up Command+Shift+S as a “Save As Hack”.

Shawn Blanc laments about how Lion’s Duplicate and Revert functions — replacements for the apparently outdated yet super useful Save As function — just don’t cut it when you want to save multiple versions of a document or quickly save a copy with an alternate name (I do this a lot when self-editing lab work in college). Apps like OmniOutliner work around this by offering templates (which were available before Lion mind you), but even then the Save As function offers a direct path to quickly renaming the file and shoving it in Dropbox if you have to.

Duplicate performs this function in that you physically get a new document copy presented on the desktop. The problem with Duplicate is that while it’s intended to be user friendly, it ends up making more work than is necessary. Instead of simply renaming and saving a document, you have to sit through an animation, close the original document, then rename and save the new document. I think its safe to say most Mac bloggers are inherently power-users, and have come to rely on quick keyboard shortcuts and tools that were standard up until now. While Duplicate isn’t as friendly for us, Shawn’s right: the worst part really is the lack of that shortcut key.

Shawn has a Keyboard Maestro macro available on his site for download. Alternatively, John Gruber and Ben Brooks offer a similar solution that doesn’t go as far, but brings back the shortcut irregardless through System Preferences.

Permalink

Automatically Saving PDFs (And Clipboard) to Evernote Using Keyboard Maestro

Automatically Saving PDFs (And Clipboard) to Evernote Using Keyboard Maestro

Over the weekend, I posted my initial impressions on Keyboard Maestro, a fantastic assistant for your Mac that will help making your OS X workflow faster, and personalized. Today Brett Kelly at Nerd Gap shares a tip to automate the process of virtually printing a PDF from Mail.app to Evernote:

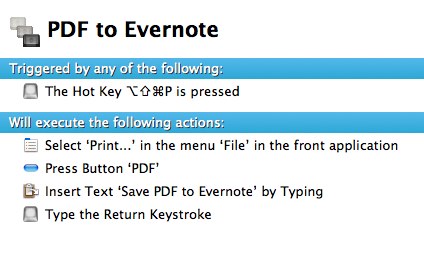
Clicking this menu option will render whatever the current thing is as a PDF and shove it into Evernote. This Keyboard Maestro recipe automates the following steps that make up this process:

- Click “File” then “Print” in the current application menu

- Click the “PDF” button at the bottom left of the Print dialog

- Type “Save PDF to Evernote” to select the appropriate option (this is the only way I could do this with some certainty that it would work, though there were other options)

- Type Return

The Keyboard Maestro macro above works with any Mac app that supports the Print… menu, although, for some reason, Google Chrome Canary returns an error at the “Click PDF button” action. Safari, Mail, Sparrow – they can all print to Evernote using Keyboard Maestro.

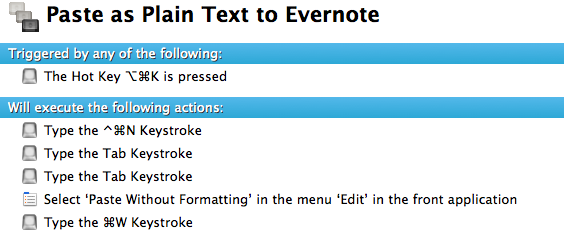
Alternatively, if you don’t want to save PDFs to Evernote, you can set up this macro to quickly create a new note using Evernote’s helper (the menubar icon), paste without style, and close the window. It’ll take less than a second to perform through Keyboard Maestro, and it’s a nice way to quickly get your latest clipboard entry onto Evernote as plain text.

You’ll need to set title and tags later, as this only pastes the clipboard in the note’s body.

Permalink

My Two Weeks with Keyboard Maestro

I’ve been intrigued by Keyboard Maestro since I first heard about it on Daring Fireball years ago, but never installed and tried the app because of a somewhat widely shared notion that it’s “too difficult to use”. Recent Keyboard Maestro coverage on Brooks Review, ShawnBlanc.net and MacDrifter took my curiosity to a whole new level, so thanks to the Productive Macs bundle, I pulled the trigger and got a copy of Keyboard Maestro, which was later upgraded to version 5.0 for free with the same license.

There’s no easy way to describe Keyboard Maestro, but I’ll try: Keyboard Maestro is a trusted and powerful assistant for your Mac. When you don’t know how to do something, or how to make an existing menu or functionality faster and easier to use, you can turn to Keyboard Maestro and start building your own way out of options third-party developers or Apple didn’t think about.

Keyboard Maestro empowers you to take existing apps, menus, keyboard shortcuts – anything your Mac can perform – and mix them together to achieve something that fits better your workflow.

Keyboard Maestro isn’t strictly about tweaking. The app’s real power lies in how it puts the focus on discovering and building what’s better for you, and sticking with it. It’s no toy, but it’s fun to use once you get the (easy) hang of it.

Writing a review of Keyboard Maestro it’s like asking someone to “write a review of Apple”. The subject is so broad, the offer so variegate and ever-changing, it makes almost no sense to go into every single feature and over-analyze it with no context. Rather, I’d prefer to provide a more empirical look at this app in that I’ll share some of the tricks and functionalities I’ve come to learn and use in the past weeks.

A simple way to understand Keyboard Maestro is this: you tell the app to do something for you automatically, in the background, whenever you want, and all you have to do to start such sequence is a trigger. The trigger can be a keyboard shortcut, something you typed, a system event – you choose the trigger and there’s plenty of options to look at when deciding which action should initiate a process. Read more