Here are today’s @MacStoriesDeals on hardware, iOS, and Mac apps that are on sale for a limited time, so get them before they end!
Read more
Posts tagged with "mac"
#MacStoriesDeals - Tuesday
#MacStoriesDeals - Monday
Here are today’s @MacStoriesDeals on hardware, iOS, and Mac apps that are on sale for a limited time, so get them before they end!
Read more
#MacStoriesDeals - Wednesday
Here are today’s @MacStoriesDeals on hardware, iOS, and Mac apps that are on sale for a limited time, so get them before they end!
Read more
#MacStoriesDeals - Monday
Here are today’s @MacStoriesDeals on hardware, iOS, and Mac apps that are on sale for a limited time, so get them before they end!
Read more
Bad Piggies Is Now Available For Download On iPhone, iPad and Mac
Bad Piggies, the latest game from Rovio, is now available for download on iPhone, iPad, Android and Mac. This latest Rovio game is a twist on the infamous Angry Birds series in which you now control the pigs and must pilot them safely to the bird eggs. Unlike the simple mechanic featured in Angry Birds in which you simply slingshot the birds into the pigs and their structures, Bad Piggies requires you to make “the ultimate flying machine” and steer them through the levels.
With more than 60 levels, and free updates coming up, you have hours and hours of pig-crashing, exploding, and flying fun! Get three stars on every level to unlock 30 more puzzles! HINT: Sometimes you need to play the level several times to achieve all the objectives – try building a new device or steering in a different way to earn all the stars!
The game currently features 60 levels, with another 30 unlockable by getting three-stars on levels and will, like Angry Birds, receive free updates that add levels. There’s also 4 sandbox levels in which you can really have fun with making some awesome flying contraptions with various fans, wings, motors, balloons and other objects. If you’re interested in reading a review, check out this one by Polygon’s Chris Plante:
Bad Piggies’ levels aren’t nearly as fast as Angry Birds. They require attention and patience as the pig slowly travels from one end to the other. Unlike Angry Birds, it’s not as easy to play on a subway or during a coffee break. The main game is a fine distraction, something to do with your hands while watching sitcoms or talking on the phone.
Download links:
- Bad Piggies for iPhone ($0.99)
- Bad Piggies for iPad ($2.99)
- Bad Piggies for Mac ($4.99)
#MacStoriesDeals - Wednesday
Here are today’s @MacStoriesDeals on hardware, iOS, and Mac apps that are on sale for a limited time, so get them before they end!
Read more
Latest Dropbox Beta Brings Redesigned Menu
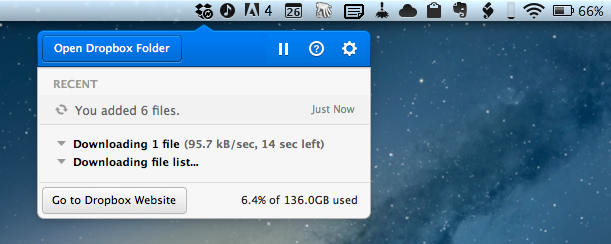
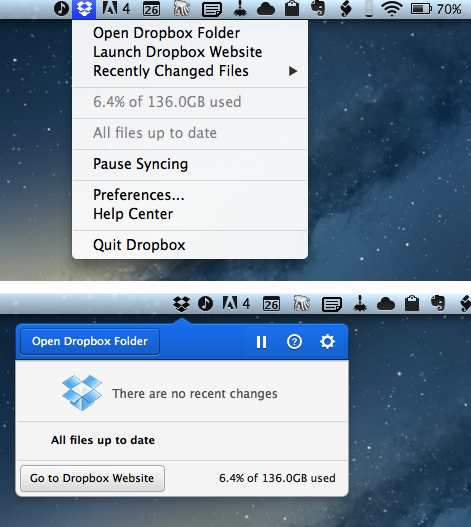
Announced last night on the public forums, the latest beta of Dropbox 1.5 for Mac brings a completely redesigned popup menu, support for Mountain Lion’s Notification Center, a new installer, and better performance.
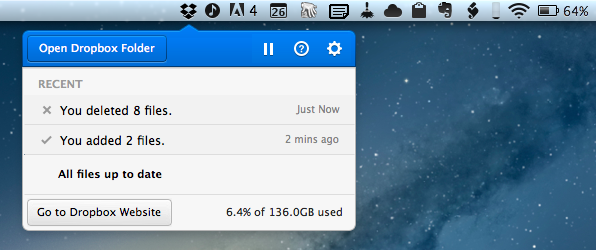
Sporting a new modern look, the redesigned popup menu is reminiscent of “popovers” that have become extremely popular among iOS developers. The new menu takes a more visual approach at displaying changes in your Dropbox, with icons for added or deleted files (that you can click to quickly go to Dropbox), a play/pause button for sync, and a large “Open Dropbox folder” to launch a Finder window at the “root” of your Dropbox.
This new popup combines all the functionality from the older tray menu with a new view of your Dropbox’s event stream, letting you see your (or other people’s) latest changes. In addition, you can use the events to easily view, share, or restore files.
Alongside the new appearance of Dropbox in the menubar, the team also says version 1.5 will bring full Notification Center support and a new, simpler installer for Mac users. The new installer works as advertised: you can simply double-click the icon for Dropbox to “update” itself to a new version. Unfortunately, while enabled in Notification Center, I haven’t been able to test the new notifications on the desktop, as I assume the functionality isn’t quite ready yet in this beta.
Personally, I think what Dropbox is showing in this experimental build is very promising. The popup menu was in need of a serious upgrade, and I’m looking forward to seeing how it will evolve throughout the next betas.
To download the latest Dropbox experimental build (and send feedback to the developers), you can head over the Dropbox forums.


