This Week's Sponsor:

PowerPhotos

The Ultimate Toolbox for Photos on the Mac


Posts tagged with "photography"

Obscura 3 Takes the App’s Design in a New Direction

I’ve been following Ben McCarthy’s journey with Obscura since the app first launched in 2015, watching the app as it has evolved alongside changes to Apple’s camera hardware. Camera apps pose unique design challenges, especially for camera apps like Obscura, which has consistently aimed to deliver pro features that can be used one-handed on an iPhone. Those challenges have only continued to multiply since I wrote about Obscura 2 and its innovative Control Wheel.

With Obscura 3, which is a brand new app, McCarthy and the Obscura team have taken a new direction with the app’s design that’s better suited for the capabilities of Apple’s modern camera hardware. It’s a direction that remains true to the app’s historical design aesthetic and user experience while making changes that I expect will provide greater flexibility to quickly adapt to future camera innovations.

I’m going to focus on Obscura 3’s design because I haven’t tested every possible combination of features the app offers. It’s winter in the Chicago area and not the best time for photo walks. Still, I’ve spent enough time with the app to know that the new design works well, allowing users to step through its myriad of features with ease, so let’s take a closer look.

Read more


Pixelmator Photo for iPhone: First Impressions

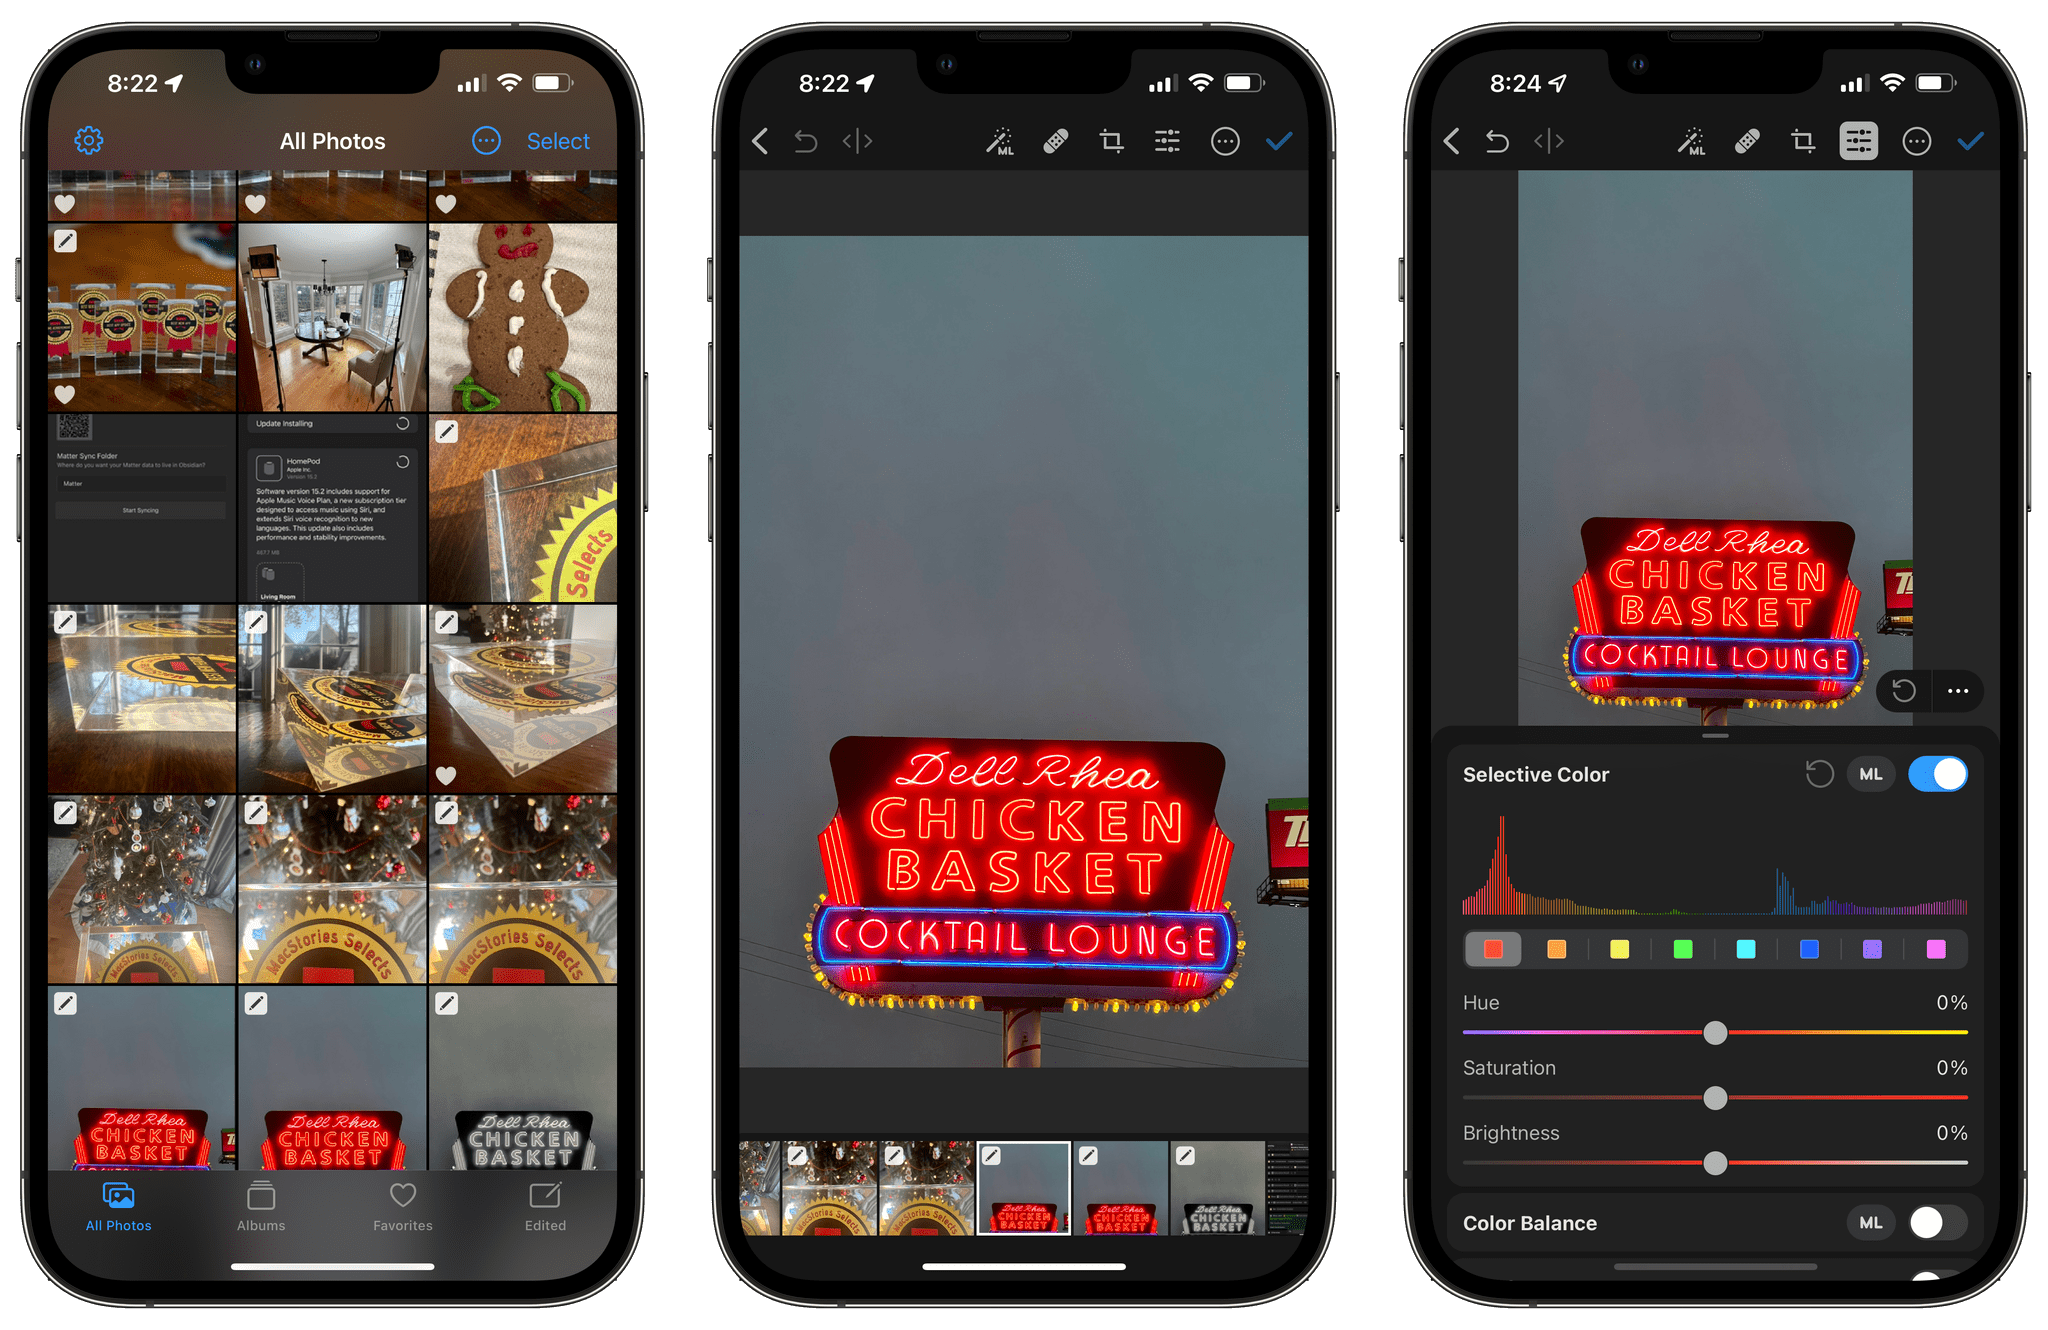
Pixelmator Photo has long been one of my favorite iPad photo editing apps. The app makes great use of the iPad’s large screen, which provides space for tools alongside the image you’re editing. Reducing that experience to even the largest model of iPhone is a tall order, but from my preliminary testing, it looks as though the Pixelmator team has pulled it off.

Pixelmator Photo on the iPad offers an extensive suite of editing tools that strike a nice balance. The app makes it simple to apply the app’s machine learning-based tools for quick editing and sharing, but it also includes fine-grained controls for when you want to more finely tune a photo. The same is true on the iPhone, but the design tilts in favor of quick access and edits, which I think is appropriate on a device like the iPhone. The deeper tools are still there, just beneath the surface and easy to access when you need them, but on the iPhone the emphasis is on accessing frequently-used tools quickly.

Read more


Pixelmator Pro Updated with Background Removal, Subject Selection, and Select and Mask Tools

Mac image editor Pixelmator Pro continues its streak of releasing machine learning-based tools that feel like magic, with a release that the Pixelmator team calls Abracadabra appropriately enough. The release of version 2.3 features tools to remove the background of an image, select just the subject of a photo, and a new Select and Mask feature for making fine-tuned selections.

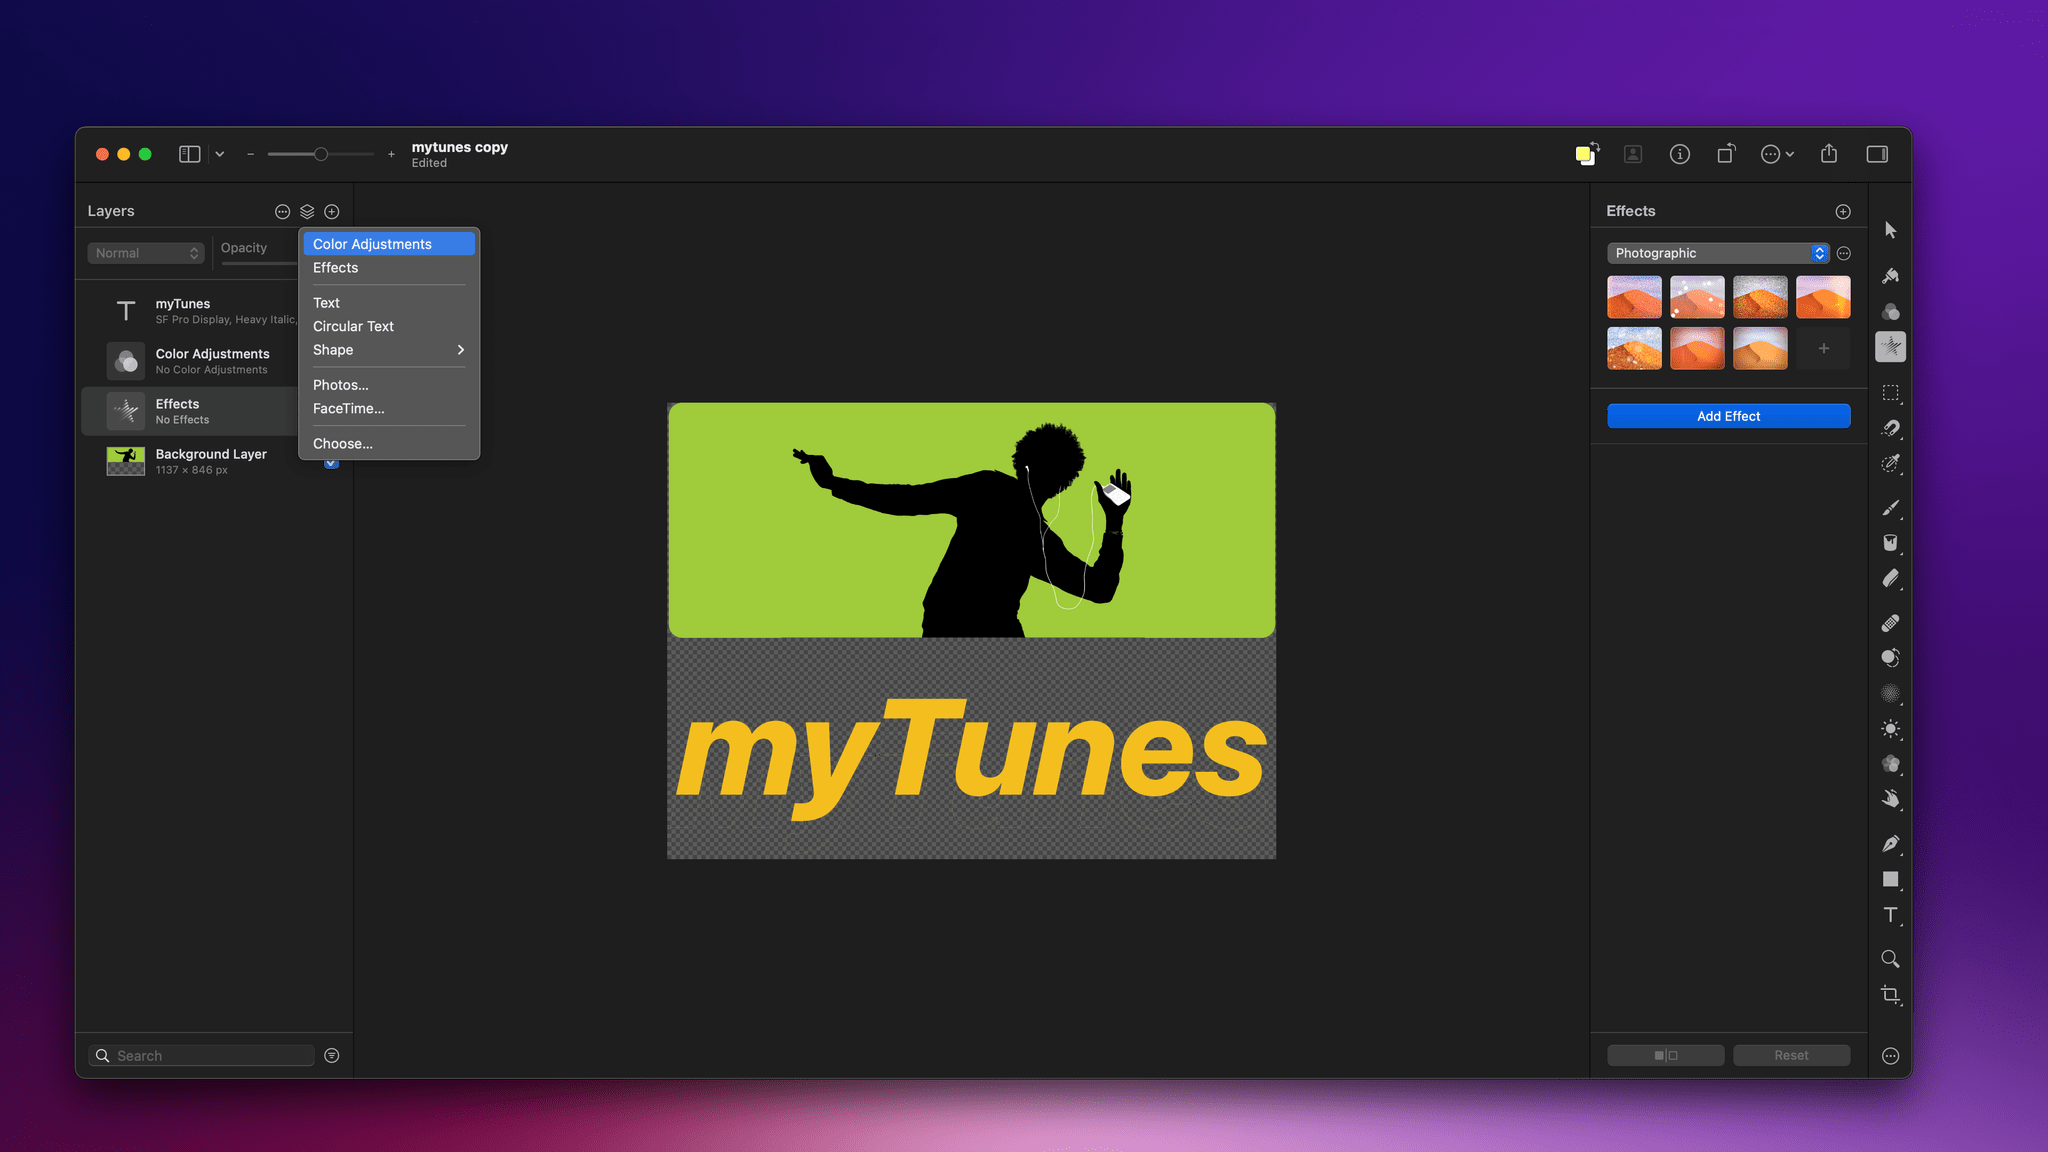
I started with these images.

I started with these images.

When I first saw a demo of what Pixelmator 2.3 could do, I was a little skeptical that the features would work as well with my photos as the ones picked to show off the new tools. However, Pixelmator Pro’s new suite of related features is the real deal. With virtually no work on my part, I grabbed a photo of Federico and me from my trip to Rome, selected us, and after making a few refinements to the selection to pick up more of Federico’s hair (mine was perfect), I cut out the background, and replaced it with a photo I took in Dublin days before. After compositing the photos on separate layers, I color-matched the layers using ML Match Colors, so they’d fit together better.

The final composed image.

The final composed image.

The results aren’t perfect – the lighting and perspective are a little off – but those are issues with the photos I chose, not the tools I used. The photo of Federico and me was taken after the sun had set and was artificially lit, while the Dublin Canal was shot on a sunny morning, yet the composite image works incredibly well. What’s remarkable is what I was able to accomplish in just a few minutes. I also removed the background from one of the photos I took recently for my Stream Deck story, which worked perfectly with no additional work needed, which has interesting implications for product photography.

Remove Background takes advantage of Apple’s Core ML framework and works in just a few seconds. Select Subject works similarly but selects the subject of an image instead of erasing the background behind the subject. If you look closely at the masked selection below, you can see how well Pixelmator Pro did picking up the edges to get selection details like hair without any additional work by me. However, if an image needs a little selection touch-up, the Refine Edge Brush and Smart Refine feature make that sort of work easy too.

Pixelmator Pro’s new tools are available elsewhere in macOS, too, as Finder Quick Actions, Shortcuts actions, and AppleScript commands. I covered Pixelmator Pro’s Shortcuts actions earlier this fall, and they are some of the best available among Mac-only apps, so it’s fantastic to see those automation options continue to expand.

Pixelmator Pro has long been one of my must-have Mac apps. I don’t spend a lot of time editing images, but when I do, I appreciate that Pixelmator Pro makes the process easy and produces excellent results regardless of your experience with image editors.


Austin Mann on the M1 MacBook Pros

Pro photographer Austin Mann has been testing a new MacBook Pro M1 Max with 64GB RAM and an 8TB SSD in Arizona. As always, his review includes beautiful images that required substantial computer power to create. After running the highest-end version of the MacBook Pro through its paces, Mann came away impressed by the laptop’s fast charging and power efficiency, as well as its overall performance:

In summary, the most impressive performance from the new MacBook Pro M1 Max wasn’t just speed (it was about twice as fast), but it was insanely efficient in how it managed both its power and heat, which matters as much or more than pure speed.

Mann’s review does an excellent job capturing how the new MacBook Pros work as a package. It’s not just that they are power efficient or fast, but the combination of multiple advances that has enabled such a substantial leap forward over previous models.

Permalink

Halide 2.5 Adds New Macro Mode

Halide 2.5 is out, and it includes a brand new Macro Mode. Macro photography is an exclusive feature of the iPhone 13 Pro and 13 Pro Max. Still, Halide has managed to make its Macro Mode available on the iPhone 8 and newer models thanks to some cool machine learning tricks.

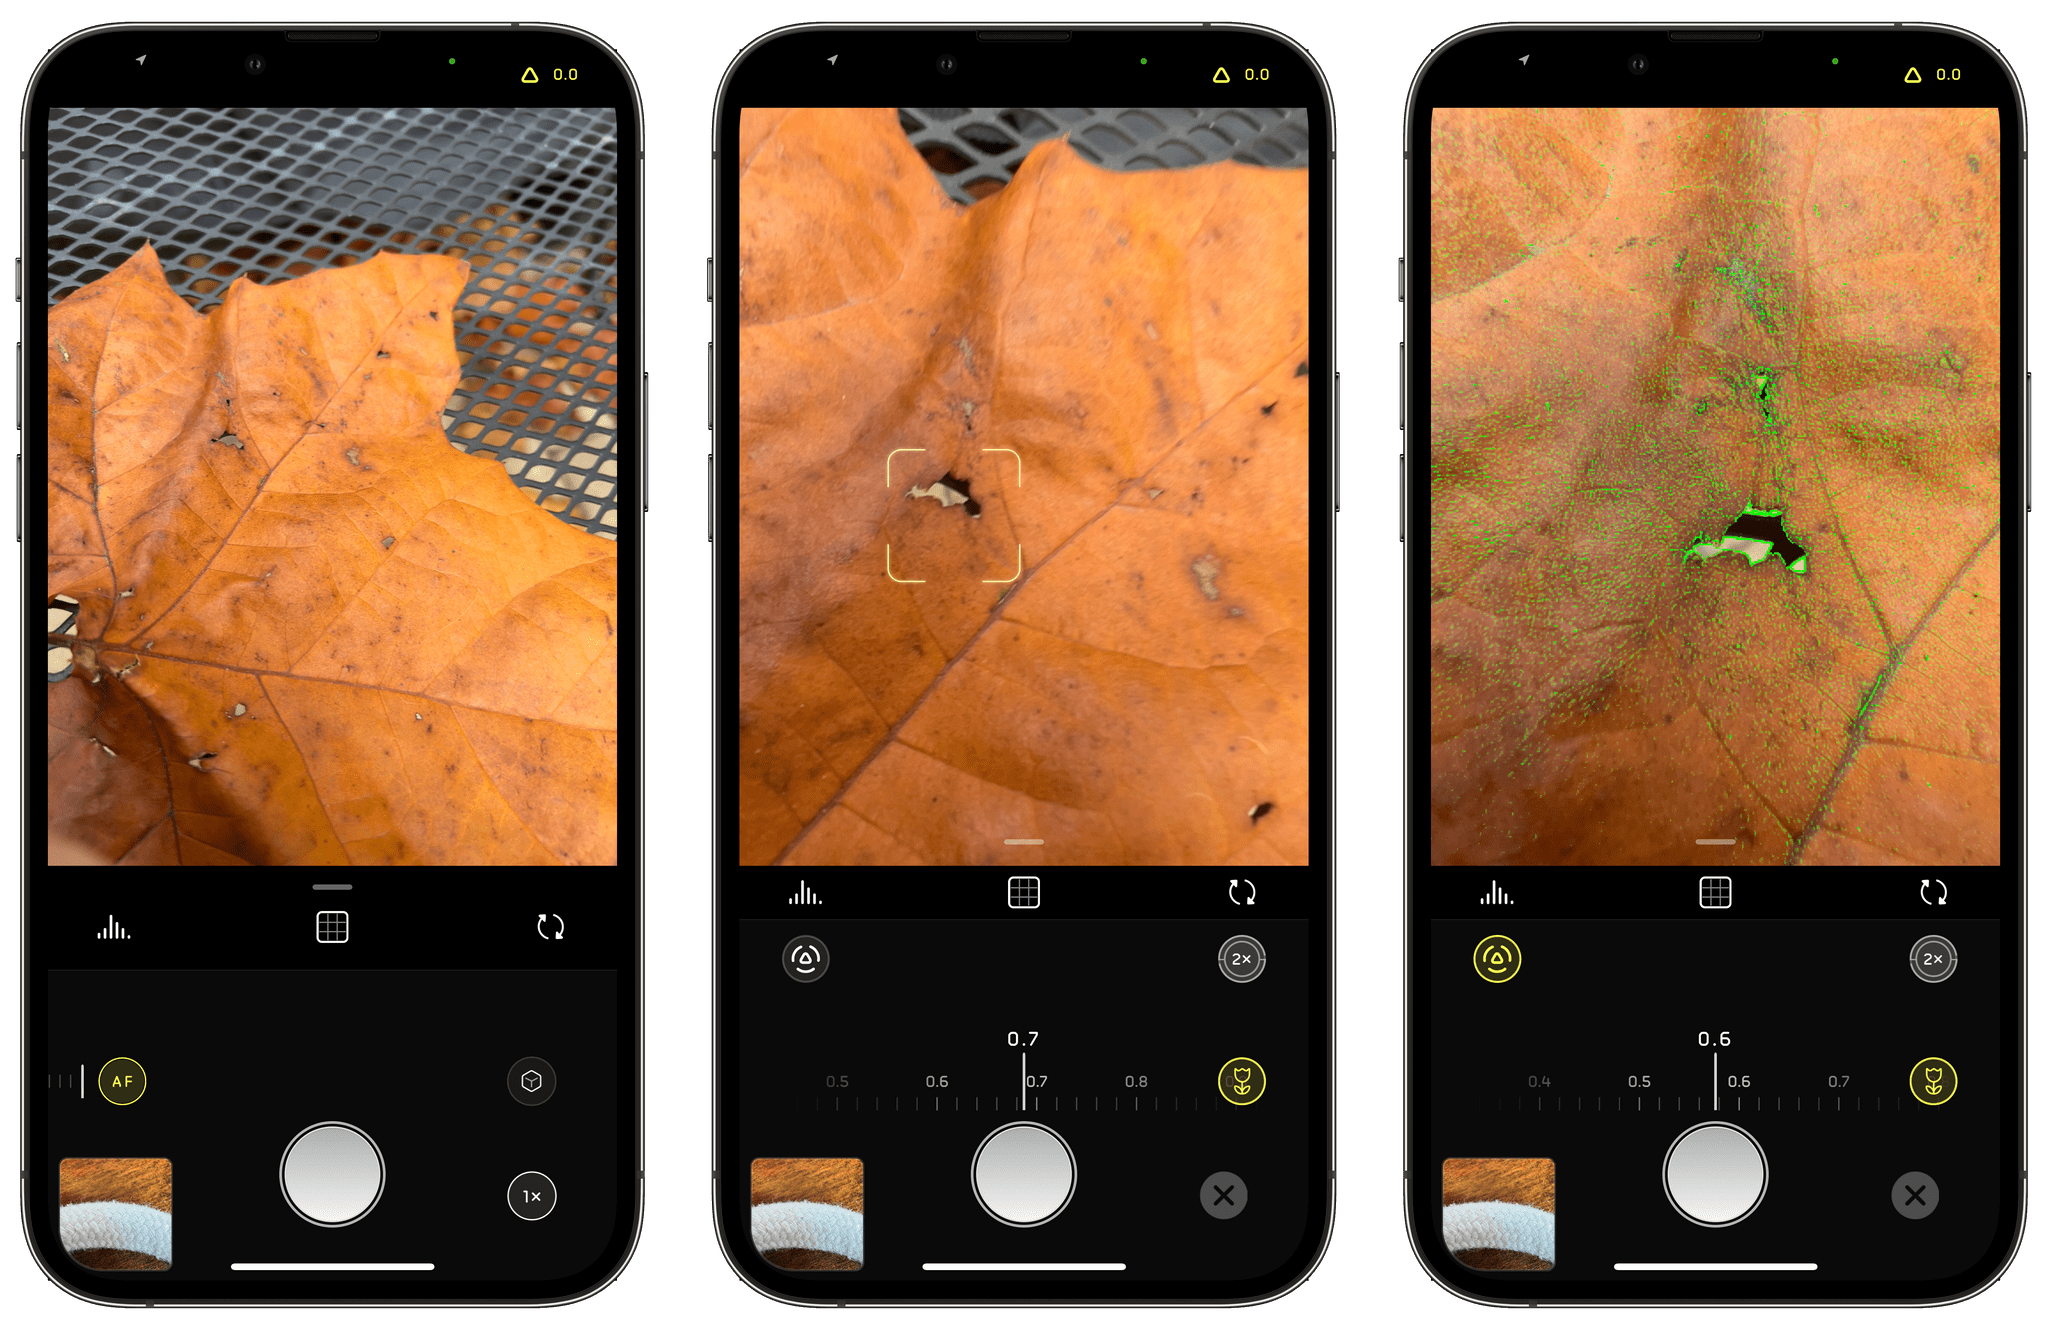
Switching to Macro Mode and dialing in precise focus is simple with Halide 2.5.

Switching to Macro Mode and dialing in precise focus is simple with Halide 2.5.

Macro Mode is easy to use. When you open the app, auto-focus (AF) is selected by default. Tap it, and the focus controls slide into place with the auto-focus at one end of the app’s focus dial and Macro Mode (the button with the flower) at the other end. Select Macro Mode, and you’ll see a new focus dial with smaller increments appear. The Halide team says this enables sub-millimeter focusing for extra-precise close-up focusing.

Halide takes its close-ups by first switching to the camera on your iPhone that can take the closest shots. Focusing is handled by its precision focus dial, and the final step is to enhance the image’s details using an AI-based enhancement process. That last super-resolution step is what allows Halide’s Macro Mode to be used on cameras on older models of iPhones and to enhance Apple’s own macro system too.

In my testing over the past day, the results have been impressive. I’m especially fond of the precise focus dial that allows for minute adjustments that make a difference at such close range.

If you’re a Club MacStories+ and Club Premier member, head over to the new Photography channel in our Club Discord to see even more of my experiments with Halide’s Macro Mode and share your own macro shots.

Halide is available as on the App Store as a subscription for $2.99/month or $11.99/year or for a one-time payment of $49.99. The app also offers a 7-day free trial.


Matthew Panzarino Tests the iPhone 13 Pro’s Cinematic Mode and Interviews Apple Executives

Matthew Panzarino, TechCrunch’s Editor-in-Chief, put the iPhone 13 Pro camera’s new Cinematic mode through its paces at Disneyland in an excellent real-world test of the new feature. Panzarino also spoke to Kaiann Drance, Apple’s vice president of Worldwide iPhone Product Marketing and Johnnie Manzari, a designer on Apple’s Human Interface Team about how Cinematic mode works.

As Manzari explained:

“In cinema, the role of gaze and body movement to direct that story is so fundamental. And as humans we naturally do this, if you look at something, I look at it too.”

So they knew they would need to build in gaze detection to help lead their focusing target around the frame, which in turn leads the viewer through the story. Being on set, Manzari says, allowed Apple to observe these highly skilled technicians and then build in that feel.

“We’re on set and we have all these amazing people and they’re really the best of the best. And one of the engineers noticed that the focus puller has this focus control wheel, and, and he’s just studying the way that this person does this. Just like when you look at like someone who’s really good at playing the piano, and it looks so easy, and yet you know it’s impossible. There’s no way you’re going to be able to do this,” says Manzari.

“This person is an artist, this person is so good at what they do and the craft they put into it. And so we spent a lot of time trying to model the analog feel of a focus wheel turning.”

To make it all come together into one, coherent feature, Apple’s engineers had to solve a long list of technical challenges:

Some of the individual components that make up Cinematic Mode include:

  • Subject recognition and tracking
  • Focus locking
  • Rack focusing (moving focus from one subject to another in an organic-looking way)
  • Image overscan and in camera stabilization
  • Synthetic Bokeh (lens blur)
  • A post-shot editing mode that lets you alter your focus points even after shooting

And all of those things are happening in real-time.

Despite everything that goes into Cinematic mode, Panzarino notes that the battery impact of using it throughout the day was surprisingly slight.

Cinematic mode isn’t without its flaws, which are covered in the story, but it’s worth watching the entire video that Panzarino shot during a Disneyland visit with his family to get a sense for it yourself. If you study the video closely, you’ll pick up on the places where Cinematic mode struggles. However, sitting back and casually watching the video like you would after a vacation or if a friend sent it to you, the flaws largely fade into the background. I’m eager to test Cinematic mode for myself, and I don’t mean to suggest that it’s necessarily fine as it is, but I also expect that it will be a net positive in a lot of circumstances.

Permalink

Austin Mann Puts the iPhone 13 Pro and iPhone 13 Pro Max Cameras Through Their Paces

Specs only tell part of the story of new hardware. They’re important, but they only hint at what’s possible. Put that hardware in the hands of someone who can push it to its limits, and those hints of the possible become concrete examples of the actual. When Apple announced the iPhone 13 Pro, the stats suggested the device’s camera was poised to leap forward. Austin Mann’s review of the 13 Pro’s camera confirms it with a series of stunning photographs from Tanzania.

One of the new Camera features I’m looking forward to most is the ability to take macro photos. Mann explains that:

Although the iPhone 13 Pro still only has three lenses, the addition of macro capability is like adding a new lens altogether, and for the serious photographer I think it’s perhaps the strongest advancement in this year’s camera system.

Macro is more than just improved focus distance. It offers a new way of seeing and opens up an entirely new world of photography and storytelling.

Taken using Photographic Styles. Source [austinmann.com](https://austinmann.com/trek/iphone-13-pro-camera-review-tanzania)

Taken using Photographic Styles. Source austinmann.com

Mann also covers Photographic Styles, which he says allow for a relatively subtle shift of the look of photos without feeling like a flat image-wide filter has been applied, explaining when he’d use them even as a pro photographer:

Of course, I’m usually shooting ProRAW on client projects, but there are times when I just want great looking images right now versus maximum processing control later. Photographic Styles will be perfect for that.

Finally, I thought this insight about Cinematic mode was interesting:

As I watched this piece, particularly the interview in Cinematic mode, it dawned on me that we’re moving beyond the world of just computational photography and into the realm of computational videography. The release of Cinematic mode marks another one of those fundamental shifts where software, unbounded by the limitations of hardware, has opened up entirely new possibilities in the creative process.

From the reviews I’ve seen, Cinematic mode feels like early Portrait mode in terms of how well it works. Although there’s obvious room for improvement, Portrait mode has come a long way in recent years, and it’s exciting to think Cinematic mode may do the same too.

As usual, Mann’s review is full of fantastic shots of the landscapes, people, and nature of Tanzania, which are beautifully shot and are excellent examples about what’s possible with the iPhone 13 Pro.

Permalink

Pixelmator Pro 2.1 Adds ML Crop, Quick Fill Color, and Text Tool Updates

The team at Pixelmator has released an update to its Mac photo and image editing tool Pixelmator Pro that includes several new features.

Teased last month, Pixelmator Pro 2.1 has been updated with ML Crop, a machine learning-based cropping tool that algorithmically suggests ways to crop your images. The feature joins several other machine learning-based features that the app has added in the past couple of years. In my limited testing, ML Crop works well, suggesting crops based on the subject of photos that are more dramatic and focused on the image’s subject. The entire cropping process is non-destructive, so even if you aren’t entirely happy with a suggested crop, it can be used as a starting point and easily tweaked manually.

Source: Pixelmator.

Source: Pixelmator.

Pixelmator Pro has evolved into more than just a photo editor. The app includes powerful image creation tools that got an update today too. Quick Fill is a fast way to fill an image layer with color by simply dragging the color from the app’s new color well that also supports switching between foreground and background colors.

The app has added a Stroke with Brush feature that facilitates painting with the app’s brushes along the path of shapes and image layers too. The feature joins a new brush picker and an option for smoothing strokes. Also, the Type tool has been updated to add a slider that quickly resizes text and the ability to control paragraph spacing.

There are other smaller refinements throughout the app too. For instance, when you hover the pointer over a predefined crop, your image updates with a preview of what the new crop will look like. The feature works dynamically in tandem with ML Crop when that feature is turned on, and there are now multiple crop overlay options in the latest update like the Rule of Thirds, the Golden Ratio, the Golden Spiral, and others. Image perspective can be adjusted, and the background of the app’s editor can be changed too. For a quick demo of the highlights, Pixelmator’s announcement video is worth watching:

I haven’t had a chance to try all the new features of Pixelmator’s latest release yet, but I like what I’ve seen so far. The app’s machine learning-based features are fast, especially on an M1 Mac, and they work well in most circumstances. Even when the results aren’t exactly what I want, the app’s machine learning tools are a handy head start with editing.

Pixelmator 2.1 is a free update on the Mac App Store, and currently, the app is available for $19.99, which is 50% off of its usual price until July 6th.


Photo Editing and Management App Darkroom Adds Extensive Shortcuts Support

Photo editing and management app Darkroom, which added a new Clarity tool last month, has added substantial new Shortcuts actions to the app that allow users to automate a wide variety of its features for the first time. The update is notable because it allows Darkroom to work hand-in-hand with other apps, something which few photography apps do. For now, the shortcuts are available in Apple’s Shortcuts app on iPhones and iPads, but this fall, when macOS Monterey is released, the Darkroom team says that it plans to offer the same actions on the Mac.

The update features five Shortcuts actions:

  • Import to Darkroom
  • Flag Photos
  • Reject Photos
  • Add Photos to Favorites
  • Edit With Darkroom
Darkroom can automate cropping to a long list of aspect ratios.

Darkroom can automate cropping to a long list of aspect ratios.

The Import to Darkroom action adds images to Darkroom and can simultaneously apply a filter with the intensity you choose, set a frame aspect ratio with an inset, and optionally prepare the processed image for export. The Edit With Darkroom action can also apply filters and apply a frame to an image and adds the ability to crop an image to any of a long list of preset aspect ratios and add a watermark to images, all without opening Darkroom. Cropping an image has also been added as an edit that can be pasted to multiple images inside the Darkroom app itself.

The Flag, Reject, and Favorite actions do as you’d expect, allowing you to mark images accordingly without doing so from inside Darkroom itself. Flagging and rejecting photos is a recent addition to Darkroom, which I previously covered on MacStories.

It’s fantastic to see Darkroom adding such deep support for Shortcuts. The app itself is one of my favorite photo editors. However, by freeing its core features from the app itself, Darkroom gains the advantage of becoming part of more complex photo-editing workflows, automatically processing images in multiple apps, without the images having to be opened sequentially in each app. I’ve just begun to scratch the surface of what Darkroom’s new Shortcuts actions can do, but the possibilities are intriguing.