Last weekend I decided that I wanted to try to set up a VPN server on my MacBook Pro running Snow Leopard 10.6.6. What’s that? – you may ask. A Virtual Private Network (VPN) is a type of Internet connection that allows users to establish a secure connection between a computer or a mobile device and a server. The cool thing about the secure connection is that all traffic is “tunneled” through a cryptographic system that makes it almost impossible (let’s say very difficult) for hackers or people who want to take a peek at your Internet traffic to access your data. There are several implementations of VPN out there, but the main concept is that through a secure connection multiple computers and devices can stay on the same local “virtual network”.
On the Mac
As for OS X support of VPN, Apple offers the option to set up a VPN server (the one that will receive and handle incoming connections from computers and devices) only in the Server version of Snow Leopard. However, it’s still possible to create a VPN server on the consumer version of OS X 10.6 with a bit of command line hacking or a third party application. While Snow Leopard Server offers an easy-to-use dedicated GUI for creating and managing VPN servers, the “regular” Snow Leopard comes with the same vpnd system process that will handle all your incoming VPN connections. So: Snow Leopard Server and Snow Leopard have the same VPN functionality, but it’s a bit harder to set up a VPN server on Snow Leopard.
Why would I want to create a VPN server on my Mac, instead of subscribing to one of the hundreds of VPN services out there? Good question. Indeed I am a StrongVPN subscriber, but the Mac VPN sever comes with a series of perks I was really interested in trying out: besides the secure connection, a VPN server running on your Mac allows you to remotely access your computer and attached drives (even network drives) as if you were on the same local network. To put it simply: even if your iPhone is on 3G, the Mac will “see” it as a device on its local network. Thanks to the VPN connection between the Mac and your iPhone or iPad (or why not, another computer) you’ll be able to access a computer or external hard drive with the same local IP addresses you already know – those 192.168.x.x addresses you’re likely using for Edovia’s Screens, Here File File or Plex.
Once again: your iPhone isn’t on the Mac’s local network, but the VPN will let OS X think it is. This opens to a lot of remote computing possibilities I was curious to test, encrypted connection aside.
First off, let me mention that having a secure, encrypted connection can come incredibly in handy if you connect to a lot of public, unsecured WiFi hotspots during the day and you’re afraid someone using Firesheep or other network sniffing tools may intercept your traffic and steal your data. It’s not being paranoid, it’s making sure our data is kept secure and private while using free, public WiFi. A VPN brings security, no matter if you subscribe to a paid service or set up a free server on your Mac. If you’re not interested in the remote computing options, I highly recommend you take a look at the VPN options out there anyway. Also, if you work in a corporate environment it’s very likely that you’re already familiar with VPN for secure access and emails. The latest versions of iOS indeed come with advanced business features, including VPN support.
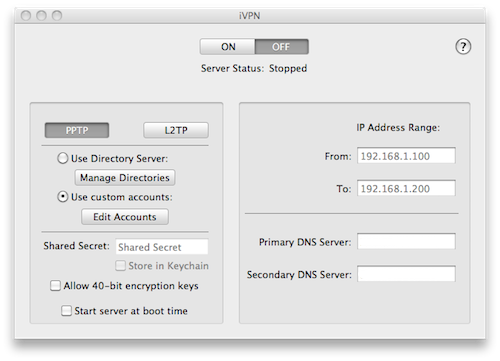
So how did I set up this VPN server on Snow Leopard? After a bit of browsing and some suggestions I received on Twitter, I decided to follow this tutorial to manually set up the server and put files in place to allow for incoming connections. Three hours later, the VPN server wasn’t working and I couldn’t connect from my iPhone at all. So I went for the GUI approach and installed iVPN, a dead-simple application that with a few clicks lets you create a L2TP or PPTP server on Snow Leopard. Instead of manually editing .plist files and fixing permissions in the Terminal, all you have to do is choose the server type, type in account credentials and paste your personal Secret Key (you can generate a random one here). Make sure to pick start and end IP addresses (the ones your router will assign to the computer or device connecting remotely through VPN) and restart.
On the next boot, the VPN server should be up and running on Snow Leopard, waiting for connections. It runs in the background so you won’t see anything on your desktop, but you’ll notice a vpnd process in Activity Monitor and you can take a look at the server log with this Terminal command:
tail -f /var/log/ppp/vpnd.log
Notes
While iVPN is very easy to use, I have a few observations to make:
- I assigned a static IP address to my MacBook Pro and created a free DynDNS global hostname so I can access my computer at any time, no matter the changes my ISP makes. My public IP at home is dynamic, it changes every few days, so the DynDNS background utility allows you to always connect with a personal address (something like stevejobs.dyndns.com) without having to worry about anything else. It’s really great, and I use for a couple of additional apps as well;
- Your ISP may be blocking some ports required by the VPN connection. Personally, I managed to make it all work by opening UDP ports 500, 1701 and 4500 on my router;
- I’m using this VPN method with my iPhone 4 and iPad WiFi (connected through Personal Hotspot on the go) and it works;
- If, for some reason, the VPN server stops working after a while (never happened to me), just restart your Mac. The VPN server process is always initiated at OS X boot;
- iVPN is a paid app, so really think about whether you’d use a VPN server on your Mac before going ahead and purchase it.
iOS
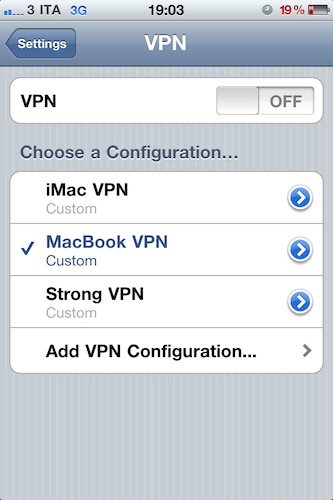
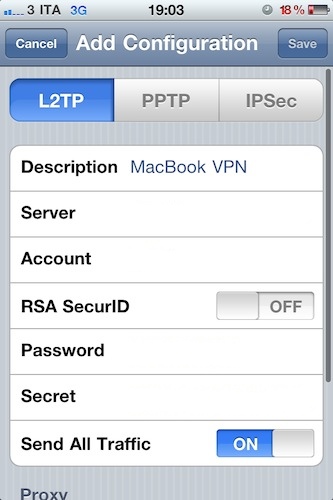
That being said, connecting through an iOS device to the newly created VPN network is very easy: open the Settings app, navigate to General->Network->VPN and add a new configuration. Choose L2TP or PPTP, enter a friendly name in the description (I set MacBook VPN), put your public IP address / DynDns hostname in the Server field, set account and password to the ones you chose in iVPN, leave RSA SecurID to “off”. Enter the secret key and choose to “send all traffic”. This will make sure not only the direct connections to the Mac server but all web traffic is tunneled through the VPN. You may notice a decrease in speed while on 3G (due to data encryption), but otherwise on any other WiFi connection speed should be fine. Select the VPN, and slide the switch to “on”. A blue VPN icon will appear in the iOS status bar indicating that the connection was successful and you’re now connected to your Mac server.
Apps you can test
With a Mac-iOS VPN connection going on, you might want to test a series of apps that take advantage of remote access to your machine to see how the whole “iPhone virtually sitting in your local network” thing really works. For instance, I set up a single MacBook Pro configuration in Edovia Screens so I can access my computer’s screen both locally and remotely with the same 192.168.1.8 IP address. When I’m at home the iPhone is on the WiFi local network, while on the go I can fire up the VPN and access it with the same IP thanks to the tunneled connection to my Mac. The same applies for Cloud Connect Pro, an iPad app that with the VPN method explained above lets you log in your computer remotely as if it was on the same local network. Or again, Plex for media streaming, FileBrowser and NetPortal for computer AND AirPort Disks access. Like I said, the possibilities are endless and it’s up to you once you have an OS X VPN server to find the apps that might save you some precious time when remotely browsing your machine or external hard drives.
What it can’t do
Unfortunately, the VPN network I created doesn’t let me use the new iOS 4.3 Home Sharing feature remotely. My guess is that Home Sharing is advertised on a local WiFi network as a Bonjour service, and Bonjour can’t go through a VPN that easily. Hopefully someone will find a solution for this before Apple comes out with its own remote implementation.
Wrap-up
Creating a VPN server on your Snow Leopard machine is very simple with iVPN. While connecting with a computer or iOS device you’ll end up with a pretty sweet way to access another computer, control it and stream media – plus you’ll also have a secure encrypted connection so no one can take a peek at your data traffic. If you have ideas or suggestions for apps that can benefit from this tutorial, the comment section below is the right place to go.


