When The Omni Group brought OmniOutliner to the iPad, they didn’t just create an outlining app for text and field notes. While useful for preparing research, taking notes, and organizing ideas, OmniOutliner can adapt to a variety of needs and circumstances with relative ease. Combined with a personal desire for customization, OmniOutliner can be tailored to solve a variety of creative problems such as the one we’re looking at today.
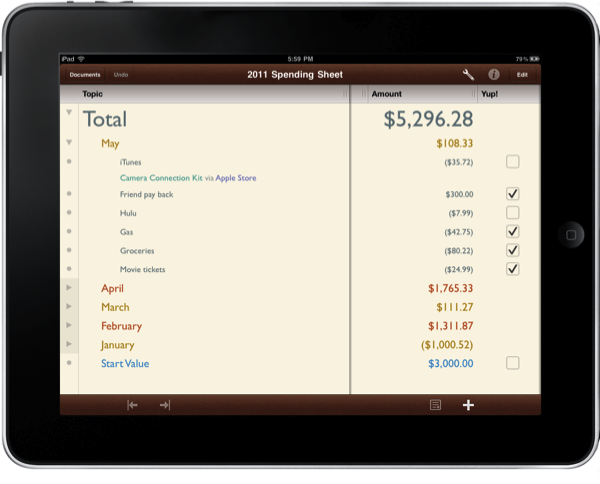
The flexibility in OmniOutliner can be admired when we apply a real world scenario such as tracking your daily spending. Mint might be useful for telling you how you spend your money, but nothing beats your own checklist when it comes time to compare the month’s expenditures against a bank statement. Writing your purchases down enables you to catch maintenance charges, find fraudulent activity, and become better aware of your current financial status. With paper likely being a rarity in our lives thanks to the iPad, OmniOutliner fits the bill nicely.
The tutorial past the break will teach you how to modify a provided template to your liking; you’ll learn how styles work in OmniOutliner; we’ll cover date, number, and pop-up columns; and lastly we’ll put it all together to make something terrific. Even if you have zero interest in tracking your spending, this tutorial will help you learn quite a bit about how OmniOutliner’s features fit together quite beautifully.
If you don’t already have a copy of OmniOutliner for the iPad in front of you at this very moment, you can download it from the App Store. OmniOutliner costs $19.99, but you’ll quickly see why it’s well worth the asking price.
Getting Started
When you open OmniOutliner for the iPad, you’ll notice that The Omni Group has already populated the app with various samples in the document browser. You can use these documents to learn more about how various pieces of OmniOutliner fit together; the introductory tutorial covers the basics. You’ll quickly become familiar with the various gestures OmniOutliner employs as you select rows, create notes, and indent to format a good looking outline. Let’s begin by choosing one of these templates as a base to work with.
Quick Tip!: You can find OmniOutliner Help under the Omni button in the documents browser. It’s a great resource for becoming familiar with various interface elements and terminology.
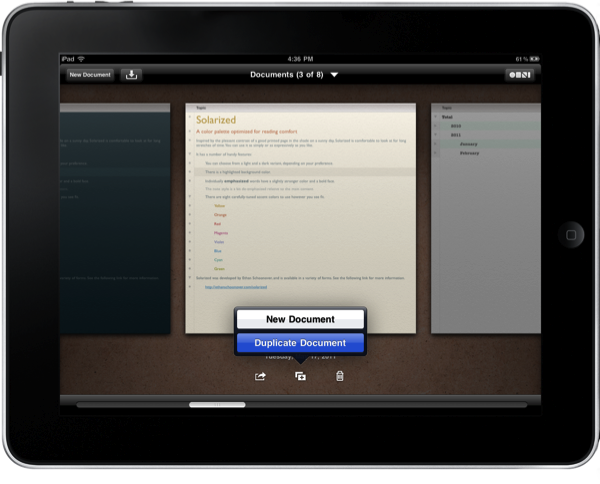
You can create your own document from scratch, but to get started we’ll be utilizing what The Omni Group has already provided for us. There’s lots of room for experimentation with the Solarized (Dark) and Solarized (Light) templates, which both feature great font and color styles that we can use. I don’t want to modify the base templates, so by tapping the duplicate button, we can work with a copy of a theme that we may want to use again at a later time. I’ve duplicated the Solarized (Light) document per my tastes, but you’re free to use the Dark version if you insist.
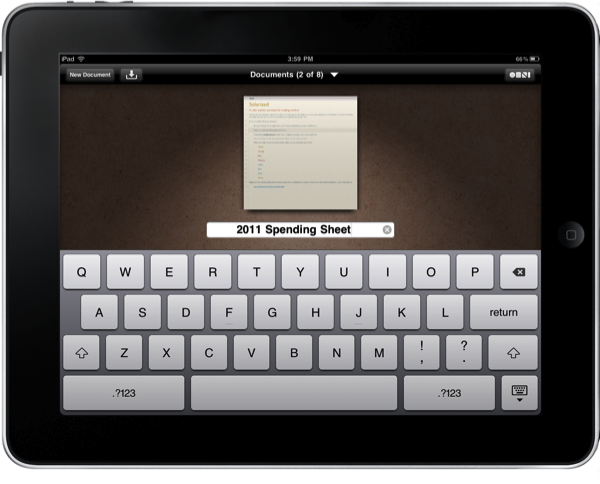
With Solarized (Light) 2 now centered in our document browser, we should rename it to something more memorable. Tapping on the title (not the document image), OmniOutliner lets us change the document name. I’m going to name mine “2011 Spending Sheet.” When finished, simply hit the return key on the keyboard. Alternatively, we can open the document and single tap on the title in the toolbar to change the document name.
Quick Tip!: You can export the included documents to a webDAV server, then import them when you need a quick template to work with.
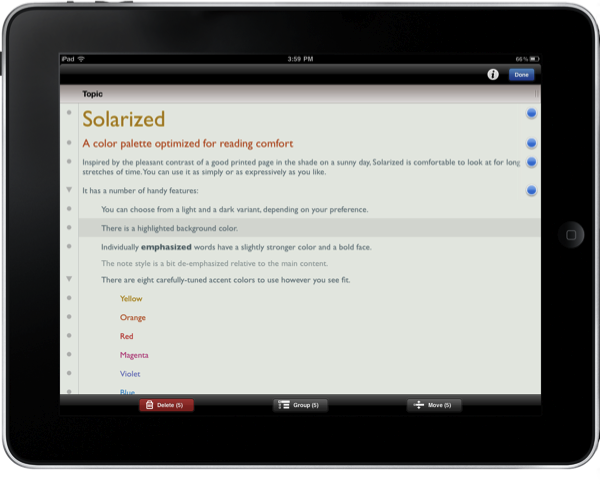
With our outline titled, we can start from scratch by deleting its current contents. Don’t worry, all of our styles will be retained and we can quickly craft something unique and more powerful than what The Omni Group initially provided. For now, we’ll tap the edit button in the toolbar.
The edit button initiates edit mode. Edit mode allows us to move, delete, and group multiple rows (useful for larger documents). We simply need to clear the outline so we have a fresh slate to work with. From top to bottom, tap on each row until all of them are selected. As children will automatically be deleted with their parent rows, you’ll notice that these groups will automatically be included for you. Once everything is selected, press the delete button to wipe the document clean. Tap done to exit editing mode.
Developing a Working Outline
Now we’re getting to the good stuff. To create our spending sheet, we first need to decide how we want to display our information. We know we’re going to need dates, amounts, and checkboxes in order to verify our purchases at a later time, but we also need to decide how we visually want to display that information. Before we begin to style our Spending Sheet, we should begin by outlining (creating a wireframe) of our ideas at hand.
A spending sheet should tell us how much money is currently in our account. Knowing that we’ll need to display the total amount of money we have, let’s kick things off by doing just that: creating a “total row” to display our total (say that three times fast). Simply tap the first row in OmniOutliner and type, “Total.”
We’re off to a running start, but where do we go next? We want this total to keep us updated throughout the year, so our next course of action is to list the months of the year. Personally, I like to group my purchases by month so they’re easier to reference. Since we’re in the month of May at the time of this tutorial, let’s start there.
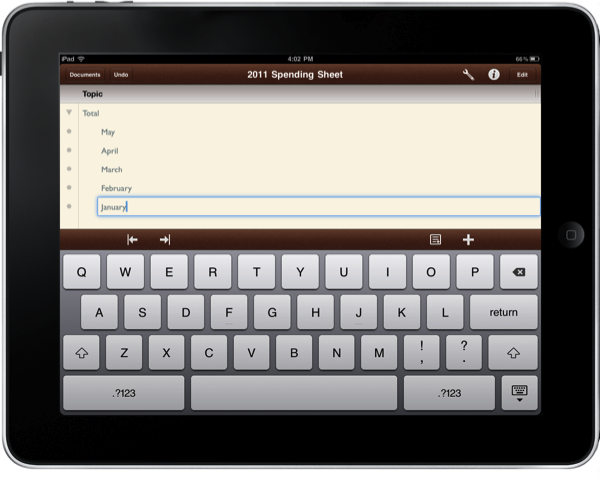
Using the add row button in the editbar at the bottom of your screen, you can tap and hold to reveal a set of indent and outdent buttons. We want to outdent the months underneath our Total row, so let’s slide our finger over to the bottom right arrow. OmniOutliner will create a child row that’s already indented for us. Let’s begin this new row by typing “May” or “May 2011,” then press enter on the keyboard to create a second row.
If you’re interested in populating the spending sheet with past purchases, you can continue creating a series of new rows through January. Otherwise, as we progress into the next months, we’ll simply create these months above May to keep up the date. You might be asking why I just don’t populate all of the months at once. While it’s probably easier to do it that way if you want to build a template, I feel I don’t need to see the months in which I haven’t made any purchases yet. I only need to see what’s current, but feel free to set this up however you’d like. Personally I like to keep the months in descending order so that the current spending period is always at the top and easy to access.
At this point, we’ve created a Total row that’s housing a series of months in which we’ll organize our purchases. Before we go any further, let’s create a few columns that will eventually house some additional information. We’ll be creating a column necessary to note the date of the purchase; a second column will tell us how much we spent on that item; finally a third column will be used to check off our purchases.
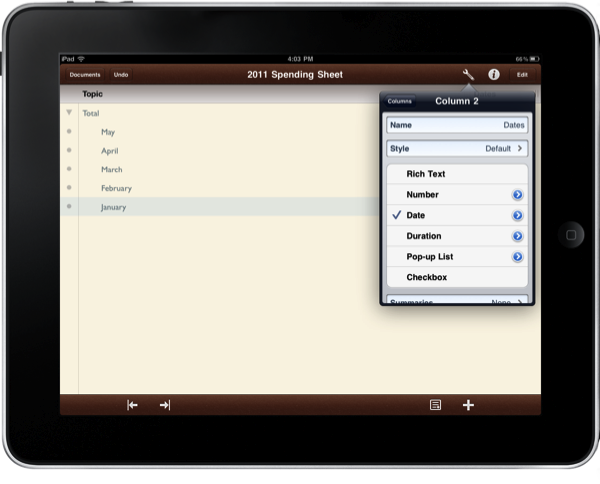
Creating columns in OmniOutliner is easy. Simply tap the tools button in the toolbar, and tap the New Column button under the Columns view. OmniOutliner will not only create the new column, but immediately present you with the opportunity to configure your new column. You’ll first be requested to type a column name, which we’ll call, “Dates.” Tapping the return key names the column, and we can now adjust various properties. We’re not interested in entering text, but rather dates. With various column types to choose from, we should quickly overview what kinds are available.
- Rich Text: The default column type in OmniOutliner used for entering text and paragraphs.
- Number: The number column allows us to enter numerical data in a variety of formats for currencies, percentages, and rounding to the nearest whole number (just to name a few).
- Date: The date column allows us to specify the date, time, or both in a various formats.
- Duration: If you’re tracking time, you can keep track of the total hours a task has taken to complete.
- Pop-up List: If you find yourself consistently entering the same types of information into a column, pop-up lists are great for selecting various text choices.
- Checkbox: This one’s obvious folks! Presents a simple box for checking off items with no configurable options.
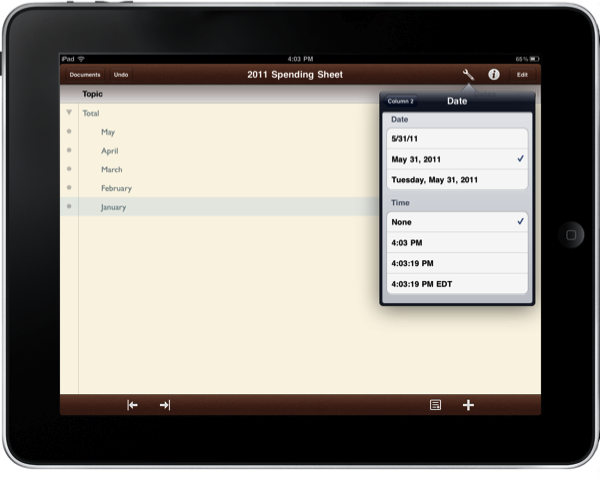
If you want to adjust how dates are displayed, you can tap the blue arrow to adjust various individual properties. I personally like the second option (I don’t display the time as that’s unnecessary).
Next we want to create an Amount column, except this time we want to make it a column of numbers. Adjusting our properties, we can specifically request that OmniOutliner automatically format our data as currency. Lastly, we want to create a third column of checkboxes. I personally name this column, “Yup!” That’s eventually what I end up saying as I check off the list, so it makes sense.
Understanding Styles, Inheritance, and Peers
Having completed our wireframe, we really want certain elements to stand out. Our total deserves to be big and bold for easy skimming, and our months need to be distinct from our purchases. It’s time we start learning about styles, but we need to edit the Solarize theme (and in the process learn about automatic styling) to make it all work relatively seamlessly.
By default, Solarize doesn’t automatically apply styles to top-level rows or its children. The problem is that we want to create something that’s flexible enough to automatically apply styles as we add more months, and we also want our months to be visually appealing and distinct so our spending sheet is easy to browse. Utilizing how OmniOutliner can link styles together, we can create a pretty stylish document with little effort.
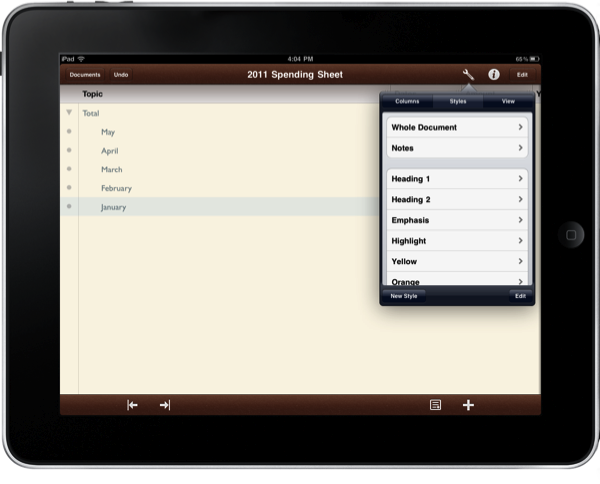
Let’s start by applying a bold style to our top-level row (which is the Total row in our case). Tap on the tools button in the toolbar, then select the Styles view to access our global styles. It’s here where we can edit styles to our heart’s content, but let’s first dive into the Whole Document setting to adjust some properties.
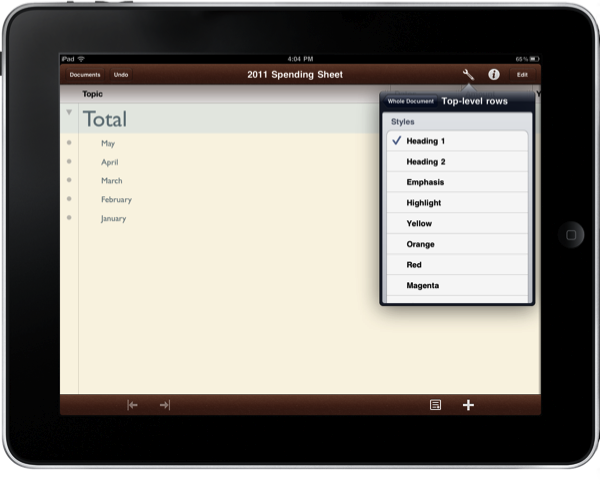
Whole Document is where you can select options such as the document background color, the default text used when no styles are applied, numbering and alignment schemes, and it’s also where we’ll choose a style for our Top-level rows. Taping on Top-level rows, choose Heading 1 to see our Total row change in real time.
Quick Tip!: View presents its own options for background color and alternate row color. I feel alternate rows don’t give me enough control over how children are displayed, so I won’t be using it here (we’ll implement this with peer stylings shortly). The background color option will be the same as what you specify in your Whole Document settings.
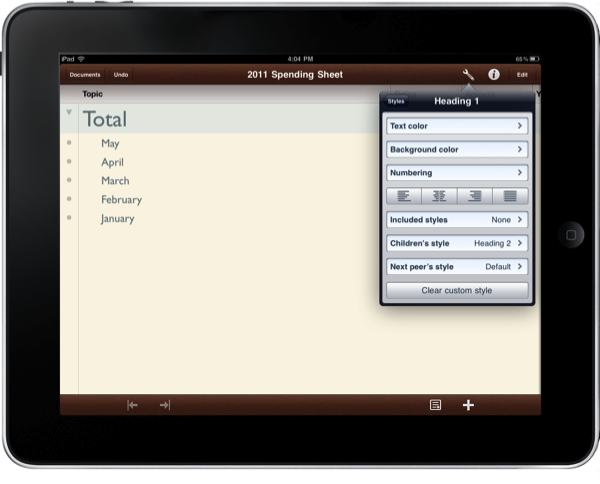
The next thing we want to style is our months, and we want our months to adopt a style defined by Heading 1. Return to the Styles view, and select Heading 1 to edit its properties. Some of the final customizations seem confusing, but they’re actually really useful.
- Included styles: Let’s say we wanted to give our Heading 1 a bit of color. Included styles can add on various other styles for highlighting and emphasis, and using this method allows you to make a set of changes all at once. You’ll see how this option works in a few minutes.
- Children’s style: This is the option we’re most interested in for Heading 1. Children of Heading 1 will inherit the style you set here.
- Next peer’s style: Think of this as an “every-other” option. You can use this to do some crazy things with alternating colors and styles, but it’s currently a little finicky in practice. We’ll also be utilizing this in a moment.
We’re interested in setting the children’s style for our Total row. We’ll select Heading 2 to keep things easy, and you’ll instantly see the style be applied to all of your months.
OmniOutliner for the iPad is a bit easier than its Mac counterpart when it comes to building styles, and the Solarize theme we’re working with can generate something that’s really stunning. Using included and peer styles, we’ll complete the picture on how they link together.
Our months are currently kind of drab, and eventually we’re going to need some contrast between the items we purchased and between each individual month. If we’re going to browse our spending sheet, items need to be distinct and easy to find. Let’s start off by editing our Heading 2 style.
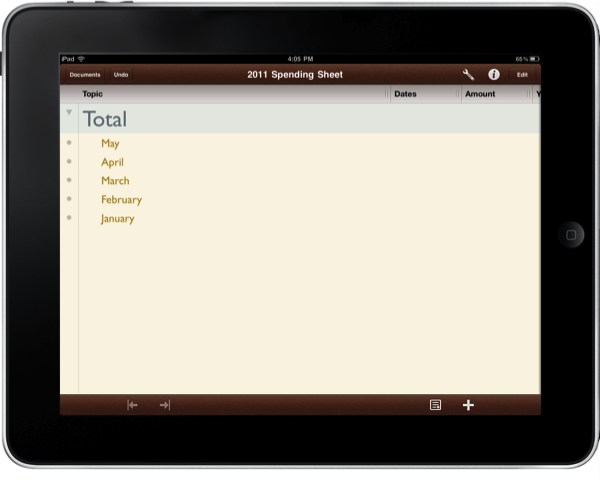
Jumping into our Heading 2 style, I think you’d agree it needs a bit of color. Let’s include a colored style: we can pick from a variety of presets from green to yellow, and I’ve personally chosen the Yellow style as it doesn’t clash with the default text colors.
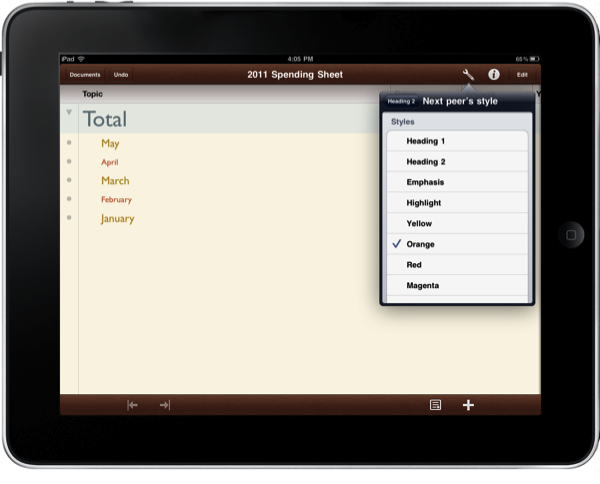
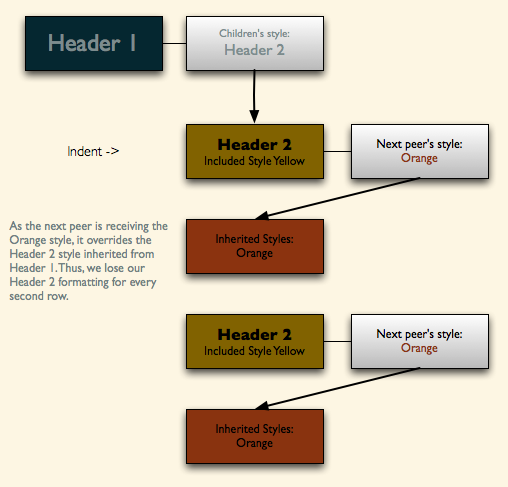
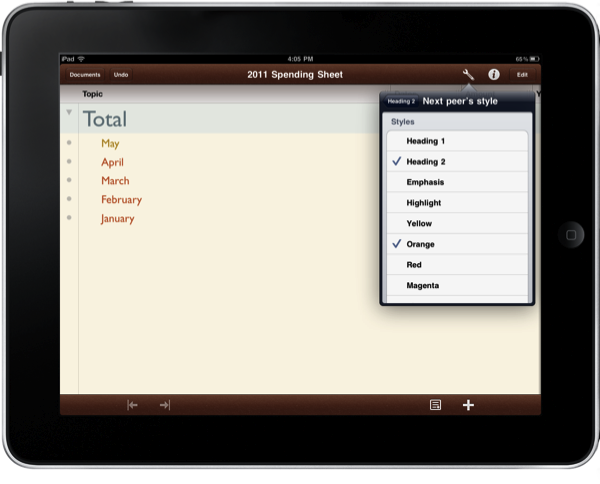
Now, I also want my next peer to be colored Orange. So what happens when we apply the Orange style to our next peers?
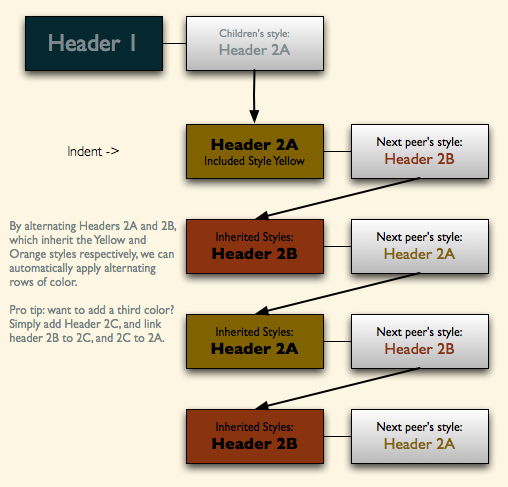
That’s weird right? OmniOutliner overrides our Heading 2 style with the font size and color choices for Orange. The graph below visualizes why this is happening.
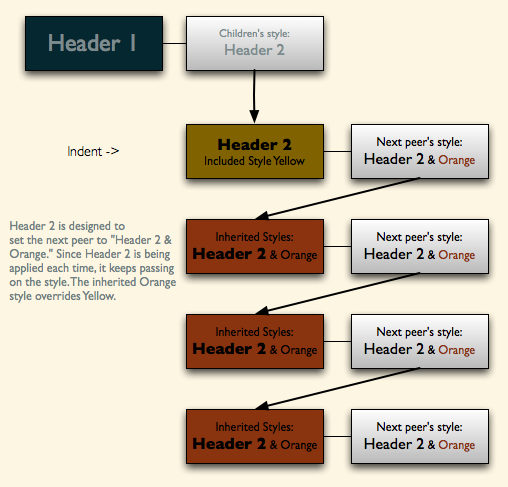
We can attempt to fix this by intermixing various styles, so let’s also select Heading 2 again to see if it fixes our issue.
Well this is getting tricky. Now all of the reaming rows are orange! We’re not gonna have any luck configuring our peer stylings, so let’s deselect our current options and rethink the problem. It’s obvious that the Orange style would override our Header 2 style, but why did reselecting the Header 2 style in our peer settings turn every remaining month orange? Remember that Header 2 is already being inherited from the Header 1 style. By applying Header 2 again for every second row, OmniOutliner will apply a loop where the peer styles are applied to each subsequent row. Check out the graph below to better visualize why this happens.
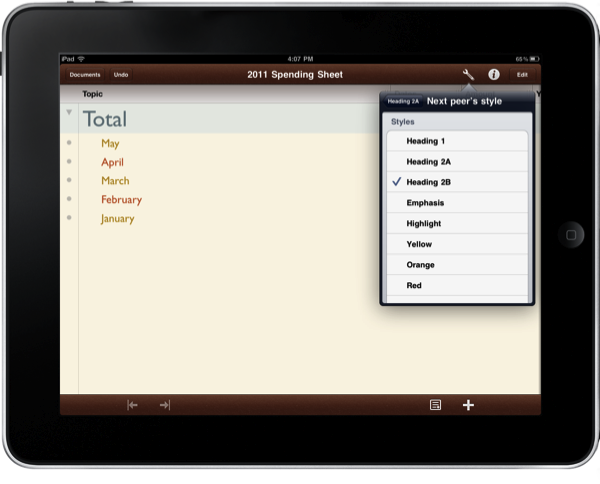
That’s certainly not what we want to happen, thus we can work around this issue by linking two styles together, peer to peer. Let’s rename our current Heading 2 style to Heading 2A. Next, we want to create a new style called Heading 2B. Heading 2B should have the following attributes:
- Name: Heading 2B
- Font size: 16 points
- Font: Gill Sans
- Included styles: Orange
- Next peer’s style: Heading 2A
Next, we’ll return to Heading 2A and set its peer style to Heading 2B. By doing this, we can alternate colors and create a visually appealing layout.
The benefit is that we have a lot more control over our presentation, and as we add new months we don’t need to individually apply a color style per row. The color formatting will automatically be applied for us, and it can be as complex as it needs to be.
With our alternating level-two row colors in place, our document styling is nearly complete.
Dates and Fine Tuning With Summaries
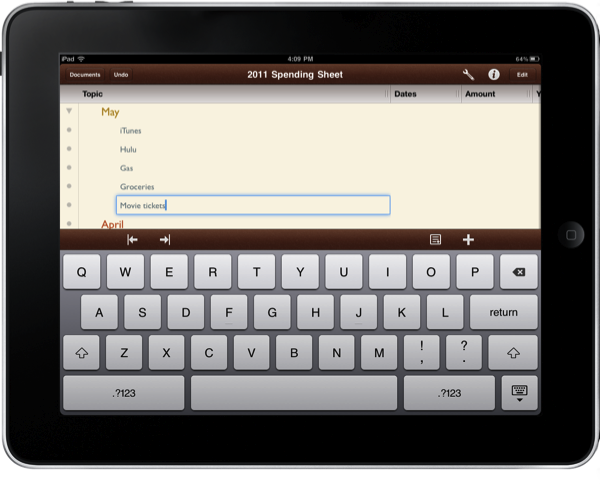
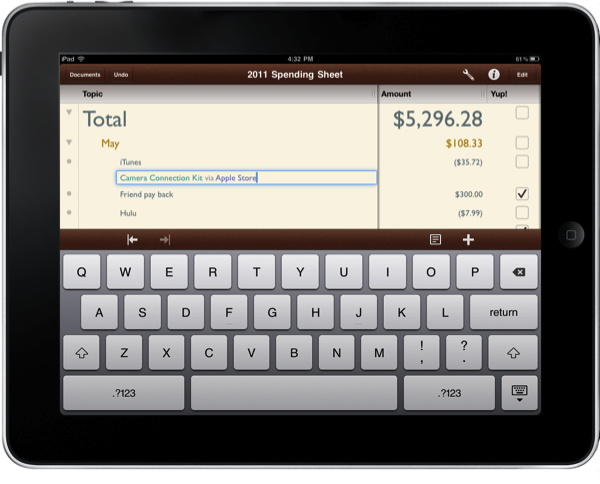
Now that we’ve established a good looking document, let’s start adding recent purchases to the month of May. Because OmniOutliner already sets the default text for us document wide, there’s no need to develop or refine any further document styles. Simply tap on the May row, and add a new outdented row underneath it using the add row button. Adding your expenses is really easy at this point, and now we get to play with the Date and Amount columns that we created earlier.
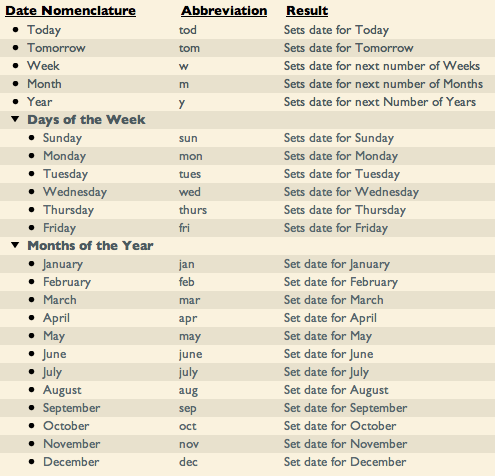
Simply tap where you want to enter a date for the date column, and type in the word, “Today.” OmniOutliner automatically applies today’s date to the column. You could also type, “May 18” or just “18,” and OmniOutliner will apply the date as well. I’ve listed some examples below so you can see how intuitive adding a date can be.
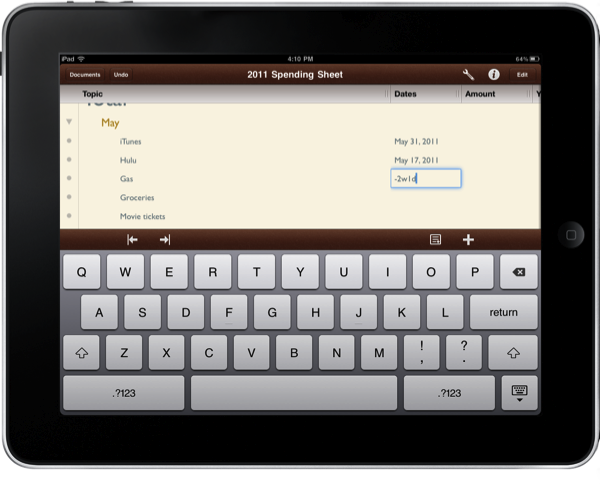
OmniOutliner is smart enough to take rather English date nomenclature into consideration when applying dates. It gets even better since you can abbreviate much of what’s listed above. Instead of writing out “1 month 2 weeks 1 day,” you can simply type 1m2w1d in any order, spaces or no spaces. There is a bit of leeway given when you write out your dates, and you can even go as far as to write dates in the date month year format.
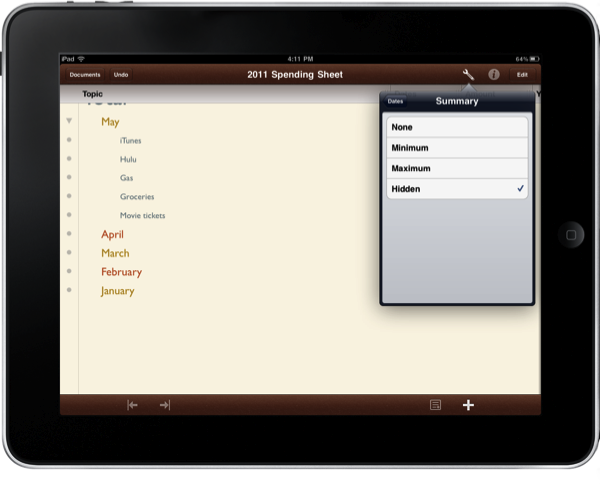
In our current implementation, we can apply a date to any row in our OmniOutliner document. This is a problem, considering we don’t need to date the month groupings or our accumulative totals. What OmniOutliner gives us the ability to do is set column summaries which allows us to determine how parent values are calculated from their children.
Summary attributes on columns dictate whether parents can have values, and if so, what kinds of values they’re going to have. If you tap & hold on the column title, you can select edit from the pop-up which will take you into that column’s attributes. A date column won’t be able to perform math functions such as total and average leaves, but let’s go over what each of the summaries can perform.
- None: None turns any summary calculation off for parents, and simultaneously allows you to set independent values for parents.
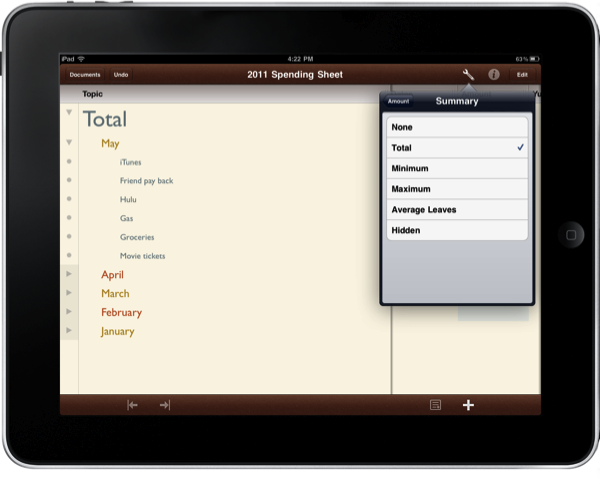
- Total: Each parent will automatically calculate the sum of it’s children. Useful for numbers, monetary values, and duration.
- Minimum: Parents will display the least value of their children.
- Maximum: Parents will display the greatest value of their children.
- Average Leaves: Parents will display the average value calculated amongst all of its descendants.
- Hidden: Does not display any value for parent rows, and simultaneously will not allow you to set an independent value.
More than any of the other summaries, the hidden summary can be used to keep checkboxes, dates, and rich text information from entering parent rows. I don’t need to set a date for the total or for each labeled month, so let’s select hidden and move on to our Amount column.
The Amount column has already been formatted for currency (it’ll automatically set itself to USD, Euro, etc. depending on your iPad’s settings), so the only thing that’s required is a plain number in any format. OmniOutliner will convert the number and by default right align it. With values being entered into our Amount column, we can change the summary for that column to total summaries. Like magic, OmniOutliner will sum all of your expenses per month, and total those months so you have an accurate representation of where you are now. This makes it incredibly easy to reference (over a period of time) how much you’ve spent or earned at any given point.
But, remember that summaries only enable you to total monetary values, not subtract. We can mitigate this by entering negative amounts for values we want to deduct by adding a hyphen in front of our amount. The value -9.99 will show up as ($9.99), which indicates a negative value. We run into a new problem, however, in that we now end up with a negative total. What OmniOutliner needs is a reference, or start value at the beginning of the year or at some month so it can correctly calculate additions and deductions to your account.
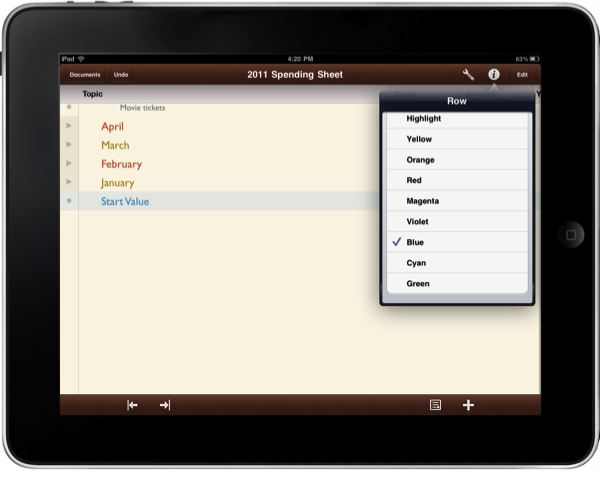
Total values cascade from top to bottom through OmniOutliner. The top-level row is always the sum of its children, and each top-level row is independent of its peer. Thus, we need a start value in our months’ rows. If you are calculating the changes in your account (starting in may), you could create a new row under the month called “start” or “start value.” Start value, however, should be independent of the orange and yellow coloring we’ve set earlier so that it’s not represented as an actual month. We can individually style rows and override inherited styles by using the inspector in the toolbar.
I recommend choosing a blue color, and I’ve gone so far as to duplicate the document’s default text into it’s own style just for this use. The Default Color style I’ve developed has the following attributes:
- Name: Default Color
- Font size: 12 points
- Font: Gill Sans
- Text Color: RGB Red 99, Green 121, Blue 129
This is applied to my Start row so that it matches the Total row. If you start with a positive value of $1200, and subtract $600 in the month of May, OmniOutliner will make that calculation in the Total. You’re allowed to edit the Start value since it doesn’t have any children.
Lastly, we have our Yup! column which is displaying checkboxes for all rows. I recommend changing its summary to hidden so you’ll only have the ability to check off expenses (the one casualty being your start value).
Sorting the Information and Working with Popups
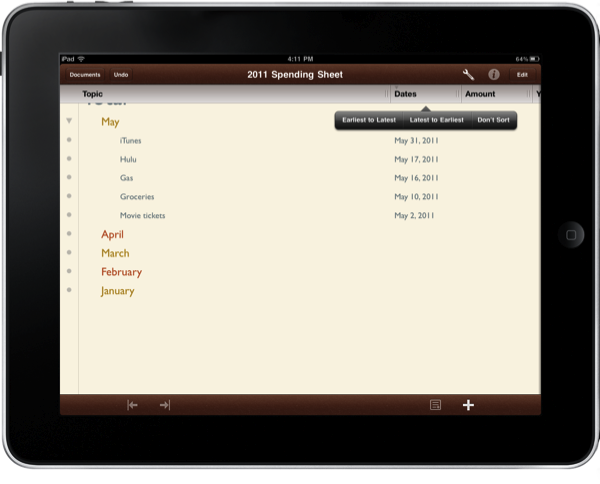
By now we have a fleshed out spending sheet, lots of expenses entered, and it looks professional thanks to the customized Solarized style we’ve established. What doesn’t look professional is out of order dates, which will make it difficult to later glance over information easily. If you want sort information by date, you can tap and hold on the Date column, select Sort, then choose Latest to Earliest (no weird terms like ascending or descending here folks). OmniOutliner will automatically rearrange your expenses based on the date column. All of the associated information per row (amount, expense name, and checked status) will be sorted with it. This is a powerful feature, but you need to be aware of a minor issue. If you decide to sort, entering new rows may be a pain. Rows without values will end up at the bottom of the list, and as dates are entered they’ll automatically move to their new position. If you’re doing lots of editing you may want to un-sort rows temporarily so you may edit without obstruction.
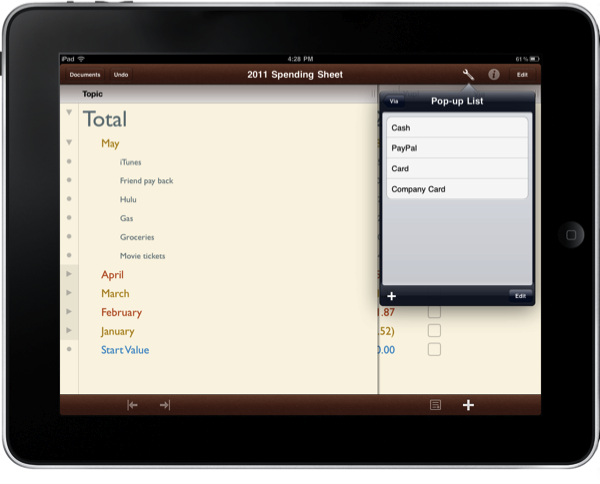
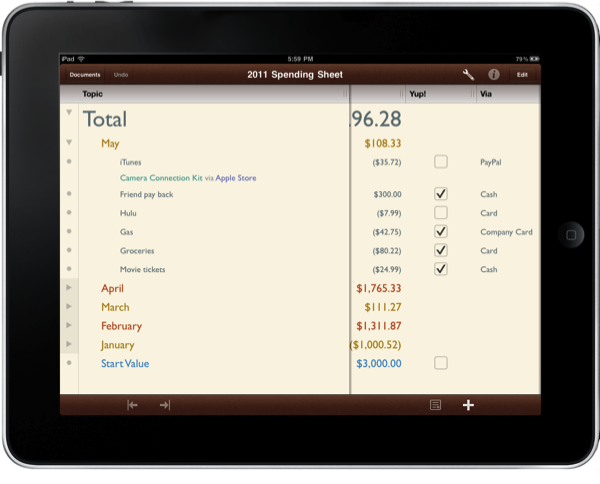
We could consider this a job well done at this point, but we continue to add columns if we desire to glean even more information. One of the things I like to do is create a couple of pop-up columns so I know where that expense was made. Did I pay via cash or a debit card? Did I donate money through an SMS message or from Paypal? There might be times when money comes from my account that doesn’t show up as the actual expense since it was withdrawn from another form of payment, thus the statement only shows that there was a withdrawal. Making a pop-up column to handle this situation is really easy.
Create a new column called “Via,” and choose Pop-up List as the column type. You can customize the Pop-up List for your various forms of payment, such as cash, debit card, and online. I’d also set the summaries for the column to hidden as before. When you’re through, you can scroll left to expose the Via column. If you tap on the column, you’ll get a pop-up list that allows you to select how you paid. By far, that’s one of my favorite features as it simply saves time.
A Brief on Working with Notes
Notes give you a lot of flexibility in OmniOutliner for iPad, and are often used to append some extra information to the first column. You can add notes to your purchases, individually style them using the inspector and selecting one of the colors, but you can utilize a cool tip to expand and collapse notes in a few different ways.
To add a note to a row, simply tap the “note” button in the editbar. Once you’ve added a note, the plus symbol will disappear. If you tap the note button again, it will hide and collapse a note per that row. Tapping and holding the note button will present a couple of options so you can expand and collapse all rows. This is useful for when you’re adding a bunch of information, and need to quickly collapse your notes to free up vertical space.
Concluding the Tutorial, and Where to Go Next
Wile The Omni Group provides a similar example showing the end result, how to get there is a completely different story. Not only did we craft a well made expense sheet, it’s beautiful and customized to readily meet our demands. Styles are built from the top down, and give us an automated dash of flexibility that will allow us to continue using the same document for years to come, or as a template for other projects.
If you want to learn more about OmniOutliner and it’s Mac companion app, check out the OmniOutliner page, and visit the Omni Forums for advanced help on subjects in a friendly community.


